TruckMate 2021.4 New Features: Operations
ConnectedDock
ConnectedDock unit code display
Now you can limit what Unit Codes can be used within the ConnectedDock application. Previously, the only items you could limit in ConnectedDock were the commodities a dockworker could use to identify and distinguish freight.
A new Exclude from ConnectedDock checkbox option has been added to the Codes Maintenance > Unit Codes tab.
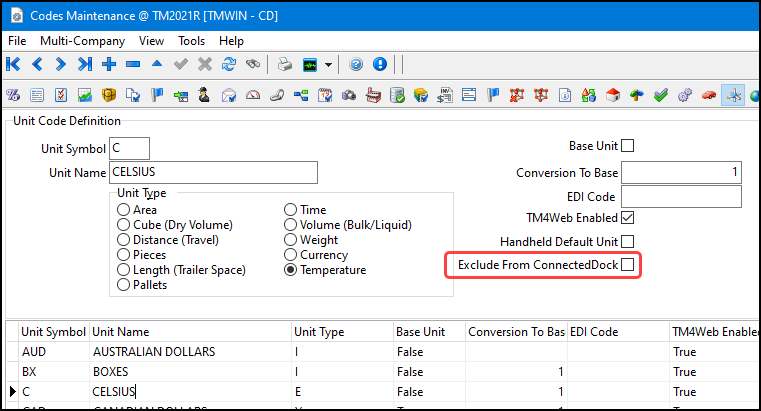
Use this checkbox option to indicate which unit codes can be used in the ConnectedDock application. The unit types controlled by this new feature are:
-
Length
-
Pallets
-
Pieces
-
Temperature
-
Weight
Some unit types are not used in ConnectedDock so the Exclude from ConnectedDock checkbox option is greyed out to indicate it cannot be selected for this unit type. This includes:
-
Area
-
Cube
-
Currency
-
Distance
-
Time
-
Volume
The default setting is to have the Exclude from ConnectedDock checkbox option cleared so all available ConnectedDock unit types can be used. Select the checkbox
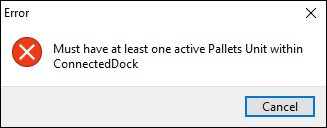
At least one Unit Code must be made available within ConnectedDock for each unit type. You cannot exclude all unit codes for a particular unit type. For example, you must have at least one unit code for length, one for weight, one for temperature, etc. If you try to exclude all unit codes for a particular unit type, an error message appears.
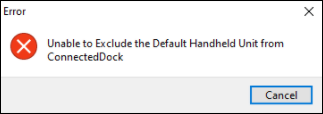
You cannot exclude the unit code if it is the Handheld Default Unit. If they attempt to do this, they will receive an error informing them that the Default Unit must not be excluded.
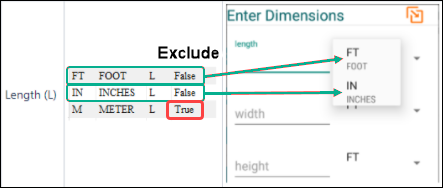
If any unit codes have been excluded, dockworkers will only see the unrestricted unit codes while using ConnectedDock.
If any changes are made to the Unit Code settings, the ART Server must be restarted in order for the change to take effect.
Controlling which commodity codes can be used in ConnectedDock is still set using the Exclude from ConnectedDock checkbox option on the Codes Maintenance > Commodity Code Definition tab.
Dispatching Operations
This section describes these new features and improvements:
Trip Tree view for Dispatch/Multi Mode Dispatch
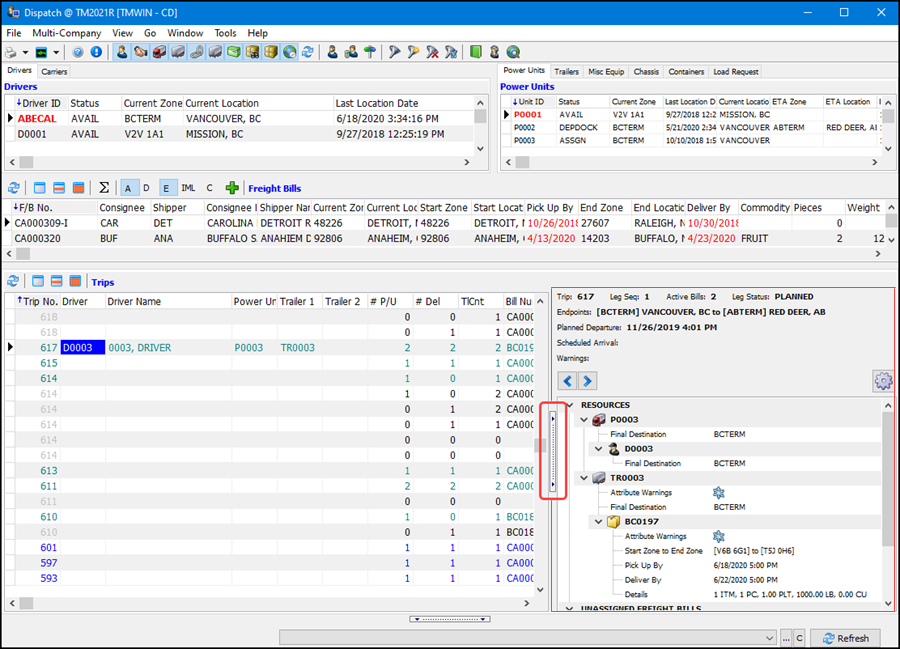
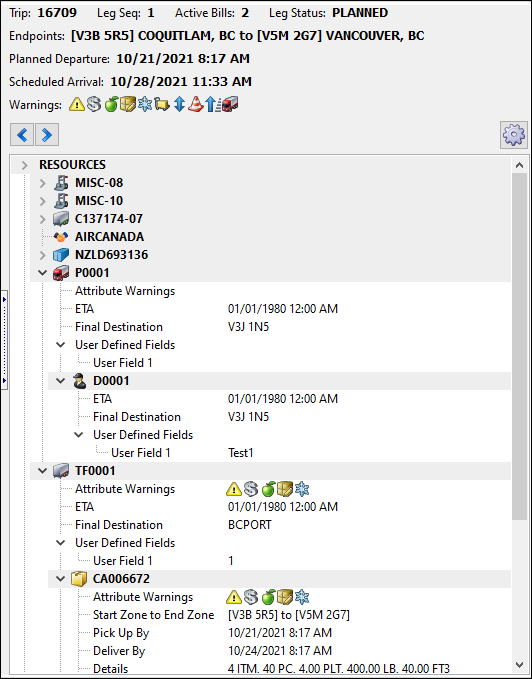
The new Trip Tree View provides an improved and interactive way to view all the resources and freight bills present on a trip leg. You can use this tool to link resources and to rearrange and reorder them within the tree view using drag-and-drip with your mouse or by using keyboard controls; CTRL+Up/Down to rearrange and CTRL+Left/Right to re-assign resources within the nodes.
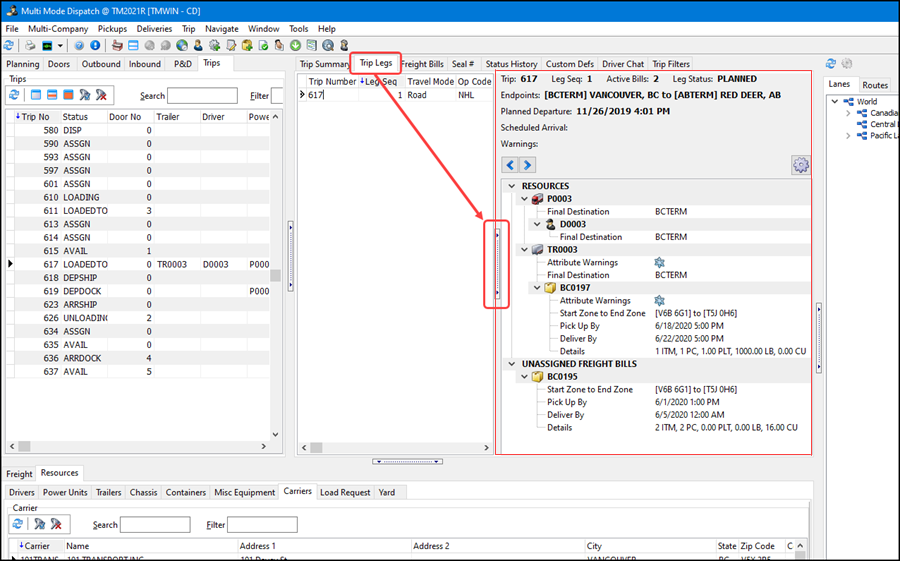
Open the Trip Tree View using the drag-bar on the right side of the Dispatch and Multi Mode Dispatch > Trip grid. You can resize the view and use the drag-bar as a toggle switch to hide it.
You can also open the Trip Tree View as a floating window by double-clicking the 'Bill Linkage' or 'Link Type' column value on the Multi Mode Dispatch > Freight Bills grid or the Dispatch > Drilldown window.
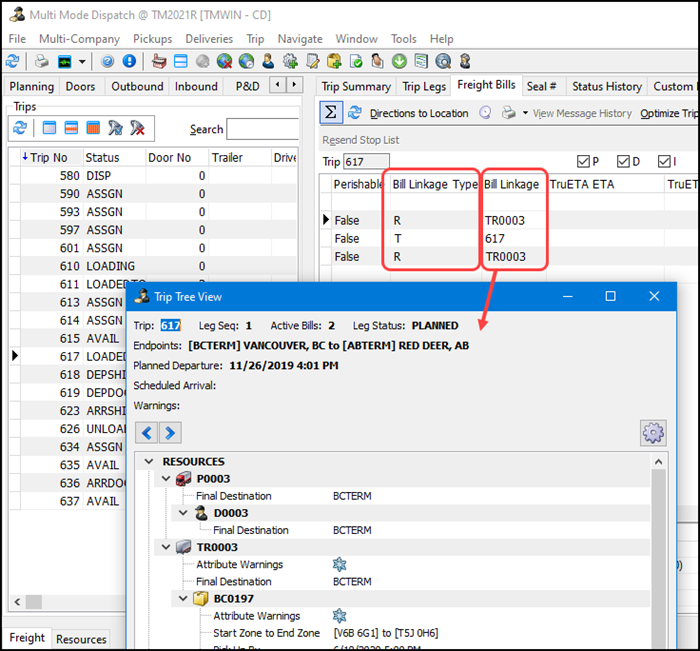
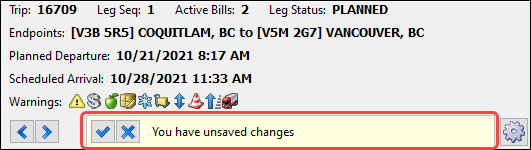
The Trip Tree View shows the current status of the leg, total number of bills on the leg, the start and end zones (with descriptions), the planned time of departure, the scheduled arrival time, and any warnings.
Header
The Header summarizes the key components of the leg/trip and provides some functions to go to other records and to set some configuration options. The Warning icons include bill-level and trip-level icons:
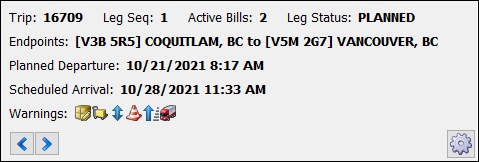
![]() Left/Right Arrows
Left/Right Arrows
-
Dispatch - Navigates to the next leg or trip in the Trips grid.
-
Multi Mode Dispatch - Navigates to the previous/next leg in the Trip Legs grid. (To move to a different trip you need to select a different trip on the Trips grid.)
![]() Config Wheel
Config Wheel
Opens the Trip Tree View Modification window, where you can select which fields to include in the view and set the default appearance.
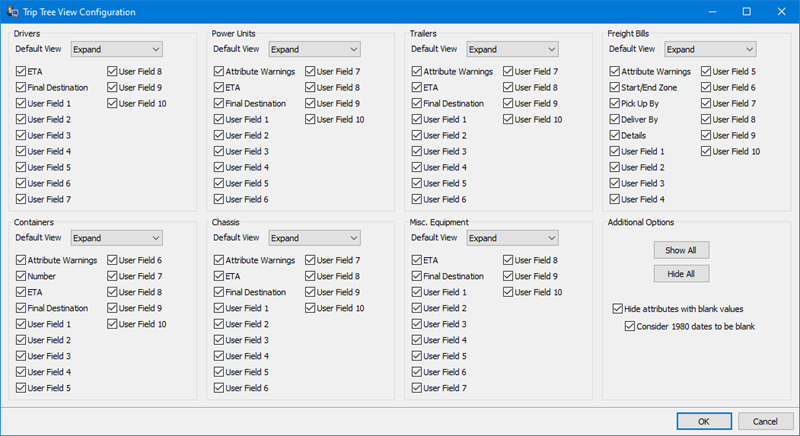
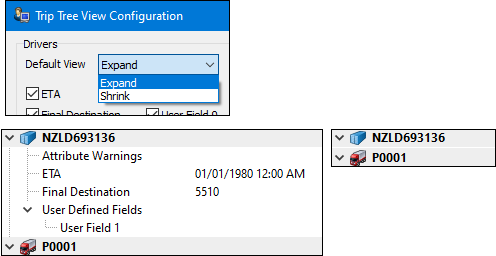
Select Expand or Shrink to determine the default appearance for each branch in the tree.
Other options provide shortcuts for configuring the checkbox settings and a way to hide blank values.
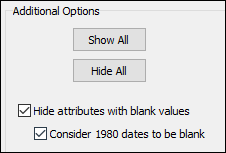
The Consider 1980 dates to be blank sub-setting underneath the Hide attributes with blank values will hide any date entries that are dated 01/01/1980. (Jan. 1st, 1980 is a default "filler" date when a date entry cannot be null.)
Improved Linkage tool
The new Tree View is now the linkage system of record and replaces the previous TruckMate Linkage window. It enforces a logical set of rules to ensure that only valid matches may be made. For example, you cannot assign a driver to a container but you can assign a driver to a power unit or straight truck.
To match a resource, use your mouse to drag-and-drop the resource to another valid resource. When the resource is dropped, it becomes a sub-node of the intended target in the Tree View.
After you make any changes, a message bar is displayed to let you know that "You have unsaved changes".
If you scroll away from a Trip with pending changes, the bar changes color from yellow to red and the Tree View will not update to the latest Trip. You must respond to the prompt in the header to proceed.
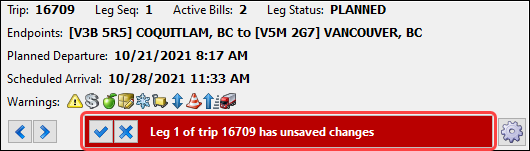
After responding, the Tree View will refresh and display the user information about the new leg/Trip you had scrolled to.
Details
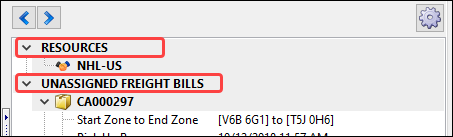
There are two headers within the Details Panel:
-
Resources
Dragging a non-freight bill resource to the Resources header will de-assign the resource from all other resources. It is 'unlinked' on the trip but from a leg perspective, it is still assigned to the trip and would be updated as normal.
-
Unassigned Freight Bills
Dragging a Freight Bill to the 'Unassigned Freight Bills' header will un-match the bill from the resource it was assigned to. It is 'unassigned' on the trip but from a leg perspective, it is still assigned to the Trip and would be updated as normal.
Resources can only be moved on ACTIVE or PLANNED legs. If a leg is FINISHED, resources cannot be moved on these legs.
The Allow moving bills between Trailers Security setting also controls the Trip Tree View. If this is set to False, you will not be able to move bills between resources within the Tree.
Copying Trip Tree data
You can copy values from the Tree to the clipboard using options on the shortcut menu available on the Trip Tree View and paste this result elsewhere.
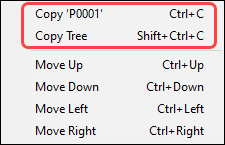
You can copy just the one item or you can copy everything in the tree view downwards from the selected item.
Implement Reason Code restrictions in Dispatch and Multi Mode Dispatch
TruckMate 2021.3 introduced a new set of enhancements allowing you to restrict which reason codes can be applied to specific status codes in Customer Service and Dispatch.
See Create reason codes and apply filtered list of status codes & reason codes at trip level in the TruckMate 2021.3 release notes for more details.
The Dispatch and Multi Mode Dispatch grids have improved the Reason Codes logic in TruckMate 2021.4 so it will only apply to certain set of status changes. The grids include:
-
Dispatch > Trips grid
-
Dispatch > Drilldown window
-
Multi Mode Dispatch > All Trip grids
-
Multi Mode Dispatch > Freight Bills grid
This new logic requires that:
-
At least one reason code must be set up.
-
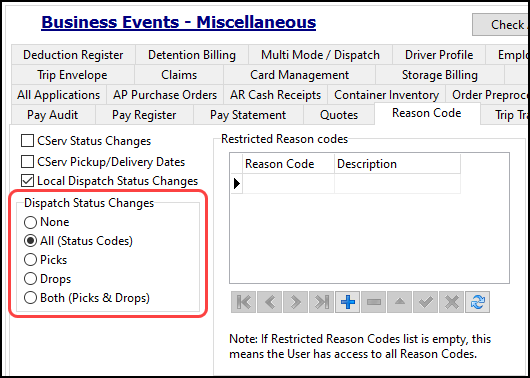
The Security Configuration > Security tab > Business Events > Reason Code tab > Dispatch Status Changes option must be set to a value other than None.
| Option | Description |
|---|---|
None |
No reason code prompts will be received. |
All |
Every status code flagged as requiring a reason code in Codes Maintenance will receive a prompt. |
Picks |
Only statuses completing a pickup action will receive a prompt. |
Drops |
Only statuses completing a drop action will receive a prompt. |
Both |
Statuses processing either a pickup or drop action will receive a prompt. |
If reason codes are set to apply in certain cases, the prompt will be displayed as usual and now in TruckMate 2021.4; the drop-down list is generated using the following rules.
-
The Codes Maintenance > Status Codes > Dispatch/Orders > Reason Code tab > Applicable To Status values for this status code is reviewed and records with a setting of False are filtered out.
-
The Security Configuration > Security tab > Business Events > Misc > Reason Code tab > Restricted Reason Codes security grid for this user is reviewed and restricted codes are filtered out.
Reason Code Selection added to Dispatch FB Grid
Reason codes have been enhanced in Dispatch and Multi Mode Dispatch for the following grids:
-
Dispatch > Freight Bills grid
-
MMDisp > Deliveries grid
-
MMDisp > Pickups grid
-
MMDisp > CrossDock grid
Previously, when changing the status of a Freight Bill in the Dispatch Freight Bills grid, a reason code prompt would not be displayed, regardless of how the TruckMate security was configured. This has been revised using new logic.
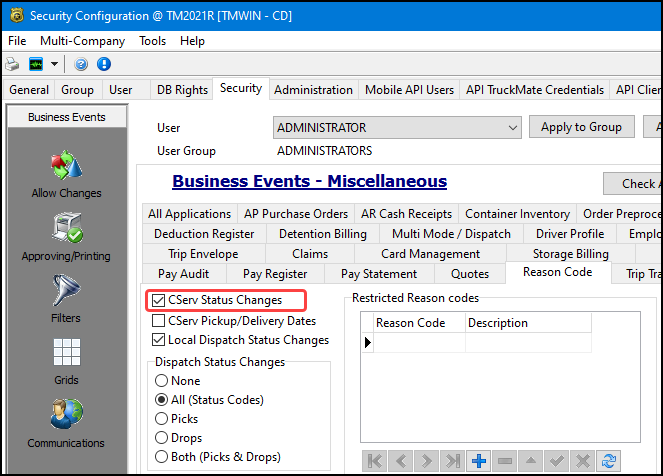
Now when the Security Configuration program > Security tab > Business Events > Misc > Reason Code tab > CServ Status Changes checkbox option is selected, a reason code prompt will be displayed when changing the status of a freight fill in the Dispatch > FB grid.
Since the change happens on the freight bill order level, the reason code prompt will not show the Trip Number and Actual fields that you would see when making changes at the trip level.
This new reason code pick list follows the new reason code restriction rules. Any Codes Maintenance > Applicable to Status and Security > Restricted Reason Codes rules are obeyed when changing a freight bill status.
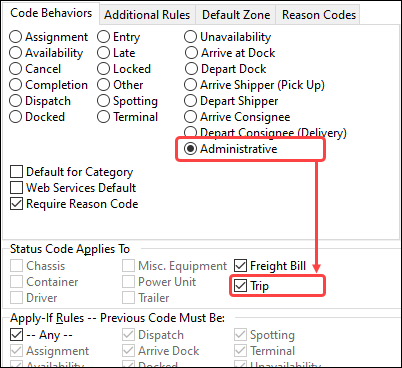
Apply Administrative Statuses at Trip Level
Previously, you could only apply Administrative statuses to a freight bill, but only at a specific freight bill level. You could not apply an Administrative status to a bill at the trip level.
Now if you have the security permission you can apply Administrative statuses at the trip level. The status change will roll down and update all active Freight Bills on the trip at the time you apply the status change.
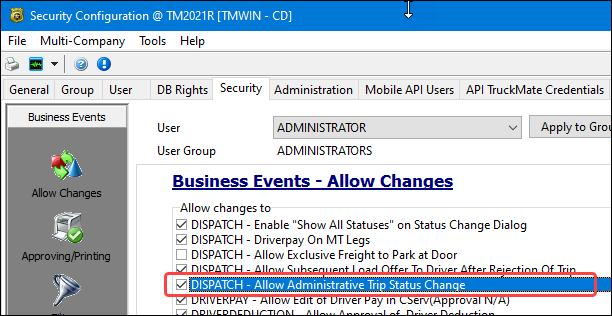
You must have the DISPATCH - Allow Administrative Trip Status Change Security setting selected to use this feature. The permission is not granted by default.
This also requires that the status codes with an Administrative code behavior you want to use have the Trip checkbox selected in the Status Code Applies To section on the Codes Maintenance > Status Codes window. This setting allows users with the security permission to apply these Administrative statuses at the trip level in Dispatch and Multi Mode Dispatch.
When these settings are enabled, the Trip Status Change dialog will include these Administrative Codes in the status change dropdown list. When an Administrative status code is applied, the following changes occur at the trip and freight bill levels:
Trip Level
-
The trip status will not change; it remains in its current operational status.
-
The trip zone will not change; it remains in its current zone.
-
A TRIPSTAT (Status History) record is recorded against the trip to show that an Administrative status was applied to the trip.
-
If a custom comment was entered as part of the Trip Status Change, it is added to the Trip Status History > Comment field. Otherwise, a default comment of 'Admin Status Change' is added.

-
Freight Bill level
-
The freight bill 'Admin' status will change; it will either be set or updated (if it already had an 'Admin' status).
-
The freight bill zone will not change; it will remains in its current zone.
-
An ODRSTAT (Order History) record will be recorded against the bill to show that the Administrative Status was applied to the bill via the trip.
-
If a custom comment was entered as part of the Trip Status Change, it is added to the Comment field for the Order History record. Otherwise, a default comment of 'Admin Status Code applied from Trip' is added.

-
Reason Code records will roll down from the trip to the freight bill(s) present on the active leg of the Trip. If bills have already been completed on prior legs, or are planned on future legs, they will not receive the Reason Code roll down; this logic will only update bills on the current leg of the trip.
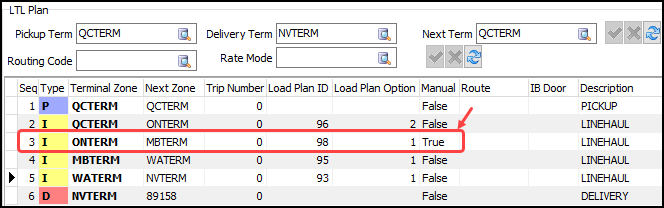
Change Load Plan options on freight bills
Previously, when a freight bill was created in Customer Service, the terminal plan was created based on the order’s shipper and consignee. If there were any required intermediate moves between the pick and delivery terminals, the Load Plans were used to determine the specific route a freight bill would need to take to ensure it reaches the delivery terminal. If 'Alternate Options' were specified on a Load Plan, "Option 1" was always selected by default but you could change this. For example, in Multi Mode Dispatch you could only change the Intermediate Terminal. If you rerouted the freight bill down an entirely different route, it would cause problems.
Now Customer Service allows you to change Load Plan Options directly from the freight bill. If a Terminal Plan Intermediate Sequence contains a Load Plan with valid options, you can double-click the Load Plan Option field and select a new Intermediate Terminal and several things will happen:
-
The entire route from this point forward will be recalculated to ensure it follows the specified Load Plans from the newly selected Terminal.
-
The new Terminal sequence will be shown as 'Manual' to show it was changed).
-
The Travel Mode and days of service will be updated (if applicable) per the new Load Plan option.
-
You can update a Freight Bill multiple times so the sequences can be modified as needed to route the bill as planned.
-
If the Shipper or Consignee is changed on an order, any manual changes will be reset in order to ensure the Terminal Plan is recalculated correctly.
-
If 'Stop Recalc Term Plan' is selected for a bill, changes will not be permitted. This setting will need to be toggled off using the shortcut menu option before any Load Plan changes can be made.
-
Once a particular sequence has been completed (by trip(s)), users will be unable to modify the Load Plan option for that completed move. Non-completed sequences, however, will still be modifiable.
There are two important takeaways if you want to use this new function:
-
It is always important to modify your routes from the highest sequence moving down. When a Load Plan Option is changed, it will recalculate everything below it. This means, for example, if a user modified Sequence 4, and then modified Sequence 1, their Sequence 4 changes would be lost as a result of them changing Sequence 1.
-
This function depends on having a strong Load Plan system established within your environment. If you have certain Load Plan options that would lead to an 'invalid' routing, the system will still accept it. You would need to fix the Load Plan Options to correct the route.
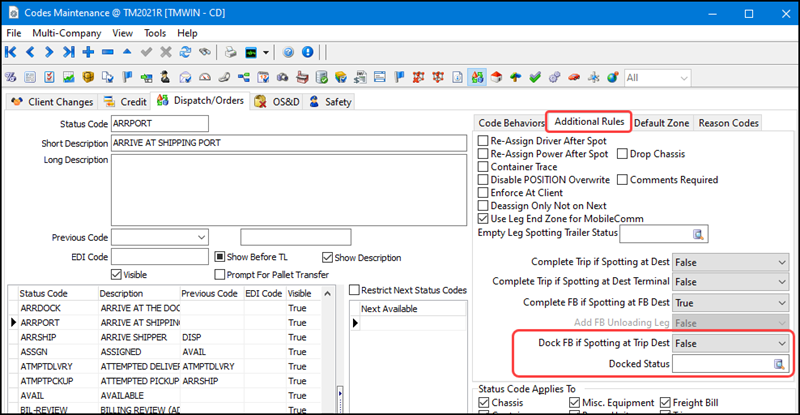
New rule to dock freight bill(s) wen spotting at destination
Two new options have been added to the Codes Maintenance > Status Codes > Dispatch/Orders Additional Rules section. Now you can quick-dock the freight bills that are not complete but they do not require any form of "unloading" and you can set a specific dock status.
Dock FB if Spotting at Trip Dest
-
This will determine whether a freight bill should end up in a Docked status if the trip is spotted at the trip Destination.
-
True - If the trip is spotted at the Trip Destination, the freight bills should be Docked.
-
False - If this is False, no freight bill will be Docked as a result of the spotted status being applied to the end of the trip.
-
Docked Status
-
If at any point a freight bill would be docked as a result of a spotting status (either with the setting above or per other automated methods), the system will apply this status. If this field is empty, the system will always use the first-detected default status for the 'Docked' code behavior category.
Change zone of first/last stops in Load Optimizer
The Load Optimizer in Dispatch and Multi Mode Dispatch has the ability now to use the Change Zone shortcut menu option to modify the first and last stops on a trip. When you select Change Zone, a new window lets you manually enter or pick a new zone for any stop including the first and last stops.

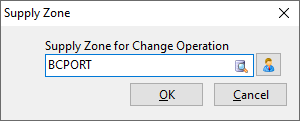
Once you click OK, the stop is updated to this new zone and since the stop is being updated directly, you do not have to move any bills between the old and new stops. They stay with the stop and adopt the revised zone change.
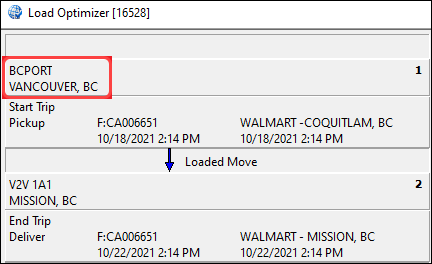
The Start Trip and End Trip field functions remain otherwise unchanged so you can still use the Prepend/Append structure to add new stops.
Previously, the Load Optimizer > Change Zone function could not be used on the first and last stops on a trip. Instead, you would have had to prepend or append new stops on a trip. If the original stop was no longer needed you had to use a three step process (create new stop, move bills, remove old stop).
Improved Seal Numbers workflow
Previously, if a Seal Number was moved to a different trip you had to update the Sealed Trip value but this was not tracking the original trip where the resource was actually sealed.
To better track the seal information, a new CURRENT_TRIP field was added to the SEAL_NUMBERS table. This new field will always show the 'active' trip a Seal Number is assigned to. The 'Sealed Trip' value will remain unchanged and will no longer be updated after it is originally set.
New workflow
When a trip is loaded and sealed within Multi Mode Dispatch, ConnectedDock or via the REST API, the Current Trip value is set to be the same as the Sealed Trip value. Afterwards, the Sealed Trip will never be modified, but the Current Trip is updated if the resource is moved to a different trip. Otherwise, sealing and breaking the seal functions remain the same.
In the Seal Numbers grid, the new Current Trip column is read-only and cannot be manually modified. The Current Trip value can be modified by the TruckMate system if the resources are merged or split onto different trips.
Print Manifest option available in Trip Envelope Processing
Previously, you could only print reports within Trip Envelope Processing in two ways:
-
 Print Reports on the task bar
 -
Print Reports shortcut menu option on the Trip Leg grid
This option prints a manifest for every trip. If you needed to print a manifest for a single trip, you had to use a custom report that called the correct parameter.
Now, a new Print Manifest shortcut menu option (CTRL+M) is enabled when one or more trips display in Trip Envelope Processing.
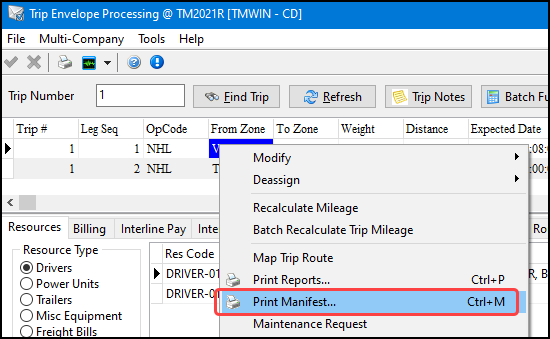
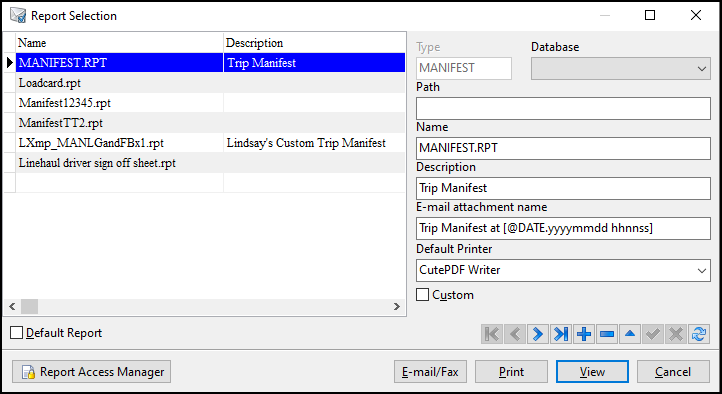
The Print Manifest option loads all reports with type MANIFEST. From the Report Selection window, you can print a report that uses the TRIP_NUMBER parameter. Custom reports are no longer necessary.
All other report printing options remain the same.
This new report view is also available in the:
-
Dispatch > Trips grid
-
Multi Mode Dispatch > Trip grid
-
Customer Service > Status grid
Split Bill Number
The previous logic around active split bills was to increase the numeric count for any new split bills as they were created. For example, a parent bill was split into two split bills labeled S1 and S2. Any splits made to these split bills would continue to increase the count as S3, S4, etc. When split bills were merged back together and a second split was made from the parent bill, the split could create another S1 and S2 and possibly result in duplicate Freight Bill numbers.
This workflow has been changed to prevent creating duplicate split bill numbers from multiple splits and merges. Every time you create a new split, the numeric value of the split bill is always increased. Using the previous example, the initial split bill would be S1 and S2. If you split these bills again, it would create an S3 and S4 bill. If you merged them back together and a new split occurred, the new bills would be S5 and S6.
Since TruckMate 2021.4, the bill numbers were increased from 10 to 20 characters so split bills can support double-digit values and avoid being truncated if 10 or more split bills are created.
The new Split Bill workflow logic is supported in all TruckMate applications that can process and work with Split Bills, including, but not limited to:
-
Customer Service
-
Multi Mode Dispatch
-
ConnectedDock
The new workflow also respects every setting of the MMDISP.EXE > Use Freight Bill Items for split application configuration setting (Auto, True, False). This means it will work for freight bills with or without barcode items.
Add Offset to reason codes
TruckMate has improved the status and reason codes filtering feature first introduced in TruckMate 2021.3. The expected committed pickup and delivery dates and the updated Estimated Delivery Date (EDD) are recorded as the order is being moved from its origin to its destination.
The changes include:
-
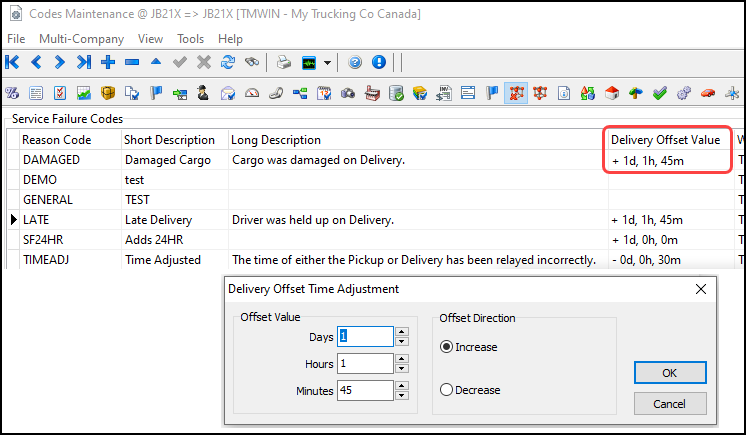
A new Delivery Offset Value column was added to the Codes Maintenance > Service Failure Codes. Double-click to use the popup form that lets you set the days/hours/minutes and whether to increase or decrease the Estimated Delivery Date (EDD).
-
Two new read-only fields were added to the Dispatch > Freight Bills grid and to the Multi Mode Dispatch Freight grids (Deliveries, Pickups and CrossDock)
-
Estimated Delivery Date and EDD Overridden.
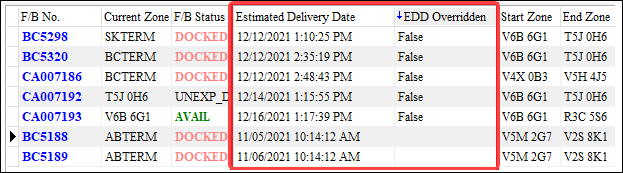
-
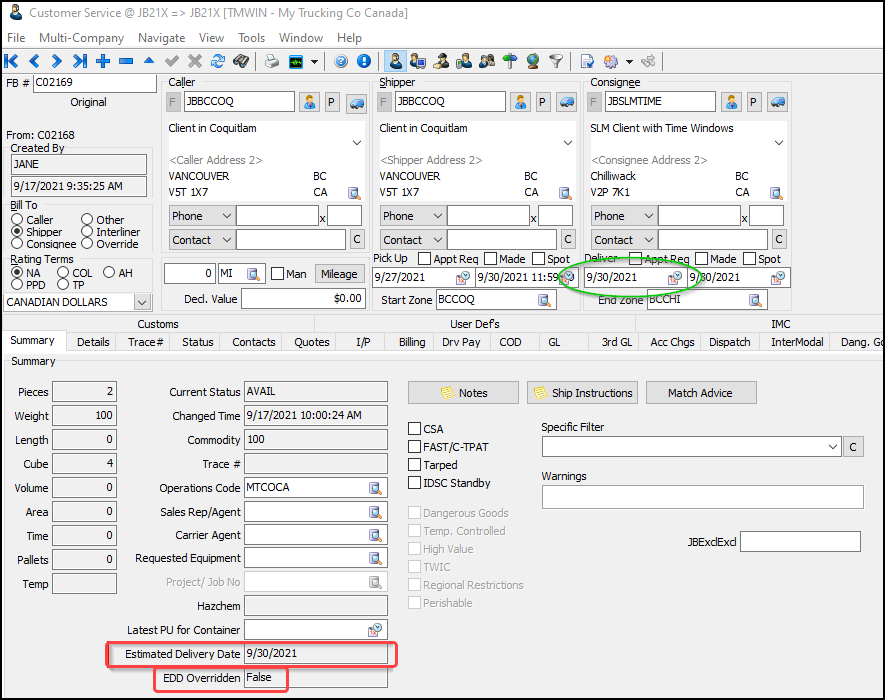
These two read-only fields were also added to the Customer Service > Summary tab:
Field Description Estimated Delivery Date
This date is not set until the freight bill has a bill number. Once it does, the date is set to the Customer Service > SLM tab > Service Delivery date. If there is no Service Delivery date, it will be set to the Deliver By date.
EDD Overridden
Defaults to False. It is True if a status is applied to the order with a service failure code that has an offset configured in CODES.EXE. It can be reset to False if the new Service Level Matrix calculated date is equal to the new overridden EDD value.
If a status code associated with a reason code (as set up in Codes Maintenance > Service Failure Codes) with an offset is applied:
-
The Estimated Delivery Date (EDD) is increased by the amount of time in the offset (e.g., 1day, 1hr and 45m)
-
The EDD Overridden is set to True.

-
-
Two new CSERV.EXE application configuration options were added to control whether updates to the new Estimated Delivery Date will:
-
Update the Customer Service header > Deliver By information
-
Reset the Estimated Delivery Date back to the SLM > Deliver_by date.
Utilities > Application Configurator > CSERVE.EXE
Option Description Update DELIVER_BY values to match Estimated Delivery Date
Determines whether the DELIVER_BY date value is updated after the Estimated Delivery Date changes.
-
True
The Deliver By date value will always be updated to match the Estimated Delivery Date (EDD) after an update to the EDD value on an order. -
False (default)
The DELIVER_BY date value will remain independent.
Reset Estimated Delivery Date Value When Delivery Date of Freight Bill Changed
Determines what happens to the Customer Service > Summary tab > Estimated Delivery Date field for an order if the regular Delivery Date changes.
-
Always (default)
If the regular Delivery Date changes the Estimated Delivery Date (EDD) will be set to the Customer Service > SLM tab > Service Delivery date unless this value is NULL.If the Service Delivery date is NULL:
-
The EDD is set to the Customer Service > header section > Deliver By date
-
The EDD Overridden value is set to False.
-
-
Never
The Estimated Delivery Date will not be updated if the regular Delivery Date changes. -
Ask
If the status being applied has service failure codes with offset times that change the Estimated Delivery Date, a message is displayed asking you "Do you wish to reset the Estimated Delivery Date value based on the changes to the Delivery Date of the order?"If you manually change the Pick Up By date, Service Level, and in some cases, the Deliver By date, this message will also be displayed to confirm you also want to reset the Estimated Delivery Date.
-
-
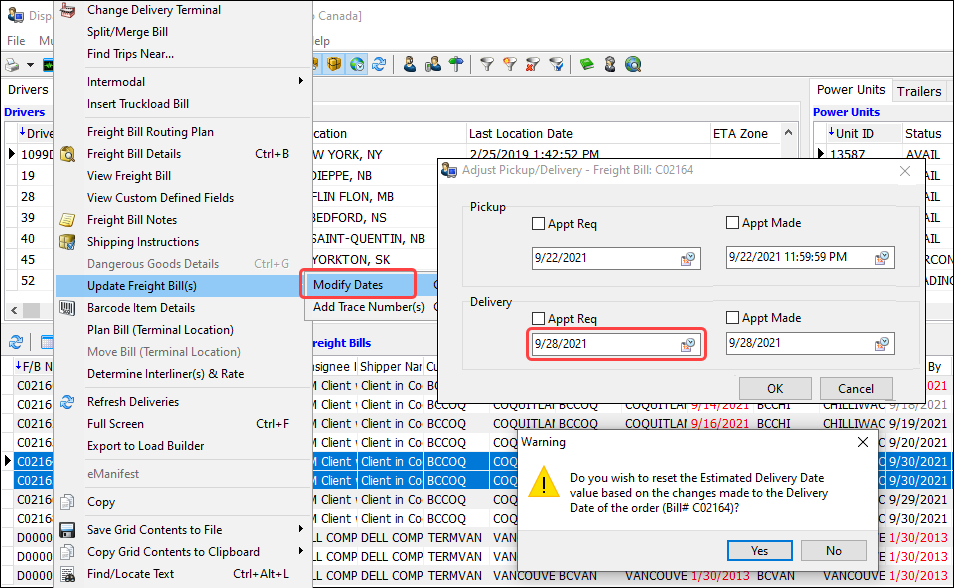
-
In Dispatch and Multi Mode Dispatch, if you use the Update Freight Bill(s) > Modify Dates shortcut menu option to change the Deliver By date, you will be asked if you want to reset the Estimated Delivery Date for any affected freight bills.
-
The TruckMate REST API tm/orders endpoint can use a GET method to retrieve the new Estimated Delivery Date field value. A PUT (but not a POST) method can change the date.
If the Pick up By or Deliver By are updated by the ART Server and if the CSERVE.EXE > Reset Date Value When Delivery Date of Freight Bill Changed application configuration is set to Ask, it will reset the Date since the API cannot respond to a prompt.
Improved Send Load Offer (EDI)
TruckMate can tender an EDI load offer to a carrier automatically since version 2020.3. TruckMate 2021.4 improves this feature.
-
Customer Service > IP tab - A freight bill status change will now cause the EDI load offer to be resent as a change or a cancel.
-
Dispatch - Carrier Information - The Send Offer will only be sent to the carrier on that load. It will not be sent to the carriers on other legs of the trip.
-
Dispatch - configuration - The DISPATCH.EXE > 'Carrier Assign and 'Carrier Deassign' application configuration options will only send EDI 204Out load offers to the carriers on the load that triggered the freight bill status entry. It will not be sent to all carriers on the trip.
Carrier rating date
The rating date used when the carrier assignment was last edit/saved is displayed as the Lookup Date. The Rate Logging will now show the accessorial charges it tried to use and the ones that were actually applied.
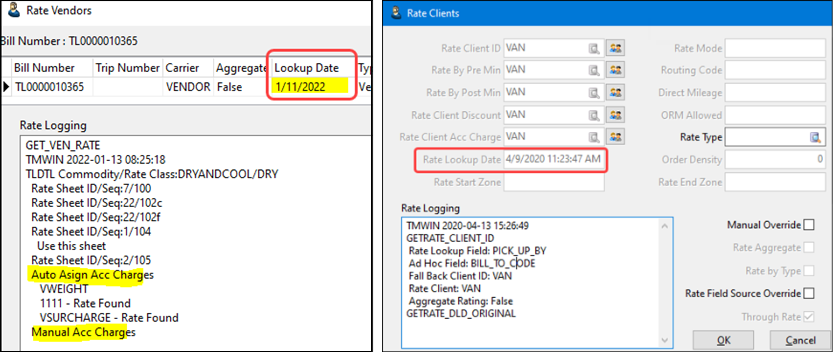
Carrier rating uses one of two possible dates for rating based on whether the trip is being consolidated.
-
If the trip is being consolidated, the rating date comes from the trip leg (LEGSUM.LS_ACTIVE_DATE).
-
If the trip is not being consolidated, the rating date comes from the fright bill (TLORDER_RATES.RATE_LOOKUP_DATE). This date can be viewed in Customer Service > Details tab > View Rate Clients shortcut menu option.
Framework
This section describes these new features and improvements:
Expanded mouse cursor changes
In TruckMate 2021.3, a subtle but important change was made to the mouse cursor icons in the Dispatch, Multi Mode Dispatch and Customer Service programs. In TruckMate 201.4, this change has been expanded to include ALL of the TruckMate program mouse cursors.
The hourglass and spinning circle icons showing the page was still waiting for data and all processes to complete were removed. This change speeds up page refreshing, stops screen flickering and improves the overall performance.
It is important to note that without the screen mouse icon providing feedback during operations such as a post or the creation on an x-stop, the programs may appear to be unresponsive or locked up. Awareness of this change and some patience in needed if you are working with large databases.
DB2 11.5 Upgrade
TruckMate 2021.4 works with both DB2 11.1 and DB2 11.5 database versions.
A future TruckMate 2022.1 release will require DB2 11.5.6. TruckMate versions prior to 2021.4 require DB2 11.1.
Instructions for upgrading and installing DB2 11.5 are available in the Trimble Transportation Learning Center on the TruckMate page in the Installation Guides section. Refer to the IBM DB2 11.5 Installation & Maintenance Guide.
SQL Execute - faster Record Count Total
The SQL Execute feature for showing the total record count (in the lower left corner) is faster now when dealing with large data sets.

Database Migration Wizard rebinds all
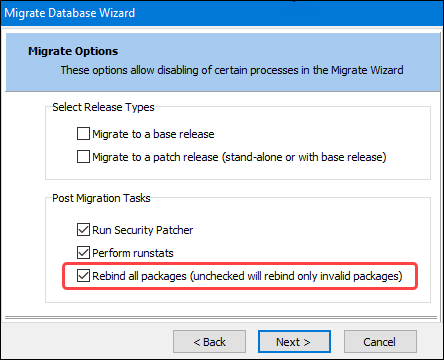
Previously, you could choose whether to run rebinds on all of the packages that became invalid because of the migration. If you choose not to rebind after the migration, it would leave invalid objects in the database.
The way the Database Migration Wizard rebind option works has changed. The checkbox option name has been renamed from Rebind packages to Rebind all packages (unchecked will rebind only invalid packages) to reflect the change.
-
If the 'Rebind all packages' checkbox is selected, a rebind is applied to every database package at the end of the migration process. If not, a rebind still occurs but only to the packages that became invalid because of the migration.
This change prevents invalid objects from remaining in the database after a migration. This also ensures the runstats function will be run on a database that has already undergone a rebind process.
Using WITH in SQL Statements allowed
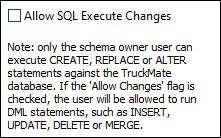
Previously, users who did not have the Allow SQL Execute Changes security permission would get an error message when using the WITH function in SQL statements.
Now you can use WITH statements in your SQL statements. This typically applies when creating reports.
If you do not have the Security Configuration > Administration > Allow SQL Execute Changes permission, this will now apply to which SQL statements are available to you:
You can use:
-
WITH
-
SELECT
You cannot use:
-
UPDATE
-
INSERT
-
MERGE
-
DELETE
-
CREATE
-
REPLACE
-
ALTER
Warning If TMUP File Is Old
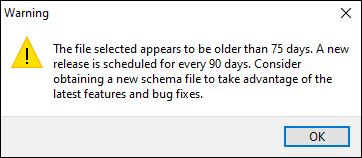
The Migrate Database Wizard will present a warning message if the base upgrade or patch update .TMUP file you are using is older than recommended.
For base releases, a message will appear if the .TMUP file is 75 days older than the most recently available base release.
For example, suppose:
-
2021.2 was released on Jul. 16, 2021
-
2021.3 was released on Oct. 12, 2021
On Oct 15, 2021, if you were to upgrade using the 21.2.0_Base_2021.07.16_Flyway_Schema.tmup file, the wizard tool would notice the .TMUP file date is 91 days old. The following message would appear encouraging you to look for the next available GA base release or pre-release version.
For patch releases, a message will appear if the .TMUP file is 21 days older than the most recently available patch release.
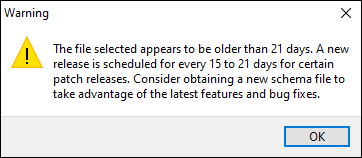
You can choose to ignore the message and complete the upgrade or patch update anyways.
SQL Execute opens faster
A change was made to the startup query used for loading the SQL Execute window so it opens much faster now.
Resize SQL History/Favorites Window
Previously, the SQL Execute > SQL History / Favorites window used for displaying saved SQL queries was a fixed size. Now you can resize this window and if you do, the new size is saved in the registry so it will stay like this for the next time you open the window.
New DB2 parameter for DB2 version 11.5.6
TruckMate 2021.4 is compatible with DB2 version 11.1.3 and with DB2 version 11.5.6. If you upgrade to DB2 11.5.6 and TruckMate 2021.4 or higher, you will need to set a new DB2 system parameter called DB2_UPGRADE_SKIP_CYCLE_CHECK to TRUE.
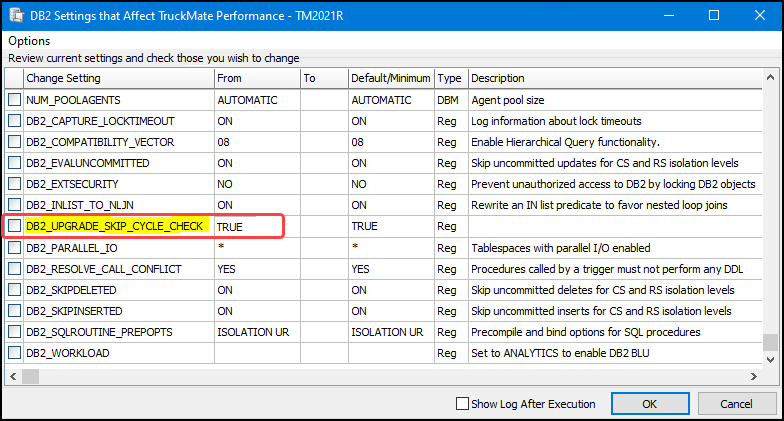
If the parameter is set to FALSE, a warning message about DB2 Registry Settings will appear when users are logging into any TruckMate application. You can set the parameter to TRUE using DB2 commands or by using the TruckMate SQL Execute > Performance menu > DB2 Configs function.
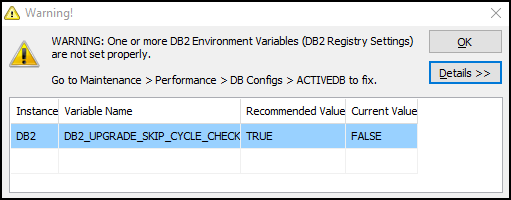
If you upgrade to TruckMate 2021.4 but remain on DB2 11.1.3, this parameter will not be available yet and no warning message will appear.
Intermodal Operations
This section describes these new features and improvements:
Improved IM empty bill prompts
Previously, when trying to manually match empty intermodal bills to trips (i.e., the DISPATCH.EXE > Create IM Trip for IM Freight Bills from grid application configuration option is set to FALSE), the message prompts asking if you wanted to match other empty bills within the same intermodal 'family' were misleading. These prompts were asking a Yes or No question, but the prompts were using OK or Cancel buttons.
These message prompts now use Yes or No options to avoid confusion between the question being asked and the available responses. For example:

-
If YES, the IM bill would be matched to the trip.
-
If NO, the IM Bill would not be matched to the trip and would remain in its current status.
The prompts depend on what type of bill you are attempting to match.
-
If you attempt to match the Parent Bill, you will be prompted for:
-
Empty Bill (-I/-E)
-
Chassis Pick Bill (-H) - if it exists
-
Chassis Term Bill (-C) - - if it exists
-
-
If you attempt to match the Empty Bill, you will be prompted for:
-
Chassis Pick Bill (-H) - if it exists
-
Chassis Term Bill (-C) - if it exists
-
-
If you attempt to match the Chassis Pick Bill, you will be prompted for:
-
Empty Bill (-I/-E)
-
Chassis Term Bill (-C) - if it exists
-
-
If you attempt to match the Chassis Term Bill, you will be prompted for:
-
Empty Bill (-I/-E)
-
Chassis Pick Bill (-H) - if it exists
-
-
If you attempt to match a Rendezvous Bill, you will be prompted for:
-
Empty Bill (-I/-E)
-
Chassis Pick Bill (-H) - if it exists
-
Chassis Term Bill (-C) - if it exists
-
Prevent container/chassis from being assigned to rendezvous bills
Previously, when rendezvous bills were matched to a trip, the container and chassis for that freight bill would also be assigned to the trip. However, in the case of a rendezvous bill/trip scenario, the container and chassis are not actually required to be assigned. This could create a scenario where you cannot process the rendezvous trip because the resources are already active on the main Intermodal trip.
Now when rendezvous trips are created, the resources will not automatically be assigned to the trip. The trip will be created with no resources, and you will have to assign the required resources for the rendezvous trip.
If the container/chassis for the rendezvous bill are added later, removing these resources will not invoke the auto-design logic that would clear the resources if unmatched from the trip.
Auto-match paired chassis/container
The Container Profiles > Basic Info tab > Paired Chassis field allows you to create a connection link between a chassis record and a container record. In previous versions of TruckMate, this pairing functionality only applies when assigning a resource in Dispatch or Multi Mode Dispatch, not when creating a trip and not when matching a resource on a freight bill. This has been a "loose" connection so even though the chassis and container are marked as paired, they would not automatically match, assign or de-assign with one another.
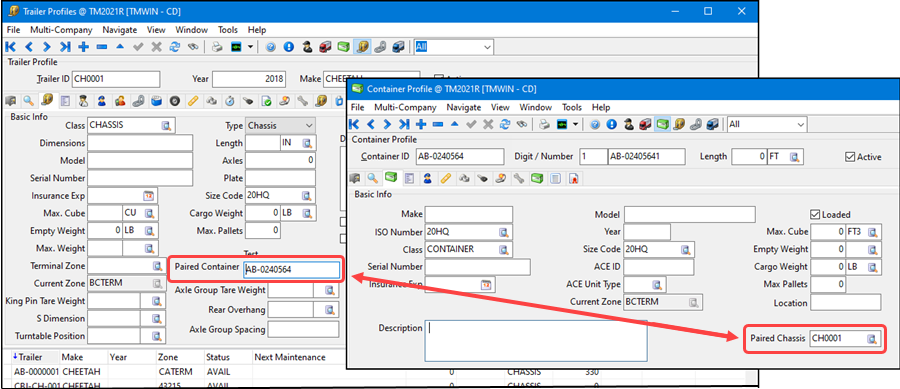
Now in TruckMate 2021, this is now a "hard" connection so a paired container and chassis will be matched together when one of the pair is matched to an intermodal record.
For example, suppose container NZCT029683 has as a paired chassis 'CHAS029683'. If the container is assigned to an intermodal order in Customer Service, the paired chassis will also be assigned to this order.
If one of the paired resources is marked as 'Inactive', you will receive a prompt when you assign the active resource to an intermodal order asking you how to proceed.
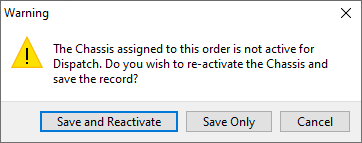
| Option | Description |
|---|---|
Save and Reactivate |
Saves the intermodal record AND re-activates the paired container/chassis. |
Save Only |
Saves the intermodal record but will NOT re-activate the paired container/chassis. |
Cancel |
This will NOT save the intermodal record or re-activate the paired container/chassis. |
This logic applies to the Customer Service, Dispatch and Multi Mode Dispatch applications.
Multi Container window - new fields
Five new fields were added to the Multi Container window. The Multi Container window accessed from Customer Service, Dispatch and Multi Mode Dispatch. It is used to view InterModal freight bills that either share the same Job Number as one another (when using the Trace List viewset), or to view all 'pending' InterModal orders (when using the Bill List viewset).
The five new fields display freight bill information:
| Field | Aligns with this Customer Service > Intermodal tab value for the order |
|---|---|
Shipper Name |
Pickup |
Consignee Name |
Delivery |
Empty Disposition Name |
Empty Disp |
Empty Origin Name |
Empty Origin |
Movement Type |
Movement Type |
All of these fields are read-only so they can only be viewed (but not adjusted) from the Multi Container screen. These grid columns can be sorted and moved within the grid.
Mobile Communications
This section describes these new features and improvements:
Force Return Macro to uppercase
A new Upper Case macro field option has been added to the Communications Macro Definition Tool to automatically change the entered value to uppercase.
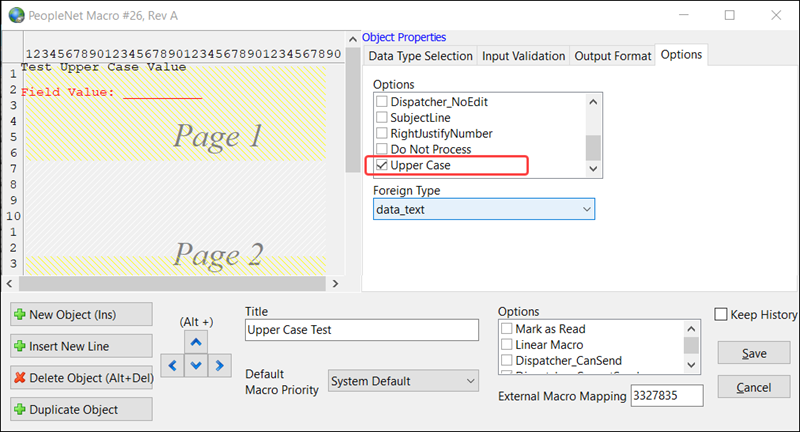
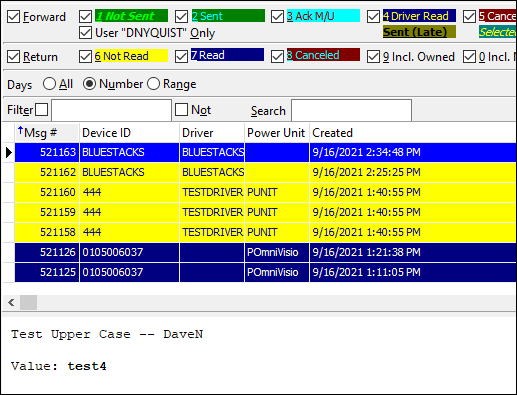
Some fields (driver id, truck id, and freight bill number, etc.) require the values to be in uppercase. If a driver enters the value in lowercase, this option will convert the value to uppercase. The message viewed in GL Reconciliation will still show the driver entered value.
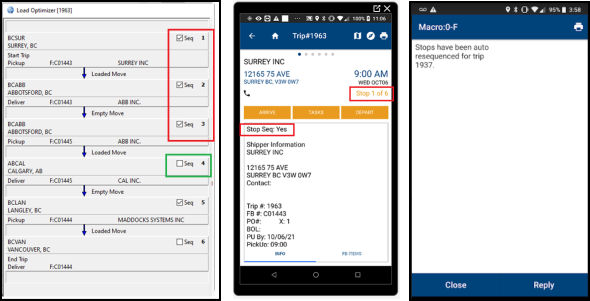
Ability to update trips in any sequence
Trip legs can now be re-sequenced when picks and drops occur at a stop level. These Application Configurator settings allow you to enable this feature.
-
DISPATCH.EXE > Stop Sequence - Enforce Sequenced Order (True/False)
-
DISPATCH.EXE > Stop Sequence - Re-sequence Legs and Stops (All/None/P&D)
When Stop Sequence - Enforce Sequenced Order is True, a dispatcher can use the Seq checkbox beside each stop in the Trip Optimizer to control which stops will be sequenced. The sequenced stop can be marked in the D2link stop schedule if it is defined in the Communications Macro Definition Tool schedule forms.
When the Stop Sequence - Resequence Legs and Stops is set to All, the freight bill has not been picked up and the Seq checkbox is cleared for this stop, a D2Link driver can go to that stop in any order. After the "Arrive" status is applied, the re-sequenced trip schedule and a message are sent to the driver.
If there is a conflict:
-
The new status is not applied to the stop
-
A message is sent to the D2Link driver if the Mobile Communications Manager is set up to send a message.
New Intermodal fields added to MobComm API
Two additional values have been added to the TruckMate MobComm API for the SetIntermodalOrder and GetIntermodalOrders SOAP API endpoints.
-
ContainerISO
-
ContainerOwner
PowerFleet API Certification (Trailer Tracking)
PowerFleet Trailer Tracking is now certified for use with the TruckMate MobComm API. PowerFleet offers standard trailer tracking to monitor GPS pings and the sensor history of a trailer in TruckMate.
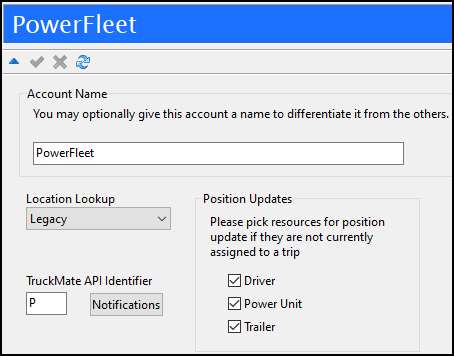
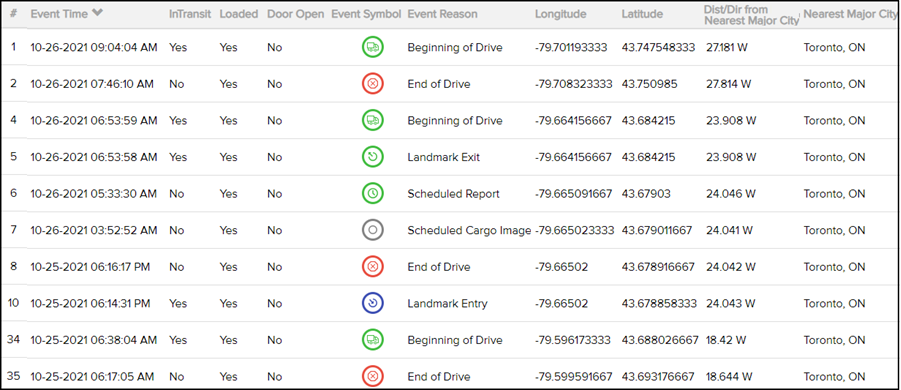
PowerFleet also offers use of their portal to track trailer movement and events online. Resources are linked to devices within the TruckMate Mobile Device Maintenance program when first created. There is no need to manually create trailer device linkages.
The standard elements available include:
-
GPS Pings
-
When a trailer is on an active move, trailer GPS pings can be reported more often (e.g. every 30 minutes) to track location.
-
Stationary trailers can still be pinged (e.g., every 24 hours) to show current location.
-
-
Sensor Information
-
Loaded - Indicates trailer is currently loaded.
-
Door Open - Indicates trailer door is open.
-
Motion - Indicates trailer is in motion.
-
Other
This section describes these new features and improvements:
Updated icons
The icons used within Dispatch and Multi Mode Dispatch have been updated and modernized. This includes the icons in the taskbar and shortcut menus. For example:
Dispatch
-
All of the Profile application icons have been replaced with the modern image.
-
Filter icons have been updated.
-
Driver Diary icon has been updated.

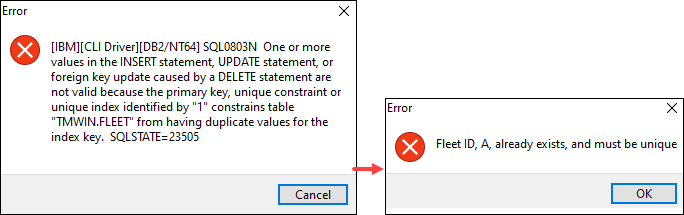
Simpler Error Message for Duplicate Fleet ID’s
The duplicate Fleet ID error message in Fleet Maintenance has been simplified. If you try to save using an existing Fleet ID, you will need to change the ID or cancel and make changes to that fleet.
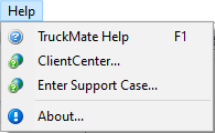
Remove 'Product Feedback…' Options From Help Menus
The Product Feedback option has been removed from the Help menu common to all TruckMate applications. Going forward, contact Trimble Transportation Support with any feedback or questions about the TruckMate software.
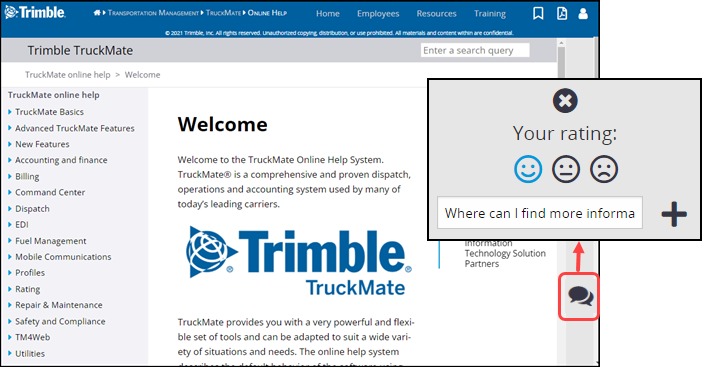
If you have feedback or comments related to the contents of the new TruckMate online help system, click the ![]() comment button on the right side.
comment button on the right side.