Find Near window

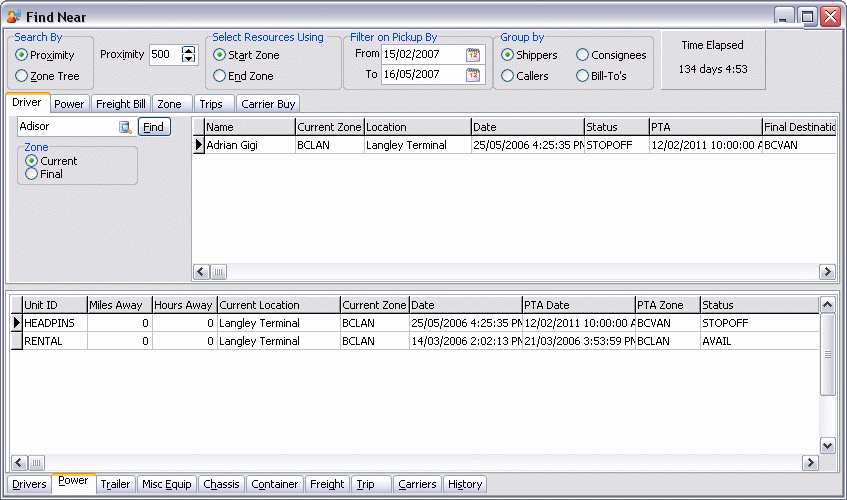
The Find Near function is available from all Grids and provides the ability to 'Find' the required Trips, Freight Bills and Resources near the Trip, Freight Bill or Resource in order to effectively match the requirements of each Trip based on the Current Zone and the Proximity you define.
|
Before Using the Find Near feature:
|
The Find Near window is comprised of three sections: the top 'Header' section where certain search options are specified, the middle 'Parameters' section, where the parameter used to Search By is entered, and the bottom 'Results' section, where you choose which items you would like to 'Find Near' the 'Search By' parameter.
For example:
Select a Freight Bill (# 'L00053', for example) in the Freight Bill Grid, then select 'Find Drivers Near' from the Context Menu.
The Find Near window displays:
-
In the Parameters Section the Freight Bill Tab is selected and FB L00053 displays as the 'Find' criteria.
-
In the Results Section the Driver Tab is selected with the Drivers near FB L00053 listed in the grid. You can now select any of the other Resource Tabs to view the other resources available, for example select the Trailer Tab to view Trailers near FB L00053.
| Once on the Find Near window you can complete multiple searches, simply change the criteria in the middle area of the window, select the Find button and the results will display in the selected Tab Grids. |
Header Section
The options available in this section depend on which Tab of the Find Near window you are currently using.
Search By
Select either 'Proximity' or 'Zone Tree'. Proximity searches use the value in the 'Proximity' field to the right as a distance marker (in kilometers) that filters out Resources depending on their location. Selecting the Zone Tree method will use the current Zone and all of it’s Sub-Zones in searching for Freight Bills.
Select Resources Using
Choose either 'Current Zone' (the zone that the equipment currently resides in) or 'PTA Zone' (Projected Time of Arrival Zone).
Filter on Pickup By
This section is only available when using the History Tab in the Results Section. Enter a Date Range using the two date fields and all Shipper records that have a 'Pick Up By' Date within that range will be displayed on the History Tab.
Group By
This section is only available when using the History Tab in the Results Section. Choose the radio option you would like to group the records by.
Time Elapsed
This read-only section is available when using the Carrier Buy Tab. Once an order has been assigned to a User the time elapsed clock starts. This will allow operations managers to be alerted if an order has not been tendered to a Carrier within a specific period of time.
Parameters Section
The middle 'Parameters' area contains 6 Tabs to display and define the 'Find' frame of reference (or criteria,).
Driver Tab
The Driver Tab allows you to search for resources that are near (defined by your 'Search By' choice) to a specific Driver in your system. Use the database search button next to the available field and select a TruckMate Driver from your system. Then in the 'Zone' section, choose either 'Current' or 'Final' (zone where Driver will reside at end of current Trip) and select the Find button. The Driver’s details should appear in the Driver Tab Grid to the right.
Using the bottom 'Results' Tabs, you can see which Resources are near to the selected Driver.
User 1 / User 2
These two user fields allow you to search by any User Defined fields you have added to the Dispatch program.
Power Unit Tab
The Power Unit Tab allows you to search for resources that are near (defined by your 'Search By' choice) to a specific Power Unit in your system. Use the database search button next to the available field and select a TruckMate Power Unit from your system. Then in the 'Zone' section, choose either 'Current' or 'Final' (zone where Power Unit will reside at end of current Trip) and select the Find button. The Power Unit’s details should appear in the Power Unit Tab Grid to the right.
Using the bottom 'Results' Tabs, you can see which Resources are near to the selected Power Unit.
Freight Bill Tab
The Freight Bill Tab allows you to search for resources that are near (defined by your 'Search By' choice) to a specific Freight Bill in your system. Use the database search button next to the available field and select a TruckMate Freight Bill from your system and select the Find button. The Freight Bill’s details should appear in the Freight Bill Tab Grid to the right.
Using the bottom 'Results' Tabs, you can see which Resources are near to the selected Freight Bill.
User 1 / User 2
These two user fields allow you to search by any User Defined fields you have added to the Dispatch program.
Zone Tab
The Zone Tab allows you to search for resources that are near (defined by your 'Search By' choice) to a specific Zone in your system. Use the database search button next to the available field and select a TruckMate Zone from your system and select the Find button.
Using the bottom 'Results' Tabs, you can see which Resources are near to the selected Zone.
Trips Tab
The Trips Tab allows you to search for resources that are near (defined by your 'Search By' choice) to a specific Trip in your system. Enter a specific Trip number into the available field and select the Find button, then use the Context Menu option described below to mark the beginning and ending of the Trip.
Using the bottom 'Results' Tabs, you can see which Resources are near to the defined Trip.
User 1 / User 2
These two user fields allow you to search by any User Defined fields you have added to the Dispatch program.
Context Menu
Mark Start Sequence / Mark End Sequence
Right click a Trip Leg Sequence number in the Grid and use the 'Mark Start Sequence' option to define the beginning of the Trip location range. Right click a different Trip Leg sequence number and select the 'Mark End Sequence' option to define the end of the Trip location range.
Carrier Buy Tab
The Carrier Buy Tab is designed to show the User the current Freight Bill information that the User is attempting to find a Carrier for. It will also display certain target margin rates that the User is expected to obtain when securing a Carrier to move the order. An additional option on this Tab is the 'Time Elapsed' option: once an order has been assigned to a User the time elapsed clock starts near the top right corner of the Find Near window. This will allow operations managers to be alerted if an order has not been tendered to a Carrier within a specific period of time.
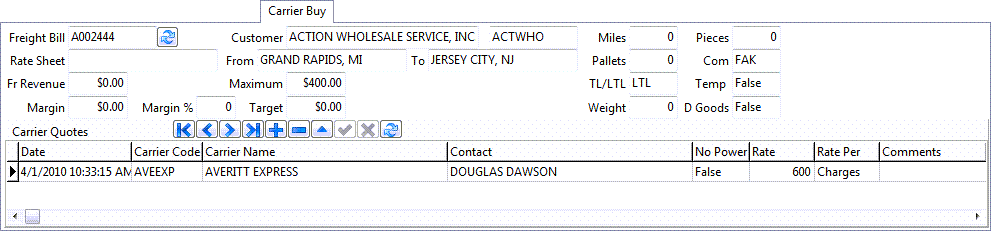
Freight Bill
When first opening the Carrier Buy Tab this field will display the minimum or first Freight Bill on the trip that the 'Find Near' option was selected for. There is a look up option to find a specific Freight Bill number.
Customer
This field displays the Client name of the Freight Bill’s 'Bill-To' Customer.
Rate Sheet
This field displays the Rate Sheet attached to the default Vendor.
Rating Zone
Displays the rate sheet description Start Zone from the Rate Sheet that has been set up and assigned to the default Vendor and matches the Start and End Zone criteria. Two potential rate sheets should be found: one, mileage, one pallet. If the 'Site ID' is type 'LTL' reference the Rate Sheet that has a sheet class of 'LTL'. If the 'Site ID' is type 'Truckload' (TL), reference the Rate Sheet that has a sheet class of 'TL'.
Miles
Displays the Mileage for the Freight Bill that is selected in the 'Freight Bill' field.
Pieces
Displays the total Pieces for the Freight Bill that is selected in the 'Freight Bill' field.
Pallets
Displays the total number of Pallets for the Freight bill that is selected in the 'Freight Bill' field.
Commodity
Displays the Commodity for the Freight Bill that is selected in the 'Freight Bill' field.
TL/LTL
Displays either 'TL' or 'LTL' for the Freight Bill that is selected in the Freight Bill field. Depending no the type of Freight Bill, the options below ('Margin', 'Margin %' and 'Target') will change functionality.
Temperature Controlled
Displays 'True' or 'False' depending on if the default Commodity is labelled as Temperature Controlled.
Weight
Displays the Weight for the Freight Bill that is selected in the Freight Bill field.
Dangerous Goods
Displays 'True' or 'False' depending on if the default Commodity is labelled as a Dangerous Good.
Freight Revenue
This field displays the base Freight Bill charges for the Freight Bill that is selected in the 'Freight Bill' field.
Maximum
This field displays the 'Max' value that was entered against the Freight Bill on the Customer Service program > Billing Tab . It designates the maximum amount of IP charges that can be allocated against the particular bill. When using the Carrier Buy Tab, if the IP charges entered exceed this value, when the user selects the 'Use Carrier' context menu option, they will be warned for exceeding the maximum.
Depending on the user’s security settings in the Security Setup program > Security Tab > Allow Changes section, they may be then prevented from assigning the Carrier on the Carrier Assign window itself. They can adjust the IP charges there, however, in order to assign the Carrier.
Margin
-
LTL: this is a calculated field based on the 'Margin %' field below using the following formula: (TLORDER.CHARGES-(TLORDER.CHARGES*MARGIN%)).
-
TL: this is a calculated field based on the 'Margin %' field below using the following formula: (TLORDER.CHARGES-(TLORDER.CHARGES*MARGIN%)
Margin %
-
LTL: this value is the Default configuration value that is set by the administrative User.
-
TL: this is a calculated field based on the following formula:
(TLORDER.CHARGES-(TLORDER.ROLLUP_MILES*TARGET TO))/ TLORDER.CHARGES
Target
-
LTL: displays the calculated rate from the Rate Sheet that has been assigned to the default Vendor where the pick up and delivery zones match and the sheet class has been set as 'LTL'.
-
TL:
-
Target From: displays the Minimum mileage rate from the rate sheet that has been assigned to the default vendor where the pick up and delivery zones match and the sheet class has been set as TL.
-
Target To: displays the mileage rate from the rate sheet that has been assigned to the default vendor where the pick up and delivery zones match and the sheet class has been set as TL and the rate break has not been set as minimum.
-
Carrier Contact Grid
This section allows Users to insert records of contact with potential Carriers when attempting to find a Carrier to move the load. The User can use the Navigator bar to insert a record and enter the particulars of the conversation. The User will also be able to access a right mouse option to 'Use a Carrier' that the cursor is focused on.
Date
This field is automatically populated when the User selects the '+' button to create a record.
Carrier Code / Carrier Name
The User will have the ability to enter a Carrier (vendor) code if known, or double click on the field to bring up a search box to search for the Carrier (Vendor). The 'Carrier Name' field will then automatically populate based on the Carrier selected.
Contact
This will default the Contact name from the Vendor file if a vendor code has been entered. The user will have the ability to over ride this field is needed. Contacts are configured on the Customer and Vendor Profiles progarm > Vendor > Contacts Tab.
No Power
This field is a double click toggle field to toggle the value between 'True' and 'False' based on if the selected Carrier has Power Units.
Rate
This field is used to enter the Total rate the carrier is providing if the shipment is LTL or a dollar per mile rate if the shipment is TL.
Comment
Free format text entry field for any notes (120 character limit).
Margin
Calculated field.
$ Per Mile
Calculated field.
Context Menu
Carrier Details
Selecting this button will open the Vendor Information window, which gives all the detailed information on the selected Vendor, as entered in the Customer & Vendor Profiles program. The 'Interliner' Tab allows you to view an Interliner Vendor’s Insurance details prior to adding them as the Carrier on a Trip.
Use Carrier
If all the details of the selected Carrier are acceptable, select this option to open the Carrier Assign window and continue on with the Carrier Assignment process.
Results Section
The bottom 'Results' area contains 10 Tabs representing all Dispatch Grids. Each Tab displays the results of the 'Find' with the related data sorted in ascending order according to the value in the Miles Away column.
Carriers Tab
Custom SQL Filters
On the first four find carrier near sub-tabs (Area Service, Rating, Load Request, and Active Trips), there is a new filter option called Custom Filter. This allows you to further filter the grid results by any column you like. To select an existing filter (one that either you created or another user created and made public), simply click the pick button (immediately to the right of the edit-box); to apply the filter, click the refresh button on the nav-bar. To edit an existing filter, or create a new one, click the ellipse button to the right of the pick button.
| The editor that comes up allows you to write a column name into your custom WHERE clause via a column picker invoked by either the top menu, double-click or right-click. It also has the performance test feature (will not let you save a query that takes longer than a configurable number of seconds to execute). |
If the custom filter box has a number in it when you click the editor button, then you will be (initially) placed onto that filter in the editor. Of course, the editor has a nav-bar, including a find button, to allow you to switch to a different filter (or hit plus to add a new one). Similarly, if you click the 'OK' button in the editor, then the filter number you had displayed in the editor will get copied over to the Find Carrier Near screen.
Area Service Tab
Displays the list of carriers matching the criteria. When specific Equipment is required, select the Equipment class and click Find again to restrict to Carriers with that equipment.
Driver Score / Vehicle Score / Safety Score / Safety Rating
If any of these values fall below the default requirements (as configured via the Application Configurator program > Dispatch options), the Carrier will not be allowed to be assigned to Trips in the Trip Grid, and will not show up on the 'Find Near' window when searching for Carriers. (See the documentation on Carrier 411 Integration and RMIS Integration for more information.)
Rating Tab
Displays all vendors who are attached to Rate Sheets that fit the criteria. You can further define the Find criteria by Currency, Equipment, Distance and Consolidated. Placing a checkmark in the Consolidated box provides consolidation of freight bills into one rate for the interliner for that trip and the ability to define Service Level and Commodity criteria.
| The Service Level and Commodity filters are only applicable (and thus enabled) if 'Consolidated' is checked. |
Load Request Tab
Displays Load Requests that match the criteria. Also, the ability to Create, Edit and Assign a Load Request is available from the Context Menu.
Carrier History Tab
The Carrier History Tab will display for the User any previous orders which match the filter criteria for the Freight Bill displayed in the 'Freight Bill' field on the Carrier Buy Tab. The User has the option of changing the filter options to find other Freight Bills on more or less detailed search criteria. Freight Bills selected will have an exact match for the filter criteria selected.

Carrier History Sub-Tabs
Payables
Select the 'Payables' button to view the Payables grid. The 'Payables' Grid displays Vendor Payables information for the selected Vendor, and can be configured using the 'View Style' and 'Record Summary' options above. The user is able to title-click sort this grid, so once a set of payables information is returned, you can sort the results by any column you would like.
Carrier Summary
Select the 'Carrier Summary' button to view the Carrier Summary grid, which displays only Carrier specific information for the selected Vendor. The user is able to title-click sort this grid, so once a set of Vendors is returned, you can sort the results by any column you would like.
Carrier Quotes
Select the 'Carrier Quotes' button to view the Carrier Quotes grid. The Carrier Quotes grid lists all entries users have made via the Carrier Buy Tab (upper part of the Find Near window). When user enters a "contact" or carrier rate quote in the Carrier Buy Tab, it is applicable just for that specific trip/leg. However, this info might be useful for other trips/legs. In other words, if you are looking for a Carrier for a trip from A to B, it might help to see what quotes you received in the past for similar trips.
Like the other two sub-tabs, you may apply any of the filters (zone, state, date, etc). And like the other two tabs, "air" mileages (lat/long calculations) are included for distances between the Start/End Zone of the trip you are looking for and the Start/End Zone of the past quote/contact, as well as between the Start/End Zone of the trip you are looking for and the Carrier’s office. Therefore, just like the other two tabs, you can title-click on any of these columns to either see whose office is closest (to start or end of trip) or which past quote is closest to what you are currently looking for.
Search Information
To Zone / From Zone
These fields will default to the Start Zone and End Zone (respectively) of the Freight Bill displayed in the 'Freight Bill' field on the Carrier Buy Tab. The User can change the Zone Codes in the fields by using the database search button, or can un-check the options to not filter by Zone Codes at all.
From State / To State
The User can enter a state range using these options in order to filter the returned records. These fields will pre-populate based on the Freight Bill displayed in the 'Freight Bill' field on the Carrier Buy Tab.
Vendor
This field will default blank but allows the User to narrow the History list by selecting a specific Carrier Code.
Commodity Class
This field will default blank but allows the User to narrow the History list by selecting a specific Commodity Class.
Date Range
These fields allow the User to narrow the History list by defining a Date Range for applicable records. You can use the Context Menu (right-click) within this field to quickly set a Date Range from a wide variety of options.
| he Application Configurator program > DISPATCH.EXE > 'CarrierHist Days' option can be used to default the Date Range displayed in these fields. |
View Style
Choose the View Style of the Payables Grid (below) from the two available radio options:
Normal
This View Style will show each individual Freight Bill and Carrier.
Aggregate
This View Style will consolidate the display list as one line per unique Carrier ID.
Record Summary
Choose from one of the two Record Summary options:
All
This option will display all record instances of the Freight Bill including Credit Bills.
Original/Rebill
This option will not display any Credit Bills.
Freight Bill Exact Match Options
If you select any of the Carrier history’s FB exact match filter radio options, then an exact match will be done against the FB currently selected in the grid in the top section. Note that this is only applicable if the top section is currently set to the Freight Bill, Trips, or Carrier Buy Tabs. The Driver, Power, and Zone Tabs, however, do not involve a FB, so these options will be disabled. Also, the filter is disabled when you choose the Contacts button/subtab on the lower section (Carrier History tab); again, because the grid in that lower tab does not involve a FB.
Refresh Filter / Clear Filter
The top button (plain filter icon) is the old 'Refresh Filter' button- it applies your filter choices to the grid. The Filter button with a red 'X' clears your filter; more precisely, it un-checks all the filter checkboxes and refreshes the grid (i.e. shows all unfiltered data).
Other tabs
Drivers / Power / Trailer / Misc Equip / Chassis / Container Tabs
Results in these Tabs will be included in the search regardless of the Resource’s current Status. That is, Drivers and Equipment will be displayed regardless of whether or not they are assigned or active on a Trip.
Freight Tab
Freight Bills will be returned by the search if their current status is of the 'Available' or 'Docked' code behavior (as configured in the Codes Maintenance program). That is, Freight Bills that are assigned to Trips will not be displayed.
Trip Tab
Trip information will be returned by the search function regardless of the Trips 'Active' status.
History Tab
The History Tab displays Shipper history. The top grid displays the Shipper Summary data ('Shipper ID', 'Name', 'Freight Bill Count', etc.) while the bottom grid displays the details of the Summary record that is selected in the top grid. When using the History Tab, two more sections are available in the Find Near Header section: 'Filter on Pickup By' and 'Group By'.