Communications Manager procedures

How do I Setup the Communication Manager to Automatically Login?
You can start the Communication Manager program automatically every time the communication workstation reboots.
-
In Windows Explorer, In the workstation’s Startup group (C:\WINDOWS\Start Menu\Programs\StartUp), click the right mouse button and select New - Shortcut.
-
In the Command Line field, enter the following text: C:\Program Files\TruckMate 20xx\COMMGR.EXE '\U:USER' '\P:password'. Replace the 'USER' value with the user name (in upper case) that you wish to use. Replace the 'password' value with the password for the specified user. Note that the path described above is the default path for TruckMate programs; modify as necessary.
How do I Link Communication Manager with my HighwayMaster Software?
HighwayMaster’s software interface is called WinHost Comm Handler. Install according to the directions provided with the software. When installation is complete, run the program and click the Options button. Configure the following options:
| For this option | Do this |
|---|---|
Directory |
Enter the path to Comm Handler’s import directory. By default, this is 'c:\hm\import'. |
Processing Interval |
Set this value to '30'. |
Processing Time Limit |
Set this value to '0'. |
Pre-process Program |
Should be left blank. |
Pause for x seconds after executing |
Should be set to '5'. |
Integration Type |
Set this value to 'General Purpose'. |
Type - Specific Options |
|
When the WinHost Comm Handler setup is complete, proceed to the Communication Manager program > HighwayMaster Tab for information on configuring TruckMate to work with the software. To set up communication Macros, refer to the Communication Macro Setup program.
How do I Link Communication Manager to my Qtracs/Cancom/Omnitracs Software?
Cancom’s (Omnitracs) communication software is called QTracs. TruckMate uses the QTracs system to provide a 24-hour two-way communications link between the dispatch office and the mobile device installed on the vehicles. In addition, QTracs can provide locations for each of your vehicles. When you link to QTracs, you can use TruckMate software to send and receive free format messages from your drivers. As well, you can take full advantage of TruckMate macro capabilities for automatic data updates.
Installing QTracs
QTracs and TruckMate’s Communication Manager program are designed to run on a dedicated PC whose sole function is to send and receive transmissions from the satellite network. If multi-company setup is required, a dedicated PC will be required for each company. To link the TruckMate system to QTracs, follow instructions included with the QTracs software, using the following parameters:
-
When you begin installing QTracs, you will be prompted for the type of installation. Select 'Administrator'.
-
At the end of the installation, you will be prompted to re-boot your PC. Select the 'Later' option.
-
MS Visual Foxpro ODBC components must be installed to support QTracs. To install, go to the file vfpodbc5.exe (located in the TruckMate directory) and double-click to run the installation. When prompted to reboot, choose Yes.
Setting Up QTracs
-
The first time you invoke the QTracs program, you will be prompted for some configuration information. Leave all settings at the default, and press OK. Next you will be prompted to log in: the user 'Supervisor' and the company 'Default' will be selected by default. Enter the password 'sup' and press 'Login'.
-
Configure the following options:
-
On the Tools menu, System Options, on the Dispatch/EAL Tab:
-
In the Dispatch Link section, check the option 'Linked to External Dispatch System'
-
In the EAL Parameters section, check the options 'Save EAL Import Files' and 'Save EAL Export Files'.
-
-
On the Tools menu, Company Options, on the EAL Tab, Link Options:
Check the options 'Enable DBF Import', 'Enable DBF Export', 'Export Macro Field Data Separately for Macro Messages', 'Export all Vehicle Position Reports', 'Export Status for Previously Imported Forward Messages', and 'Mark Exported Messages as 'Have Been Read''.
-
On the Tools menu, Communications Options, Workstation Options Tab:
-
In the Poller Type on this Workstation field, select 'Local, Autopoll' from the drop down list.
-
In the Defined Communication Instances section, click Add, change the Instance Name to 'Default' and select the applicable Communication Type, the COM port to which the modem is connected, and the Baud (the speed at which the modem communicates - 28,800 is the maximum in Qtracs 3.0).
-
-
On the Tools menu, Communications Options, System Options Tab:
In the Communications Debugging section, check Save Communications Queue Files.
-
On the Tools menu, Communications Options, Company Options Tab:
-
In the General Company Parameters section, enter your Cancom Account Number and Password.
-
In the Call/Login Parameters (Dialup Only) section, Add your Cancom access telephone number.
-
Note: If you are running Communication Manager in TruckMate 5.0 or later, with Qtracs 3.3.x or later, the regional settings on the host machine must be set to: h:mm:ss tt, where it indicates AM, PM. These settings are case sensitive (i.e., you must set AM, and PM in uppercase letters). There is no leading zero for hours.
-
-
Once you have set these, reboot the host machine and then restart Qtracs and the Communication Manager program.
-
When the QTracs setup is complete, proceed to the Communication Manager documentation for information on configuring TruckMate to work with QTracs. To set up communication macros, refer to the Communication Macro Setup program.
How do I Setup PACOS Statuses?
-
Open the Communication Manager program (COMMGR.EXE), click: Start > Programs > TruckMate > Mobile Communications > Communication Manager.
-
From the 'File Menu' select the 'Configuration' option. The Configuration window will display. If you do not see the PeopleNet Tab displayed, select the Network Tab and enable the PeopleNet Tab by selecting the checkbox next to the 'PeopleNet' option.
-
Select the PeopleNet Tab and select the button labelled 'Event Status Setup'.
-
Configure the various Status Codes as required by your Company. For more information, proceed to the Communication Manager documentation on PeopleNet and view the information under the 'Event Status Setup' option.
How do I setup driver messaging?
Driver to driver Messaging allows for drivers to send messages from any mobile network to an e-mail address or to another driver that is setup in the system. This functionality works for all supported Mobile Networks in the Communications Manager and Trimble Service Host program.
Setup: Message Driver to Driver
A driver can send a message to a 'Driver ID'. The driver must know the TruckMate code for the Driver (as configured in the Driver Profiles program) in order to send to another driver. You will have the ability to use User Defined Data types. Users can setup the messaging so that if a Driver ID is 'SAMCH001' it can be mapped to something as simple as 'SAM'.
There are a few ways that you can setup your macro in the Communications Macro Setup program. You could create one macro that encompasses all types of messaging ('Driver to Driver', 'Address Message to Distribution Group', and 'E-mail') or you could setup separate macros, depending on the situation.
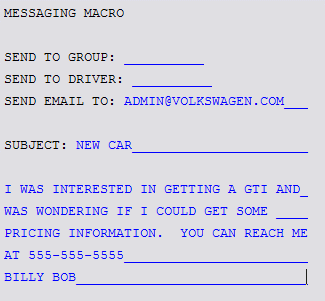
Each macro needs at least one text return action. Below is an example messaging macro:
SEND TO GROUP: __________  (02-Text-Address Message)
SEND TO DRIVER: __________ (02-Text-Send To Driver)
SEND EMAIL TO: ______________________________ (02-Text-Send To Email)
SUBJECT: ____________________________________(02-Text-Send to Subject)
_____________________________________________________________
_____________________________________________________________
_____________________________________________________________
_____________________________________________________________
_____________________________________________________________
________________________________________ (02-Text- None)
Of course this macro can be split up into multiple macros to allow only for e-mail, or sending to another driver, etc.
Sending Driver to Driver Messages
On your Mobile Device or Macro Return Emulator enter a Driver ID and a message:

Note the outgoing message for the other device:
Setting up the Driver E-mail
Using the same form created above drivers can send e-mails while out on the road. E-mail will be sent out through the Trimble Service Host program > Scheduler Emails Service using your corporate e-mail servers. Driver’s e-mail addresses are used as the from e-mail address automatically. If you do not have an e-mail address setup for the driver (in the Driver Profiles program) the system will not send out the e-mail.
-
Open the Driver Profiles program (DRIVERS.EXE).
-
Select the Phone Number/Contact Tab.
-
In the 'E-Mail' field, enter the Driver’s e-mail address.
-
Next, setup the mail server and credentials you wish to use:
-
Open the Trimble Service Host program > Scheduler Emails Properties window.
-
Choose an option in the 'Schedule' section to set the e-mail sending frequency that suits your company.
-
Choose the 'Default E-Mail Profile' used to handle your incoming/outgoing e-mail.
-
Sending Driver E-mail Messages:
Sending the message via e-mail is the same as sending to the driver. Instead of the driver name you would enter in any e-mail address:
The message will be interpreted by the Communications Manager / TMW Windows Services Host programs and then e-mailed out. These messages can also be seen in the Message Center program.
|
Please note that e-mailing is only one way: when replying to the original e-mail, all replies will go to the Inbox (or sometimes junk mail) folder of the replied address. These messages will not be received by the driver in the cab of the truck. It is also important to note that drivers should be informed that all information transmitted via a macro is 100% visible to anyone using the Message Center or Driver Call In program. There is no privacy in regards to e-mail content. |
TruckMate Windows Service Details
IT administrators can setup the new service to automatically start when Windows first boots up.
Service Setup
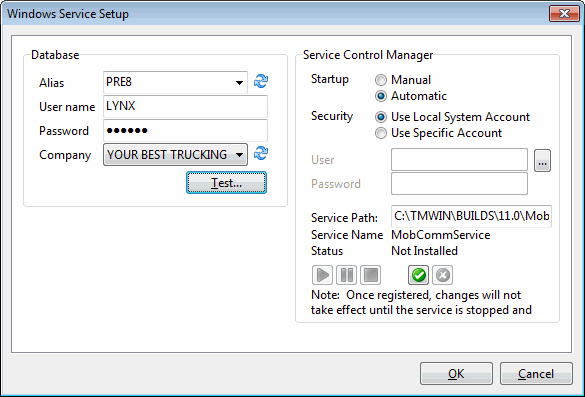
Follow these steps to setup the Communications Manager as a Windows Service:
| These steps are also valid when setting up the EDI Communications Manager as a service (they use the same setup). |
-
Select the Startup type to be 'Automatic' so that the TruckMate service can start on boot up.
-
Double check that the Service Path for the application is valid.
-
Click the 'Register' (checkmark) button to install the Windows Service.
-
Select the appropriate DB2 database 'Alias'.
-
Enter in the DB2 Database User credentials in the 'User Name', 'Password', 'Schema' and 'Company' fields.
-
Validate the Database credentials by clicking the 'Test' button.
-
If the database validation was successful, click the 'OK' button to save the changes.
-
The Database configuration is stored in the appropriate file.
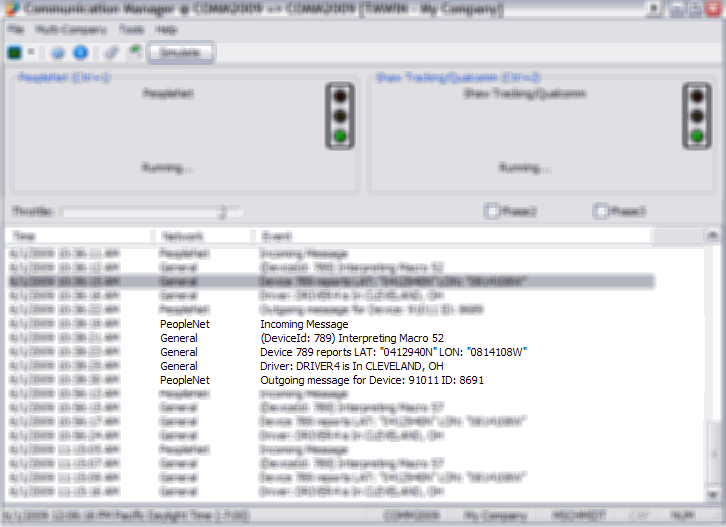
Using the Communications Manager Service
Two new icons have been added to the toolbar to stop and start the Windows service. To start the service click the green right arrow. If logging is enabled you should see some logging activity in the listview as it’s starting. To stop the service click the red stop button.
The status bar shows the current status of the TruckMate Windows Service. The types of statuses would be Stopped, Running, and Not Installed.
A new System Tray icon has been added to show the status of the TruckMate Windows Service. It is a picture of a stop light. Below are the types of stop light indicators.
-
Red - Service is Stopped.
-
Yellow - Service is stopping.
-
Green - Service is Running.
Technical Tips
Below is a table that shows how the Import/Export routines worked between the old Communication Manager and the new Communications Manager Service.
| Mobile Communications Vendor | Previous Mobile Comm. Import/Export Method | New Mobile Comm. Service Import/Export Method |
|---|---|---|
Omnitracs Qtracs/Win |
DBF/ASCII |
No change |
Xata |
ASCII files between COMMGR.EXE and AENTDIAL.EXE |
Return Messages via MESSAGE_RETURN_PENDING table. Forward Messages are stored in 'Work' variable |
GeoCom |
XML files generated by proprietary dialer |
No change |
D2Link |
Dialer table and MESSAGE_RETURN_PENDING |
No change |
PeopleNet |
ASCII files between COMMGR.EXE and PPLCOMM.EXE |
Return Messages via MESSAGE_RETURN_PENDING table. Forward Messages are stored in 'Work' variable |
FleetMind |
MES files generated by proprietary dialer |
No change |
Transcore GlobalWave (Vistar) |
ASCII files between COMMGR.EXE and VISCOMM.EXE |
Return Messages via MESSAGE_RETURN_PENDING table. Forward Messages are stored in 'Work' variable |
The 'Work' variable is an object in memory. The specific Mobile Communications thread will store the export information into that variable. The dialer object will constantly read from that variable, process the data, and send out the data to the third party Mobile Communications network. This method is more efficient and quicker than reading/writing to ASCII files.
Return Messages, positions, and statii will be stored in the MESSAGE_RETURN_PENDING instead of the ASCII file. This way the dialer code can quickly insert the data into the MESSAGE_RETURN_PENDING table and perform other tasks. Meanwhile at the same time the specific Mobile Communications thread is processing the various messages from the MESSAGE_RETURN_PENDING table.