GL Journal Entries

The primary purpose of the General Ledger Journal Entries program is used to make and edit manual journal entries. In addition it has some secondary functions which make recurring journal entries easier.
The program screen offers a main screen, divided into areas: the journal entry area, batch information grid, button bar, and a data sheet view. The journal entry area offers a form based mode of entering journal entries. The batch information grid offers summary totals of the various manual entry batches which are currently un-posted. The button bar offers the user access to the usual record control buttons as well as some special function buttons. Finally the data sheet view is a pop-up form that allows entries to be made in a ledger format.
To access GL Journal Entries:
| From this location | Go to |
|---|---|
TruckMate Menu and TruckMate Task List |
Accounting & Finance > General Ledger > GL Journal Entries |
Windows Start Menu |
TruckMate 20xx > GL Journal Entries |
Windows Explorer |
C:\Program Files (x86) > TruckMate 20xx > Gje.exe |
How Do I?
How do I Make Manual Journal Entries and Period-End Currency Adjustments?
Manual Journal Entries:
-
Open the GL Journal Entries program (GJE.EXE).
-
Select the "+" to add a new record.
-
Enter a batch number of your choosing. When manually entering journal entries, you can enter a batch code of up to ten characters in the Batch field. The batch code can be used to group manual journal entries together so that the system knows which entries to use when calculating the Batch Totals.
-
Enter the details of the entry and then save your entry using the 'checkmark' button from the navigational bar.
-
When all the entries have been made, the entry can be posted through the GL Journal Entries Register.
Month-end Currency Adjustments:
| Ensure that all outstanding registers and entries for the month have been posted to the General Ledger prior to running the currency adjustments. |
-
Open the GL Journal Entries program (GJE.EXE), click: Start image: > Programs image: > TruckMate image: > Accounting & Finance image: > General Ledger image: > GL Journal Entries
-
Click on the blue calculator icon known as your "Calculate Foreign Exchange" button. This is on the main navigational bar.
-
The Period End Currency Adjustments dialog box will open. Enter the appropriate information. Refer to the online help for this topic for more information.
-
After completing the Period End Currency Adjustment information, select the "Create Journal Entry" button in the bottom right-hand side of your screen.
-
Update the entries through the GL Journal Entries Register.
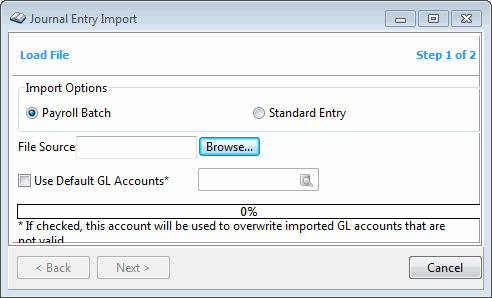
How do I import Journal Entries (Standard or Payroll) from third-party accounting software?
Two types of Journal entries can be imported in TruckMate, 'Payroll' journal entries, those entries can be imported when a payroll batch has been processed by a third-party accounting software package (i.e. ADP), in which case the GL Journal Entries can be imported back into TruckMate accounting for final processing. And the 'Standard' journal entries, those entries are accounting entries of any type other than 'Payroll', also processed by a third party accounting software. The steps for both import types are almost the same, with the exception of selecting the type of Journal Entry you wish to import.
-
Open the GL Journal Entries program (GJE.EXE).
-
On the program toolbar, select the 'Import Journal Entry' button (
 ).
). -
The Journal Entry Import wizard will display. Select the Import Option ('Payroll Batch' or 'Standard Entry').
-
Browse to the location of the file you want to import.
Note: If you selected to import a 'Payroll Batch' type of journal, ensure that the 'Use Default GL Accounts' field is left un-checked. Also ensure that the 'batch_id' in the import file matches the 'batch_id' that was sent during the ADP Payroll export, or else the import will fail.
-
Select 'Next'. A successful import will bring up a screen detailing all of the records that will be imported into TruckMate. Select the 'Finish' button to complete the import.
-
Once import is complete, you’ll see an entry in the GL Journal Entries program with the same 'Batch ID' as the one you imported.
-
Review the imported records and then run the GL Journal Entries Register program once accuracy is verified.
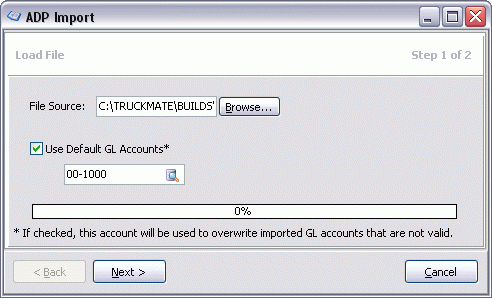
Using the ADP Import window
Step One - Load File
The First section of the ADP Import window is used to specify the import file you will be using and to set the import behaviour for your existing GL Accounts.
File Source
Select the Browse button to access your system hard drive, and go to where the import file is located.
Use Default GL Accounts / Account ID
If you wish to overwrite invalid GL Accounts during the Import, select this checkbox, then use the Database search button to select a GL Account. When an Invalid account is found during the import process, the GL Account you specify here will be used instead.
When you have configured these two steps, select the 'Next' button.
Menu Bar / Toolbar
File Menu
ADP Import
![]() Selecting this option will open the ADP Import window, which will allow you to import journal entries from ADP after it has processed the payroll.
Selecting this option will open the ADP Import window, which will allow you to import journal entries from ADP after it has processed the payroll.
Exit
![]() Selecting this option will close the GL Journal Entries program.
Selecting this option will close the GL Journal Entries program.
Multi-Company Menu
For more information on the Multi-Company options available from the Menu Bar, see the Multi-Company documentation.
Navigate Menu
The Navigate Menu contains the standard TruckMate Navigation Bar, used to browse your Database records.
Tools Menu
TruckMate Monitor
![]() Click the down arrow next to this button to access the various functions of the new TruckMate Monitor.
Click the down arrow next to this button to access the various functions of the new TruckMate Monitor.
Remember Position / Size
Selecting this option will maintain the program window position and size upon close. When the program is re-opened, it will appear the same.
Datasheet View
![]() Click the 'Data Sheet View' button to open the Data Sheet View form. See the section on the Data Sheet View below for more information.
Click the 'Data Sheet View' button to open the Data Sheet View form. See the section on the Data Sheet View below for more information.
Calculate Foreign Exchange
![]() Click on the 'Calculate Foreign Exchange' button to display the Period End Currency Adjustments form. See the Period End Currency Adjustments section for a description of this function.
Click on the 'Calculate Foreign Exchange' button to display the Period End Currency Adjustments form. See the Period End Currency Adjustments section for a description of this function.
Create Foreign Exchange Entry
![]() Click on the 'Create Foreign Exchange Entry' button to automatically calculate and add a foreign exchange entry based on your foreign exchange rates. This function applies in cases where a batch references an account (or accounts) that is assigned to foreign currency.
Click on the 'Create Foreign Exchange Entry' button to automatically calculate and add a foreign exchange entry based on your foreign exchange rates. This function applies in cases where a batch references an account (or accounts) that is assigned to foreign currency.
For example, you create a journal entry that details a $100 USD purchase funded from your US bank account, and expensed to your office expense account, which is a CAD account. If your current exchange is $1.30, a foreign exchange entry of $30 will be automatically entered into your batch using the foreign exchange account associated with the foreign currency account.
Reverse Journal Entry
![]() The 'Create Reversing Journal Entry' button works similarly to the button above, except that it only reverses the entry currently displayed.
The 'Create Reversing Journal Entry' button works similarly to the button above, except that it only reverses the entry currently displayed.
Toggle Group Hold
![]() Selecting this option will toggle the 'Hold' flag value from unchecked ('False') to checked ('True') for the displayed Batch. See the 'Hold' flag description in the Header section for more information.
Selecting this option will toggle the 'Hold' flag value from unchecked ('False') to checked ('True') for the displayed Batch. See the 'Hold' flag description in the Header section for more information.
Reverse Batch
![]() Click the 'Create Reversing Journal Entries for Batch' button to create reverse postings for a batch. The Batch Reverse function will create the same journal entries as were in the original batch, but with debits instead of credits (or vice versa). The reversing entries will be included in a batch that has the same batch code as the original batch with the suffix of '-R'. The date on the reversing journal entries will default to the first day of the period following the original batch. This option can only be used with manual journal entries.
Click the 'Create Reversing Journal Entries for Batch' button to create reverse postings for a batch. The Batch Reverse function will create the same journal entries as were in the original batch, but with debits instead of credits (or vice versa). The reversing entries will be included in a batch that has the same batch code as the original batch with the suffix of '-R'. The date on the reversing journal entries will default to the first day of the period following the original batch. This option can only be used with manual journal entries.
Refresh Batch Totals
![]() Click this button to refresh the Batch Information Grid.
Click this button to refresh the Batch Information Grid.
Memorize Batch… / Recall Memorized Batch…
The Memorize Batch / Recall Memorized Batch functions allow you to store batches of journal entries which recur periodically.
For example: whenever a piece of equipment is purchased, you must key a dozen separate journal entries to record the transaction.
Instead of looking up the previous entries to confirm which accounts were used and how the transaction was distributed to the various accounts, you can use the memorize batch function to copy the entries to a list of memorized batches. You can then look up the batch and copy the entries into a new set of entries which you then edit and post.
Memorize Batch
![]() After you click on the 'Memorize Batch' button, you will be prompted for a description to label the memorized entries with, which will be displayed when you recall the memorized batch of journal entries.
After you click on the 'Memorize Batch' button, you will be prompted for a description to label the memorized entries with, which will be displayed when you recall the memorized batch of journal entries.
Selecting the 'Memorize Batch' button will open the Memorize Transactions window, which allows you to set several parameters related to the Memorized Batch you will be creating.
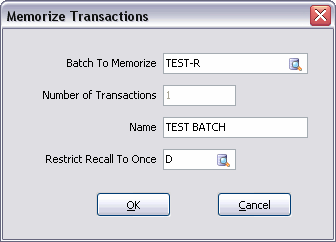
Configure all of the following options for the Memorized Batch:
Field |
Definition |
Batch to Memorize |
This field will default to the 'original batch' (batch to be remembered), which is usually the batch of the currently displayed transaction. However, you are allowed to over-ride this (via the Database Search button) to select any (not yet memorized) 'Batch ID' in your system. In fact, unlike in prior versions of TruckMate, you may access this screen even when the transaction currently displayed in the main form does not have a 'Batch ID'. |
Number of Transactions |
This value will default based on the number of transactions in the batch to be remembered (to help confirm that the correct batch is selected). This value is read-only. |
Name |
Provide the Memorized Batch with a Name to aid in recalling the Memorized Batch later on. |
Restrict Recall To Once |
When Memorizing a Batch, this field allows it to be restricted to one use/recall per a selected period ('Never', 'Daily', 'Weekly', 'Monthly', or 'Yearly'- the same choices as the 'frequency' value in AP Memorized Transactions). |
Recall Memorized Batch
![]() When you click on the 'Recall Memorized Batch' button, the Recall Memorized Transactions window will appear where you can select the Memorized Batch to recall from a list.
When you click on the 'Recall Memorized Batch' button, the Recall Memorized Transactions window will appear where you can select the Memorized Batch to recall from a list.
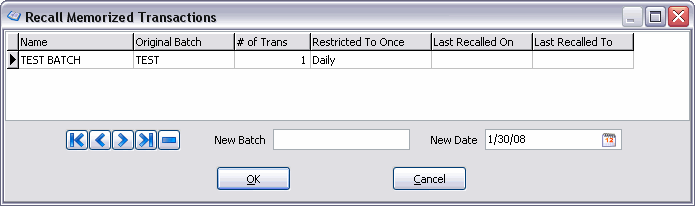
To complete the recall process you must highlight the memorized set of entries you wish to recall, enter a 'Batch ID' to apply to the recalled entries, and finally specify a date to apply to the new entries. Click on the 'OK' button to create the new entries.
When recalling a batch, you will get an error if the batch has been restricted to once per a certain period. For example, suppose a batch restricted to once monthly shows Last Recalled On = 1st or 2nd day of current month, and Last Recalled To = last day of previous month. You would be able to recall the batch to any date in the current month, but not to any date in the previous month. The error message will indicate who has already recalled the batch.
|
Window Menu
GL Journal Entries Register
![]() Selecting this option will open an instance of the GL Journal Entries Register program.
Selecting this option will open an instance of the GL Journal Entries Register program.
GL Chart of Accounts
![]() Selecting this option will open an instance of the GL Chart of Accounts program.
Selecting this option will open an instance of the GL Chart of Accounts program.
Toolbar
Import from External Payroll
![]() This option allows the user to import GL Journal Entries from ADP (or any supported third party accounting software package) back into TruckMate accounting after they have been processed as a payroll batch.
This option allows the user to import GL Journal Entries from ADP (or any supported third party accounting software package) back into TruckMate accounting after they have been processed as a payroll batch.
| For an import to succeed the 'Batch_ID' of the import file must match the 'Batch_ID' that was sent to ADP during the ADP Payroll Export process. If these values do not match, the import will fail, and the user will receive an error message. |
Header Information
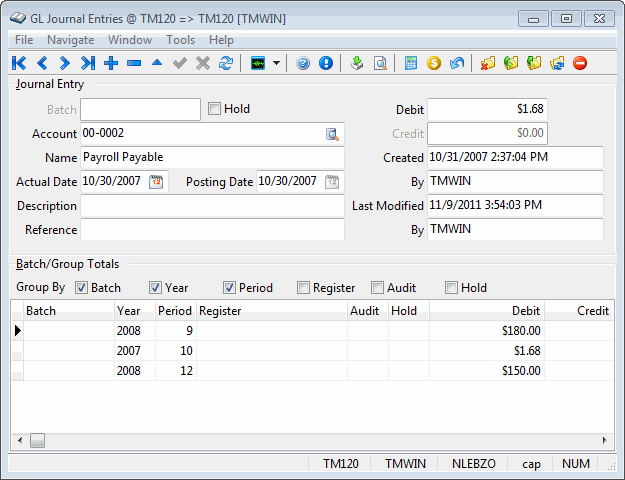
Batch
The 'Batch' field is one of the ways the system differentiates manual journal entries from those generated from sub-ledger registers. When manually entering journal entries, you can enter a batch code of up to ten characters in the Batch field.
The Batch code is used to group manual journal entries together so that the system knows which entries to use when calculating the Batch Totals. Batch codes are also used to create memorized batches. You can also specify a batch when updating journal entries with the GL Journal Entries Register program.
Hold
The 'Hold' flag (true/false) can will set a specific GL Batch ID to 'Hold' status, and will apply to each GL transaction in that Batch. Users can update it in one of three ways:
-
Check / uncheck the box on main screen for currently displayed transaction.
-
Double-click the 'Hold' column in Data Sheet View window’s grid to toggle hold status on single transaction.
-
Double-click the 'Hold' column in the Batch/Period Totals Grid on main screen (or use Menu Bar / Toolbar button) to toggle hold status on all transactions in the group.
Since the last method can affect many transactions, the user will be prompted before the update is actually performed. The prompt will indicate how many transactions will be affected. Also, a new column in the group grid will display the number of transactions in the group so user will know how many flags they will reset before they even do the double-click.
| Batch IDs set to 'Hold' will not be included when the GL Journal Entries Register program processes the records. |
Account
You can either key in a general ledger account or open a search form by clicking on the search button to the right of the field.
Name
Once an account is designated in the field above, the description of the account selected is automatically filled into this field from the chart of accounts.
Actual Date
You must supply a date for the transaction. When you are making multiple entries for a batch, this value will default to the date from the last entry. Users should note that the system will not restrict you to entering the same date for the debit and credit sides of a transaction, so you should be careful to not make entries that span multiple periods. As with most date fields in the TruckMate system, clicking on the down arrow to the right of the field opens a calendar which you can select a date from.
Posting Date
This is a read only field which displays the actual date the transactio will be posted to GL. This field was introduced to have a distinction between the date the transaction was actually entered to the system 'Actual Date' and the date the posting will be done (a calculated read-only field).
Description
This free format text field is provided for additional notes to describe the transaction. If you are making many entries, it will default to the description used in the last entry.
Reference
This field is similar to the above field and is provided to enter an alternate description or code for reporting and reference.
Debit / Credit
Enter the amount of the posting into either the Debit or the Credit field. The program will not allow you enter values into both fields.
Batch/Period Totals
The Batch / Period Totals Grid shows you the total debits and credits by period for each currently un-posted batch. As you are keying your journal entries, you should refer often to this grid to ensure you are completing balanced entries for the batch and not making entries that span periods as in the example below.
Group By
The 'Group By' option allows you to sort the records in the Batch/Period Totals Grid using 5 new flags: by 'Batch', 'Year', 'b', 'Register' and 'Audit'. You may check any combination of these 5 checkboxes, then select the 'Refresh Batch Totals' option (via the Menu Bar / Toolbar, or by using the <Ctrl><T> hotkey), and the grid will refresh according to your selections. For each grouping you did NOT check, the corresponding column in the grid will be blank. A row will be displayed (with debit / credit totals) for each unique combination of your checked groupings.
For example, if you checked none of the 5 grouping options, the grid will only show a single row with total debits and credits for all non-posted transactions in the system (regardless of batch, period, etc). If you check all 5 checkboxes, you will get the most detailed breakdown (most rows in grid). The status (checked or unchecked) of these 5 options will be "remembered" to the system registry (by user / machine) when you close the program so that they will be the same the next time you run the program. For the first time you run the program on a machine, the default will be that batch, year, and period are checked, and register and audit are not.
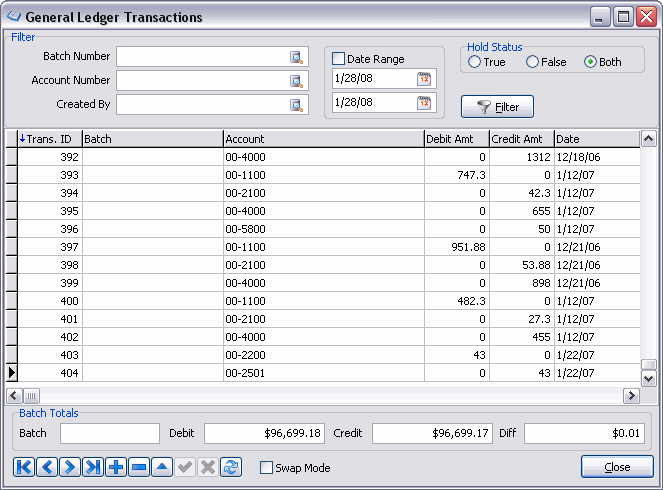
Data Sheet View
The Data Sheet View window is divided into a filter section in the top part of the screen, the journal entries grid, and a batch totals section at the bottom of the screen. As with the main screen, the journal entries shown are un-posted journal entries - that is journal entries which have not been locked by the GL Register and assigned an audit number. Unlike the main screen, this screen will also show journal entries created by the sub-ledger registers, so users should take advantage of the filter options to ensure they are viewing and editing those journal entries they should be viewing and editing.
| This screen can be maximized to take advantage of monitors with greater than 800 x 600 resolution. |
Filter Options
You can filter the journal entries in the grid by one or a combination of: Batch Number, Account Number, Created By, or Date Range. There is currently no provision for specifying multiple batch id’s or account numbers or users in the filters. Only one value for each is allowed.
Batch Number
Use the Database search button to filter the records by their Batch Number (displayed in the 'Batch' column in the grid), which is the same thing as the batch field in the main screen.
Account Number
Use the Database search button to filter the records by their Account Number (displayed in the 'Account' column in the grid), which is a general ledger account number.
Created By
Created By refers to the user who made the journal entry. Users should note that entries created by sub-ledger registers show a created by which corresponds with the user who posted the register.
Date Range
Date range refers to the transaction dates assigned to each entry. If, for example, the debit and credit totals for the entries made in the month of July do not balance, you can filter for only those entries made in the month by setting this range. As with other date ranges in the TruckMate system, you can use the right mouse click over the date range fields to get a list of date functions to quickly set the date range.
Hold Status
These three options allow you to filter records based on their 'Hold' status: select 'True' to view only held records, or 'False' to view records that are not set to 'Hold'. Select 'Both' (default) to view both held and un-held records.
Filter
Once you have set your filter criteria, click on the 'Filter' button to refresh the grid display to match your criteria. To clear your filter criteria, you must delete the values in the filter fields and click on the Filter button again.
Journal Entries Grid
The grid offers essentially the same fields as the journal entry area in the main screen. Because the data sheet view also includes entries from the sub-ledger registers, Source Journal and Source Audit also appear in the grid. You may sort the grid entries by either Batch or Account by double-clicking on the column description.
Known issues:
-
Column sorts do not offer option to sort 'Z-A', only 'A-Z'.
-
There is no way to clear the column sorting once it has been applied.
Seq ID
Whenever a GLTRANS Table record is created, this field defaults to be the same value as the 'Trans.ID'. However, you may manually change each 'Seq.Id' value to whatever (integer) value you like. Thus, if you are sorting by 'Seq.ID' (you title-clicked the column so it has a blue arrow), then you are able to manually sort the rows any way you like.
Hold
This field displays the 'Hold' status of the specific item, either 'True' or 'False' depending on if the record (or batch) has been set to 'Hold' on the main Journal Entries program screen.
Batch Totals
The batch totals area offers the same information as the batch totals in the main screen. As you move through the different batches in the journal entries grid, the batch totals change to reflect the totals for the batch corresponding to the currently highlighted entry.
Swap Mode
If the 'Swap Mode' flag is checked:
-
You WILL be able to swap the 'Seq ID''s on 2 rows by dragging one row onto another (again, if you are sorting by 'Seq ID', then the rows will swap positions in the grid).
-
You will NOT be able to title-click (change sort column), edit data in a row, or insert a new row (so make sure to un-check 'Swap Mode' when finished swapping).
Period End Currency Adjustments
The Period End Currency Adjustment Window is used to create journal entries that account for currency fluctuations. For example, say that you had $1000 in your US bank account at the end of June. The exchange rate at that time was 1.32%. Now, at the end of July, the exchange rate is 1.35% and your US bank account balance is undervalued. At the end of each accounting period (as defined on the Periods tab of the GL Chart of Accounts program) you can run a Period End Currency Adjustment to create journal entries that account for the fluctuation in currency.
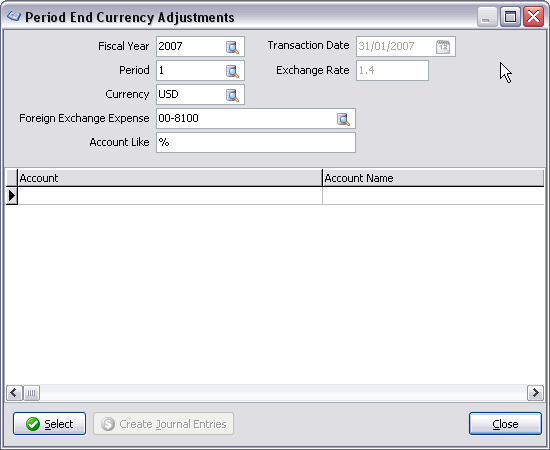
Fiscal Year
Use the Database search button to select the fiscal year for which you wish to make currency adjustments.
Period
Use the Database search button to select the period within the selected Fiscal Year for which you wish to make currency adjustments.
Transaction Date
Will default to the last day of the month for the Period and Fiscal Year selected.
Exchange Rate
Will default to the exchange rate entered on the GL Chart of Accounts program > Currency Tab. The exchange rate entered against the exchange date that most closely matches the Transaction Date will be used.
Currency
Select the currency that you wish to convert. That is, journal entries will be created to account for the change in the difference between the currency selected here and the currency specified as the base currency in the Codes Maintenance program.
Foreign Exchange Expense
Select the account that will receive the offsetting entries. Only accounts of the 'Foreign Exchange Expense' type will be available for selection. Depending on the type of account and its debit / credit balance, the account selected here will be debited or credited for the original exchange amount (according to the currency rate closest to the transaction date) and debited or credited for the exchange amount calculated based on the exchange rate closest to today’s date. For example, an asset account (such as a bank account) has a balance of US$100 on January 31. The exchange rate is 1.32. On February 28, the exchange rate is 1.35. If you create a Period End Currency Adjustment for February 28, the Foreign Exchange Expense account will be credited with the original exchange amount ($32.00) and debited with the current exchange amount ($35.00). If the account were of a liability type, however, the Foreign Exchange Expense account would be debited with the original exchange amount and credited with the current exchange amount.
Account Like
Is used to select accounts that will be included in the currency adjustment. To include all accounts of the currency specified in the Currency field, enter a '%' symbol. To select a specific account, enter the account number in this field. To select accounts according to the account code’s number convention, use the wildcard in conjunction with a portion of the account code. For example, to include all account codes that begin with the prefix '01', '01-%'.
Select
After you have entered all the selection criteria, click the Select button. This will display all accounts that are applicable.
Create Journal Entries
Will create journal entries with the batch code 'Curr Adj'. Four entries will be created for each account included. The original exchange value and the new exchange value will be debited and credited (or vice versa, depending on the account type) to the Foreign Exchange Expense account, as described above. Offset postings will be created for the sub accounts of the selected accounts. For example, if the account that is being adjusted is the Accounts Receivable US control account, the system will create offset postings in the lowest numbered sub account of the A/R US Control account that is of the same currency as the Base currency (as configured in the Codes Maintenance program).
Multi Company Functionality
For multi-company databases, GL Journal Entries displays transactions that either a) will be posted to the current login company, or b) were created by a user while logged into the current login company. That is, for inter-company transactions, you will only see all transactions related to the batch in the login company, while in the "other company" of the inter-company batch, you will only see accounts for that company.
For example, suppose you log in to company 1 and:
-
Create an inter-company debit to company 2 GL account 'Y'
-
Create a "regular" credit to company 1 GL account 'Z'
In company 1, I will see both these transactions as well as a "due from" debit to a company 1 GL account and a "due to" credit to a company 2 GL account. So, in company 1, I see 4 transactions. In company 2, I only see 2 transactions: the first (debit) amount (to account Y) and the "due to" (credit) amount. In company 2, I see neither the posting to account Z nor the "due from" transaction.
Multi-Currency for Inter-Companies
If you setup inter-company (I/C) accounts for each currency (in company profiles), create a GL Journal Entry with InterCompany checked, and select a GL account that is in a foreign currency for that company, then the correct I/C GL account will be used and the amount will NOT be converted to base currency.
Also, if you run the 'Create Foreign Exchange Entry' option on a foreign currency I/C transaction, then that company’s exchange rate will be used, not the login company’s rate.