Resource tabs procedures

This section includes procedural details for assigning and removing resources such as Drivers and Equipment. Resources can be assigned to the leg of a trip or a complete trip, however when multiple legs exist the resource will be automatically assigned to all legs subsequent to the selected leg.
Drivers Tab
How do I Assign A Driver to a Trip?
To assign a driver to a trip, make sure the desired trip and leg are selected in the Trip grid (the selected trip is indicated by the black arrow on the left grid margin). Double click on the driver you want to assign. You will be asked if you also want to assign the power unit and trailer that were assigned to the same trip as the driver’s previous trip. If there are multiple legs on the trip, the driver will be assigned by default to all legs subsequent to the leg currently selected in the Trip grid. Notice that the Status of the driver in the Driver grid will change to the same status as the trip (the default is "ASSGN"). The driver’s status will continue to be updated with the statuses that are assigned to trip.
How do I Assign a Driver to a Leg of a Trip?
To assign a driver to a leg using the Quick Match function, click in the Driver field and enter the desired Driver ID (as configured in the Driver Profiles program). Note that if you are assigning a driver to a trip that is already active, when the leg that the driver was assigned to is activated, the system will notify you if the new driver’s Current Zone differs from the Leg From Zone of the trip leg. An "empty trip" will be created to account for the location change. This is the same as the Reposition function, where trips can be created and completed automatically by the system. Driver pay (as applicable) will be calculated for the "empty trip".
How do I De-Assign a Driver from a Trip Leg?
To remove a driver from a leg, click in the Driver field and hit the <Delete> key on your keyboard. Drivers can be removed from any Active or Planned leg, but not from Completed legs. If the leg from which the driver is de-assigned is active, you will be prompted to specify the location where the driver is unmatched from the trip. This will become the driver’s Current Zone. The driver will be removed from the current leg, and from all subsequent legs.
Carriers Tab
How do I Assign a Carrier (Interliner) to a Trip?
The Carrier option provides the ability to assign a Carrier (Interliner) to a trip from the Carrier Information window. The Carrier Information window is divided into 3 tabs to complete assignment, contract negotiations and payments:
-
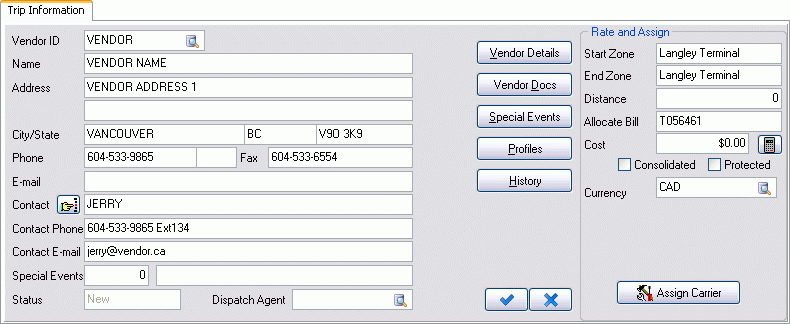
Trip Information Tab: provides the carriers summary and detailed information, rate details and trip assignment.
-
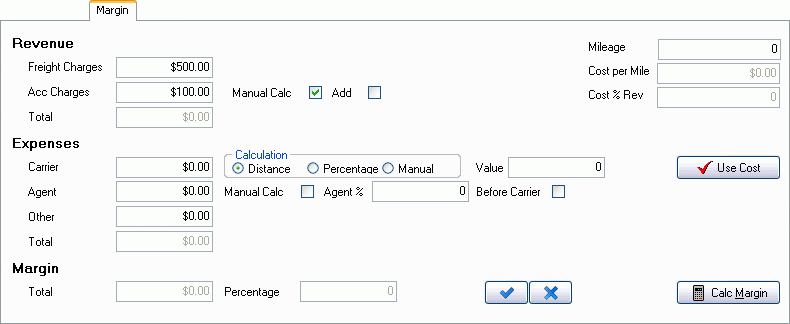
Margins Tab: provides the ability to calculate costs/margins during negotiations by providing Revenue amounts, Expense entry, Cost per Mile and Cost % Revenue on one tab.
-
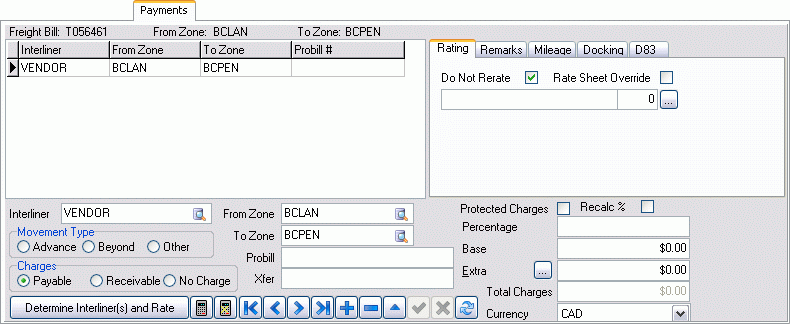
Payments Tab: used to view/update the details of the interliner pay record.
Regardless of the Tab selected, the lower panel displays 2 grids of information:
-
Freight Bill Information: displays pertinent details for all freight bills assigned to the trip leg.
-
Trip Leg Information: displays pertinent details about each trip leg. If the trip has multiple legs, the leg from which the Carrier option was invoked and all subsequent legs will be displayed.
| Interliners are created in the Customer & Vendor Profiles program > Vendors Tab. Only vendor records with the Vendor Type of 'Interliner' will be available for assignment. |
-
In the Dispatch program > Trips Grid select the trip requiring carrier assignment.
-
Select the Carrier tab, in the grid double-click on the Carrier to add. The Carrier Information window displays.
-
On the Trip Information Tab vendor information displays. The current contact information for the vendor can be modified and these changes retained for this trip only.
-
Status: The Assignment status can include New, Negotiate, Assign and Rejected depending on the current state of the negotiation.
-
Dispatch Agent: to define a dispatch agent for the trip, click the search button and select the Vendor/Employee on the search/select window. Depending on your configuration this option provides a list of Vendors or Employees.
More detailed Carrier Information is available, as follows:
-
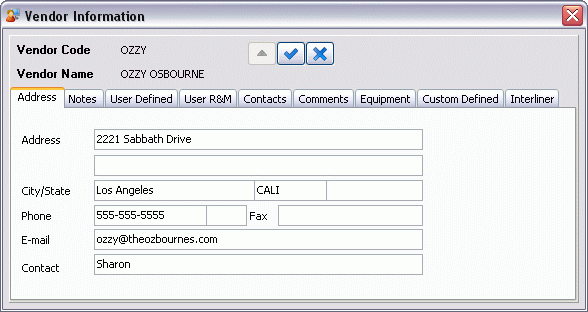
Vendor Details button: displays Notes, Contact Info, User Defined field information and more on the Vendor Information window.
-
Special Events button: displays the carrier’s special events in the Special Events window and the ability to add new events is also available. .
-
Profiles button: launches the Customer & Vendor Profiles program.
-
History button: provides the ability to view historical vendor information by specifying search criteria on the Interliner History window.
In the Rate & Assign panel the following information is available:
-
Start Zone: displays the Start Zone for the trip leg that is currently selected in the Trip Leg Information grid.
-
End Zone: displays the End Zone for the trip leg that is currently selected in the Trip Leg Information grid. This value works in conjunction with the Mark End Leg menu option in the Trip Leg Information grid. For example, if you are assigning an interliner to the last leg of a trip, you must use the Mark End Leg function to indicate that the last leg is the leg on which the interliner will be active.
-
Distance: displays the leg distance, provided by your mileage software.
-
Allocate Bill: displays the freight bill number currently selected in the Freight Bill Information grid. Note that you can split interliner charges across more than one freight bill by selecting a Cost Allocation Rule in the Freight Bill Information section. If you have elected to do this, the Allocate Cost to Bill field does not apply as only one freight bill number can be displayed.
-
Cost: displays the interliner’s charge, as calculated from the rate sheet attached to the interliner in the Rates Maintenance program or from the Margins tab when the Use Cost button is selected. If the interliner has no rated charge, you can manually enter a charge in this field before clicking the Assign Carrier button.
-
Consolidated: select this checkbox to consolidate the rating across all freight bills for the selected leg. Once selected, define one or more of the following values to be used in the consolidated rating, as follows:
-
Service Level: click the search button and select the Service Level.
-
Equipment: click the search button and select the Equipment Class.
-
Commodity: click the search button and select the commodity.
-
-
Protected: click on the Protect box to include the interliner charges in the freight bill’s total charges (as displayed on the Billing tab in the Customer Service program, in the Total Charges field). If a freight bill’s interliner charges are protected, you will bill your customer for amounts from Detail lines, Accessorial Charges and the interliner charges. If the interliner charges are not protected, they will not be added to the freight bill’s total charges, and your customer will only be billed for the amounts from Detail lines and Accessorial Charges (as applicable). This box can be checked by default by setting the Enable IP Protected option in the Application Configurator program.
-
Currency: defaults according to the interliner’s default currency in the Customer & Vendor Profiles program. You can select a different currency from the drop down list box.
-
-
Select the Margins tab to calculate actual revenue based on expenses during carrier negotiations.
-
Determine Revenue: click the Calc Margin button to display the Freight Bill charges and Acc. (Interliner) charges.
-
Acc. Charges: to modify Interliner charges select the Manual Calc. checkbox and enter the amount. To include this amount in total, select the Add checkbox.
-
Enter Expenses:
-
Carrier: enter carrier charge amount and define the charge calculation type from the 3 available options:
-
Distance: to calculate based on distance, select this option and enter the rate in the Value field.
-
Percentage: to calculate based on a percentage of total, select this checkbox and enter the percentage in the Value field.
-
Manual: enter total charges amount.
-
Agent: where applicable enter total agent charges and select the Manual Calc checkbox.
-
Other: enter any additional expenses.
-
-
Click the Calc Margins button.
Note: Click the Calc Margin button at any time to re-calculate.
-
View Margins. Displays total and percentage amounts.
-
View Costs, includes Cost per Mile, Cost % Rev and total Mileage.
Select Save.
-
-
Click the Use Cost button to replace the original costs. The new cost displays in the Cost field of the Rate rand Assign panel on the Information tab.
To view or modify the payment details, select the Payments tab. Refer to Customer Service Interline Payables Tab for details on this information.
On the Trip Information Tab, select the Assign Carrier button. This assigns the interliner to the trip leg(s), and creates an interliner payable on the associated freight bill(s).
| Interliner payments can be configured to rate automatically, based on the setup in the Rates Maintenance program > Rate Sheet Tab. Interliner pay records are attached to the freight bills associated with the legs, and can be viewed on the IP Tab of the Customer Service program. |
Select the Contract button to view and print a copy of the contract from the Reports Selection window. The Crystal Report templates supplied with the TruckMate system is called 'IPCONTRACT.RPT'.
For more information on report functionality in TruckMate, see the Crystal Reports Reference.
OR
Select the Send Offer button to e-mail or fax the contract to the carrier.
How do I Select an Outside Carrier for a Trip?
There are a couple of ways to do this. It can be done from the Dispatch screen (double clicking on the Carrier column) or from Customer Service (I/P tab).
From the I/P tab in Customer Service
-
Open the Customer Service program (CSERV.EXE). Go to the Interliner Tab.
-
Press the search button beside the Interliner Field to select a carrier to assign this load to.
-
Select a movement type. Advance = carrier picks up from shipper and drops it to main carrier for delivery to customer; Beyond = main carrier drops to Interliner for delivery to customer; Other = open for other scenarios, i.e. Interliner moving it from one midpoint to another.
-
Determine whether it is a Receivable (billing the Interliner) or Payable (billing the Customer).
-
Select the 'From' and 'To' zones the Interliner for the lane the Interliner will move this Freight bill in.
-
Enter the Interliner Probill number in the Probill field, if it is available.
-
Enter any remarks in the remarks field, as deemed necessary.
-
Select the Mileage Tab, determine the type of measurement (miles or kilometres) and the system will pull the miles by pressing the Calc Mileage button.
-
Select whether the charges are Protected or not
-
If the Interline Carrier is going to get a percentage of the revenue of the load, put the percentage amount in the percentage field or type the agreed upon rate in the Base field.
-
If there are extra charges agreed upon, press the search button and select the appropriate charge.
-
Determine the currency and then save the order.
For orders tracked in the system
If the order being given to an Interliner is to be tracked in the system, go through the dispatch process in the Dispatch program:
-
Open the Dispatch program (DISPATCH.EXE). Double click on the Carrier column in the Trip Grid.
-
Enter the Carrier Code in the "Search" field (or the first letter) and press enter. Then highlight the correct carrier and press the Assign Carrier button.
-
Select a movement type. Advance = carrier picks up from shipper and drops it to main carrier for delivery to customer; Beyond = main carrier drops to Interliner for delivery to customer; Other = open for other scenarios, i.e. Interliner moving it from one midpoint to another.
-
Determine whether it is a Receivable (billing the Interliner) or Payable (billing the Customer).
-
Select the 'From' and 'To' zones the Interliner for the lane the Interliner will move this Freight bill in.
-
Enter the Interliner Probill number in the Probill field, if it is available.
-
Enter any remarks in the remarks field, as deemed necessary.
-
Select the Mileage Tab, determine the type of measurement (miles or kilometres) and the system will pull the miles by pressing the Calc Mileage button.
-
Select whether the charges are Protected or not.
-
If the Interline Carrier is going to get a percentage of the revenue of the load, put the percentage amount in the percentage field or type the agreed upon rate in the Base field.
-
If there are extra charges agreed upon, press the search button and select the appropriate charge.
-
To print the contract, press the Contract button.
-
Close the window and then the order can be run through the regular dispatch process.
How do I De-Assign a Carrier from a Trip?
A Carrier can be de-assigned from a trip during negotiations (Status = Negotiate) or when the carrier has Rejected the load (Status = Assign).
-
In the Dispatch program > Trip Grid, select the trip requiring carrier de-assignment.
-
On the context menu, select Carrier. The Carrier Information window displays.
-
In the Trip Leg Information grid, select the trip leg to de-assign.
-
On the context menu, select Deassign Carrier. The Carrier is de-assigned from the trip.
Power Units Tab
How do I Assign Power Units?
To assign a power unit to a leg using the Quick Match function, click in the power unit field and enter the desired power unit ID (as configured in the Power Unit Profiles program). Note that if you are assigning a power unit to a trip that is already active, when the leg that the power unit was assigned to is activated, the system will notify you if the new power unit’s Current Zone differs from the Leg From Zone of the trip leg. An "empty trip" will be created to account for the location change. This is the same as the Reposition function, where trips can be created and completed automatically by the system.
How do I De-Assign Power Units?
To remove a Power Unit from a leg, click in the Power Unit field and hit the <Delete> key on your keyboard. Power Units can be removed from any Active or Planned leg, but not from Completed legs. If the leg from which the Power Unit is de-assigned is active, you will be prompted to specify the location where the power unit is unmatched from the Trip. This will become the Power Unit’s Current Zone. The Power Unit will be removed from the current leg, and from all subsequent legs.
Trailers Tab
How do I Assign Trailers?
Trailer / Trailer 1
To assign a trailer to a leg using the Quick Match function, click in the Trailer / Trailer 1 field and enter the desired Trailer ID (as configured in the Trailer Profiles program). Note that if you are assigning a trailer to a trip that is already active, when the leg that the trailer was assigned to is activated, the system will notify you if the new trailer’s Current Zone differs from the Leg From Zone of the trip leg. An "empty trip" will be created to account for the location change. This is the same as the Reposition function, where trips can be created and completed automatically by the system.
Trailer / Trailer 2
To assign a trailer to a leg using the Quick Match function, click in the Trailer / Trailer 2 field and enter the desired Trailer ID (as configured in the Trailer Profiles program). Note that if you are assigning a trailer to a trip that is already active, when the leg that the trailer was assigned to is activated, the system will notify you if the new trailer’s Current Zone differs from the Leg From Zone of the trip leg. An "empty trip" will be created to account for the location change. This is the same as the Reposition function, where trips can be created and completed automatically by the system.
How do I De-Assign Trailers?
Trailer / Trailer 1
To remove a trailer from a leg, click in the Trailer field and hit the <Delete> key on your keyboard. Trailers can be removed from any Active or Planned leg, but not from Completed legs. If the leg from which the trailer is de-assigned is active, you will be prompted to specify the location where the trailer is unmatched from the trip. This will become the trailer’s Current Zone. The trailer will be removed from the current leg, and from all subsequent legs.
Trailer / Trailer 2
To remove a trailer from a leg, click in the Trailer field and hit the <Delete> key on your keyboard. Trailers can be removed from any Active or Planned leg, but not from Completed legs. If the leg from which the trailer is de-assigned is active, you will be prompted to specify the location where the trailer is unmatched from the trip. This will become the trailer’s Current Zone. The trailer will be removed from the current leg, and from all subsequent legs.
Miscellaneous Equipment Tab
How do I Assign Miscellaneous Equipment?
To assign a piece of miscellaneous equipment to a trip, make sure the desired trip and leg are selected in the Trip grid (the selected trip is indicated by the black arrow on the left grid margin). Double click on the piece of equipment you want to assign If there are multiple legs on the trip, the power unit will be assigned by default to all legs subsequent to the leg currently selected in the Trip grid. Notice that the Status of the equipment in the Misc Equipment grid will change to the same status as the trip (the default is "ASSGN"). The equipment’s status will continue to be updated with the statuses that are assigned to trip.
To assign a piece of Miscellaneous Equipment to a leg using the Quick Match function, click in the Misc Equipment field and enter the desired Equipment ID (as configured in the Misc Equipment Profiles program). Note that if you are assigning miscellaneous equipment to a trip that is already active, when the leg that the miscellaneous equipment was assigned to is activated, the system will notify you if the new miscellaneous equipment’s Current Zone differs from the Leg From Zone of the trip leg. An "empty trip" will be created to account for the location change. This is the same as the Reposition function, where trips can be created and completed automatically by the system.
How do I De-Assign Miscellaneous Equipment?
To remove a piece of Misc Equipment from a leg, click in the Misc Equipment field and hit the <Delete> key on your keyboard. Misc. Equipment can be removed from any Active or Planned leg, but not from Completed legs. If the leg from which the equipment is de-assigned is active, you will be prompted to specify the location where the equipment is unmatched from the trip. This will become the equipment’s Current Zone. The equipment will be removed from the current leg, and from all subsequent legs.
Chassis Tab
How do I Complete a Quick New Chassis Entry?
The Quick New options provides the ability to add a new chassis with the minimum required information to assign it to a trip.
-
In the Dispatch program, Chassis grid select Quick New from the context menu. The Quick Chassis Entry window displays.
-
Enter the following chassis details:
-
Chassis#: can be up to 10 characters in length. The chassis code is used throughout the Dispatch and Repairs & Maintenance modules to identify the container. Once you select the 'Chassis #', the rest of the fields on the Quick Chassis Entry window should automatically populate. If the Chassis you have selected is currently set to 'Active' status, there will be a warning message. With the quick Chassis, if the Chassis was in the database but not 'Active', there is now an option to set it to 'Active'.
If any other information has not automatically populated, enter values as required using the following options:
-
Make: enter the make of the chassis.
-
Type: use the search to bring up a dialog box where you can search by Equipment Class Code or Code Description.
-
Size: use the search to bring up a dialog box where you can search by Size Code or Description. The Size Code is entered in the Intermodal Setup program > Size Tab.
-
Owner: use the search to bring up a dialog box where you can search by Client ID or Client Name.
-
Current Zone: use the search to bring up a dialog box where you can search by Zone ID or Description.
-
Type: select the type radio button, chassis or flatbed.
-
-
Select OK. The new chassis is available in the Chassis grid and can be assigned to a trip.
Containers Tab
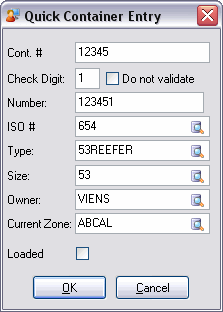
How do I Complete a Quick New Container Entry?
The Quick New options provides the ability to add a new container with the minimum required information to assign to a trip in Dispatch.
-
In the Dispatch program > Containers Tab select Quick New from the context menu. The Quick Container Entry window displays.
-
Enter the following container details:
-
Cont#: can be up to 10 characters in length. The Container ID code is used throughout the Dispatch and Repairs & Maintenance modules to identify the container. Once you select the 'Container #', the rest of the fields on the Quick Container Entry window should automatically populate. If the Container you have selected is currently set to 'Active' status, there will be a warning message.
If any other information has not automatically populated, enter values as required using the following options:
-
Check Digit: enter the two-digit number or characters (or both) assigned to this container.
-
Number: automatically defaults to the ID & Check Digit number combination.
-
ISO #: Enter the ISO Number for this Container, or click the search button to select an ISO Number from those available on your system.
-
Type: use the search to bring up a dialog box where you can search by Equipment Class Code or Code Description.
-
Size: use the search to bring up a dialog box where you can search by Size Code or Description. The Size Code is entered in the Intermodal Setup program > Size Tab.
-
Owner: use the search to bring up a dialog box where you can search by Client ID or Client Name.
-
Current Zone: use the search to bring up a dialog box where you can search by Zone ID or Description.
-
Loaded: select when the container is loaded.
-
-
Select OK. The new container is available in the Container grid and can be assigned to a trip.
Load Requests Tab
How do I Create / Edit a Load Request?
The Load Request Tab is used to enter a load request from a vendor. This request can be entered for one of your existing vendors selected by vendor code or from a vendor that is not normally hired and therefore not available in TruckMate. However, to assign this "unlisted" vendor to a trip you will need to add them to the Customer & Vendor Profiles program.
-
In the Dispatch program select the Load Request Tab. (This can also be accessed from the Carrier Tab > Find Near window).
-
From the context menu select New. The Enter a Load Request window displays.
-
Add the Load Request, as follows: (a * denotes a required field).
-
Enter the Vendor Code or click the search button to select vendor.
OR
-
If this vendor is not listed enter the Vendor Name. It is important to note that this "unlisted" vendor must be added to the Customer & Vendor Profiles program prior to adding to a trip.
-
-
Enter the Vendor Information including Contact information, as required.
-
Enter the Vendor’s Current Zone or click the search button to select the zone.
-
Enter the Vendor’s Destination Zone or click the search button to select the zone.
-
Available Dates range default to current date/time to current date/time plus one day. Click the Calendar button to modify as required.
-
Note: When the date range End Date defined here is reached the load request is purged.
-
Enter Vendor’s Equipment or click the search button to select equipment class.
-
Enter Remarks, as required.
-
Select OK. The Load Request details display in the grid.
| To assign a "unlisted" vendor to a trip you will need to add them to the Customer & Vendor Profiles program. |
Reposition/Change Status of a resource
The Reposition/Status option, which is available in the context menus in all resources' tabs, is a combination between the standard Status Change operation and the standard Reposition operation. Using the unified Trip Status Change and Equipment repositioning window. The user can Reposition, Change Status or do both in one step. Reposition option is used to move a resource from its Current Location to a new location.
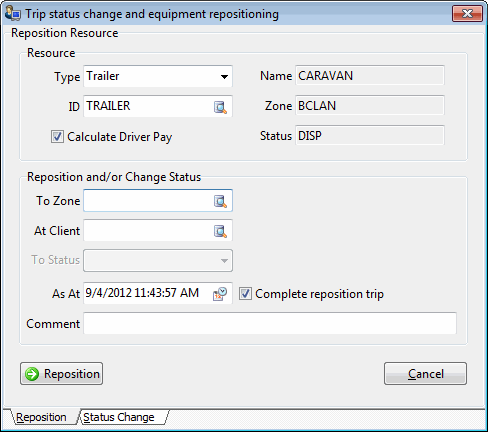
Resource Section
This section displays information about the selected resource. The user can select a different resource of the same type or can even change the resource type and select another resource of a different type.
Reposition and/or Change Status
This section is where the actual action cam be performed. A resource can repositioned, have its status changed or both.
To Zone
Selecting a new value for this field will reposition the resource in to the new Zone.
At Client
You can select to assign the resource to a different client by selecting a different value for this field.
To Status
The user can change the status of the selected resource by using the drop down list and selecting the new status for the resource.
As At
This field allows the user to time-stamp the action taken by selecting a date and time using the calendar button. The default value is the 'Current' date and time.
Complete Reposition Trip
If you are changing the zone (repositioning the resource), you can check this option to cause the reposition trip to go through the statuses to complete ('ASSGN', 'DISP', 'PICKD', 'DELVRD'), or uncheck it to create the reposition trip but leave it in 'ASSGN' status, so the trip appears in the main form’s trip grid (to allow you to manually add other resources and run through status changes yourself manually).
If this checkbox is not checked, then the status change option is disabled (physically impossible to leave the resource in both an 'AVAIL' and an 'ASSGN' status at the same time). In other words, to do both a reposition and a status change in a single step, you must leave the checkbox checked - resource will go to your chosen 'AVAIL' status after cycling through 'ASSGN', 'DISP', 'PICKD', 'DELVRD'.
Comment
A user can comment on the action taken using free format text.
Reposition
Selecting this button will confirm the performed action and conclude the process by saving the changes to the appropriate tables.
Status Change option allows the user to change a resource’s status. The status codes defined with the code behavior as configured in the Codes Maintenance program are available for selection.
|
The rights for a user or group of users to use this functionality is controlled in Security Setup Program > Security > Business Events > Allow Changes, through six business events each corresponding to one of the available resources (Driver, Chassis, Container, Misc. Equipment, Power Unit and Trailer). A resource which has a current status of 'Unavailable' cannot be assigned to trips. |