Invoice Print

The Invoice Print program is used to create invoices from Freight Bills entered in the Customer Service program or the Quick Bill Entry program. Invoices can be selected by various criteria, such as Billing Date or Current Status. You can update the Freight Bill’s status after generating the invoice.
Further features have been added to the Security Setup program on the Security Tab, Business Events Tab which affect the Invoice Printing program.
To access Invoice Print:
| From this location | Go to |
|---|---|
TruckMate Menu and TruckMate Task List |
Billing > Invoice Print |
Windows Start Menu |
TruckMate 20xx > Invoice Print |
Windows Explorer |
C:\Program Files (x86) > TruckMate 20xx > Bill.exe |
What’s New in Invoice Print
Print the Print Style in the FB Order Status comments (2021.1)
You can differentiate between a print and a reprint by specifying 'Truckmate Invoicer' for prints, and 'Truckmate Invoicer Reprint' for reprints. This appears in the Comment column of the "FB PRINTED" ODRSTAT records.
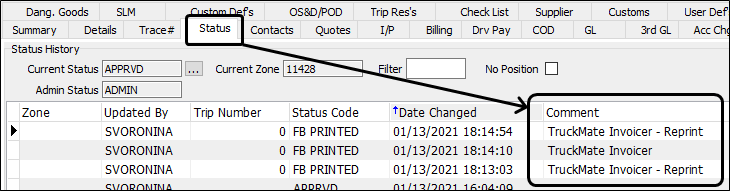
The Print Style is set in the Billable > Invoice Print program.
Menu Bar / Toolbar
File Menu
Print Reports
 Brings up the report selection window, common to many TruckMate applications. Here, you will select a report file from those available in your system and a Crystal Report will be generated.
For more information on Report functionality in TruckMate, see the Crystal Reports Reference.
Exit
 Selecting this option will close the Invoice Print program.
Multi-Company Menu
For more information on the Multi-Company options available from the Menu Bar, see the Multi-Company documentation.
Window Menu
Customer Service
![]() Selecting this option will open an instance of the Customer Service program.
Selecting this option will open an instance of the Customer Service program.
Statement Printing
![]() Selecting this option will open an instance of the Statement Printing program.
Selecting this option will open an instance of the Statement Printing program.
Billing Register
![]() Selecting this option will open an instance of the Billing Register program.
Selecting this option will open an instance of the Billing Register program.
Windows Service Menu
This tool bar menu is used to setup, configure and control an automated bill printing service to run as a windows service. The user can define the criteria to select bills to be printed and can define the schedule for performing the service.
Start
![]() This option starts the automated bill register service.
This option starts the automated bill register service.
Stop
![]() This option stops the automated bill register service.
This option stops the automated bill register service.
Service Configuration
![]() This option invokes the Service Setup window to allow the user to setup and configure the automated bill register service.
This option invokes the Service Setup window to allow the user to setup and configure the automated bill register service.
This window allows the user to set up the Windows Service behavior. For more information on the components of this window visit TMW Windows Service Host Overview > Windows Service Setup.
Setup Options
This option opens the Bill Printing Windows Service Settings window which allows the user to schedule a new bill printing service.
Tools Menu
TruckMate Monitor
 Click the down arrow next to this button to access the various functions of the new TruckMate Monitor.
Remember Position / Size
Selecting this option will maintain the program window position and size upon close. When the program is re-opened, it will appear the same.
Help Menu
TruckMate Help
 Selecting this button will open the Invoice Print topic in the TruckMate Online Help file (the page you are currently viewing).
Service Portal
 Selecting this button will open an instance of your default Internet browsing software, with the https://www.tmwcare.com login page displayed.
About
 Selecting this button will open the standard TruckMate About window, which contains important information about the application you are currently using, including its version number (important for support calls).
Toolbar
Setup Filter
![]() Clicking this button will bring up the Filter Setup window, that allows you to pick the options that will appear in the 'Filter On' section of the main program screen.
Clicking this button will bring up the Filter Setup window, that allows you to pick the options that will appear in the 'Filter On' section of the main program screen.
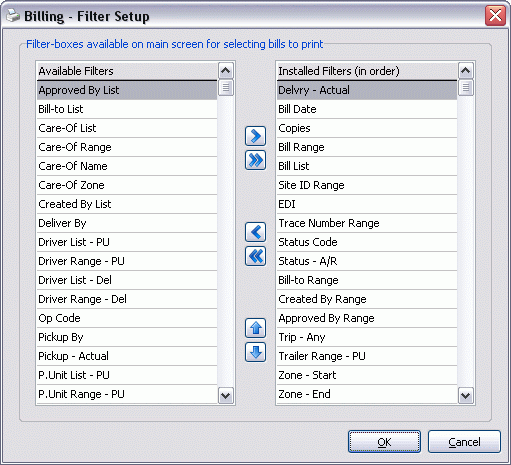
The left side of the screen displays a list of available search filters while the right side displays those filters that will appear on the main Invoice Printing program screen.
The various buttons in the middle of the module allow you to add or remove filter options from those that will appear on the program screen. The 'up' and 'down' arrow buttons set the order in which your chosen filter options will appear, from left to right.
Clear Filter
![]() Clicking the Clear Filter button will remove all data entered into the 'Filter On' fields at the top of the program screen.
Clicking the Clear Filter button will remove all data entered into the 'Filter On' fields at the top of the program screen.
Test Filter
![]() Clicking the Test Filter button will test to see if the data you have entered into the 'Filter On' fields returns any available Freight Bills to be printed.
Clicking the Test Filter button will test to see if the data you have entered into the 'Filter On' fields returns any available Freight Bills to be printed.
Freight Bill Filtering Options
The following Filtering criteria can be used in any number of different combinations by the user to select one or more Freight Bills to print onto your invoices. Any one option can be selected to be used by clicking on the checkbox near the top of the section it is contained in. If more than one option is set, the program will only select those Freight Bills which match both criteria (i.e. if 'Bill Status' = 'COMPLETE' and 'Site ID' = 'SITE 2', only those Freight Bills which were created by SITE 2 and are currently COMPLETE will be selected for printing).
Available Filters
The Filters available on the main form of the Invoice Print program are those that are displayed in the 'Installed Filters' column of the Filter Setup window (accessed via the program Toolbar). If you don’t see a Filter that you wish to use, simply open the Filter Setup window and add the filter from the left-side 'Available Filters' column to the right-side 'Installed Filters' column.
Once you have all of the Filters displayed as you require, simply enter the required information in them (whether it be a Bill Number, Date Range, or User name) and select the 'Test Filter' icon on the toolbar to see if any results are gathered by the Filter. If you are satisfied with the results returned by the Filter, you can then select the 'Print' option (from the File Menu) and choose the Invoice report you wish to use. See below for more information.
Custom Filter
In the Filter Setup window (accessed via the program Toolbar), there is a new filter type available called 'Custom Filter'. If you add it to 'Installed Filters' section of the Filter Setup window, then you will see a new filter box on the main screen that allows you to select a filter that you have created in the Customer Service program > Filter Setup window. If a filter is selected (and the checkbox above it is checked), then the custom filter will get added (as an 'AND' statement) to the SELECT statement that determines which Invoices to print.
There is also a 'Setup' button that brings up a form that allows you to add new filters (or edit existing ones). The setup is the SQL Filter window, common to many TruckMate applications.
| The Security Setup program > Security > Business Events > Filters Tab settings for Customer Service to 'Allow INSERT' and 'Allow EDIT/DELETE' also apply to the Invoice Print version of the filter setup window. |
Print Action Options
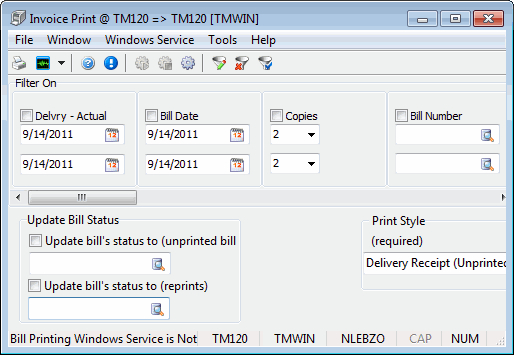
Update Bill Status
Update Bill’s Status To (unprinted bill)
This checkbox is for bills being printed for the first time. Place a checkmark in the box provided if you wish to automatically update (after printing) the Freight Bill’s current status (that can be viewed on the Customer Service program > Summary Tab) to indicate that the Freight Bill has been printed. Only status codes of the Completion type are available in the drop down list. Status codes are configured in the Codes Maintenance program. There is an option in the Application Configurator program ('Printed OK Prompt') that can be configured to prompt the user to confirm that the Freight Bill printed correctly before the status of the Freight Bill is updated.
Update Bill’s Status To (reprints)
This checkbox is for bills being re-printed. Place a checkmark in the box provided if you wish to automatically update (after printing) the Freight Bill’s current status (that can be viewed on the Customer Service program > Summary Tab). Only status codes of the Completion type are available in the drop down list. Status codes are configured in the Codes Maintenance program. There is an option in the Application Configurator program ('Printed OK Prompt') that can be configured to prompt the user to confirm that the Freight Bill printed correctly before the status of the Freight Bill is updated. Another application configuration option is also available which allows you to choose whether to insert the System Status code into the status history or not if this checkbox is NOT selected. Setting the 'Reprint Freight Bill Insert System Status Code' in Application Configurator program to 'False' will NOT insert the system status code into status history after a reprint while this option is not selected.
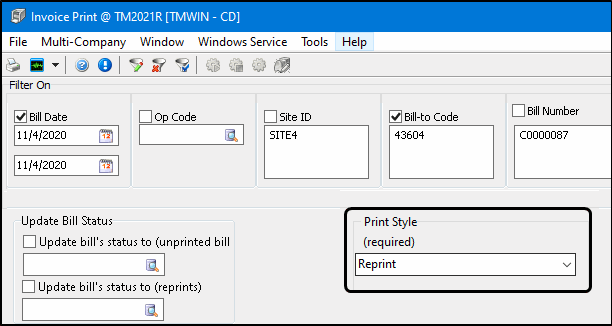
Print Style
A second type of status code is maintained for Freight Bills. This status code is used to indicate the bill’s printed status. These are 'system' status codes.
That is, these codes are not configured in the Codes Maintenance program, and they do not update the Freight Bill’s current status (as displayed on the Customer Service program > Summary Tab). They are used by the system to track and select the printing of delivery receipts and Freight Bills. The print status can be viewed on the Customer Service program > Status Tab. The Update Bill’s Status to field (in the field above) is not affected by the Delivery/Freight Bill Status and can be used in conjunction with the Print Style field.
| To print invoices that have been updated (properly or in error), you must choose the 'Reprint' option. |
You can differentiate between a print and a reprint by specifying 'Truckmate Invoicer' for prints, and 'Truckmate Invoicer Reprint' for reprints. This appears in the Comment column of the "FB PRINTED" ODRSTAT records.
The Print Style is set in the Billable > Invoice Print program.
Delivery Receipt (Unprinted)
Will add the system status code of 'DR Printed' to the Freight Bill. Only Freight Bills that do not have the status of 'DR Printed' will be included.
Frt Bill (Unprinted, DR Must be Printed)
Will add the system status code of 'FB Printed' to the Freight Bill. Only Freight Bills that have a 'DR Printed' status will be included, so in order to use this option you must first print the Freight Bill using the Print Style of Delivery Receipt (Unprinted) or Delivery Receipt (Printed or Unprinted).
Frt Bill (Unprinted, No DR Required)
Will add the system status code of 'FB Printed' to the Freight Bill. Only Freight Bills that do not have the status of 'FB Printed' will be included.
Frt Bill (Printed or Unprinted)
Will add the system status code of 'FB Printed' to the Freight Bill. Bills will be included regardless of their Print Style status.
Frt Bill (Printed or Unprinted, Incl X-Stops)
Will add the system status code of 'FB Printed' to the Freight Bill print Freight Bills for all extra stops undertaken in the given trip.
Delivery Receipt (Printed or Unprinted)
Will add the system status code of 'DR Printed' to the Freight Bill. Bills we be included regardless of their Print Style status.
Reprint
Is used to re-print a Freight Bill that has been previously printed, or to re-print a Freight Bill that has been previously updated by the Billing Register program. No system status codes are added to the Freight Bill. Even if the User has been restricted from printing (via the Security Setup program) they will have access to the 'Reprint' option.
Printing
After you have specified your selection criteria and output options, click the Print button. The Print button will display the Report Selection form. The Crystal Report templates supplied with the TruckMate system are called 'INVOICE.RPT' and 'INVOICE1.RPT'.
'INVOICE.RPT' specifies a landscape invoice style; 'INVOICE1.RPT' specifies a portrait style. Click the printer icon at the top of the screen to send the report to the printer that is configured as the default printer for your workstation. You can modify these report templates or create your own invoice templates using the Crystal Reports program.
For more information on report functions in TruckMate, see the Crystal Reports Reference.
Invoice Print - Windows Service Setup
TruckMate allows you to set up an automated windows service for invoice printing that can be run at any time on selected invoices based on a predefined criteria. Multiple services can be set to handle different customers, different kinds of invoices and different time intervals.
The service can be setup as a local service using a local system account and a local printer or it can be setup to be run as a service on the network using a specific user account allowing it to access network printers and file folder locations elsewhere on the network.
| If the invoice is going to be printed to a network printer then the user running the service will need to have the appropriate permissions to print to the network location. (For example, DB2ADMIN will very likely not have enough network security access.) |
To setup invoice printing to run as a regularly scheduled Windows service:
-
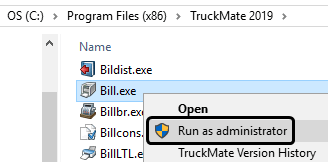
Go to the Program Files (x86) > TruckMate 20xx folder and use a right-click to start the Bill.exe program to Run as administrator.
Note: To setup and configure a Windows Service for Invoice Printing, you will need to start the Billing > Invoice Print program (Bill.exe) as an administrator who has local system administrator privileges on this workstation or server.
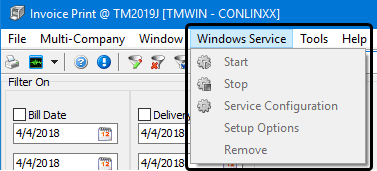
The Invoice Print program will open.
If you are not logged in as a local system administrator or if no service has already been setup, the menu options under the Windows Service menu will be disabled.
-
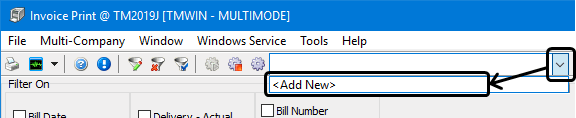
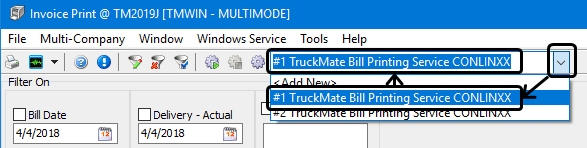
If no service has been added yet, click the pull-down list button in the empty field in the header at the top and select <Add New>. (If any invoice print services had already been added, they will appear in this drop-down list.)
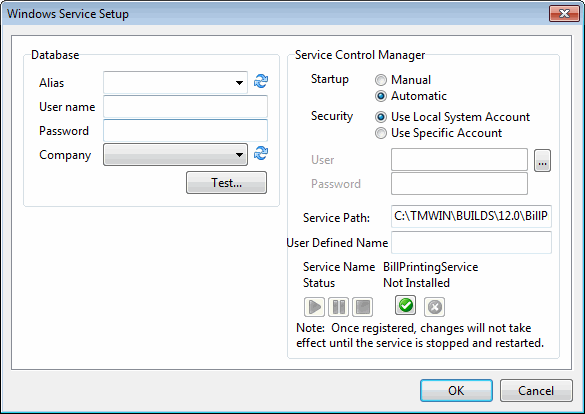
The Windows Service Setup window will open. (If you are editing an existing service, go to the Windows Service menu and select Service Configuration.)
-
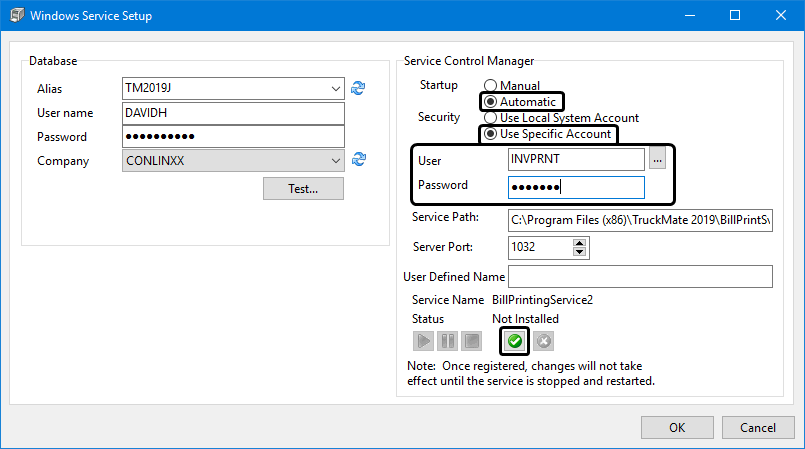
Enter the database configuration information and use the Test button to verify the connection is successful.
-
Select Automatic for the Startup.
-
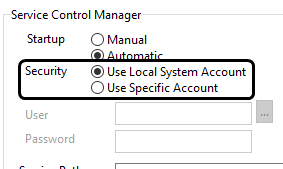
Select a security option depending upon whether the printer is local or a network printer.
A local system account will be sufficient if the invoice is going to be printed using a local printer and the log files created and updated in a local folder.
-
Local Service Setup (Use Local System Account)
If the invoices are being sent to a local printer (i.e., a printer attached to this workstation or server), select the default Use Local System Account for the Security option.
-
Network Printer Setup (Use Specific Account)
If the invoice is going to be printed to a network printer location then the user running the service will need to have the appropriate permissions to print to that network location.
Either the local user must be granted sufficient network security permissions allowing them to access and print to the network printer(s) and create the log files in a network folder, or the Windows service must be setup to use a specific account with sufficient security permissions. Either way, you will need to work with your local IT resources and network administrators to set this up.
-
Select Use Specific Account for the Security setting.
-
Enter the User and Password as supplied by your local IT resources or Network Administrator. This network user must have the necessary and appropriate network security permissions to access the network printer(s) used for invoice printing) and create log files.
-
-
-
Accept the defaults for the remaining fields (or adjust if necessary) and click the
 Install Service button to install the service. (Make sure Startup is set to Automatic to ensure the service will restart in the event of a server reboot.)
 -
Click OK to save your entries and return to the Invoice Print program window.
-
Go to the Windows Service menu and select Setup Options to open the Bill Printing Windows Service Settings window to complete the configuration.
Bill Printing Windows Service Setting
The Billing > Invoice Print program > Windows Service menu > Setup Options > Bill Printing Windows Service Setting window is used to set up, schedule and configure when and how the Invoice/Bill Printing will run as a windows service. You can print selected bills based on user-defined criteria and you can schedule the service to run according to business needs.
To edit the TruckMate Bill Printing Windows service setup options:
-
Go to the Program Files (x86) > TruckMate 20xx folder and use a right-click to start the Bill.exe program to Run as administrator.
Note: To setup and configure a Windows Service for Invoice Printing, you will need to start the Billing > Invoice Print program (Bill.exe) as an administrator who has local system administrator privileges on this workstation or server.
The Invoice Print program will open.
If you are not logged in as a local system administrator or if no service has already been setup, the menu options under the Windows Service menu will be disabled.
-
Use the drop-down list to select the service since it is possible to run multiple Bill Printing services using different settings for each.
If no service has been added yet, click the pull-down list button in the empty field in the header at the top and select <Add New>. Refer to Invoice Print - Windows Service Setup.
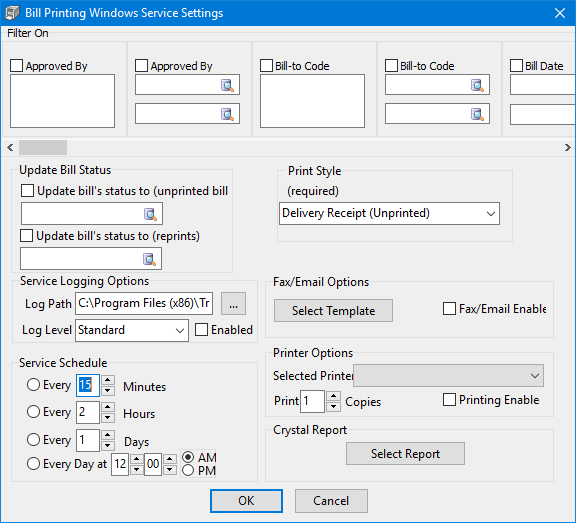
The Bill Printing Windows Service Settings window will open. This window includes most of the fields available in the typical Bill Printing process so you can identify the criteria for selecting the bills to be printed by the service.
Field definitions
Required field: *
Field Definition Filter On /
Update Bill Status
These sections contain the same fields as the main Invoice Print window, See Freight Bill Filtering Options and Print Action Options.
Service Logging Options
Log Path *
Enter/Select the path of the location where you want your log files to be stored. The system will use this path to store the log files when the service is run.
Log Level *
Determine the log level you desire to have in your log files. Available options are:
-
'None': No information will be logged. Use this option if the service is very stable and there is enough confidence that the service is expected to run smoothly all the time. It’s not recommended to use this option unless there is a serious storage issue to consider. Log files of high frequency services that run in short intervals can consume large amounts of storage space if not set to the proper log level.
-
'Error': Only errors will be recorded in the log file. This option is best used in fairly stable services with minimal expectations for errors to take place.
-
'Warning': Warnings and errors will be recorded if this level is selected. Log files of this level can give a clear idea about errors that take place during the service run as well as potential threats that can cause a service failure.
-
'Standard': A standard debug is a bug where Errors, Warnings and Important steps are recorded. If storage is not an issue this level can be used and can provide good amount of information about every run of the service.
-
'Debug': This level can be selected if the service is not running as it should run. A log file of this level will record all steps of the process in addition to the values of the various parameters and variables involved in the service.
Enabled
This checkbox controls the logging process. Check this checkbox to enable logging. If unchecked the system will not generate any log files.
Fax/E-mail Options
Select Template
You can select the 'Select Template' button to choose a predefined fax/e-mail template or create a new template. The 'Chose Template' window that pops up when selecting this button allows the user to either select a template from the list of available templates (if any is available), or create a new template by selecting the link on the bottom of the window which will open the 'Edit Template' window.
Fax/E-mail Enabled
This checkbox allows the user to either enable the Fax/E-mail sending functionality by checking this checkbox, or disable the functionality by deselecting the checkbox. This is useful when the fax/e-mail sending functionality is only needed at some periods of time and is not needed at some others.
Service Schedule
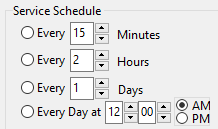
This section consists of the timing options available for scheduling this service. The first three radio buttons are used to set an interval between each run of the service and the next. The interval can be set in Minutes, Hours or Days based on your selection.
The fourth radio button is a fixed time of the day at which you wish the service to run every day. Select the one option that serves your business needs best and set the value of the selected option to the desired timing.
Printer Options
Selected Printer *
Use this drop down list to select the printer you want the service to user when printing the bill, all connected printers will be available in the drop down list.
Print Copies *
Use the up/down arrows to select the desired number of copies to be printed when the service is run.
Printing Enabled
Use this flag to switch printing on and off as needed. If you want a hard copy to be printed when the service is run check this checkbox, otherwise leave it unchecked.
Crystal Report
Select Report
Select this button to invoke the 'Report Selection Window'. The report selection window contains a list of available reports with the path to the location of the report and some descriptive information. The window also has a button 'Report Access Manager' that allows the user to access Crystal Reports library for a wider selection of available reports.
-