Driver Call-In menu bar, toolbar, and header

Menu Bar / Toolbar
File Menu
Print Reports
![]() Selecting the Print Reports button will bring up the report selection window, common to many TruckMate applications. Here, you will select a report file from those available in your system and a Crystal Report will be generated.
Selecting the Print Reports button will bring up the report selection window, common to many TruckMate applications. Here, you will select a report file from those available in your system and a Crystal Report will be generated.
For more information on Report functionality in TruckMate, see the Crystal Reports Reference.
Exit
![]() Closes the Driver Call-In program.
Closes the Driver Call-In program.
Multi-Company Menu
For more information on the Multi-Company options available from the Menu Bar, see the Multi-Company documentation.
Navigate Menu
The Navigate menu contains the standard TruckMate Navigation Bar as well as the following items:
Refresh
![]() Select this option to refresh the details displayed in the main window of the Driver Call-In program.
Select this option to refresh the details displayed in the main window of the Driver Call-In program.
Tools Menu
TruckMate Monitor
![]() Click the down arrow next to this button to access the various functions of the new TruckMate Monitor.
Click the down arrow next to this button to access the various functions of the new TruckMate Monitor.
Remember Position / Size
Selecting this option will maintain the program window position and size upon close. When the program is re-opened, it will appear the same.
Reload Configuration Options
This option is only available when you are working with a Multi-Company database. Selecting this option will re-apply the Application Configurator program options to the application you are currently working in.
| Only those config options that relate to application logic will be updated on the fly. Configuration options related to default selections (such as flags being checked/un-checked) will not update, as these configs are only checked when the application is loaded. |
IDSC Expert Fuel Advice / IDSC Fuel Request / IDSC Netwise
Selecting these options will open their (respective) external application (if available). TruckMate has it’s own component that accesses the IDSC data, however, that can be accessed from the Driver Call In program’s Trips Assigned Grid (via right-click Context Menu).
For more information, see the Expert Fuel Optimization window documentation.
Window Menu
Customer Service
![]() Clicking this button will open an instance of the Customer Service program.
Clicking this button will open an instance of the Customer Service program.
Dispatch
![]() Clicking this button will open an instance of the Dispatch program.
Clicking this button will open an instance of the Dispatch program.
Driver Call-In
![]() Clicking this button will restore your view of the main window of the Driver Call-In program.
Clicking this button will restore your view of the main window of the Driver Call-In program.
Trip Tracer
![]() Clicking this button will open an instance of the Trip Tracer program.
Clicking this button will open an instance of the Trip Tracer program.
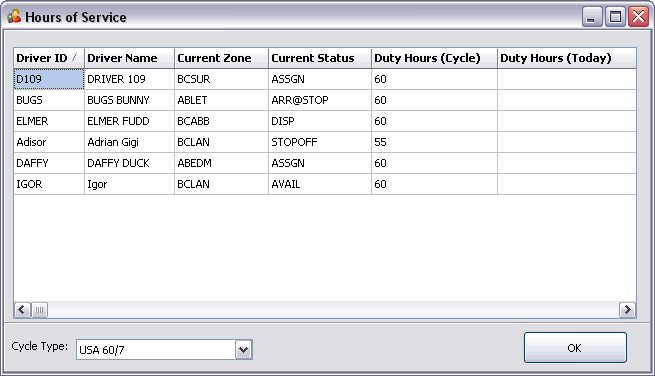
Hours of Service Driver Selector
![]() Selecting this button will open the HOS Driver Selector window, which allows you choose a Driver to work with in the Driver Call In program based on their Hours of Service availability as per a specific Cycle/Jurisdiction.
Selecting this button will open the HOS Driver Selector window, which allows you choose a Driver to work with in the Driver Call In program based on their Hours of Service availability as per a specific Cycle/Jurisdiction.
-
Driver ID / Driver Name / Current Zone / Current Status / Duty Hours (Cycle) / Duty Hours (Today)
All of this information is automatically populated from the Logbooks program, and will allow you to quickly view all of your Driver’s availability as per the selected 'Cycle Type'. Only the Drivers setup on the Logbooks program > Driver Tab will appear in this window.
-
Cycle Type
Use the drop-down menu to select a Cycle Type in order to see how many hours your Drivers have available for a particular Cycle/Jurisdiction. The Cycle Types available in this menu are configured in the Logbooks program > Jurisdiction > Cycle Types Tab.
Help Menu
TruckMate Help
![]() Selecting this button will open the Diver Call-In topic in the TruckMate Online Help file (the page you are currently viewing).
Selecting this button will open the Diver Call-In topic in the TruckMate Online Help file (the page you are currently viewing).
Service Portal
![]() Selecting this button will open an instance of your default Internet browsing software, with the https://www.tmwcare.com login page displayed.
Selecting this button will open an instance of your default Internet browsing software, with the https://www.tmwcare.com login page displayed.
About
![]() Selecting this button will open the standard TruckMate About window, which contains important information about the application you are currently using, including its version number (important for support calls).
Selecting this button will open the standard TruckMate About window, which contains important information about the application you are currently using, including its version number (important for support calls).
Header Information
Unit ID
You can display records in the Driver Call In program by selecting a Power Unit ID in this field or a Driver ID in the Driver ID field below. If you look up a Driver by entering a Power Unit ID, the Driver that is currently assigned to any active legs as the Power Unit will be displayed. If the Power Unit is not assigned to any active legs, the Driver that is displayed in the 'Last Driver 1' field in the Dispatch program > Power Unit Tab will be displayed. You must click the ![]() button to the right of the Driver ID field to display the record. Click the search button for a search form.
button to the right of the Driver ID field to display the record. Click the search button for a search form.
| You can navigate between Power Units using the <Alt><Left arrow> and <Alt><Right arrow> hot key combination. |
Driver ID
Use this field to select a Driver. Click on the search button to the right of the field to select a Driver code. After you have selected the code, click the ![]() button to retrieve the selected Driver’s record, which will be displayed in the Grid to the right. Driver codes are configured in the Driver Profiles program. Drivers will not be available for selection unless the 'Show In Dispatch' box on the Detail Tab of the Driver Profile program is checked.
button to retrieve the selected Driver’s record, which will be displayed in the Grid to the right. Driver codes are configured in the Driver Profiles program. Drivers will not be available for selection unless the 'Show In Dispatch' box on the Detail Tab of the Driver Profile program is checked.
| You can navigate between Drivers using the <Alt><Left arrow> and <Alt><Right arrow> hot key combination. |
Context Menu
While in the Header section, you can right-click either the 'Unit ID' or 'Driver ID' field to access some Resource Filters, which are pulled from the Dispatch program’s Filter Setup page (the 'Driver' and 'Power Unit' Tabs, specifically). For more information on creating Dispatch Filters, see the Dispatch User Manual > Filter Setup section.