Managing filters

Filtering data in the dispatch grids can be accomplished in 2 ways, depending on your needs. These 2 methods include:
-
Set Filter Option: This feature is used to configure and apply grid specific filters. You can save these Filters to re-apply at any time as well as grouping them together in Filter Templates. Each of the resource grids in Dispatch has the Set Filter context menu option. For those experienced in SQL the ability to define Manual SQL Filters is available.
-
Smart Filter: a Smart Filter limits the data displayed in a grid by matching locations. Specifically, the current zones or zones on the same level (or below) in the zone hierarchy to the current zone in the Freight Bill, Trip or resource selected for filtering will display in the other grids.
For example, if you apply the Smart Filter to a freight bill, the driver and equipment grids will only display resources with a Current Zone that matches the freight bill’s Current Zone or the zone on the same hierarchy level. The trip grid will only display trips that have legs with Leg From Zones that match the filtered freight bill’s Current Zone. Zones located under the filtered zone in the zone hierarchy are also included. Zone codes and the zone code hierarchy are configured in the Codes Maintenance program.
| If you want to find a particular trip or resource in a grid, try the 'Quick Find' option. |
How do I Create Filters for Grids?
The Set Filter Option feature is used to configure and apply grid specific filters which are used to narrow down the data displayed in the grids so that load planning is simplified. You can save these Filters to re-apply at any time as well as grouping them together in Filter Templates. The Set/Clear Filter options are available for all grids from the context menu. The Security Setup program > Security Tab > Dispatch > 'Allow Filter Setup' option must be enabled for this feature to be available to the user or group.
| Filters created on the Drivers Tab and Power Units Tab of the Filter Setup window can be used in the Driver Call-In program, as well as the Dispatch program. |
Need to create more complex filters than those available in the Set Filter option? Try creating a Manual SQL Filter.
-
In the Dispatch program, select a grid requiring a filter.
-
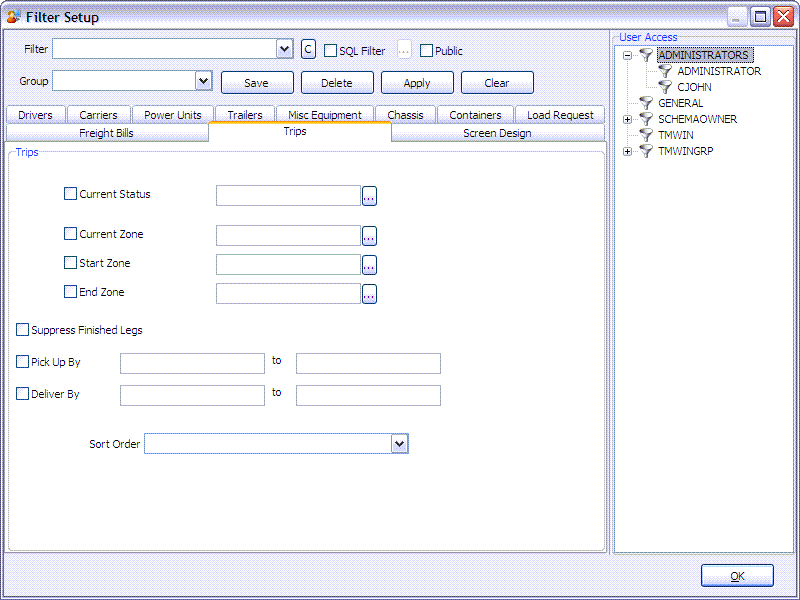
Select 'Set Filter' from the context menu. The Filter Setup window displays with the applicable tab selected.
Note: Filters created on the Drivers Tab and Power Units Tab of the Filter Setup window can be used in the Driver Call-In program, as well as the Dispatch program.
-
Define the Filter criteria. Listed below is an example of defining, applying and saving a filter for the drivers grid. These steps can be accomplished for each of the grids by selecting the appropriate tab on the Filter Setup window.
-
Select the checkboxes for the fields you want to filter by. In the example image we have selected Current Status and Current Zone.
-
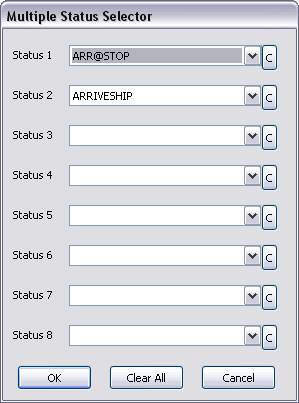
Click the search button to define one or more than one value on the Multiple Selector window. The '<Multiple>' indicator displays in the value field when more than one value is defined. Use the "C" buttons to clear any of the values.
Note: In some cases you can enter values directly, for example the Other Category field on the Drivers Tab.
-
Select a Sort Order from the drop down list. The default sort order for the Driver grid is the Driver ID field.
-
Select the 'Public' checkbox to make the Filter available to other users. De-select this checkbox when the filter is intended for 'Private' (individual) use.
-
When a Filter is set as 'Private' ('Public' option is not selected), the User Access section to the right of the window becomes available for use. Filters that are 'Private' can now be assigned to selected Users or User Groups (as defined in the Security Setup program). Double clicking a record in the User Access section toggles access rights.
By default the filters that are 'Private' will only be available and visible to the original filter owner. This Filter Owner can expand access rights and assign the Filter to other users or whole user groups. Whomever has access can act as the Filter Owner and make changes to the Filter (in affect you’re letting more then one person own the Filter). Note that nothing prevents the original Filter Owner from removing their own access rights, thus locking themselves out of access to the Filter.
-
If you want the new Filter to be a part of a Filter Group, select the Filter Group ID from the 'Group' drop-down menu. If no Filter Groups exist, you can create one for your new Filter simply by typing a Group ID into the 'Group' field. Once Filters are added to Filter Groups, you will see the Filter Group ID when you right-click on a Dispatch Resource Tab, and all the Filters belonging to the Group will be available in a sub-menu off of the Group ID (which will ease in organization and Filter selection).
-
The Screen Design tab allows users to either clear the existing screen design layout (if one is loaded) or load a screen design layout (whether one is loaded or not) when the filter is applied/loaded. (The screen design layout is not affected when the filter is cleared, only when it is applied.)
Note: You cannot apply more than one screen design at the same time.
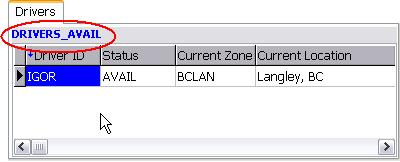
When done creating the Filter, Select Apply. The Drivers that meet the filter criteria display in the driver grid.
-
-
Select Save to save the filter for future use. The Filter Name window displays.
-
Enter a name for the filter that best describes the filter’s criteria.
-
Click OK. The Filter is saved and available for future use.
-
Close the Filter Setup window, or create other filters as required.
Note: You can create and apply filter for any grid, regardless of the grid you were in when you opened the window, simply select the applicable tab. The Filter selection criteria is unique for each grid, so depending on the tab selected the filter criteria changes.
-
Create a Filter Template to group multiple grid filters so they can be applied together rather than one grid at a time.
To delete an existing filter on the Filter Setup window, select the filter name from the drop down list box and select the <Delete> key on the keyboard.
When a saved filter is applied to a grid the Filter Name replaces the grid name in the top left corner. When a filter is applied without being saved a short description of the filter displays here.
For quick access to the Filter Setup window, double click on the blue text regardless of whether or not a filter is currently applied.
For quick access to saved filters or to clear a filter, right click on the blue text to access the filters context menu.
Any filter created for any section of Dispatch is now available for assignment to a custom button via Screen Design. When adding a custom screen design button for a dispatch filter and looking in the action drop-down list in the Custom Button tab of the screen design property editor, look for action names of the form "miFilter_X_N - description" where "miFilter" is fxed, X is a single-letter code for the filter type (e.g. P = power units), N is the unique integer ID for the filter, and description is the name/title you assigned to the filter (e.g. "miFilter_D_17 - Company"). Note that the filter type is helpful in cases where you create multiple filters with the same name (for example, you may have both a driver filter and a power unit filter named "Company").
How do I Setup an SQL Filter?
SQL Filter is available when you require a more complex filters than the ones available in the Set Filter option using SQL (Structured Query Language). The primary advantage of using SQL filters is that you have access to more fields than are provided with the standard Filter Setup. It is recommended you have a working knowledge of SQL to create these Filters, which can then be made Public for others to use.
-
In the Dispatch program, select a grid requiring a manual filter. For this procedure the Driver’s grid is selected but this applies to all grids in the Dispatch program.
-
Select Set Filter from the context menu. The Filter Setup window displays.
-
To base your manual filter on an existing Filter, select the Filter from the drop down list, or if one is not available, Define any criteria using the fields available.
-
Select the SQL Filter checkbox.
-
"Convert current filter to SQL" message displays, select Yes.
-
The SQL Filter window appears.
-
In the User SQL panel to enter the SQL statements that define the Manual Filter. Refer to the System Tables Index to view a list of TruckMate tables and their available fields.
-
Select the Test / Benchmark button to confirm the syntax is correct and view the total records selected. All syntax errors must be corrected prior to applying/saving the Filter.
-
Select OK. This returns you to the Filter Setup screen.
-
Ensure you select the Public checkbox to make the Filter available to other users.
-
Select Save to save the Manual filter for future use.
-
The Filter Name window displays, enter a name that best describes the filter’s criteria.
-
Click OK. The Filter is saved and available for future use.
-
Close the Filter Setup window, or create other filters as required.
| You can convert a filter at any time to see an example of how a filter query is formed. With the Filter selected from the drop down list, select the SQL Filter checkbox and convert to display the format on the Manual SQL Filter Editor window. |
How do I Create Filter Templates?
Filter Templates provide the ability to group grid filters into one Template for easy application. Also available for private use templates (not public access) is the ability to include your grid profiles in the template defined in the Customize Grid program.
-
In the Dispatch program, select the 'Setup Filter Template' button, available on the toolbar at the bottom of the window.
-
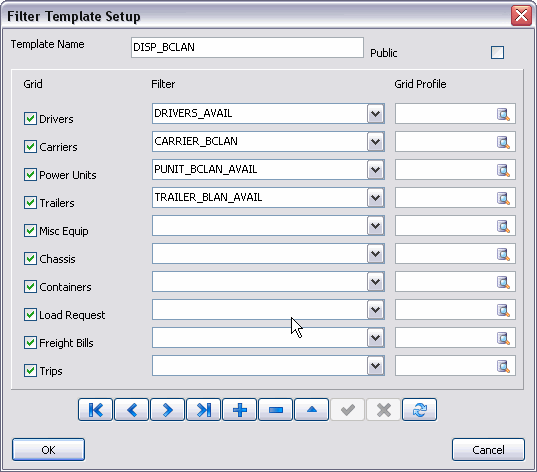
The Filter Template Setup window displays. Select the '+' button on the TruckMate Navigational Bar to insert a new record.
-
Define the Template, as follows:
Field Definition Template Name
Enter a name that best describes the template.
Public
select this checkbox when the template is for other users.
Grids
select the checkbox for each grid that requires a filter included in the template.
Filter
select the filter to include for each selected grid from the drop-down list.
Grid Profile
select the grid profile from the drop down list. The grid profiles are only available for private templates so the 'Public' checkbox must be de-selected prior to adding grid profiles to the template.
-
Select the 'checkmark' button.
-
Repeat steps 2 - 4 for each template.
-
Once all templates complete, select OK.
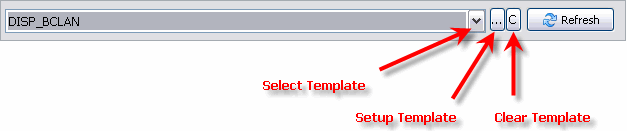
Select the arrow in the Filter Toolbar to select a filter template from the drop down list box.
To clear the filter template that is currently selected, click the "C" button. This button can also be used to clear filters assigned individually to grids using the Set Filter menu option.
How Do I Setup a Smart Filter?
Using the Smart Filter feature provides the ability to limit the data displayed in all grids to a particular location by comparing locations. When you apply the Smart Filter, bill, or resource only records in the other grids with matching current zones or zones on the same level (or below) in the zone hierarchy will be displayed.
For example, if you apply the Smart Filter to a freight bill, the driver and equipment grids will only show resources with a Current Zone that matches the freight bill’s Current Zone or the zone on the same hierarchy level. The trip grid will only display trips that have legs with Leg From Zones that match the filtered freight bill’s Current Zone. Zones located under the filtered zone in the zone hierarchy are also included. Zone codes and the zone code hierarchy are configured in the Codes Maintenance program.
-
In the Dispatch program, select the
 Smart Filter button, available on the program toolbar.
 -
When you click the Smart Filter button at the bottom of the screen, the mouse pointer will change to a magnifying glass. Point it at the record (in any grid) that you want to use as the basis for the filter, then click the left mouse button.
-
The screen display will be refreshed, and each grid will show items that are pertinent to the record that was chosen as the filter basis.
-
Click the
 Clear Filter button to re-display all data in all grids.