Unassigned Freight tab

The Multi Mode Dispatch > Unassigned Freight / Resources section displays all the freight and resources (drivers, trailers, power units, etc.) available to be assigned to the trips.
The Freight tab displays information regarding all of the freight that has not been assigned to a trip yet. The three tabs, (Deliveries, Pickups and Cross Dock), filter the unassigned freight bills into relevant groups.
Deliveries tab
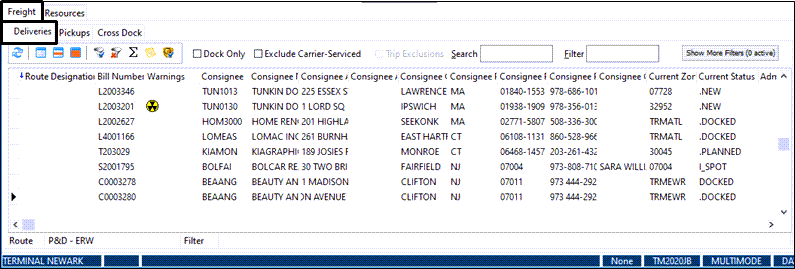
The Multi Mode Dispatch > Unassigned Freight > Deliveries sub-tab displays the details of all delivery-type freight bills available to be assigned to a trip. Details in this tab cannot be edited, but certain functions can be accessed using the context menu. The user can also drag and drop these freight bills to match them with trips in the Active Trips section. TruckMate will automatically add route sequence number to the drop freight bills. TruckMate then checks the route sequences for all the stops. If the same route sequence exists for two different locations and the same stop type, a popup will report the situation to the dispatcher so he can manually modify the route sequence. The user can multi select freight bills to make a group assignment. If so, TruckMate will allow the user to override automatically assigned route sequences via a pop up screen that displays for that purpose.
|
Toolbar - Deliveries tab

| Icon/Keybd | Menu Option | Definition |
|---|---|---|
|
Refresh Deliveries |
Refreshes the Deliveries grid to check for any new delivery freight bills in the system. |
|
Clear Delivery Selection |
Clears any selected freight bills. |
|
Select/Unselect This Bill |
Select this button to highlight or remove highlighting a single detail line in the Deliveries grid. The user can hold the <CTRL> key and use this button to select multiple freight bills. |
|
Select All |
Select all records in the grid. |
|
Set Filter |
Opens the standard Dispatch Filter Trips window, which allows the user to create field-specific or SQL-based custom filters for the grid. |
|
Clear Filter |
Select this button to clear any filter that has been applied to the Deliveries grid. |
|
Show/Hide Summary |
Toggles the summary information section (the grey area beneath the grid) on and off. |
|
Freight Bill Notes |
Selecting this button will display any notes associated with the currently selected freight bill. The Notes window has several of its own tabs near the bottom of the window. These are used to enter notes for the different aspects of the selected freight bill. |
|
View Shipping Instructions |
Displays any shipping instructions that have been attached to the client(s) included on the selected freight bill. Shipping instructions are created in the Codes Maintenance program > Shipping Instructions tab, and attached to specific client codes in the Customer Profiles program > Shipping Instructions tab. |
Dock Only |
Allows you to restrict the grid to display only the freight that is at the Dock (e.g., has a status of DOCKED). |
|
Exclude Carrier Serviced |
When selected, any FB row on the Deliveries grid that contains a ‘Beyond Carrier’ will disappear from the record list to help indicate which shipments require you to take action. |
|
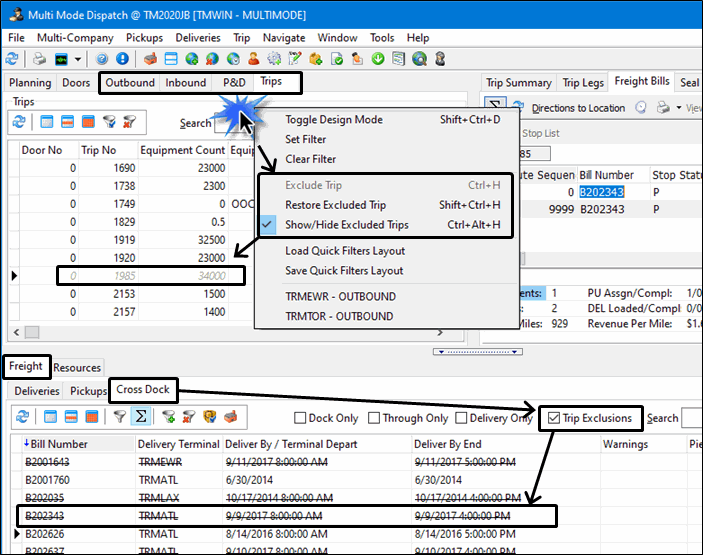
Trip Exclusions |
When selected, any trips that were flagged as "excluded" (using the Exclude Trip shortcut menu option in the Active Trips grid),
|
|
Search |
The user can type characters into the Search field to have the cursor move to the appropriate record. |
|
Filter |
The Filter field will filter the records based on the currently selected grid column header. Select one of the grid column labels to filter on it, enter text into the Filter field, then press the <Enter> key to filter the resource records. |
|
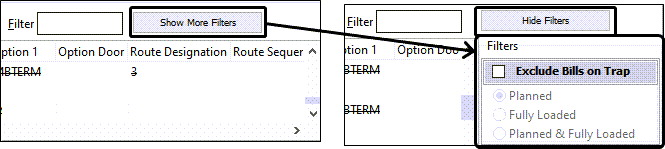
Show More Filters / Hide Filters |
Toggles to determine whether to display a list of configurable "quick filter" checkbox groups for additional filtering.
|
Special Grid Features
Prior Trip Expected Date
The Prior Trip Expected Date column displays the expected delivery date of the trip scheduled directly before the selected trip. This column and the other related prior date columns are only populated with data if the 'Load Prior Trip Fields' configuration option in 'CITY_DISPATCH.EXE' is enabled (set to 'True').

Context Menu - Deliveries tab
| Icon/Keybd | Menu Option | Definition |
|---|---|---|
<Shift+Ctrl+D> |
Toggle Design Mode |
Allows those with security permission, access to the Screen Design mode where you can create and save different layouts. See Custom Screen Design Mode and the Security Configuration program > Security > Business Events > Screen Design section. |
|
Clear Delivery Selection |
Clears any selected records in the Deliveries grid. |
|
Select All |
Allows the user to select all available deliveries requests. This is useful in the case of performing a process that involves mass numbers of deliveries. Exporting deliveries to Appian - Direct Route would be one example on that. |
|
Select/Unselect this Bill |
Toggles selection of the individual record. You can also use <Ctrl+Click> to use your mouse to select and deselect records. |
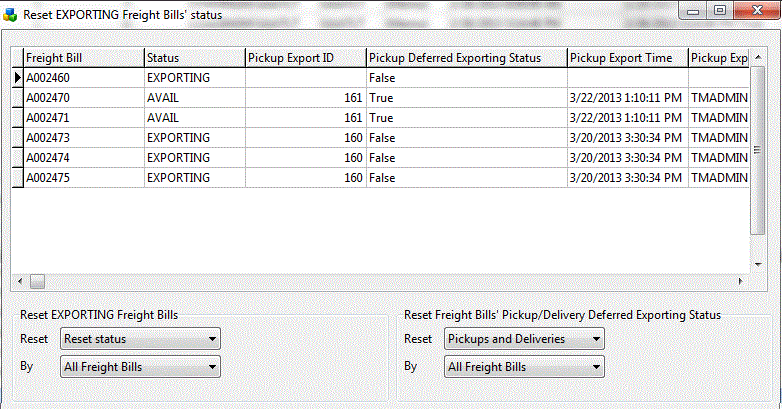
When Freight Bills are sent to Direct Route, their statuses become 'Exporting'. If for any reason the process is interrupted, the statuses of the Freight Bills that were not successfully processed remain as 'Exporting', preventing them from being selected for future routing. This option allows you to collectively revert the Freight Bills with the status of 'Exporting' back to their previous statuses. Selecting this value will open the Reset Exporting Bills' Status window.
This option displays all freight bills that were sent to Direct Route, with information on their status and Pickup / Delivery times, whether their exporting status was deferred and other information that can help you make you selections and decisions. You can use the drop down lists to select your criteria for selecting which freight bills to apply the reset action to. |
||
Multi Route Update |
If you have selected multiple freight bills in the grid, you can select this option to update the 'Route Designation' field for all of them at once. A window will appear asking the user to enter a route name, which will be entered into the 'Route Designation' field. |
|
Multi Route Clear |
If some of the records in the grid have data in the 'Route Designation' field, the user can select all of these records and then choose this option to remove the data from this field. |
|
Change Status |
This option allows you to change the Freight Bill’s status (TLORDER.CURRENT_STATUS). Available options are those status codes with an 'LTL Sort Order' value in on the Codes Maintenance program > Status tab. |
|
Change Delivery Terminal |
This option will open a new window that will allow the user to edit the 'Ending Zone' of the selected freight bill. |
|
NEW |
Split/Merge Bill |
Selecting the Split/Merge Bill window will open the LTL Freight Bill Split window, which allows the user to split a single freight bill into multiple freight bill records (in the case that a shipment must be broken up prior to transport). Once the two shipments reach their destination, they can be merged back together into a single freight bill record. |
NEW |
Freight Bill Routing Plan |
This option will open the Routing window, which is the same as the Customer Service program > LTL/Routing tab in the Customer Service program, and is used to view (and alter) terminal plans, perform intermodal marketing company (IMC) functions and for LTL freight forwarding. |
NEW |
Freight Bill Details |
This option will open a window that shows the details of the selected freight bill (TLDTL table data). The data that appears in the window is pulled directly from the Customer Service program > Details tab for the selected record. |
Dangerous Goods Details |
If there are any dangerous goods attached to a delivery freight bill (signified by icons in the 'Warning' field,) the user can select this option to open a window that shows the dangerous goods information for the selected freight bill. The data that appears in the window is pulled directly from the Customer Service program > Dangerous Goods tab for the selected record. |
|
Barcode Item Details |
This option will display details for any barcoded items. This can also be accessed by double clicking in the 'Items' column. |
See Common Shortcut Menu Options in the Active Trips section for descriptions for these shortcut menu options common to many of the grids on the Multi Mode Dispatch window.
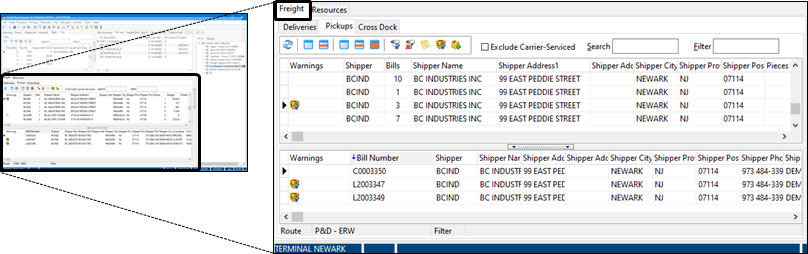
Pickups tab
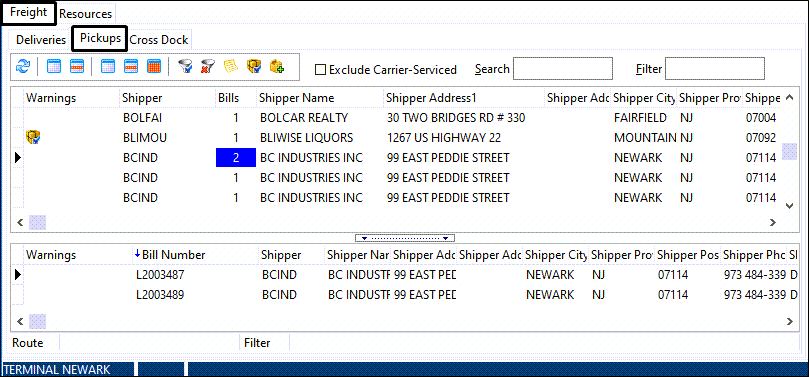
The Pickups tab displays the details of all the pickup-type freight bills available to be assigned to a trip in the Active Trips section of Multi Mode Dispatch. The details of this tab cannot be edited, but certain functions can be accessed using the context menu. The user can also drag and drop these freight bills into the Active Trips section to add them to the trip you are working with. This grid also lists the various pick-ups inbound to the terminal. Each row shows a summary data from a given location. The 'Existing Trip' field in the grid displays the number of the trip that has the same 'Pickup Location' as the freight bill, so the user can assign the bill to that trip.
| If carriers are already assigned to a trip and you match a freight bill to the same trip, the system can either recalculate carrier costs or leave them the same. To have the system automatically recalculate carrier costs every time a freight bill is matched/unmatched to a trip, set the application configuration option 'DISPATCH.EXE - ReCalc Carrier Costs after FB Match' to 'True', in Application Configurator program. |
Toolbar - Pickups tab

| Icon/Keybd | Menu Option | Definition |
|---|---|---|
|
Refresh Pickup Summary |
Refreshes the Pickups grid to check for any new pickup freight bills in the system. |
|
Clear Pickup Summary Selection |
Clears any selected freight bills. |
|
Select/Unselect This Summary |
Select this button to highlight or remove highlighting a single detail line in the grid. The user can hold the <CTRL> key and use this button to select multiple freight bills. |
|
Clear Selection |
Clears any selected freight bills. |
|
Select/Unselect This Bill |
Select this button to highlight or remove highlighting a single detail line in the Deliveries grid. The user can hold the <CTRL> key and use this button to select multiple freight bills. |
|
Select All |
Select all records in the grid. |
|
Set Filter |
Opens the standard Filter Trips window, which allows you to create field-specific or SQL-based custom filters for the grid. |
|
Clear Filter |
Select this button to clear any filter that has been applied to the grid. |
|
Freight Bill Notes |
Displays any notes associated with the currently selected freight bill. The Notes window has several of its own tabs near the bottom of the window. These are used to enter notes for the different aspects of the selected freight bill. |
|
View Shipping Instructions |
Displays any shipping instructions that have been attached to the client(s) included on the selected freight bill. Shipping instructions are created in the Codes Maintenance program > Shipping Instructions tab, and attached to specific client codes in the Customer Profiles program > Shipping Instructions tab. |
|
Create New Pickup |
Opens the Short Form Pickup Entry window used to enter Pickup information. |
Search |
Type characters into the Search field to have the cursor move to the appropriate record. |
|
Filter |
The Filter field will filter the records based on the currently selected grid column header. Select one of the grid column labels to filter on it, enter text into the Filter field, then press the <Enter> key to filter the resource records. |
Context Menu (Top grid - Pickups tab)
| Icon/Keybd | Menu Option | Definition |
|---|---|---|
<Shift+Ctrl+D> |
Toggle Design Mode |
Allows those with security permission, access to the Screen Design mode where you can create and save different layouts. See Custom Screen Design Mode and the Security Configuration program > Security > Business Events > Screen Design section. |
|
Clear Pickup Summary Selection |
Clears any selected records in the Pickups grid. |
|
Select/Unselect this Summary |
Toggles selection of the individual record. You can also use <Ctrl+Click> to use your mouse to select and deselect records. |
NEW |
Create Pickup |
@ |
NEW |
Find a Pickup Freight Bill |
Selecting this option will open a small window where you can search for a pickup freight bill by entering its freight bill number. |
NEW |
Change Pickup Terminal |
Selecting this option will open a small window that will allow you to change the selected freight bill’s pickup terminal. |
NEW |
Update Freight Bill(s) |
@ |
NEW |
Determine Interliner(s) & Rate |
@ |
?? |
Barcode Item Details |
@ This option will display details for any barcoded items. This can also be accessed by double clicking in the 'Items' column. |
NEW |
Refresh Pickup Summary |
@ |
<Ctrl+F> |
Full Screen |
Expands this grid to fill the whole screen view. Use <Ctrl+F> as a toggle to return to the previous view. |
See Common Shortcut Menu Options in the Active Trips section for descriptions for these shortcut menu options common to many of the grids on the Multi Mode Dispatch window.
Context Menu (Bottom grid - Pickups tab)
| Icon/Keybd | Menu Option | Definition The Context Menu contains some of the same options available from the Toolbar options described before. Those options described above will not be detailed below: |
|---|---|---|
Reset EXPORTING Bills' Status |
When Freight Bills are sent to Direct Route, their statuses become 'Exporting'. If for any reason the process is interrupted, the statuses of the Freight Bills that were not successfully processed remain as 'Exporting', preventing them from being selected for future routing. This option will collectively revert the Freight Bills with the status of 'Exporting' back to their previous statuses. Selecting this value will open the Reset Exporting Bills' Status window. |
|
NEW |
Hold Delivery |
Sets the selected Delivery record to a 'Hold' Status. You will be prompted to confirm. |
NEW |
Cancel Freight Bill |
@ |
<Shift+Ctrl+D> |
Toggle Design Mode |
Allows those with security permission, access to the Screen Design mode where you can create and save different layouts. See Custom Screen Design Mode and the Security Configuration program > Security > Business Events > Screen Design section. |
|
Clear Selection |
Clears any selected records in the grid. |
|
Select/Unselect this Bill |
Toggles selection of the individual record. You can also use <Ctrl+Click> to use your mouse to select and deselect records. |
|
Select All |
Allows the user to select all available bills. |
NEW |
Clear Route Filter |
@ |
NEW |
Add Route Filter |
@ |
Multi Route Update |
If you have selected multiple freight bills in the grid, you can select this option to update the 'Route Designation' field for all of them at once. A window will appear asking the user to enter a route name, which will be entered into the 'Route Designation' field. |
|
Multi Route Clear |
If some of the records in the grid have data in the 'Route Designation' field, the user can select all of these records and then choose this option to remove the data from this field. |
|
Change Status |
This option allows you to change the Freight Bill’s Status value. The only status change option available with this Context option is to change the Freight Bill status to: 'Deassign Freight from Driver (RESCHED)'. |
|
NEW |
Routing |
@ |
NEW |
Set Care of Drop Point |
@ |
NEW |
Split/Merge Bill |
@ |
NEW |
Find Trips Near |
@ |
NEW |
Update Freight Bill(s) |
@ |
NEW |
Intermodal |
@ |
NEW |
Insert Truckload Bill |
@ |
NEW |
Freight Bill Routing Plan |
@ |
NEW |
Freight Bill Details |
This option will open a window that shows the details of the selected Freight Bill (TLDTL table data). The data that appears in the window is pulled directly from the Customer Service program > Details tab for the selected record. |
NEW |
View Freight Bill |
@ |
NEW |
View Custom Defined Fields |
@ |
NEW |
Freight Bill Notes |
@ |
NEW |
Shipping Instructions |
@ |
Dangerous Goods Details |
If there are any dangerous goods attached to a pickup freight bill (signified by icons in the 'Warning' field,) you can select this option to view further details regarding the Dangerous Goods. The data that appears in the window is pulled directly from the Customer Service program > Dangerous Goods tab for the selected record. |
|
Barcode Item Details |
This option will display details for any barcoded items. This can also be accessed by double clicking in the 'Items' column. |
|
NEW |
Mark FB Received |
@ |
NEW |
Move Bill (Terminal Location) |
@ |
NEW |
Plan Bill (Terminal Location) |
@ * |
NEW |
Determine Interliner(s) & Rate |
@ |
NEW |
Reset EXPORTING Freight Bills' status |
@ |
NEW |
Refresh Bills |
@ |
Full Screen |
Selecting this option will enlarge the Pickups tab to a full screen view. Use this option if you have many Freight Bills in the Pickups tab and wish to select many of them at once. |
|
NEW <F5> |
Export to Load Builder |
@ |
See Common Shortcut Menu Options in the Active Trips section for descriptions for these shortcut menu options common to many of the grids on the Multi Mode Dispatch window.
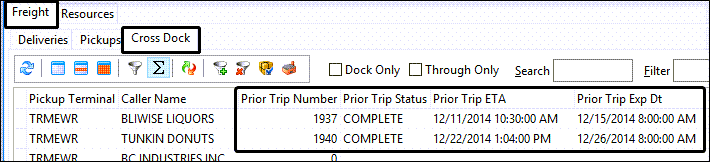
CrossDock tab
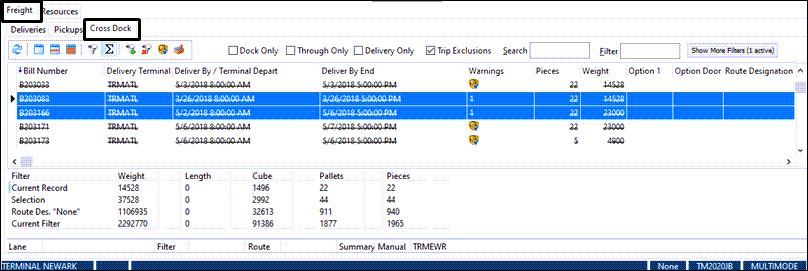
The CrossDock tab displays freight bills that will be processed from the current terminal to another terminal. It uses the same component used by the CrossDock application, allowing the user to access the functionality of the Freight Bill grid of the CrossDock program from within the Multi Mode Dispatch program, simplifying the process. However, some additional columns have been added to the grid to facilitate the function of Multi Mode Dispatch in an easier way. Those additional columns are described in the 'Special Grid Features' section.
You can edit the dates in the 'Deliver By' and 'Deliver By End' fields from within this tab grid. If you change the delivery date, then TruckMate will set the 'Delivery Appointment Made' to 'True'.
Toolbar - CrossDock tab

| Icon/Keybd | Menu Option | Definition |
|---|---|---|
|
Refresh Bills <F5> |
Refreshes the grid to check for any new freight bills in the system. |
|
Clear Selection <Ctrl+Alt+A> |
Clears any selected freight bills. |
|
Select/Unselect This Bill <Ctrl+S> |
Select this button to highlight or remove highlighting a single detail line in the Deliveries grid. The user can hold the <CTRL> key and use this button to select multiple freight bills. |
|
Filter |
Select this button to open the Freight Bills Filters window, which allows the user to create custom filters for the grid. |
|
Select All <Ctrl+A> |
Select all records in the grid. |
|
Add Route Filter |
Allows you to enter a route to use as a filter. Before selecting this option, if you click on a cell in the route column that contains the route by which you wish to filter freight bills, the route will default. Otherwise, enter the route designation by which you want to filter freight bills. After selecting this menu option, only freight bills with the same value in their Route Designation field will be displayed. |
|
Clear Route Filter |
Removes the filter on the Route field, and display all freight bills in the grid. |
|
View Shipping Instructions |
Displays any shipping instructions that have been attached to the client(s) included on the selected freight bill. Shipping instructions are created in the Codes Maintenance program > Shipping Instructions tab, and attached to specific client codes in the Customer Profiles program > Shipping Instructions tab. |
|
Change Current Terminal |
Opens a popup window that allows you to switch to a different terminal. |
Dock Only |
Allows you to restrict the grid to display only the freight that is at the Dock (e.g., has a status of DOCKED). |
|
Through Only |
When selected, only freight bills with a status associated with the behavior category of 'Through' will be displayed in the grid. If the box is not checked, all non-completed freight bills will be displayed. |
|
Trip Exclusions |
When selected, any trips that were flagged as "excluded" (using the Exclude Trip shortcut menu option in the Active Trips grid),
|
|
Search |
The user can type characters into the Search field to have the cursor move to the appropriate record. |
|
Filter |
The Filter field will filter the records based on the currently selected grid column header. Select one of the grid column labels to filter on it, enter text into the Filter field, then press the <Enter> key to filter the resource records. |
Special Grid Features
Prior Trip Expected Date
The Prior Trip Expected Date column displays the expected delivery date of the trip scheduled directly before the selected trip. This column and the other related prior date columns are only populated with data if the 'Load Prior Trip Fields' configuration option in 'CITY_DISPATCH.EXE' is enabled (set to 'True').
Context Menu - CrossDock tab
| Icon/Keybd | Menu Option | Definition |
|---|---|---|
<Shift+Ctrl+D> |
Toggle Design Mode |
Allows those with security permission, access to the Screen Design mode where you can create and save different layouts. See Custom Screen Design Mode and the Security Configuration program > Security > Business Events > Screen Design section. |
|
Clear Selection |
Clears any selected records in the grid. |
|
Select/Unselect this Bill |
Toggles selection of the individual record. You can also use <Ctrl+Click> to use your mouse to select and deselect records. |
|
Select All |
Allows the user to select all available bills. |
NEW |
Clear Route Filter |
@ |
NEW |
Add Route Filter |
@ |
Multi Route Update |
If you have selected multiple freight bills in the grid, you can select this option to update the 'Route Designation' field for all of them at once. A window will appear asking the user to enter a route name, which will be entered into the 'Route Designation' field. |
|
Multi Route Clear |
If some of the records in the grid have data in the 'Route Designation' field, the user can select all of these records and then choose this option to remove the data from this field. |
|
Change Status |
This option allows you to change the Freight Bill’s Status value. Available options are those status codes with an 'LTL Sort Order' value in on the Codes Maintenance program > Status tab. |
|
NEW |
Routing |
@ |
NEW |
Set Care of Drop Point |
This option will allow you to specify a zone code for the terminal that will be used as a 'Care Of Drop Point'. Setting this option will also populate the 'Care Of Drop Point' field on the Customer Service program > Contacts tab. This option is used when a freight bill includes a final destination (Consignee Site) but the current hauler will only be taking the freight to a specific drop point, where another carrier will continue the delivery. |
NEW |
Split/Merge Bill |
Selecting the Split/Merge Bill window will open the LTL Freight Bill Split window, which allows the user to split a single freight bill into multiple freight bill records (in the case that a shipment must be broken up prior to transport). Once the two shipments reach their destination, they can be merged back together into a single freight bill record. |
NEW |
Find Trips Near |
@ |
NEW |
Update Freight Bill(s) |
@ |
NEW |
Intermodal |
@ |
NEW |
Insert Truckload Bill |
@ |
NEW |
Freight Bill Routing Plan |
This option will open the Routing window, which is the same as the LTL/Routing tab in the Customer Service program, and is used to view (and alter) terminal plans, perform intermodal marketing company (IMC) functions and for LTL freight forwarding. |
NEW |
Freight Bill Details |
This option will open a window that shows the details of the selected Freight Bill (TLDTL table data). The data that appears in the window is pulled directly from the Customer Service program > Details tab for the selected record. |
NEW |
View Freight Bill |
@ |
NEW |
View Custom Defined Fields |
@ |
NEW |
Freight Bill Notes |
Displays any notes associated with the currently selected freight bill. The Notes window has several of its own tabs near the bottom of the window. These are used to enter notes for the different aspects of the selected freight bill. |
NEW |
Shipping Instructions |
@ |
Dangerous Goods Details |
If there are any dangerous goods attached to a pickup freight bill (signified by icons in the 'Warning' field,) you can select this option to view further details regarding the Dangerous Goods. The data that appears in the window is pulled directly from the Customer Service program > Dangerous Goods tab for the selected record. |
|
Barcode Item Details |
This option will display details for any barcoded items. This can also be accessed by double clicking in the 'Items' column. |
|
NEW |
Mark FB Received |
@ |
NEW |
Move Bill (Terminal Location) |
@ |
NEW |
Plan Bill (Terminal Location) |
@ * |
NEW |
Determine Interliner(s) & Rate |
@ |
NEW |
Reset EXPORTING Freight Bills' status |
@ |
NEW |
Refresh Bills |
@ |
Full Screen |
Selecting this option will enlarge the Pickups tab to a full screen view. Use this option if you have many Freight Bills in the Pickups tab and wish to select many of them at once. |
|
NEW <F5> |
Export to Load Builder |
@ |
See Common Shortcut Menu Options in the Active Trips section for descriptions for these shortcut menu options common to many of the grids on the Multi Mode Dispatch window.