TruckMate 2020.4 New Features: Operations
Framework
New Security > Administration tab in SECURITY.EXE (TM-153624)
A new Administration tab has been added into the Security Configuration application to contain the configuration that was previously found in the Security > Security > Administration section which has been removed.
This prevents the previous security risk where a user with access to Security could have granted themselves permission to other tabs for full TruckMate access.
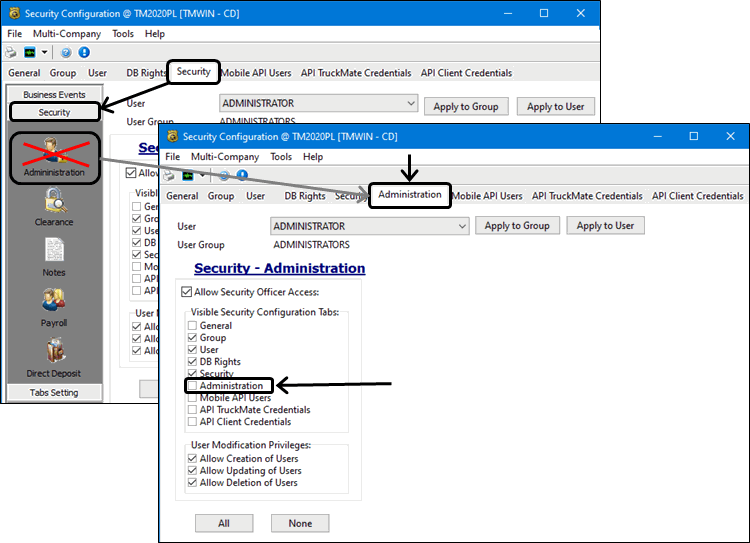
By default, only the following users will have access to this Adminstration tab when this update is applied to your database:
-
The Schema Owner (TMWIN/LYNX).
-
DB2ADMIN (providing DB2ADMIN is setup as a Supervisor user, which it should be by default).
-
All users marked as Supervisors within the system.
The Adminstration tab contains a new Administration checkbox option required to grant user access to the Administration tab.
This tab is special in that if you have access to this tab and make changes, you can apply the Apply to User and Apply to Group functions but it will ONLY update the Administration tab settings. It will not update any of the other options on other tabs within the system. Similarly, any update made on elsewhere on the Security tab will NOT update the Administration tab settings. You must explicitly apply the Apply to User and Apply to Group functions directly on the Administration tab.
| This tab was added to correct a problem where users were allowed to give themselves full access by virtue of accessing the previous Security > Administration settings. If you are setup where your users all belong to the same group and every user is marked as Supervisor, this won’t prevent the security risk. The idea behind splitting this tab is to give further security control to customers who may want some users to update the security settings on the Security tab without running the risk of giving them further access than needed. |
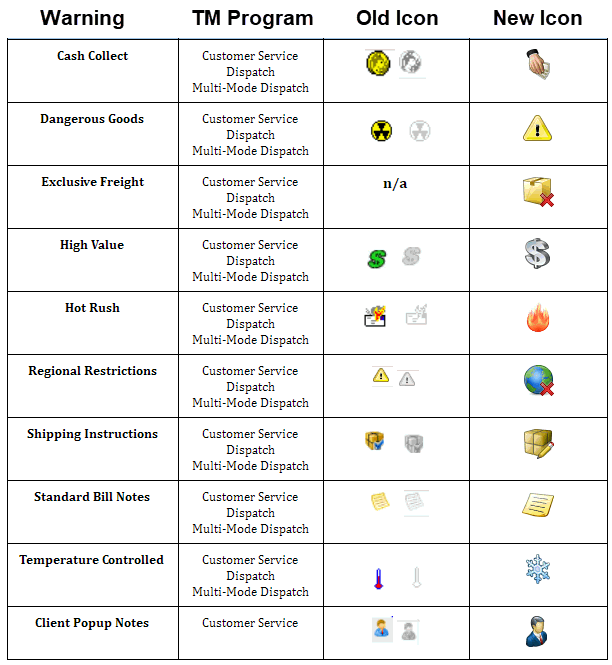
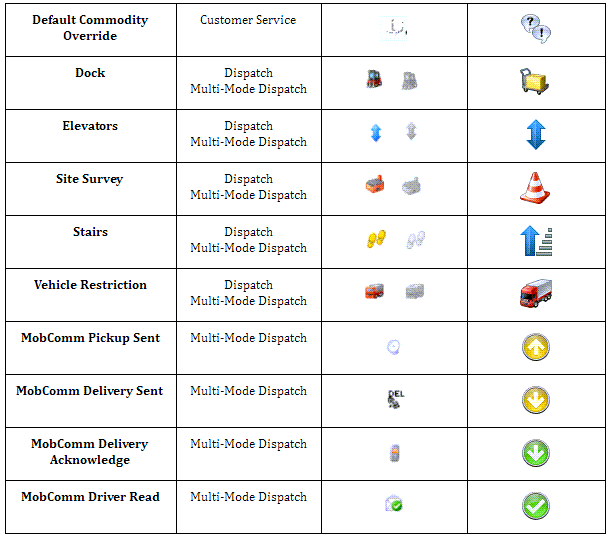
Warning Icon Updates Within TruckMate (TM-151961)
As part of a larger ongoing project, a major update was done to the Warnings structure in TruckMate to refresh the appearance of the warning icons and eliminate unnecessary 'grey' icons telling you when there was no warning.
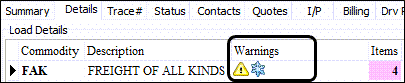
A brand new set of Warnings icons have been introduced. These icons replace all of the previous ones across all applications. (LTLBe and OrderPrePro will be similarly updated at a later date in a future release).
The locations where "grey" icons (inactive) Warnings would appear have now been removed. With the first branch of updates, this mainly impacts Customer Service - typically, all of the Warnings would be present and would light up when a particular Warning was active. This is now no longer the case - the warnings will only appear in the application when a specific Warning is active against a freight bill.
Further updates will be coming (likely in 21.1), for this project, including adding more Warnings columns across Customer Service, Dispatch and MMDisp, and also a restructuring of the Warnings design inside ConnectedDock.
Mileage and mapping
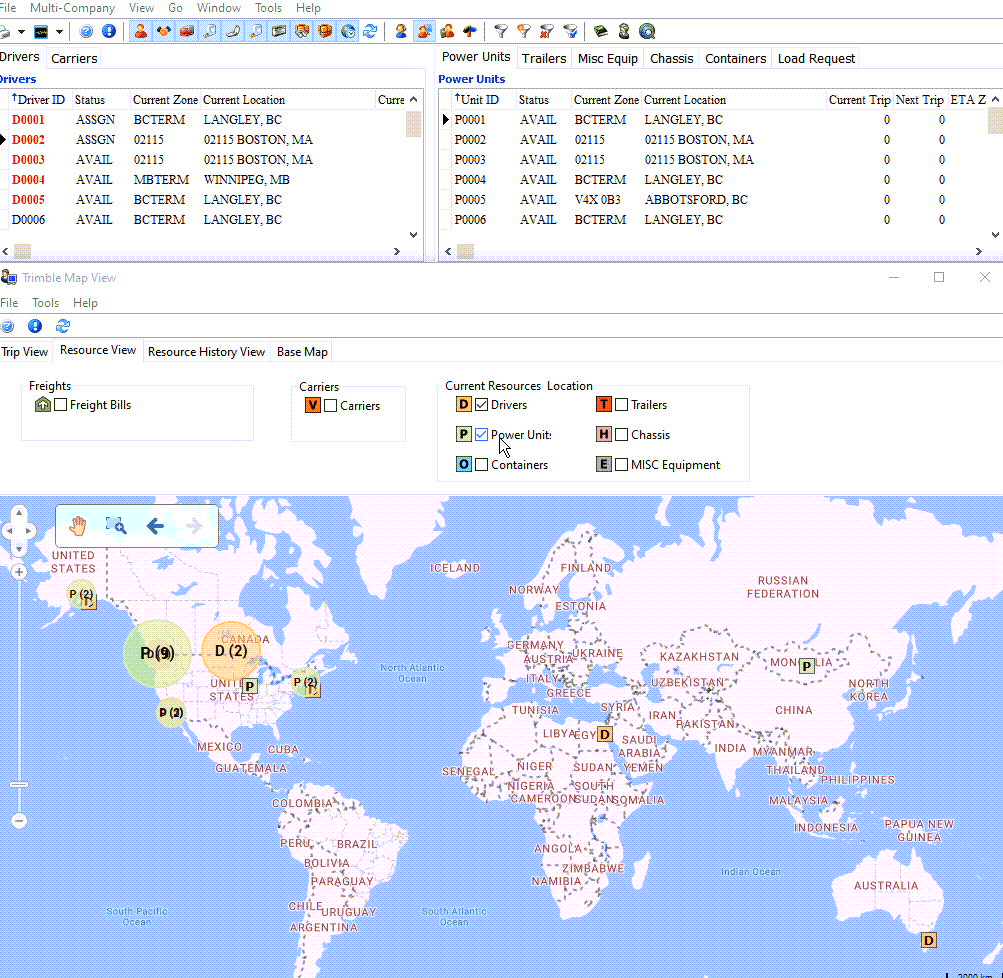
Drag and Drop added to the Trimble Map (TM-151603)
Drag and drop functionality has been added to the Trimble Map. Previously, any trip planning or trip management work and all resource assignments had to be made through either the Dispatch or the Multi Mode Dispatch applications.
Now you can assign the following resources directly to Trips from the map screen:
-
Drivers
-
Power Units
-
Containers
-
Trailers
-
Chassis
-
Misc Equipment
-
Carriers
-
Freight Bills (Dispatch)
-
Pickup Freight Bills (MMDisp)
-
Delivery Freight Bills (MMDisp)
In order to achieve this, you must have one trip displayed on the map (routing enabled). When a trip is enabled, you can can use your mouse to drag and drop a chosen resource to the trip. As you hold the resource pin over the trip, the routing line will display in yellow to show that the resource will be assigned to this trip if released.
Once done, the standard assignment checks will be in place, including:
-
Consulting the subsequent legs configs for resources to see if the user wishes to assign the resource to subsequent legs.
-
Consulting the auto-match configs for resources to determine if any additional resources should be added to the trip alongside this one.
-
Confirming the maximum amount of resources on a given Trip to ensure that too many resources cannot be attached.
-
Confirming that Special Event validations are not overridden as a result of the assignment on the Trip.
-
Confirming that Dangerous Goods restrictions, Fit for Duty, and others, are all respected upon assignment.
Once the assignment is made, the matching application (Dispatch/MMDisp) will be updated automatically showing that the assigned resource was matched to the trip as expected.
If a carrier is assigned to the trip, the Carrier Assignment screen will be displayed, requiring the user to go through the standard process of assigning a carrier to a load. Once done, the view will be returned to the map, with the carrier now assigned to the trip as expected (providing the user completed the process as expected).
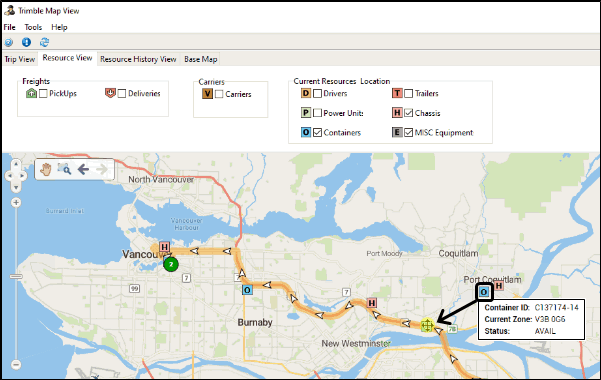
Modal warnings removed from Map and replaced with dynamic logging (TM-151875)
Previously, within the Trimble Map, if a resource was not correctly plotted, a modal error would appear while the map was loading the resources, requiring the user to close each error that appeared before resources would be drawn on the map.
Now the taskbar at the bottom of the map will indicate any warnings for the resource type(s) selected on the map.

This will apply for:
-
Drivers
-
Power Units
-
Containers
-
Trailers
-
Chassis
-
Misc Equipment
Double click the task bar to open up a single modal window, listing all of the errors that occurred when trying to load up a particular resource type.
Within this window, the errors are broken down as follows:
-
Resource - Will state which Resource ID the warning was in relation to.
-
Type - Will state which one of the six resources listed above the warning was in relation to.
-
Current Zone - Will state the actual Current Zone of the resource that failed to plot on the map.
-
Message - Will explain the reason why the resource failed to map.
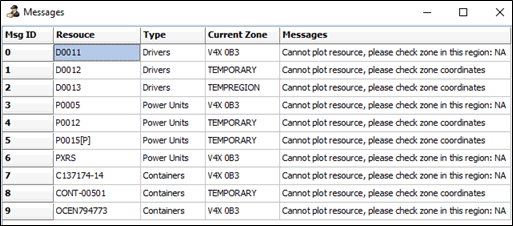
There are typically one of two messages indicating why resources failed to map:
-
"Cannot plot resource, please check zone coordinates" - this was most likely due to an invalid lat-long (or no lat long at all) given for a particular zone (ie. the current zone), and therefore the resource was not able to plot on the map.
. "Cannot plot resource, please check zone in this region" - this was most likely due to an actual invalid Postal Code or City-PC combination in which a location could not be determined.
This window indicates zones that are not mapping correctly, so you can use the information to fix up the zones within Codes Maintenance, so that eventually these resources can be mapped.
This logic was added into:
-
Dispatch
-
Multi Mode Dispatch
-
Mapview
In addition to the above, this case also saw a major performance upgrade given to the map. Previously, when attempting to plot resources, this used to take longer due to the constant reference to ALK_MAPS_GEOCODES for everything. This has now been removed - Freight Bills alone will use ALK_MAPS_GEOCODES, but resources will use the Current Zone to determine a lat-long and plot on the map.
To give an example of the sheer performance upgrade this brings, on a standard internal "lightweight" DB, it used to take ~90 seconds to plot all 6 types of resources on a map (about ~250 plots overall). Now, with the performance changes, this will take approximately 8-10 seconds to do the same, resulting in a huge improvement. This will be even more noticeable on larger systems.
Improving Multi Mode Dispatch Trip grid multiple selection (TM-152462)
The rules around selecting multiple Trips at any given time has been updated in Multi Mode Dispatch. As part of this enhancement, the way trips are mapped onto the Trimble Map hs also been updated.
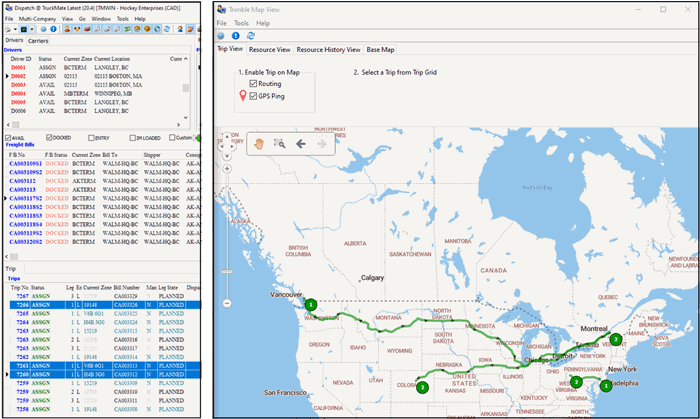
Multi Mode Dispatch
The ability to multi-select trips already in the Dispatch program has been added to Multi Mode Dispatch. The following rules are in effect when selecting multiple Trips within the Trip grid:
-
If a trip record is selected on the grid using a single click, the focus (arrow) will appear next to this trip record. This means any right-click action will occur against this trip alone.
-
If a trip record is selected using CTRL+Click, it is now part of a selection. You can use CTRL+click to select additional trips to create a larger selection set. The trips in this group can have their statuses updated together if they are shared a common status code to begin with.
-
You can select a large group of trips at once by using the SHIFT+Click method. To activate this, SHIFT+Click on the first trip, and then SHIFT+Click on your next trips. All other trips between these two on the grid will also be selected. For both CTRL+Click and CTRL+Shift functions, if a non-selected trip has the focus (as indicated by the focus arrow in the far left), any right-click actions will occur against just this trip. If the Status Change Dialog is opened, this indicates the change will be applied against all of the trips in the selection set.
-
At any time, you can use the "Clear All" option from the right-click shortcut menu to clear the selection present on the Trip grid.
-
-
The major change to the Dispatch grid is that if a selection is present on the grid, clicking anywhere within the grid will no longer remove the selection. Previously, before this change, this would be the case. Now, the selection will stay present on the Trip grid until:
-
The Trips are completed together, and disappear off of the Trip Grid, or
-
You manually remove the selection (either by using Clear All or by deselecting each one individually).
-
Trimble Maps
With this multi selection ability in Dispatch / Multi Mode Dispatch, the way trips are mapped onto the Trimble Map has been updated. The following rules are in effect when mapping trips onto the map:
-
When a single record is clicked (focused) on without a selection, that trip will display in the map. This will occur as soon as the Trimble Map View window is displayed.
-
When multiple records are selected, they will all be displayed together in the map. When this is active, any records simply clicked/focused on will not display in the map. Only trips that are part of the selection will be shown. If the selection is removed in the trips grid, then the map will revert to simply displayed the presently focused record, meaning that at least one trip will always be shown.
-
When trips are updated in Dispatch (i.e., status change), the map is also re-drawn and will reflect the changes. For example, if a trip was being mapped and a DEPSHIP at the Shipper was applied, the map would re-draw and show that particular stop as completed.
-
The same goes for any trip that is completed or cancelled. The trip will no longer display in the map, and instead the next focused record (usually the trip below) will now display in the map as it has become the new focused item.
It should be noted that while multiple trips can be mapped all at once within Dispatch, you will start to notice performance delays within the map if you attempt to map too many. This will all depend on the size of spread of the trips, number of stops, etc. Within internal testing, we noted normally a user can have approximately 5 Trips mapped at once before performance issues begin to occur.
Refresh function added to Trimble Maps (TM-153117)
A new refresh icon has been added into the Trimble Map toolbar by popular request. Previously, the Trimble Map window required you to either close and reopen the entire map to force a refresh of the Trimble Map, or deselect and reselect a particular resource on the map to force a refresh but doing so would lose your current zoom level on the map.
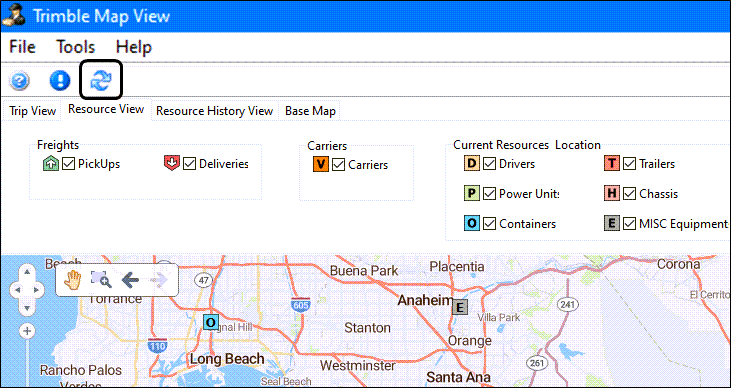
This new Refresh function will redraw all of the current plots a user has on the map, updating locations and statuses if these have changed in between the time of the last redraw/refresh. When the refresh icon is used, this will NOT reset the zoom level of the map. The zoom level will remain as is - this will allow for Dispatchers to zoom into a particular section of the map and stay there all day long, constantly refreshing to receive up to date information on resources.
This will not change the other forms of refresh logic, such as the map redrawing when filters are applied, or when new resource types are added/removed from the map - in these cases, the map will redraw AND reset the zoom level as expected.
This functionality has been added into both Dispatch and Multi Mode Dispatch. This was not added into Mapview, along with other map-worthy applications, as there is less requirement to perform a refresh within these applications.
This case also brings some additional changes into the Trimble Map program.
-
First, the Dispatch application will no longer map Pickups and Deliveries - instead, it will map just Freight Bills, which are now focused on CURRENT_ZONE. This means users using Dispatch will be able to view the exact location of bills at the flip of a button.
The Multi Mode Dispatch will retain both Pickups and Deliveries as the valid options presented to the user.
-
When resources are checked within the map, if the user is using Dispatch then the tab view will be reset to 'select' the same tab as the resource checked in the map. The GIF attached to these notes will show this in action.
Mobile Communications
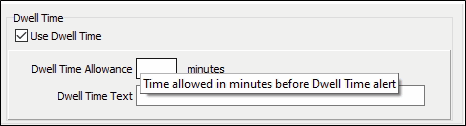
Track Dwell Time and Display Alerts (D2Link) (TM-138565)
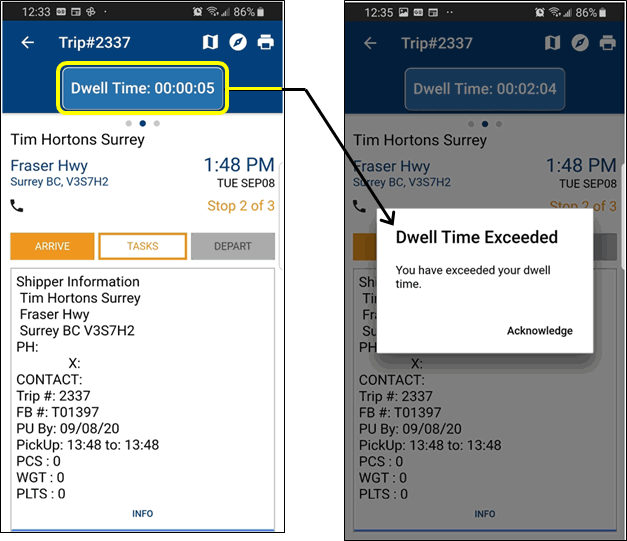
D2Link will track how long a driver has been at a location and then display a Dwell time notification in the D2Link app to notify the driver if the time at the stop exceeds a predefined value.
The Dwell time timer will start when the driver has arrived at the stop and will stop after the driver has departed the stop.
| There is no extra functionality around this that will tie into driver pay. |
The Dwell time is setup in minutes and the notification text to be displayed is entered in the D2Link stop profile wizard.
Inside the stop the dwell time time is on the top. The timer starts when the Arrive button is clicked.
Notification of the Dwell time exceeded while the driver is still on the active stop. The timer continues to count until the departure has occurred.
Ability to connect main dispatcher based on a list of dispatchers (D2Link) (TM-138562)
New functionality was added to allow a Driver, via D2Link, to easily be able to contact a specific Dispatcher that is assigned directly to the Trip the Driver is working on.
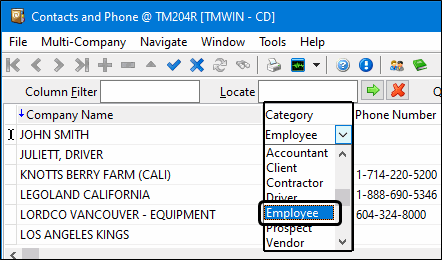
List dispatchers as contacts in phone
New logic was added into the 'Contacts and Phone' application in order to setup new Employee records. As part of the design of the project, the phone number a Driver would receive for a particular Dispatcher would come from the setup within this application.
A new Category Type of "Employee" was added into this application, so that Employee records could be created. In addition to this, a new "User ID" column was added to the grid. This field, when double-clicked, will give the user a picklist to choose from, which will list all created TruckMate Users within the system.
There are some new rules related to the Employee Category Type and User ID column.
Only one unique User ID and Type = Employee can be created to avoid any confusion about which phone number will be assoiciated with a Load Offer sent to the Driver.
The User ID restriction is not applied to other category types. For example, a User ID could be assigned to 20 different Driver records, but it may only ever exist on one single Employee record. This is all per design. The expectation is that the phone number field will be entered against the appropriate Employee record in order to determine which phone number to use.
Add DispatcherID to Dispatch and MMDisp.exe applications
New logic was added into the Dispatch and Multi Mode Dispatch applications in order for Dispatchers to be assigned to legs and a new DISPATCHER_ID column was added into the LEGSUM grid. If you are currently using filters to track which Dispatchers are responsible for certain legs, this project will provide a much easier way to do this.


A Dispatcher can be assigned to a leg in four ways:
-
Automatically assigned on Trip creation via a new Config (more details below)
-
By double clicking on the Dispatcher ID field to bring up a new picklist option.
-
By using the new menu option to Assign Dispatcher (under Trip Operations).
-
Using the Quick Match functionality.
When a Dispatcher is assigned to a specific leg, the user assigning said Dispatcher will receive a prompt asking if they wish to assign the Dispatcher to subsequent legs. If so, the Dispatcher will be assigned to all future legs of the same Trip.
If the Dispatcher needs to be removed from a particular leg, they can be removed via the following methods:
-
Using the Deassign menu to remove the Dispatcher.
-
By backspacing on the column to quickly remove the Dispatcher.
When removing a Dispatcher, you will be asked if you also want to remove them from subsequent legs.
Multi Mode Dispatch will work in exactly the same manner - the column can be found under the TRIP LEGS tab, and Dispatchers can be assigned and deassigned in the same manner.
A new Application Configuration was added to support this feature.
Utilities > Application Configurator > DISPATCH.EXE
| Option | Description |
|---|---|
Assign Dispatcher ID to new legs |
Determines if the dispatcher will be assigned to the legs when a trip is created.
|
Send Dispatcher contact in D2Link Trip Header
The final part of this project was the addition of the new call button into D2Link, and the logic tied together with the information above.
In D2Link, if a Dispatcher is attached to a particular leg that a Driver is offered, they will see a 'Call Office' button at the top of the Trip screen. This is the direct link that the Driver can use to call the Dispatcher.
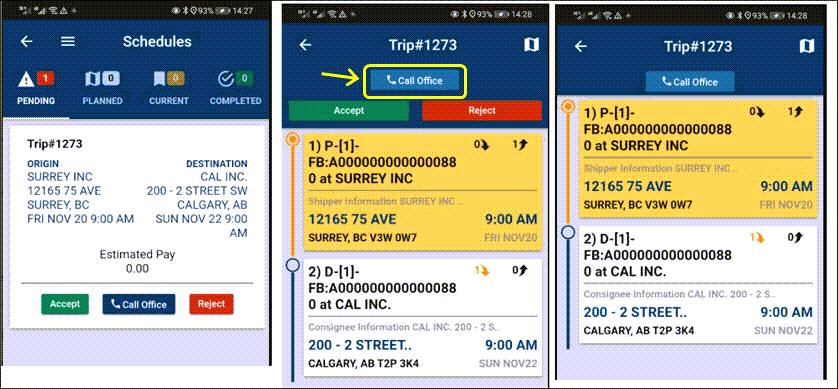
If this button is pressed, it will open the native Phone application on the device the Driver is using (if it has phone functionalities). If it does, the number associated with the Dispatcher attached (pulled from the Phone.exe application in TruckMate) will automatically be entered into the call window.
Dispatching Operations
TM-124353 - Quick Filters added to Dispatch (TM-124353)
Quick Filter logic was originally added to Multi Mode Dispatch in TruckMate 2020.1 and now in 2020.4 this logic has been added to the Dispatch program.
Quick Filters can be setup and used within the following Dispatch grids:
-
Drivers
-
Carriers
-
Power Units
-
Trailers
-
Misc Equipment
-
Chassis
-
Containers
-
Load Requests
-
Freight Bills
-
Trips
Any Quick Filters that are created can be used across either Dispatch or Multi Mode Dispatch, if they are setup appropriately.
Quick Filters can also be used in tandem with existing Dispatch filters, meaning a TruckMate User can have a standard AND other sets of Quick Filters enabled on a grid at any given time, allowing for maximum filtering capabilities and flexibility.
Existing filter security will be applied. If a user does not have permission to add new filters, they will be unable to create new Quick Filters. If they do not have permissions to change filters, they will not have permission to enable Quick Filters within the Dispatch grids.
The existing Quick Search (F3) logic will also work in tandem with the new Quick Filters, along with the existing Smart Filtering in Dispatch. However, while all can work together, Quick Filters are, if setup correctly, powerful enough to easily encompass the logic of both and still give the user more control over searching for specific items.
Quick Filters will not interfere with any existing CUSTOM_GET_DISP_TRIP_QUERY’s, and will allow for enhanced filtering (i.e, a Quick Filter can be setup to query a User Field that is pulling custom data from a chosen location).
Container fields added to Trip Tracer (TM-152049)
New CONTAINER_TLORDER columns were added to the Trip Tracer base grid to use when searching for records:
| Container Number = Container Code + Container Digit. |
-
Container Number (CONTAINER_NUMBER)
-
Container Code (CONTAINER_CODE)
-
Container Digit (CONTAINER_DIGIT)
-
Container Size (CONTAINER_SIZE)
-
Container Type (CONTAINER_TYPE)
-
Container Owner (CONTAINER_OWNER)
-
Container Iso (CONTAINER_ISO)
-
Notify Date (NOTIFY_DATE)
-
Bill Of Lading (BILL_OF_LADING)
-
Vessel (VESSEL)
-
Voyage (VOYAGE)
When a CONTAINER_TLORDER record exists against a freight bill that is pulled into the Trace grid, the container information will show. This information will be displayed against the Parent bill and the Empty Move bill (-I/-E, depending on the type of movement).
The container information will not be present on chassis movement bills (-C/-H), as these bills would typically not include a container.
These new fields will not have options to search by, but will always be pulled up if the CONTAINER_TLORDER record exists. These new fields also do not impact the Tracer report (it will continue to run as normal without any additional issues).
Centralize Intermodal Container Creation (TM-152954)
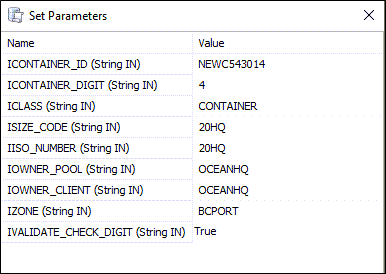
A new TruckMate Stored Procedure, SP_ADD_CONTAINER, provides a quicker, more streamlined creation of Containers within TruckMate. While this will immediately be called by API functions, this new functionality will improve Container creation in TruckMate as a whole.
This Stored Procedure can be called and used to enter in the properties for a Container with the following requirements/parameters:
-
CONTAINER_ID
-
CONTAINER_DIGIT (Check Digit)
-
CONTAINER_NUMBER (Container ID + Check Digit)
-
CLASS
-
SIZE_CODE
-
ACTIVE_IN_DISP
-
CONTAINER_OWNER
-
OWNERSHIP_TYPE
-
ZONE
-
STATUS
-
ETA_DATE
-
ISO_NUMBER
-
LOADED
-
CONTAINER_POOL
-
DIST_UNIT
-
TIME_UNIT
-
CREATED_BY
-
CREATED_DATE

As part of this enhancement, a new SP_VALIDATE_CONTAINER Stored Procedure was added to validate new Containers being added into the system via the SP_ADD_CONTAINER process. This will help to ensure that the mandatory fields involved in this creation are correct, so that we will not be inserting an already-broken record into the TruckMate system.
Per the new stored procedure, the following fields will be included in the validation check:
-
Container ID
-
Container Owner
-
Container Check Digit
-
Container Size
-
Container Type (Class)
-
Container Zone
-
Container ISO Number
-
Container Owner Pool
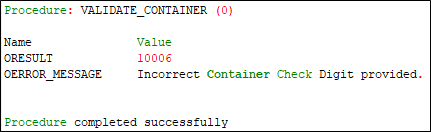
If the validation is run and passes successfully, a result of "0" will be returned, within a result message stated "Passed Validation".
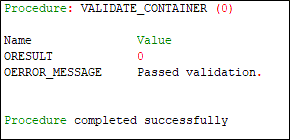
However, if the Container fails the validation, an actual error code will be received. The following table describes each of the current error codes and the reason why the error code will be received:
| Error Code | Reason for Error Code |
|---|---|
10014 |
Invalid Owner Pool Entered |
10013 |
Invalid ISO Number Entered |
10012 |
Invalid Zone Entered |
10011 |
Zone Missing |
10010 |
Invalid Container Type |
10009 |
Container Type Missing |
10008 |
Invalid Container Size |
10007 |
Container Size Missing |
10006 |
Incorrect Check Digit |
10005 |
Non-Numeric Check Digit Entered |
10004 |
Container Check Digit Required |
10003 |
Invalid Container Owner |
10002 |
Container Owner Missing |
10001 |
Container ID Missing |
HAZCHEM Codes added to Dispatch/Multi-Mode Dispatch (TM-153508)
Support for Hazchem codes has been added to the freight bill and trip grids in the Dispatch and Multi Mode Dispatch programs.
What is HazChem?
Hazchem is the warning plate system used in Australia (and others), for vehicles transporting hazardous substances, and for use on storage facilities. In the event of an accident involving a trailer/resource carrying dangerous goods, the plate/information about the load will inform emergency services on what the current danger level is based on the cargo contents, and potentially which approach should be taken to remove the danger level.

How do the HazChem codes work?
Each dangerous good, based on UN Codes, is assigned a specific structured HazChem code which is broken down into different sections.
Bullet Point - Either present or not present.
Number - Will range from 1-4.
Letter - determines what equipment will be needed, including how substance should be controlled.
E - whether evacuation should be considered in the event of an accident.
Freight Bills with different Hazchem codes can be added and removed from Trips at anytime, so the HazChem logic is dynamic enough to show the HazChem value on the leg specific level, rather than the Trip base level.
What does TruckMate do with HazChem codes?
In Bulk Codes, customers can directly assign the HazChem codes to specific items. All of these are specified by the NCEC. When a Dangerous Goods item (UN Code) is assigned against a Freight Bill, if that record contains a UN Number it will also assign the HazChem code to the Freight Bill. For example, if UN Code 1978 was added to a Freight Bill, the code 2WE would be added to the bill.
In the event of multiple HazChem codes, there is a structure to determine how the final HazChem code should be calculated.
The National Chemical Emergency Centre (NCEC) in the United Kingdom provides a Free Online Hazchem Guide that can be downloaded as a PDF file from NCEC’s website: Dangerous Goods Emergency Action Code List 2017.
In Dispatch and MMDisp, the same process will apply - the HazChem code will correctly generate based on all of the bills present on each given leg. This will therefore inform the customer with HazChem hazard placard should be placed on a given resource, so that in the event of an emergency the correct response can be taken to minimize the risk of destruction.
Customer Service > Dang. Goods tab

Customer Service > Summary tab
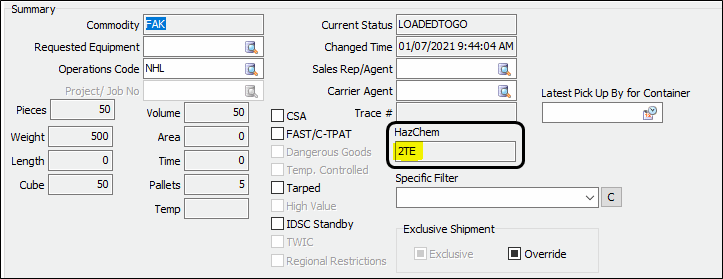
Multi Mode Dispatch > Trip Legs tab

Enhanced Bulk Update of User Defined Fields (TM-152434)
Four new checkboxes have been added to the screen used for Bulk update of User Defined Fields accessed by the View/Edit User Defined Fields on Selected Bill(s) shortcut menu option for the Freight Bills grid on the Dispatch program.
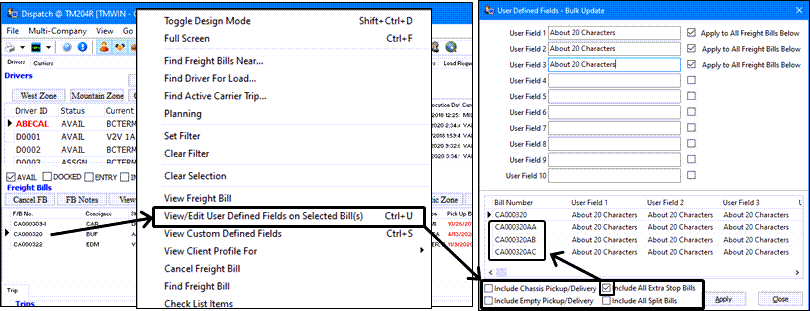
You can enter values in the User Defined Fields window and these will be applied to the indicated user defined fields: User1, User2, User3, etc. The bottom grid displays the existing values in the user fields that will be overwritten.
The new checkboxes at the bottom allow quick inclusion of related freight bills. Additional records related to the one initially displayed will be included in the grid.
-
Include Chassis Pickup/Delivery
-
Include Empty
-
Include All Extra Stop Bills
-
Include All Split Bills
Click Apply to apply the entered values.
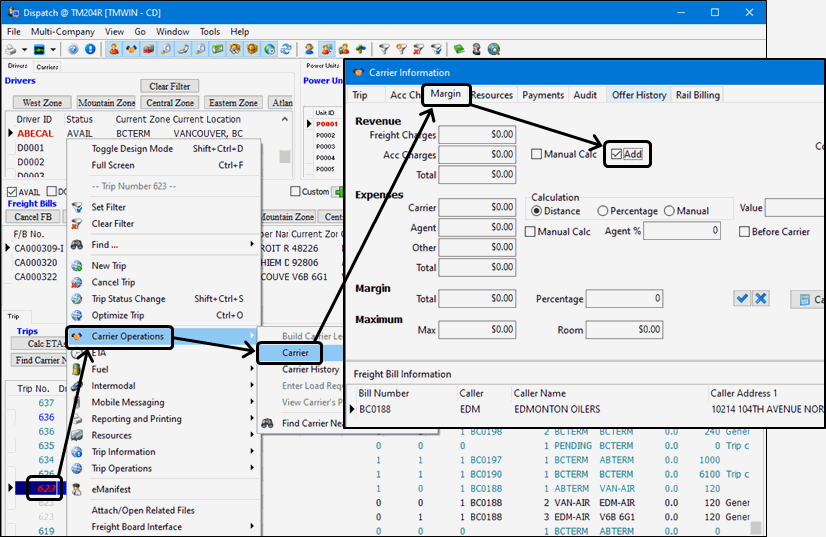
Add checkbox on Carrier Information > Margin tab selected by default toggle logic (TM-151944)
The logic determining whether the Add checkbox is selected or not on the Margin tab of the Carrier Information window has been modified:
-
For a newly created record, the Add checkbox value comes from the Windows registry.
-
For existing records, the Add checkbox value comes from the database.
-
The last checked value of the Add checkbox value is saved to the Windows registry.
ConnectedDock
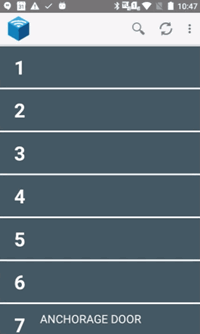
ConnectedDock Quick Unload function (TM-139683)
This feature allows you to add the ability to quickly unload items from ConnectedDock without having to go into the Item Details page for each one.
ConnectedDock already has an option to have a quick loading method, via the ConnDockAdmin setting "Immediate load when scan item in Trip screen" but the closest unloading option was the "Auto Unload" feature, but this would only ever unload items direct to an associated Bay (attached to the Door where the Unloading was occurring).
A new Quick Unload menu item is now available from the ConnectedDock Unloading Screen (when the Dock Worker logged in has permissions to do so), allowing you to unload items at a much faster rate.
A new UPDATE option was also created inside the Terminal location screens, allowing Dock Workers to update items directly, rather than having to always do a "move" action (which was always required before).
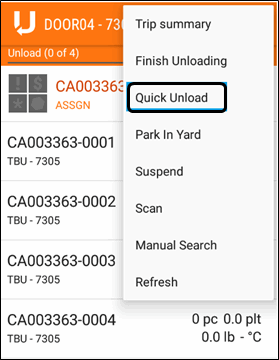
When the Quick Unload menu option is pressed, the Enter Quick Unload Location prompt allows the Dock Worker to manually enter or scan any valid location, save and apply it. The following locations can be scanned:
-
Dock Location
-
Bay Location
-
Cage Location
-
Trip Number
-
Door Number (Door Num, Door Code or Alt Code)
-
Resource ID’s (must be parked at a Door to be valid)
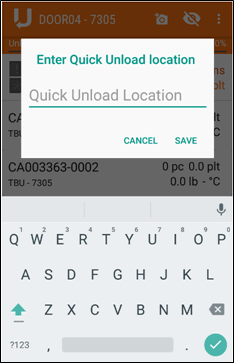
| If the Dock Worker has previously entered Quick Unload mode on this Trip in the same Door session, the previously entered/scanned value will be retained in the field, and can be removed as needed. |
Once done, the new Quick Unload view is displayed, which is distinguishable by two notable items:
-
The different background dark yellow colour on the screen indicates the Dock Worker is now in Quick Unload mode and the "Unload To" location is displayed.
-
A new UNLOAD TO bar will be present just below the Door Number. This will inform the Dock Worker which unload location they are currently unloading items too.
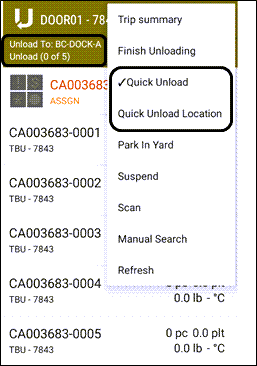
On the menu itself, the Quick Unload option is currently checked and there is also a Quick Unload Location menu option that can be used to change the specified Unload To location.
Once the Quick Unload mode is activated, you can simply either tap or scan on an item to immediately unload it from the Trip. When this is done, you will NOT go through the Item Details screen to allow the user to unload the Trip at a much faster speed rather than having to go through the Unload To location every single time for each item. At this stage the standard unload validations will occur (confirming the Terminal Location selected is valid, confirmed the Loading Trip is valid, etc.).
If, at any stage, you want to edit the details of an item, or enter in OSD values, you can do a long hold on a particular item which will display the standard Item Details screen for that itme. Once any modifications are made, you can click the checkmark - at this stage, the item will then immediately unload to the chosen Unload location.
If you want to end working in the Quick Unload mode, do one of three things:
-
Navigate "back" a page to the Terminal Screen. Once you leave the window, the Quick Unload mode will end. When you go back into the Door, the standard Unloading mode will be reenabled.
-
Select the 'Quick Unload' menu item again to disable the Quick Unload mode and return to the standard Unloading mode.
-
Use the Finish Unloading option to quickly unload the rest of the items.
However, it should be noted at this point that AUTOUNLOAD cannot be used while Quick Unload is active. If you want to Auto Unload the remaining items, you must end Quick Unload mode, and then use Auto Unload.
Changes to ConnectedDock (Update Functionality): In addition to the changes above, ConnectedDock will now offer Dock Workers the ability to update individual items that are currently location in a Terminal Location (Dock/Bay/Cage/Trap) by simply saving the item, meaning that only a dimensional history record is created and NOT an Item History (movement) record.
You can see this new option by either scanning an item directly from the Terminal screen, or scanning a Dock/Bay/Cage/Trap location, and then navigating inside an item. When you do so and go to the Item Details screen, you see the new SAVE option:
On this screen, this will replace the OSD flag but you can still access the OSD button from the parallel item screen.
Once you select the SAVE button, the ConnectedDock screen will return to the original screen you came from (e.g., Terminal Screen would go back to Terminal Screen, Terminal Location would go back to Terminal Location, etc.). The information altered in the item would be saved to the TLORDER_ILT record, and a TLORDER_ILT_RTLDTL will also be created. A TLORDER_ILT_HIST record will not be created (unless Temperature is edited, as all Temperature records are recorded under TLORDER_ILT_HIST).
Certification of Zebra MC3300 and MC9300 Devices (TM-141525_TM-141527)
The Zebra MC3300 and MC9300 Devices have been officially certified for use with ConnectedDock.
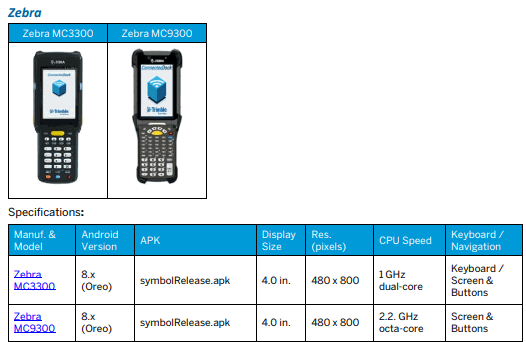
The Zebra MC3300 and MC9300 are available in versions 2020.1 and above (with the correct Fix Pack level for 20.1, 20.2 and 20.3).
Additional information about ConnectedDock Supported Devices can be found on the Trimble Transportation Learning Center.
Adding Unloading Doubles Logic To ConnectedDock (TM-141628)
The ConnectedDock application has been modified to better handle the Unloading and Loading portions of 2+ (doubles) trailers and the behaviour once dock activities are enabled for them.
Now when a trip with 2+ trailers is parked at a door, the ConnectedDock application will correctly prompt the user in stating that the trip has appropriately been split, and the second trailer was split and parked at the door requested. The user will then need to choose a new location, either the yard or another door, to park the next trailer at.
If there are more than 2 trailers, this process will continue until all trailers present on that trip are correctly parked at a door.
This process correctly aligns with Multi Mode Dispatch now and the same functionality is present in both applications
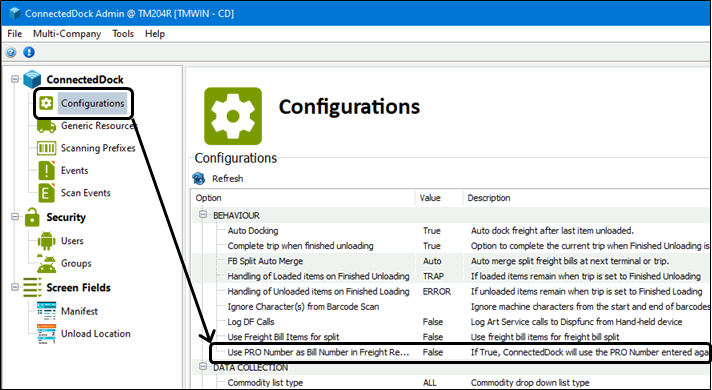
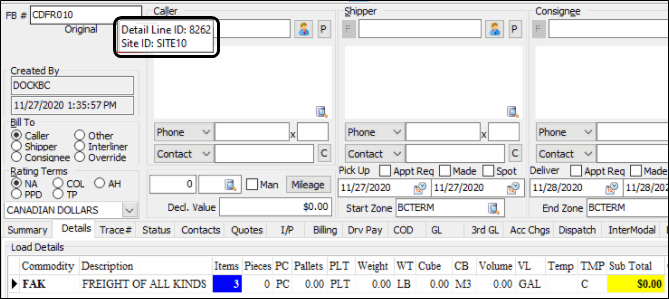
Using PRO Number as Bill Number via Receiving Freight (TM-151041)
Use the pro number that is captured within connected dock as the bill number OPEN
The purpose of this project, requested by a customer, was to allow for the ability to use PRO Numbers entered against Freight Receiving orders to actually become the Freight Bill Number of a particular order, rather the using the system-generated one from the SITEID assigned against a particular order. This saw changes to both ConnDockAdmin and ConnectedDock.
ConnectedDock Admin
A new Application Configuration was added:
Utilities > Application Configurator > IMCONFIG.EXE
| Option | Description |
|---|---|
Use PRO Number as Bill Number in Freight Receiving |
Determines what logic to use when new orders are created via Freight Receiving to determine what the freight bill number will be created. Use the pro number that is captured within connected dock as the bill number or use the SITE logic assigned to the Terminal.
|
ConnectedDock
When the new Config setting is set to True, a number of new functions will take over within the ConnectedDock application.
-
On the Receiving Freight creation screen, the value a user enters into the PRO Number field will become the new Freight Bill number.
This can either be manually entered in, or scanned in, depending on user preference.
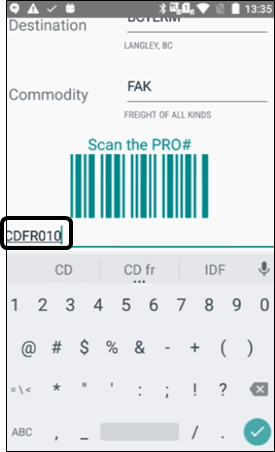
-
This PRO field, (when the app. config. is True), will have a maximum allowance of 17 characters since the BILL_NUMBER field has a maximum of 20 characters, and must account for Extra Stop bills being created (which adds 3 characters).
-
If the PRO number is valid, all other fields have been added and the checkmark is selected, the order will be created.
-
When the Dock Worker is taken to the next screen, they will see their PRO Number is now defined as the Bill Number of the order.
-
When new items are created under this Bill Number, the item is created with the correct PRO Number (Bill Number) plus the Item Identifier.
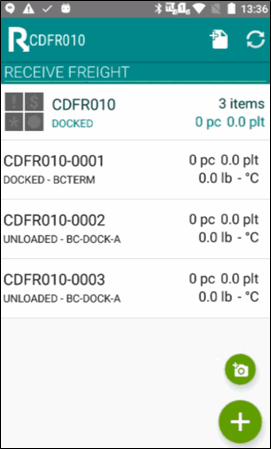
-
Alternate Barcodes are stored against items as normal.
-
Customer Service
-
When reviewed in Customer Service, the order is effectively created as expected as a "manual Bill Number".
-
The notable difference is that the SITEID assigned to the Terminal via Terminal Maintenance IS recorded against the Freight Bill, so it can still be used for filtering purposes.
-
Even though the SITEID is stored against the Freight Bill, the site sequence of the bill is not increased as a result.
-
-
The order can then be updated manually in Customer Service to add customers and additional details as needed.
-
If additional items are added in Customer Service or MMDisp, they are also correctly created with the PRO Number + Item Identifer.
-
-
The Trace Number is still correctly populated with the same PRO Number (meaning the Bill Number and Trace Probill Number will align).
-
This allows for the main Probill number to be scanned in ConnectedDock to view the bill as a whole, and the specific item number scanned to load/unload the items as required.
-
-
The Freight Bill can then be assigned to Trips without problems.
-
The Freight Bill can be unloaded and loaded onto Trips without problems.