Driver Call-In - Messaging functions

Messages sent from the TruckMate system (using the Dispatch program or Driver Call In program) to remote devices are called 'Forward' messages. Messages sent from Drivers (via the Mobile Communications equipment in the Power Units) are called 'Return Messages'.
F
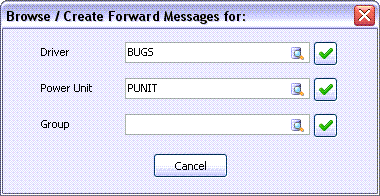
In the main Driver Call In screen, the 'F' button allows the User to access the Forward Messages form. The Browse / Create Forward Messages window will display, where you select the Driver, Power Unit, or group to whom you want to send or view forward messages. Remote devices are assigned to Power Units in the Mobile Device Maintenance program.
| Field | Description |
|---|---|
Driver |
If a Driver was selected in the main Driver Call In screen, that Driver’s code will default in the Driver field. Select a different Driver by clicking on the down arrow and choosing another Driver from the drop down list box. Click the check mark to the right of the field. Because all remote devices are assigned to Power Units, the system must determine the Power Unit in which the Driver is currently located. The system will first look for a Power Unit assigned to the Driver’s current Trip. If this Power Unit is not found, or is not configured with a mobile device in the Mobile Device Maintenance program, the system will look at the Driver’s last Trip and use the first Power Unit that is configured in the Mobile Device Maintenance program. Note: If you send a Load Offer macro (as configured in the Communication Macro Setup program) the last Trip will be ignored If this step does not yield a Power Unit with a remote device, the system will look at all the Trips to which this Driver is assigned, and attempt to determine a Power Unit by ordering the assigned legs by Pick Up By date. The first Power Unit in the list that has an assigned mobile device will be used. |
Power Unit |
To send a message directly to a Power Unit (regardless of the Driver) enter the starting characters of the Power Unit’s code in the field, then click the down arrow to select from the drop down list box. Click the check mark to the right of the field to proceed. |
Group |
To send a message to a group of remote devices, enter the starting characters of the group code in the field, then click the down arrow to select from the drop down list box. Click the check mark to the right of the field to proceed. Groups are configured in the Mobile Device Maintenance program. |
R
In the main Driver Call In screen, selecting the 'R' button in the 'Return Messages (All Drivers)' section will allow the User access to the Return Messages form. The Unread Return Message window will display any messages that have recently been received by TruckMate from your Drivers/Power Units.
All Message View
Selecting the 'All Message View' button will open the All Message View window of the Driver Call In program.
Driver <Driver Name>
Selecting the 'Driver <Driver Name>' button will open the All Message View > Return Message Tab with only the messages sent from the selected Driver displayed.
Forward Messages
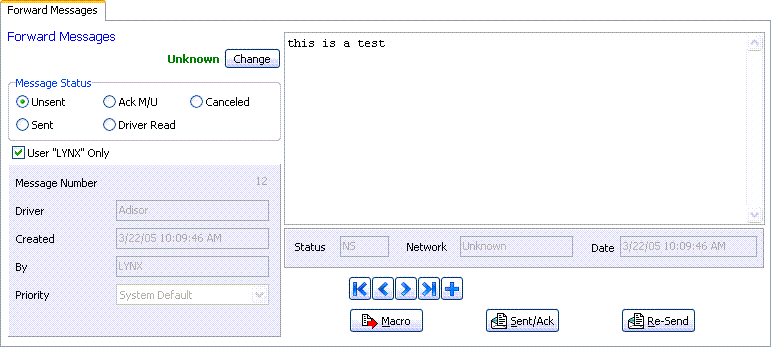
The Forward Message Tab is used to create and view forward messages for the selected Driver, Power Unit or group. To create a free form message (rather than a macro), click the Add button on the navigator bar under the macro / message display area, and enter the text of the message in the macro / message display area above. When you click the Post button on the navigator bar, the message will be released to the Communications Manager program for transmission. To send a macro, see the Macro section below. The Summary section at the top of the screen displays information about the Driver or the Power Unit’s current Trip and location, or the group (depending on the recipient type selected above).
Change
This button allows you to change the Mobile Communications Network that the Forward Message will use. Click the 'Change' button to open a small window listing your available Mobile Comm Networks. Select the radio button next to the Network you would like to use and click the 'OK' button.
The chosen Network’s name will be displayed on the main form, next to the 'Change' button.
Message Status
You can view Forward messages of any status for the selected Driver. Select the Message Status, and then use the navigator bar to scroll through messages of the selected status. 'Unsent' messages have not yet been processed by the Communications Manager program. 'Sent' messages have been processed by the network software (such as Cancom’s QTracs software) but have not yet been received by the remote device. 'ACK M/U' messages have been received by the remote device. 'Driver Read' messages have been read by the Driver (this status is only available with the Cancom and AMSC networks, and the Return Receipt option in the Communications Manager program must be enabled). 'Canceled' messages have been canceled any time before being received by the remote unit.
Message Number
This section displays information about the message, including the message number (assigned by TruckMate) and the date the message was created and received by the Communication Manager program. When creating a forward message, you can override the message priority by selecting another value from the Priority drop down list box. Default priorities are configured for each macro in the Communication Macro Setup program, and default macro priorities are set for each network in the Communication Manager program.
Status
Displays the message’s current status, either 'R' (Read), 'NR' (Not Read) or 'C' (Canceled).
Network
Displays the network by which the message was sent.
Macro
To select a macro, click this button. A list of forward macros configured for the selected network will be displayed. Double click to select the desired macro. The macro fields will display in the macro display area. Use the drop down list boxes in the macro to select the data you wish to transmit to the remote device. When the macro fields are filled in, click the Post button on the navigator bar to send the macro to the Communication Manager program.
| If you see the message 'Macro based messages are not available with Manual Messaging', you are attempting to send a Macro message to a Driver that has never received such messages before. TruckMate tries to match a Driver to a mobile communications device based on previous messages sent, or by the Power Unit that a Driver was last assigned to. If a new Driver has met neither of these criteria (never received communications or been attached to a communications-enabled Power Unit) the message will be set to 'M' and get stuck in the Mobile Comm system. Because of this, you will not be allowed to send Macro-based messages to such Drivers. |
Sent / Ack
You can change the status of an unsent message or macro by clicking this button. The message / macro status will be changed to the equivalent of 'Driver Read'; that is, the message status will be changed to indicate that the message has been sent and acknowledged by the remote device.
Re-Send
To re-send a message or macro that has been previously sent, click this button. A new message will be created that is a duplicate of the original message.
Context Menu
Print Message
Will send the message or macro that is currently displayed to the printer that is configured as the default for the workstation.
Print Preview
Will display print preview of the message or macro that is currently displayed. Click the 'Printer' button to select a printer other than the workstation’s default. The 'OK' button will send message or macro to the selected printer.
Show Message History
Will display a form that displays the date and time of the message’s status changes.
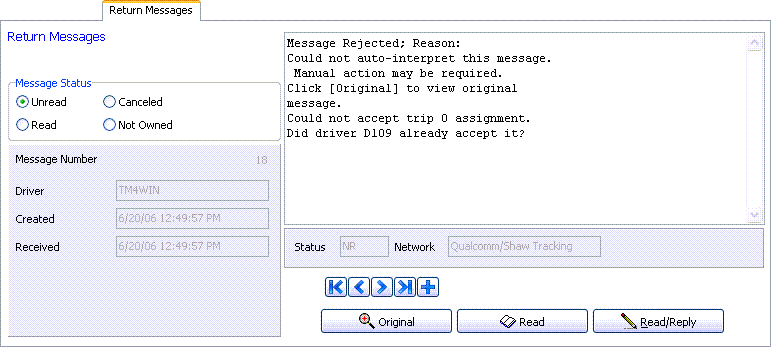
Return Messages
Messages sent from remote devices to the TruckMate system are called 'Return' messages. The Return Messages button will display text in green that says 'New Messages' if there are unread Return messages from any Driver. To view unread Return messages, click the button labeled 'R' in the Return Messages section. A list of Drivers for whom there are unread messages will be displayed. Double click to select a Driver, and the Return Messages Tab will appear for that Driver.
| You can view all messages, regardless of their direction or status, using the 'All Message View' function. |
Summary
The Summary section at the top of the screen will display information about the Driver’s current Trip and location.
Message Status
You can view Return messages of any status for the selected Driver. Select the Message Status, and then use the navigator bar to scroll through messages of the selected status.
Message Number
This section displays information about the message, including the message number (assigned by TruckMate) and the date the message was created and received by the Communication Manager program.
Status
Displays the message’s current status, either 'R' (Read), 'NR' (Not Read), 'C' (Canceled) or 'XR' (Canceled Read).
Network
Displays the network by which the message was sent.
Original
If this message was a reply to a Forward message, use the Original button to display the original Forward message.
Read
Click this button to change the status of the message from 'NR' (Not Read) to 'R' (Read).
Read / Reply
Will change the status of the message to 'R' (Read) and will generate a new Forward free format message to the Driver.
Context Menu
Print Message
Will send the message or macro that is currently displayed to the printer that is configured as the default for the workstation.
Print Preview
Will display print preview of the message or macro that is currently displayed. Click the 'Printer' button to select a printer other than the workstation’s default. The 'OK' button will send message or macro to the selected printer.
Show Message History
Will display a form that displays the date and time of the message’s status changes.
All Message View
The All Messages View window displays all 'Forward' (from the TruckMate system to the remote device) and 'Return' (from the remote device to the TruckMate system) messages based on the message status that you select. Click on the Forward Tab or Return Tab to view messages of either type. The contents of the message (Forward or Return) will display in the bottom left portion of the form.
Common Functions
Days to Show
Enter the number of days for which you want to view messages.
Search History
Clicking the 'Search History' button will open a window where you may search for Forward / Return Messages (depending on which Tab you are working with). The search window will allow you to search by: 'Network', 'Device', and / or 'Macro', and will allow you to specify the number of 'Days' back you would like to include in the search. Click the 'Search' button to generate a list of Messages based on your chosen criteria.
Sensor Information
This button will only display if you are viewing a Driver with an installed Omnitracs Device. Shows a history of SensorTracs readings. SensorTracs is an optional cable that Omnitracs devices use to gather engine control data such as odometer, fuel and reefer temperature.
What Happened?
This button will only display if you are viewing a Driver with an installed Omnitracs Device. Shows the state of various resources that are associated with the selected message. For instance, it’ll display a few pieces of information for the Driver, Power Unit and Mobile Communications Device. It’ll also show Dispatch information available at the time the message was processed. The 'What Happened' feature is basically for digging deeper into a message to see how a message was processed and what environment it was being processed in.
Location
Is only available for Return messages. This button will display a form that shows the Power Unit’s position at the time that the message was sent, and the unit’s current position.
Forward Messages Tab
The Forward Messages Tab displays messages that have been sent from the TruckMate system to the Power Unit’s Mobile Device.
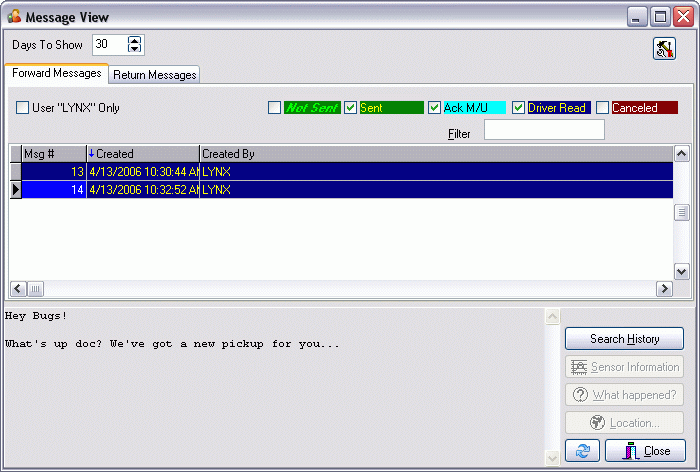
User 'LYNX' Only
Place a checkmark in the box provided if you wish to use the 'LYNX' username only.
Forward Message Distribution Configuration
![]() Clicking this button will open up the Manage Message Forward Distribution Groups window (described below).
Clicking this button will open up the Manage Message Forward Distribution Groups window (described below).
Status
-
Not Sent
You can view messages of a specific status. Choose 'Not Sent' to see messages that have not yet been processed by the Communication Manager program. -
Sent
'Sent' Messages have been processed by the Communication Manager program and processed by the communication network’s software, such as Cancom’s QTracs, but not yet received by the remote unit. -
Ack M/U
'Ack M/U' Messages have been received by the remote device. -
Driver Read
'Driver Read' Means that the remote device has received the message, and that the message has been read by the Driver (this option only functions if the Return Receipt option has been configured for the communication network in the Communication Manager program, and is only available with the Cancom and AMSC networks). -
Cancelled
'Cancelled' Messages have been canceled any time before being received by the remote unit.
Filter
You can reduce the number of records that are displayed by entering partial match data in the Filter field. The Filter field works in conjunction with the `sort' column (in the message Grid), indicated by a blue arrow (sometimes). When you enter characters in the Filter field, only records in the 'sort' column that match the characters will be displayed.
Forward Message Grid
The following fields are available from the Forward Message Grid.
Message #
Will pre-populate with message identification number.
Created
Will pre-populate with username and date/time of creation.
Created By
Will pre-populate with the creator’s username.
Driver
Will pre-populate with the Driver’s name.
Power Unit
Will pre-populate with the Power Unit name, if applicable.
Device ID
Will pre-populate with the Device ID, if applicable.
Status
Will pre-populate with the message status. See Status choices as noted above.
Network
Will pre-populate with the Network abbreviation.
Forward Message Buttons
Search History
Clicking the 'Search History' button will open a window where you may search for Forward / Return Messages (depending on which Tab you are working with). The search window will allow you to search by: 'Network', 'Device', and / or 'Macro', and will allow you to specify the number of 'Days' back you would like to include in the search. Click the 'Search' button to generate a list of Messages based on your chosen criteria.
Sensor Information
This button will only display if you are viewing a Driver with an installed Omnitracs Device. Shows a history of SensorTracs readings. SensorTracs is an optional cable that Omnitracs devices use to gather engine control data such as odometer, fuel and reefer temperature.
What Happened?
This button will only display if you are viewing a Driver with an installed Omnitracs Device. Shows the state of various resources that are associated with the selected message. For instance, it’ll display a few pieces of information for the Driver, Power Unit and Mobile Communications Device. It’ll also show Dispatch information available at the time the message was processed. The 'What Happened' feature is basically for digging deeper into a message to see how a message was processed and what environment it was being processed in.
Location
Is only available for Return messages. This button will display a form that shows the Power Unit’s position at the time that the message was sent, and the unit’s current position.
Context Menu
Cancel All Late Sent Messages
If a message has been sent to the communication network but not yet received by the remote unit, you can use this option to cancel the message. This option is only available with messages whose status is 'Sent'.
Resend All Late Sent Messages
If a message has been sent to the communication network but not yet received by the remote unit you can use this option to cancel the original message, and re-generate and re-submit a duplicate to the communication network.
Print Message
Will send the contents of the message to the printer that is identified as the default for the workstation.
Print Preview
Is used to preview the message before sending it to a printer. In the preview form, you have the option to select a different printer than the default. You can send the message to the selected printer by clicking the 'OK' button.
Show Message History
Will display a form that shows the date and time of the message’s status changes.
Send Forward Message
Will bring you to the dialog box where you can specify the 'Driver', 'Power Unit', or 'Mobile Communications Group' that you wish to send the forward message to. Use the Database Search buttons to pick an associated resource from your system, then select the green check button to proceed to the freeform Forward Message window.
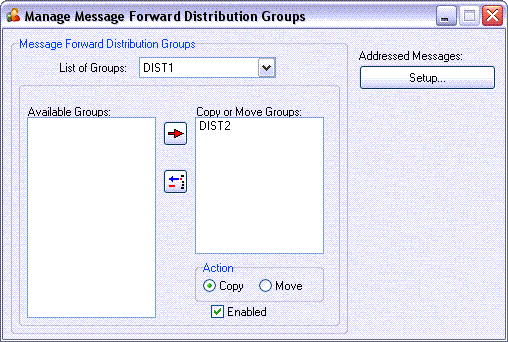
Manage Message Forward Distribution Groups
The Forward Message Distribution Configuration feature will allow users to manage the Distribution Groups to Forward (Copy) or Move messages from one group to many other groups. Whenever a new return message is received it will check with groups it can forward the message to, and create a new return message for that forward group.
| Field | Definition |
|---|---|
List of Groups |
The various Distribution Groups setup on your system will be available in this pull down menu. Distribution Groups can be setup by clicking the Setup button to the right. |
Available Groups |
Once you have selected a Distribution Group in the 'List of Groups' drop-down menu, all of the other Distribution Groups in your system will appear in this section. Select a Group you would like to Forward messages to, and then click the 'right arrow' button to move the Group into the 'Copy or Move Groups' section. |
Copy or Move Groups |
If you have moved a Distribution Group from the 'Available Groups' section, they will display here. The Groups in this section will have messages for the Group displayed in the 'List of Groups' drop-down 'Forwarded' or 'Moved' to them, depending on the option chosen below in the 'Action' section. |
Action |
The two options here control how the messages sent to the originating Distribution Group are handled:
|
Enabled |
The 'Enabled' field toggles Message Forwarding on/off for individual Distribution Groups that have been added to the 'Copy of Move Groups' section. This flag applies on a group-to-group basis, so you may have one Distribution Group enabled, and another disabled. |
Setup |
Clicking the Setup Button will open a window where you can configure your Distribution Groups, or create new ones. The functionality is exactly the same as that found in the Mobile Device Maintenance program. Note: The security for this new feature is managed on the Business Events > Communication Tab of the Security Setup program. |
Return Messages Tab
The Return Messages Tab displays messages that have been received by TruckMate from the Power Unit’s Mobile Device.
Original
If the message selected in the Grid was a reply to a Forward message, use the Original button to view the Forward message.
Read
Will change the status of a message to 'Read', thus disabling message notifications for the message. This option is only available for Return messages whose current status is 'Not Read'.
Reply
Will display the Forward Messages form, and generate a new free format message directed to the source of the selected Return message.
Message Status
Not Read
'Not Read' means that the message has been received by the TruckMate system, but has not yet been read by a user.
Read
'Read' means that the message has been read by a TruckMate user.
Canceled
'Canceled' means the return message has been rejected by the TruckMate system, as the data it contained was not acceptable for an automatic data update. Check the boxes beside each status type to view messages of the desired status.
Canceled Read
'Canceled Read' means that a 'Canceled' return message has been read. Though these messages are cancelled, the record will still be inserted into MESSAGE_STATUS table to signify that the user has read the message.
Include Owned
Shows messages for other users, and applies to return messages only. To be implemented as checkboxes to include 'Owned' and 'Not Owned' records. 'Not Owned' records are equivalent to 'Not Read'. If the user marks a 'Not Owned' message as 'Read', the user then becomes the owner (as 'NR' message), and then the message is to be marked 'Read' as usual, following 'Batch Read Messages' option as required.
Include Not Owned
Shows messages for other users, and applies to return messages only. To be implemented as checkboxes to include 'Owned' and 'Not Owned' records. 'Not Owned' records are equivalent to 'Not Read'. If the user marks a 'Not Owned' message as 'Read', the user then becomes the owner (as 'NR' message), and then the message is to be marked 'Read' as usual, following 'Batch Read Messages' option as required.
Filter
You can reduce the number of records that are displayed by entering partial match data in the Filter field. The Filter field works in conjunction with the 'sort' column (in the message Grid), indicated by a blue arrow (sometimes). When you enter characters in the Filter field, only records in the 'sort' column that match the characters will be displayed.
Return Message Grid
The following fields are available from the Return Message Grid.
Message #
Will pre-populate with message identification number.
Created
Will pre-populate with username and date/time of creation.
Message For
Will pre-populate with the recipient’s username.
Group
Will pre-populate with the Group Name, if applicable.
Driver
Will pre-populate with the Driver’s name.
Power Unit
Will pre-populate with the Power Unit name, if applicable.
Device ID
Will pre-populate with the Device ID, if applicable.
Status
Will pre-populate with the message status. See Status choices as noted above.
Network
Will pre-populate with the Network abbreviation.
Location
Will pre-populate with the Power Unit location.
Latitude
Will pre-populate with the Power Unit location latitude.
Longitude
Will pre-populate with the Power Unit location longitude.
Return Message Buttons
Search History
Clicking the 'Search History' button will open a window where you may search for Forward / Return Messages (depending on which Tab you are working with). The search window will allow you to search by: 'Network', 'Device', and / or 'Macro', and will allow you to specify the number of 'Days' back you would like to include in the search. Click the 'Search' button to generate a list of Messages based on your chosen criteria.
Sensor Information
This button will only display if you are viewing a Driver with an installed Omnitracs Device. Shows a history of SensorTracs readings. SensorTracs is an optional cable that Omnitracs devices use to gather engine control data such as odometer, fuel and reefer temperature.
What Happened?
This button will only display if you are viewing a Driver with an installed Omnitracs Device. Shows the state of various resources that are associated with the selected message. For instance, it’ll display a few pieces of information for the Driver, Power Unit and Mobile Communications Device. It’ll also show Dispatch information available at the time the message was processed. The 'What Happened' feature is basically for digging deeper into a message to see how a message was processed and what environment it was being processed in.
Location
Is only available for Return messages. This button will display a form that shows the Power Unit’s position at the time that the message was sent, and the unit’s current position.
Context Menu
Select All 'NR'
To select all messages of the status 'NR' (Not Read), use this menu function. This can be used to change the status of a group of messages to 'Read'.
Select All 'Unowned'
When a message comes in that may not be addressed to the current user, but access is still desired, these messages would be referred to as 'not owned'.
Clear Selection
To de-select a group of selected messages, use this menu function.
Print Message
Will send the contents of the message to the printer that is identified as the default for the workstation.
Print Preview
Is used to preview the message before sending it to a printer. In the preview form, you have the option to select a different printer than the default. You can send the message to the selected printer by clicking the OK button.
Show Message History
Will display a form that shows the date and time of the message’s status changes.
Send Forward Message
Will bring you to the dialog box where you can specify 'Browse/Create Forward Messages For'.