Mobile Communications Emulator

The Macro Return Simulation program is used to simulate a Return Macro message (or position update) as if the TruckMate User were a Driver sending in the same information from a Mobile Communications device. While not a Mobile Communications device itself, this application will simulate the behavior of one, which is useful in testing out the Mobile Communications system setup by sending in Return Macros and going through the Trip processes.
The Macro Return Simulation program can simulate Macro messages for the following Mobile Communications networks:
-
Shaw Tracking / Omnitracs (and Trailer Tracks/ReeferTracs positioning and sensor simulations)
-
PeopleNet
-
TracKing
-
Rand McNally Connect
To access the Communications Macro Definition Tool in Windows Explorer, navigate to and open:
C:\Program Files (x86) > TruckMate 20xx > MacroReturnSim.exe
Menu Bar / Toolbar
Tools Menu
TruckMate Monitor
![]() Click the down arrow next to this button to access the various functions of the new TruckMate Monitor.
Click the down arrow next to this button to access the various functions of the new TruckMate Monitor.
Remember Position / Size
Selecting this option will maintain the program window position and size upon close. When the program is re-opened, it will appear the same.
Help Menu
TruckMate Help
![]() Selecting this button will open the Macro Return Simulation topic in the TruckMate Online Help file (the page you are currently viewing).
Selecting this button will open the Macro Return Simulation topic in the TruckMate Online Help file (the page you are currently viewing).
Service Portal
![]() Selecting this button will open an instance of your default Internet browsing software, with the https://www.tmwcare.com login page displayed.
Selecting this button will open an instance of your default Internet browsing software, with the https://www.tmwcare.com login page displayed.
About
![]() Selecting this button will open the standard TruckMate About window, which contains important information about the application you are currently using, including the version number (important for support calls).
Selecting this button will open the standard TruckMate About window, which contains important information about the application you are currently using, including the version number (important for support calls).
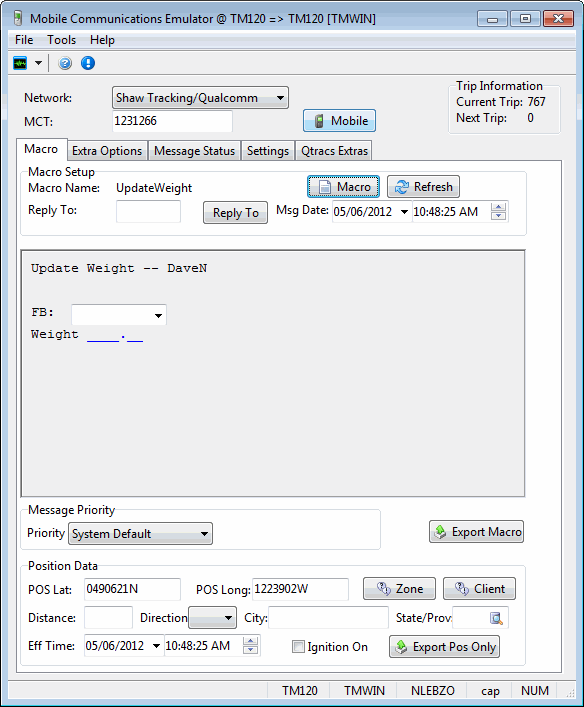
Header Section
The 'Header' section of the Macro Return Simulation program allows you to specify the Mobile Communications device that you will be using for simulating Return Macros.
Network
Use the drop-down list to select which Mobile Communications Network you wish to simulate Return Macros for. The available tabs (described next) might change based on the network selected, in other words, different set of tabs are available for different networks.
MCT
This field displays the Mobile Communications Terminal ID value for the selected Mobile Communications Network/Device. If there is only one Mobile Communications Device currently configured for the selected 'Network', that Device’s ID value will automatically populate into this field when the 'Network' is selected. If there is more than one Mobile Communications Device for a particular Network, the User can select the 'Mobile' button to choose the Device ID they would like to test.
Mobile Button
Selecting the 'Mobile' button will open a search window that will display all Mobile Communications devices (for the 'Network' selected above) that are setup in your database. On the search window that appears, you will see both the 'MCT' value and the TruckMate Resource (Power Unit ID or Trailer ID) that the Mobile Device is currently assigned to. Selecting one of these devices will load its 'MCT' value into the Header section and will allow you to test Return Macros (and/or position/sensor information pings) against the device.
Trip Information
This read-only area displays the current Trip that the selected Mobile Device is assigned to (if applicable), and displays the 'Next Trip' number that be created by the Dispatch program.
Macro tab
Macro Setup / Display
The Macro Setup section allows you to select the Mobile Communications Macro that you would like to simulate. Once a Macro is selected, its body text will appear in the grey window directly below the Macro selection options.
Macro Button
Opens a list of return macros. Select the return macro you want to simulate; it will be loaded in the gray area below.
Refresh Button
The refresh button reloads the latest version of the selected macro. This is useful to make sure you are simulating the latest version of the macro at any point in time.
Reply To Button
This button allows the user to select a forward message to reply to. The user can choose not to select one, many or non-forward messages.
Msg Date
Enter the date of the message. If no date selected, this field will default to the system date.
Export Macro Button
This button will export the selected macro to text file.
Message Priority
Priority
This drop down list determines the priority of the message. Available options in the list include:
-
System Default: This message is setup as a default message in TruckMate.
-
Normal: This message is a normal message that does not require any special attention or prompt action.
-
Important: This message is an important message and should not be ignored or discarded without attention.
-
Emergency: This message is an emergency message, a prompt action is important.
Position Data
This section displays information about the geographical position of the assigned equipment.
POS Lat/POS Long
These two fields display the Latitude and Longitude of the equipment.
Zone/Client
Either of these two buttons can be used to define a geographical location for the equipment. The 'POS Lat' and the 'POS Long' fields can be populated using one of those fields.
Distance
This field displays the distance of the equipment. You can enter the distance for simulation reasons.
Direction
This is the direction of the equipment at a given point in time. The list includes all the possible directions.
City/State/Prov
Enter the City and State or Province where the equipment is located right now.
Eff Time
Enter the time stamp of the position data.
Ignition On
This is a flag whether the equipment is currently running or not.
Odometer
This is the truck’s odometer value. This field will be exported as part of position data to Peoplenet.
Export Pos Only
This button exports only position date to a text file.
Backup Settings XML
This area is for XML display and edit. The user can enter XML scripts or load scripts using one of the applicable buttons at the middle of the screen, described next.
Get Commngr Settings
Selecting this button will load the XML script for Commngr program setup. The script will be displayed in the 'Backup Setting XML' area.
New Macro Revision
You can enter the revision number of the new macro.
Apply
This button will apply the changes and the new revision number to the macro
Message Status tab
Reference
The user can assign a reference code to the message status.
Get MSG
This button allows the user to select a forward message to reply. A window with available forward messages will pop up, and the user can select a message from the grid.
Status
A status can be selected for the simulated message.
Status Date
This field allows the user to time stamp the status of the message.
Export Status
This button allows the user to export the message status to an external file. Only a limited number of networks are currently supported in TruckMate for message status exporting.
Settings tab
Save to Registry
This option if checked will save the settings to the registry.
Show Success Export Dialogbox
This option, if selected, will show the 'Success' dialog box when the export finishes successfully.
Load Last Known Position
Selecting this option will have the system load the last known position of the equipment into the simulator when it is used.
Refresh Date/time before Export
Selecting this option will have the system load the current date/time into the simulator when it is used.
Turn Off Dialers/Turn On Dialers
These two buttons can turn off and turn on dialers.
Trailer Tracks tab
Trailer Status
The 'Trailer Status' section allows the user to enter values as related to different sensors' readings. The sensors can be of different types to capture all possible information about the trailer and the cargo.
Notification Type
The notification type is related to the specific device that captures a reading and transmits it. Mostly, this is different types of sensors located on different parts of the trailer. Select the applicable type from the drop down list.
Value
Select a value from the available pre-defined values for each 'Notification Type'. The values differ according to the notification type.
Add
This button adds the selected notification type and its value to the 'Multiple Statuses' grid described next.
Multiple Statuses
This grid displays the entered values of the different notification types. Notification Types are displayed as column headers and each value is listed under its respective notification type
Extra Reefer Fields
OEM Alarm Severity
This field can be used to determine the alarm severity installed in the trailer. Available values in this drop down list include 'None' no alarm installed, Check, Cautionary, Critical, Shutdown.
ReeferTracs tab
This tab allows the user to enter information related to the reefer.
General Reefer Information
This section is to define reefer information and reefer physical attributes. Use this section to define the used reefer and set the temperature options to simulated.
OEM Alarm Event
This section is to define the options related to the 'OEM' (Original Equipment Manufacturer) alarm event. You can define the 'Alarm Severity Level', and 'Alarm Code/Description'. The options selected in this section are dependant on the values selected/entered in the 'General Reefer Information' section.
Temperature Event
This section is to enter the options related to a temperature event. You can setup the temperature options to be simulated. Use the 'Export Temp Evt' button to simulate a temperature event