TruckMate 2021.4 New Features: Back Office
ACE eManifest
Delete / Cancel cargo-only document
Now you can modify, delete or cancel an ACE/ACI cargo-only EDI 309 customs manifest document even if there is no trip.
-
The BM-Bundled TX Set Purpose is excluded when determining if the manifest is cargo-only.
-
If these is no trip (trip#=0), a warning message will appear if you change the TX Set Purpose to BM Bundled for a cargo-only manifest.
Disable eManifest confirmation for cargo only
A new EMAN.EXE > 309-Cargo only warning application configuration option has been added so you can disable the eManifest confirmation popup message.
Utilities > Application Configurator > EMAN.EXE
| Option | Description |
|---|---|
309 Cargo only warning |
Determines whether to display a warning message if the eManifest is related to 309-Cargo only and you try to change the Tx Set or Tx Purpose values on the eManifest.
|
AP Inquiry
New security option to delete case requirements
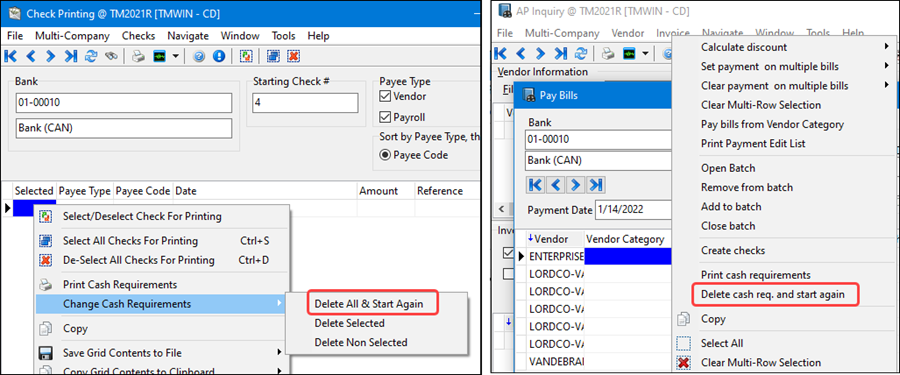
A new Allow Clearing of Other Users Checks security option was added to control whether you are allowed clearing of other users checks in both AP Inquiry and Check Printing.
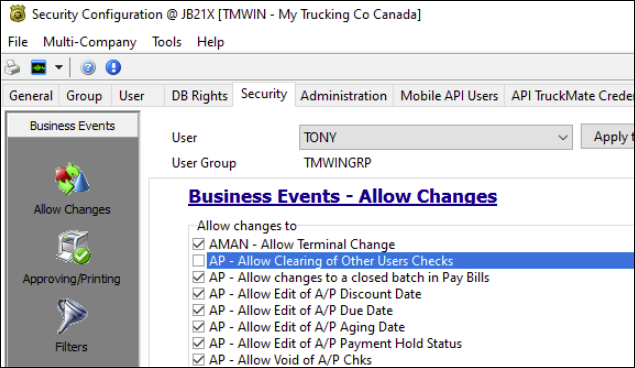
When you use the 'Delete Cash Requirements' shortcut menu options, this security option must be selected in order to delete cash requirements for all users. Otherwise, only the user’s cash requirements will be deleted.
API revisions
TruckMate REST API updates
The following TruckMate REST API endpoints have been improved:
-
Orders - /orders
-
Trace Numbers - /traceNumbers
-
Shipping Instructions - /shipInstructs
-
Freight Bill Notes - /notes
-
Status Changes - /status
Improvements include:
-
Adding fields
-
Refining a more consistent and logical use of arrays
-
Removing irrelevant query parameters
-
Other ongoing revisions coming from new features and enhancements as part of the TruckMate 2021.4 release.
Detailed inforation is available within the Trimble Transportation Learning Center web site in the TruckMate > Product Guides > TruckMate REST API Reference Guides.
Check Register
Summary at end of posting
When the 'APNCR.EXE - Commit Each Trans' application configuration option is set to True and multiple checks are posted in Check Register. If there are 'bad' cheques but at least one good check is posted, a summary popup window will be displayed.
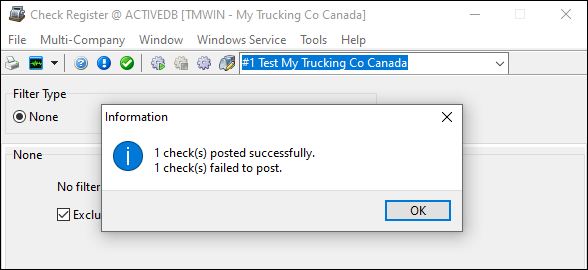
The Check Register Windows service will show same message in log file:

If the configuration is set to False, the original logic applies but no summary popup window appears. Instead you will see a message box saying "Posting Complete".
Client and Vendor Profiles
New grid columns
New grid columns have been added to the All Procedural Items tab and the Procedural (Check-List) Items grid in the CRM window. You can open the CRM window using the Customer & Vendor Profiles > Tools menu > View CRM. The new columns include User1 through User10 and the read-only Allow Repeats column.

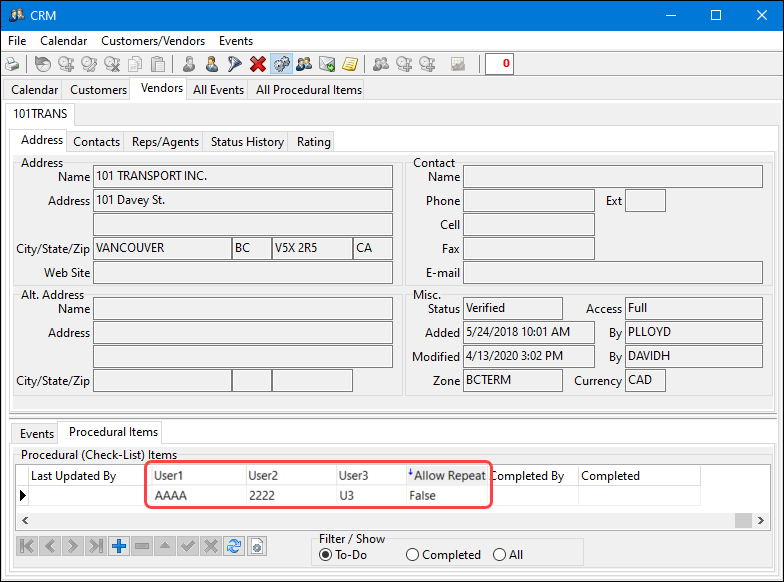
Checklist items must be created and set up in the Codes Maintenance > Checklist items tab before they can be added to the CRM Procedural (Check List) Items grid.
Customer Service
Pickup and Delivery windows can cross midnight
Now you can save a client’s pickup and delivery hours of operations even if the time range entered crosses midnight.
The following already existing application configuration options must be set to True (or Force). This will allow you to save the start and end times in Customer and Vendor Profiles even when the start time is after the end time because it is crossing midnight from the previous day.
-
CSERV.EXE > Allow Pickup/Delivery Windows Across Midnight | True
-
CSERV.EXE > Set Pickup Time From Hours of Operations | True or Force
-
CSERV.EXE > Set Delivery Time From Hours of Operations | True or Force
The behaviour of the system when setting pickup-by, pickup-by-end, delivery-by, delivery-by-end is:
-
The system first checks the (Pickup/Delivery Window -→ Pickup OR Delivery tabs). Neither tab previously allowed for midnight crossing times but now they do.
-
If not found, the system checks the customer’s Pickup/Delivery Window -→ By appointment setting. Technically, this setting has always allowed you to enter midnight crossing configurations using a +/- time to set the FB appointment. Now if the application configurations are set to permit this, the appointment can cross midnight.
-
If no appointment window is found, the system checks the (Open/Close Times window) and this window will allow for midnight crossing configurations.
Driver Pay Contracts
Create driver pay records with LTL mileage rules based on PUnit
Driver Pay contracts using LTL Mileage rules can now generate pay based on the power unit or the trailer (rentals).
For example:
-
Find or create a contract that has LTL mileage rules - either specified mileage rate or fuel average based rate.
-
Set up a new driver that is for Pay only (not dispatch) and assign the contract above.
-
In the power unit or trailer profile, set the "Pay To" driver to the one set up above.
-
When a trip using these power units or trailers is completed, verify the appropriate driver pay records were created.

Fleet Maintenance
Add User Fields to Fleet Profiles
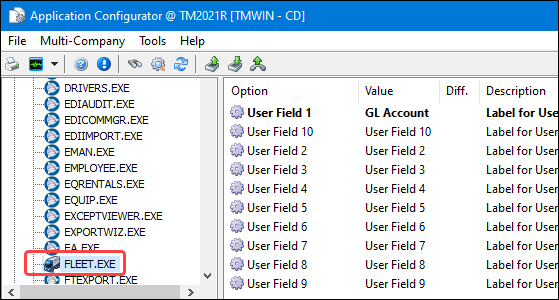
A new User Defined Fields tab has been added to Profiles > Fleet Maintenance.
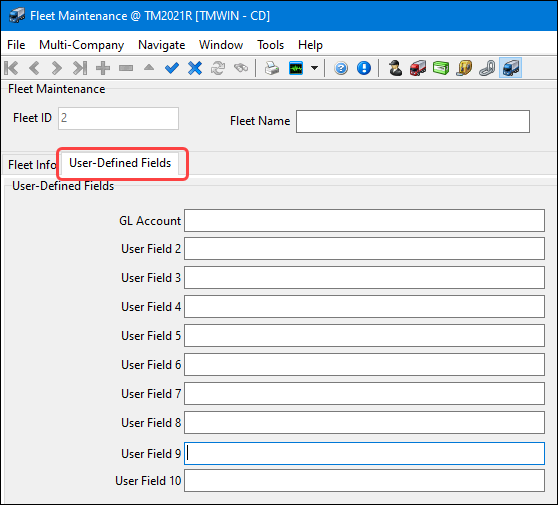
You can rename any of the 10 user fields using a new FLEET.EXE set of Application Configuration options. For example, you could rename one of the use fields as GL Account and use this as a way to separate Power Units for different GL accounts set up differently for destination or fleet.
Fuel Card Import
Re-calculate taxes based on overwritten fuel price and jurisdiction
When importing to driver deductions in the Fuel Card Data Import window, the fuel prices can be overwritten and require the sales/federal taxes to be recalculated. This is true for all card import formats except for the 22, 77 and 65 formats.
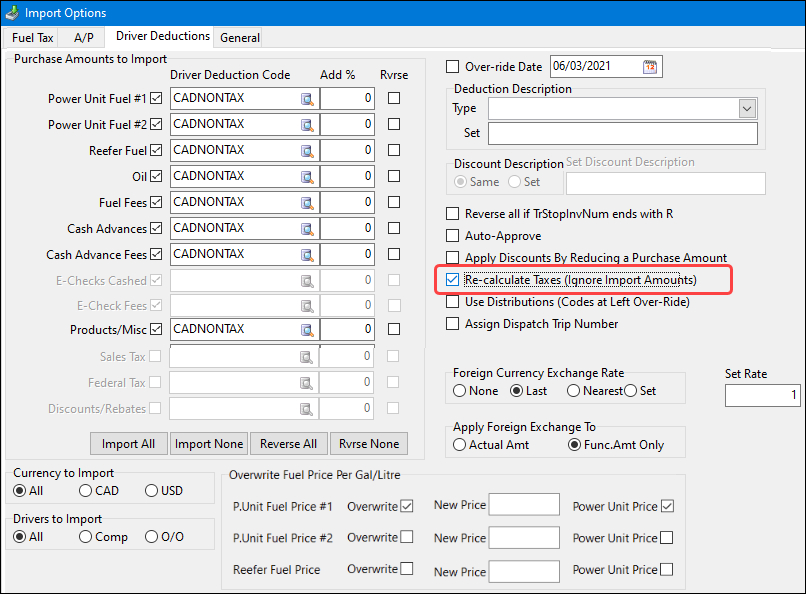
In the ![]() Import Options > Driver deduction tab, you can select which method to use for overwriting the fuel prices:
Import Options > Driver deduction tab, you can select which method to use for overwriting the fuel prices:
-
Set the new fuel price by entering a value
-
Select the Power Unit Price checkbox and use the price set in the Power Unit Profiles > Miscellaneous tab.

The overwritten amount is calculated by multiplying volume and price and does not include taxes.
The sales and federal taxes will be recalculated if you select the Re-calculate Taxes (Ignore Import Amounts) checkbox. Otherwise, the taxes will be imported as is.
The Totals form will display the overwritten amounts. It will recalculate the taxes and include the taxes in the Totals form values if:
-
The Re-calculate Taxes (Ignore Import Amounts) checkbox is selected on the Import Options > Driver deduction tab.
-
The Sales Tax and Federal Tax Included checkboxes are selected on the Import Type Definition > Basic Info tab.
Tax calculations are based on the tax rate set in Tax & Jurisdiction Maintenance.
GL Journal Entries
Reverse Journal Entry
The GL Journal Entries > Tools menu > Reverse Journal Entry command will now display a confirmation prompt for a reversing entry if an un-posted reversing batch already exists.
GL Journal Entries Import validation
The Debit and credit fields are now validated when you are importing GL Journal Entries from a file.
New logic applies when you import debit or credit field data as a number instead of a general type field. If the data contains non-numeric characters such as a comma, an error message is added to the Error Msg column stating that the amounts are not formatted correctly. These values need to be changed and reimported.

Interline Payables
Improved EDI 210 import payment process
The interline payables import processing system has been improved to provide a more automated EDI-based, IP import and reconciliation process.
The EDI 210 file contains one or more carrier invoices. It can include an individual movement or a collection of invoices for a specified billing period. When the 210 is received, it is brought into the IP Import processing system using the Interline Payable Audit.
In Application Configurator, the IPIIPM.EXE section contains six new settings:
-
Import High Tolerance - Accessorial
-
Import High Tolerance - Base
-
Import High Tolerance - Fuel
-
Import Low Tolerance - Accessorial
-
Import Low Tolerance - Base
-
Import Low Tolerance - Fuel
For each setting, you can define a range to help determine when to auto-approve invoices when matching import records to IP records.
EDI Communications Manager
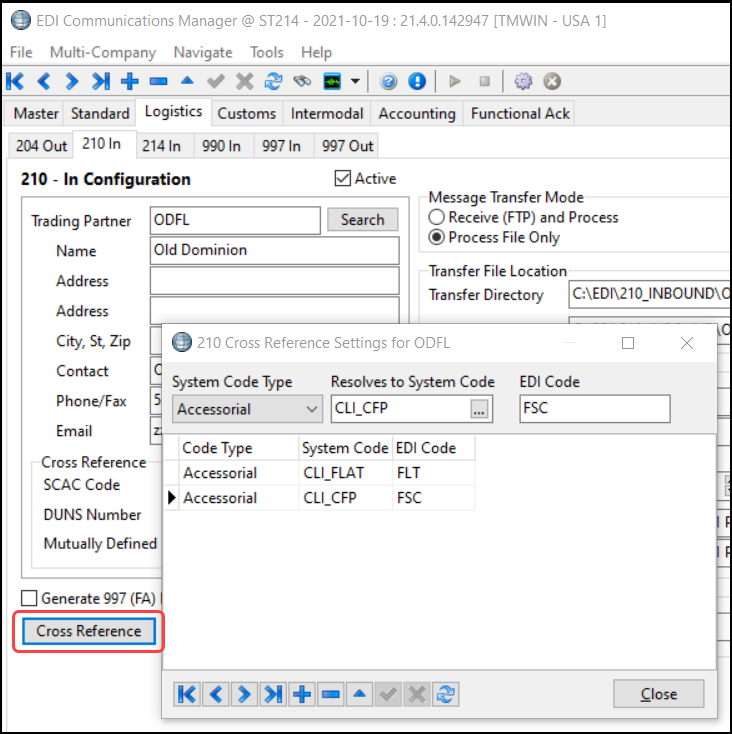
There is a new Cross-Ref button on the Logistics tab > EDI 210 In(bound) sub-tab to configure the mapping of inbound EDI codes for accessorial charges to corresponding TruckMate accessorial codes.
Billing Register
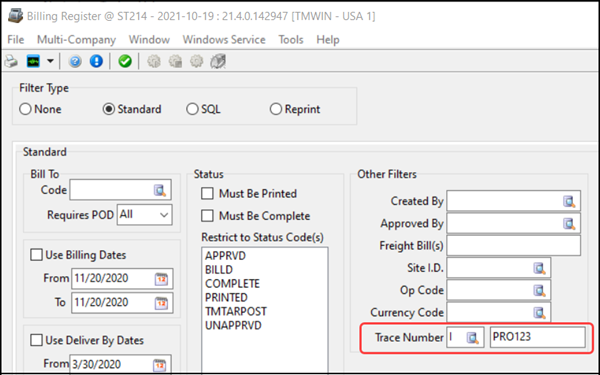
There is a new filter option for the Standard filter type based on Trace Numbers (e.g. type I pro-bill number).
Customer Service
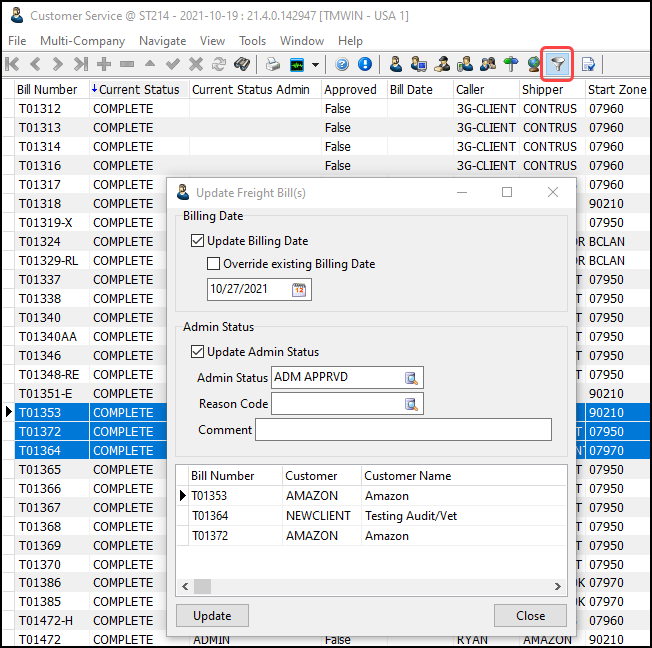
The Filter view has a new Update Freight Bill(s) shortcut menu option that allows you to set a Bill Date or Administrative Status Code in bulk.
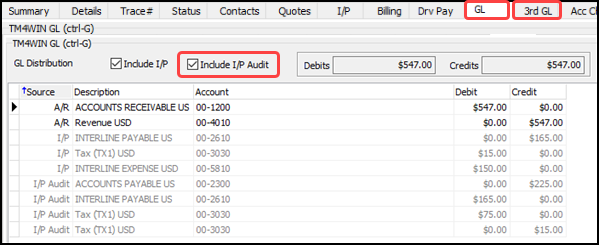
The GL and 3rd GL tabs have a new option to show the IP Audit accounts (not just the initial IP Accrual accounts).
IP Audit
Additional changes were made to the Interline Payable Audit including:
-
Import window has more fine-tuned error messaging when working with the new tolerance settings
-
Import form has filters added at both the vendor and detail levels and you can filter by the created date at the vendor level
-
Details tab has 3 new read-only user fields added for custom EDI processing and IP Auditing
'Create IP Bill' can create no-charge FB for bobtailing
The Carrier assignment 'Create IP Bill' Cost Rule method on the Carrier Information window has been enhanced to allow a no-charge freight bill (FB) to be created without requiring the new FB to:
-
contain CALLER/BILLTO/SHIPPER/CONSIGNEE information
-
be marked with a status of 'AVAIL' (available)

This prevents this no-charge order from showing up on a dispatch board and allows for automatic rating when you are paying carriers for bobtailed (power unit with no trailer) resources. To support this feature, a new 'DISPATCH.EXE > Create I/P Bill Cost Rule - Default Commodity Code' application configuration option has been added to the set of existing 'Create I/P Bill Cost Rule' settings.

Utilities > Application Configurator > DISPATCH.EXE
| Option | Description |
|---|---|
Create I/P Bill Cost Rule - Default Commodity Code |
Provides a default commodity code to be used when auto-creating I/P freight bills. Enter a valid commodity code into the text field. |
-
All 5 'Create I/P Bill Cost Rule' settings must be set for the rating logic to work for this I/P bill.
-
The IP (Interline Payable) bill is not created until the carrier is assigned.
-
Rating will not happen until after the carrier is assigned.
There are two options for rating:
-
Set the assignment to 'Not Re-rate' and the bill will be assigned a rate after the carrier is assigned.
-
Assign the carrier and click the
 Re-rate button on the Carrier Information window.
The logic has been changed so the IP credit bill is set to be completed after being created. This ensures this bill will NOT be available for Dispatch.
Load Offer
Auto-Send Load Offer - new trigger
Now you can auto-send an original load offer to the applicable EDI and API carriers when a specific combination of movement type and status code is applied. This feature applies to Customer Service, Dispatch and Multi Mode Dispatch. Only a carrier that matches the movement type and has not been sent the load offer before can be an applicable carrier.
There can be multiple status codes per movement type and the same status code can be configured for multiple movement types. For example: A:STATUS1,STATUS2;B:STATUS3;!:STATUS1,STATUS 4. Movement Types:
-
A = Advance
-
B = Beyond
-
C = Crossdock
-
L = Linehaul
-
O = Other
-
! = Null (no movement type)
-
* = All movement types including null
A new application configuration option was added to allow you to configure which combinations of movement types and status codes will trigger the sending of a load offer.
Allow for configuring of triggering events at a global level through app config.
Utilities > Application Configurator > CSERV.EXE
| Option | Description |
|---|---|
Carrier - Auto Send Load Offer on Status Change |
Determines a global list of which movement types and status codes combinations will trigger the load offer to be sent immediately. Enter the movement type, a colon followed by the list of status codes (separated by a comma) for this movement type. Use a semi-colon to separate the next set of movement type and status codes. For example: A:AVAIL;B:CARRIERDY,DEPSHIP;O:AVAIL NOTE: This list is ignored if the specific carrier has an entry in the Auto Send Override field in the Vendor Profile > Interliner tab. |
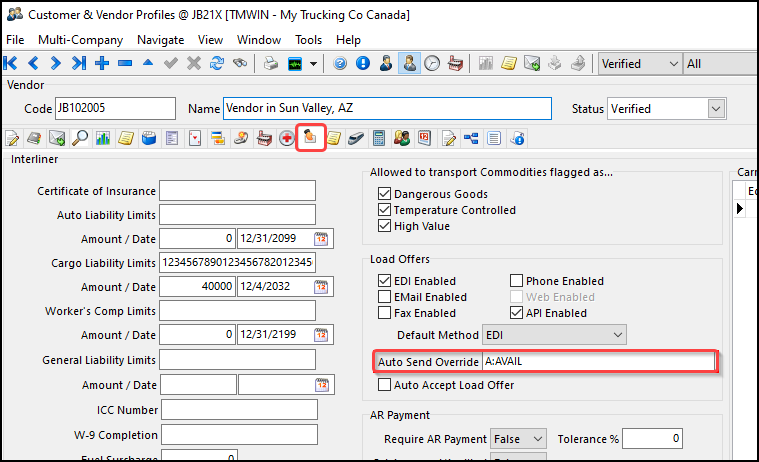
The Auto Send Override Carrier level field on the Vendor Profile > Interliner tab for a specific vendor will override the global application configuration settings.
Notes
Style options renamed
The Application Configurator note style options have all been renamed.
The original names used the phrase "Journal-Style <#>" since they were True/False settings that toggled between None and Journal. With the addition of the third 'Notes+AutoDate' option, the name now uses the phrase "note <#> style" in the name.
For example, the "ARRA Journal-style 1" option is now "ARRA note 1 style" and "TRIPS Journal-style" is now "TRIPS note style".
This name change applies to:
-
ARRA (1 and 2)
-
CLIENT (1 through 5)
-
VENDOR (1 through 5)
-
TLORDER (1 through 9)
-
TRIPS
Order Preprocessor
The Order Preprocessor now has the ability to sort on the columns in the Details, Trace #'s and Dang.Goods tabs.
Payroll - Quebec RL1
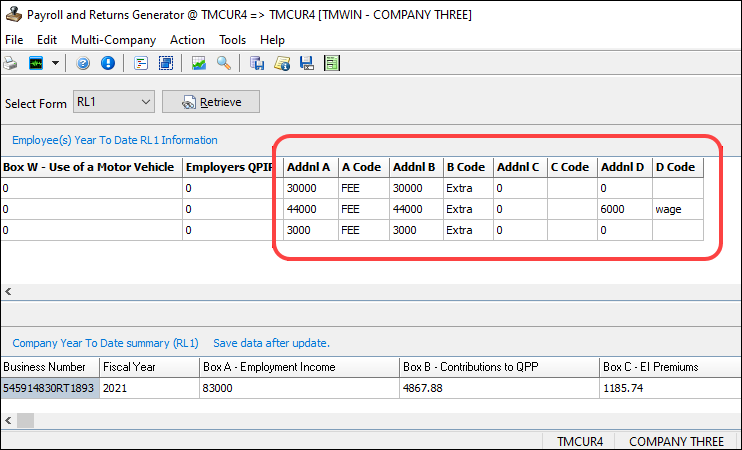
Four new Additional Info checkboxes have been added to the Payroll Configuration > Pay Codes tab for Quebec RL1 tax form reporting.
Each box can be used to describe one pay code value.
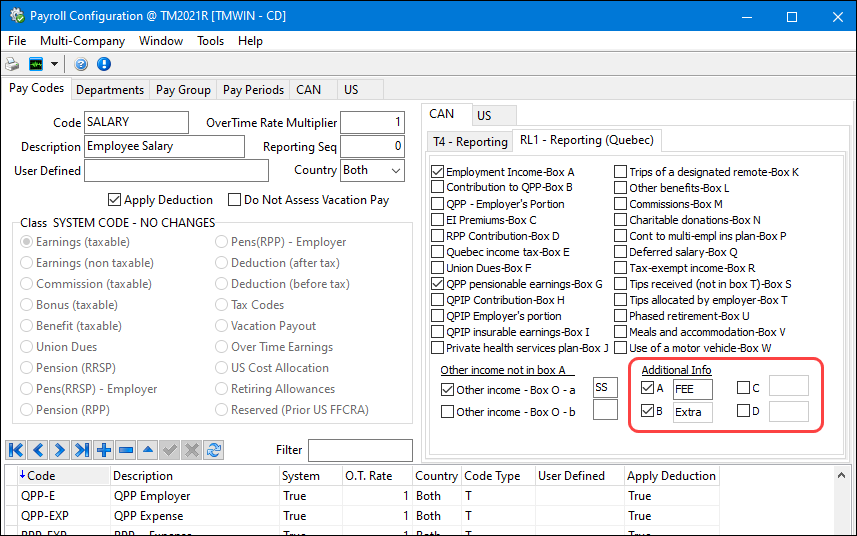
Six new columns have been added to the RL1 grid to hold the codes and amounts.
In MagMedia, add 6 new columns in RL1 grid. They will be populated with codes and amounts.
RMIS
Flexible onboarding integration
The RMIS onboarding integration now provides more control and flexibility over where and when data is updated for the vendors. A new TruckMate Service Host > Properties Onboarding tab contains several configuration and mapping grids and other features for more control over how the integration behaves during onboarding.
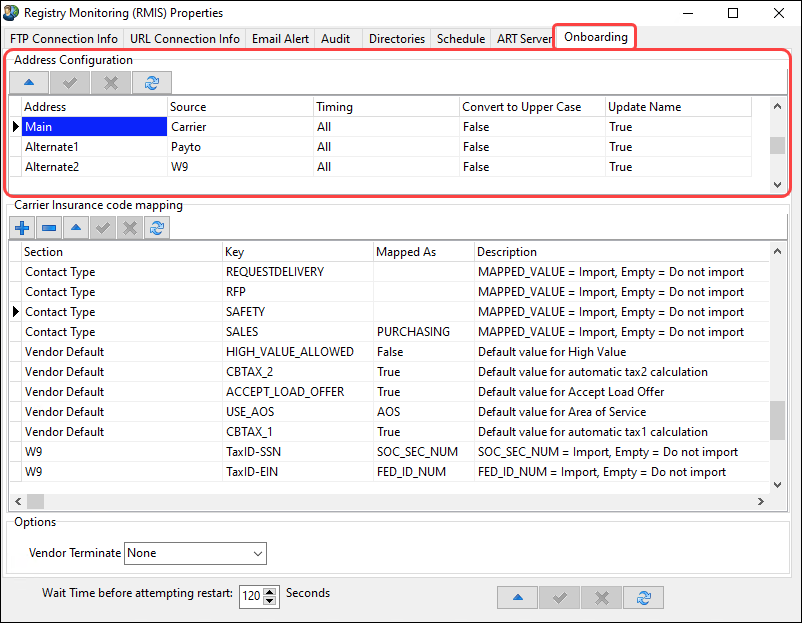
These new configuration and mapping features include:
| Feature | Description |
|---|---|
Address Configuration |
Configures the mapping between TruckMate and RMI for the vendor name and address fields. |
Vendor Terminate |
Determines whether to terminate a vendor when RMIS indicates it is not a certified carrier. |
Vendor EIN and SSN |
Determines which vendor registration numbers to import into the Vendor Profiles > Types tab. |
Vendor Contacts |
Determines which vendor contact types to import. |
Vendor Phone Number and Zip Code |
Determines whether to observe the CODES.EXE > Country - Validate Phone and ZIP Formats application configuration setting and format the phone number and zip code accordingly. |
Configurator Country |
Phone and Zip Formats validation. |
Mapping defaults |
Control VENDOR table default values if the value is not already being supplied by RMIS when creating a new vendor in TruckMate Vendor Profiles using the RMIS integration onboarding new vendor process. |
Vendor Safety Ratings |
'Import RMIS DOTSMSSafety' section and SMS Vendor Safety Ratings fields are visible in Dispatch/MMDisp > Carriers grid.
|
Other related new features include:
Preserve Insurance Configuration - New configurable control allows you to set which of the 4 insurance coverage descriptions (limits/expiry dates) to import into the Vendor Profiles > Interliner tab.

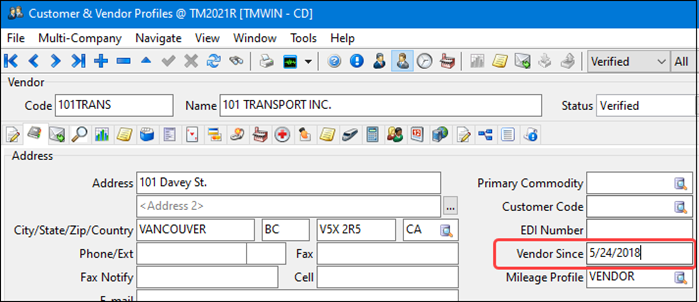
Vendor Since - The RMIS Module Service was changed to only set the VENDOR.VENDOR_SINCE value when you are creating a new vendor in TruckMate using the RMIS onboarding process.
Search by RMIS update ID - In Vendor Profile > "Select Vendor", you can now search and sort by the RMIS Update ID.
Carrier Assignment - TruckMate will check to ensure the carrier has valid coverage for the expected duration of the trip. The carrier’s Auto Liability Insurance, Worker’s Compensation Insurance and Cargo Liability Insurance expiry dates (for the carrier on the active leg) are compared to the Deliver By date and Status Change date to determine whether or not the insurance has or will expiry
Liability Expiry date - New PROFILE.EXE application configuration options have been added to control the creation and maintenance of special event insurance expiry dates. Create a special event to auto-update the value whenever the vendor’s Auto, Cargo, etc. liability insurance expiry date is manually or auto-set/changed in TruckMate.

Statement Printing
Improvements to printing and logging
Several improvements were made for setting up Statement Printing services.
-
Print Style is now a required field for Statement Printing Service Setup.
-
The END_TIME column will record the current timestamp in the statement printing service log table if an error stops the printing service.
-
The total number of invoices sent through Email or FTP is included in the Statement Printing service log file.
* Nov 3 2021 09:42:43 EmailFTPReport done
* Nov 3 2021 09:42:43 0 statement(s) and 0 invoice(s) were printed
* Nov 3 2021 09:42:43 1 statement(s) and 2 invoice(s) were sent through Email or FTP by TruckMate
Improved AR Statement security
The AR Statement Excel Generator used by the Statement Printing service now encrypts the password used in the command line parameters.
You generate an encrypted password by running "BillLTLExcel -u:username -p:password generate". You can still use the original password or the encrypted password in the command line parameter. In this example the encrypted password was enclosed with quotes because it had special characters "<",">" etc.

