Introduction to Contract Maintenance
First available in TMT Fleet Maintenance: 2018.2
As of V.2020.1, this functionality is no longer supported.
Contract Maintenance is a separately licensed module for TMT Fleet Maintenance. It allows you to set up predefined service contracts for customers. With Contract Maintenance, you can specify which services are covered and which services are not covered.
Contract Maintenance supports two contract levels:
-
Level 1
These contracts cover a specified number of preventive maintenance services (PMs) over a length of time. The system divides the negotiated cost of all the services equally over the length of the contract. It bills the customer the resulting amount each month. If the customer exceeds the contract terms (such as using more oil changes than allowed), they pay for that service at an out of service rate. -
Level 2
These contracts cover repairs, services, or fees based on the customer’s needs (such as an administrator fee or a truck washing service). You set them up on a customer-by-customer basis.The customer’s monthly cost is based on factors such as:
-
Number of miles or kilometers
-
Fixed amount per mile
-
Based on the number of miles
-
-
Number of estimated miles
-
Fixed rate per unit type
-
Fixed rate based on termination date/reason
-
Prerequisites
To use Contract Maintenance, you must:
-
Purchase and install the Contract Maintenance module.
-
Install the AMS Server API.
-
Upgrade TMT Fleet Maintenance to V2018.2 or later.
Benefits of using Contract Maintenance
Using Contract Maintenance allows you to:
-
Create a Master Service Agreement (MSA)
Master Service Agreements contain the terms of agreement, labor rates, parts markup, and the billing cycle for the contract. -
Use an automatic billing cycle
The system runs a job each month searching for equipment under a service contract and creates the invoice automatically.
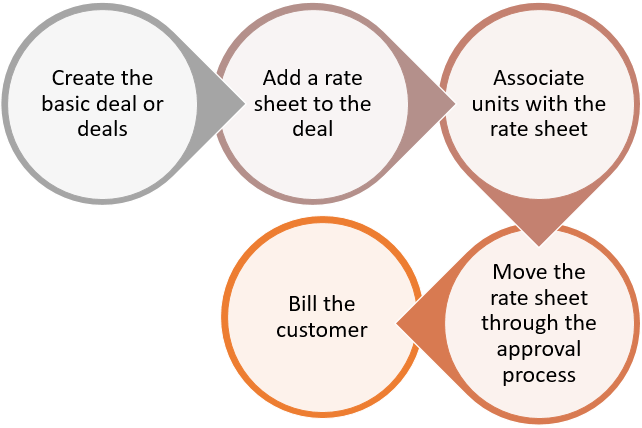
General Contract Maintenance process
You must enable Contract Maintenance on a customer-by-customer basis. Once it is enabled for a customer, you follow the process shown in this illustration.
Layout of the Contract Maintenance page
You use the Contract Maintenance page to:
-
Create deals
-
Associate rate sheets with a deal
-
View existing deals
Go to Menu > Orders > Contract Maintenance to open the Contract Maintenance page.
Note: The Contract Maintenance page contains two tabs. By default, the Deal Summary tab is displayed when you load the page.
-
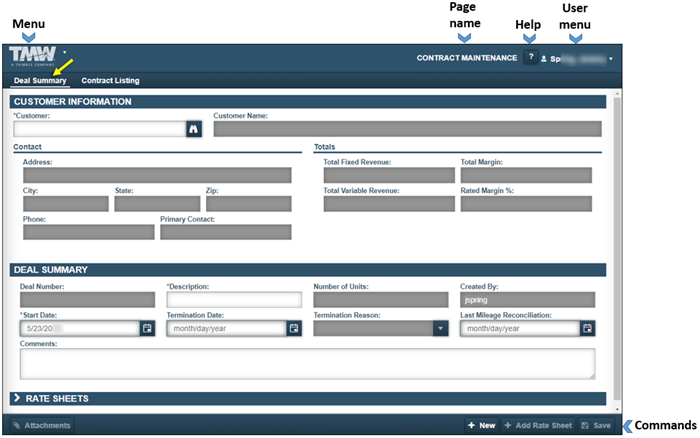
Deal Summary
This illustration shows the Deal Summary tab.
-
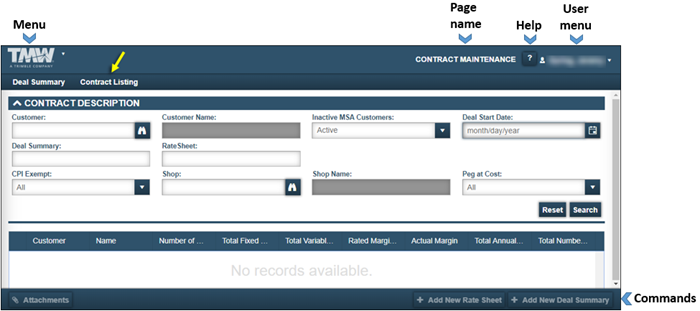
Contract Listing
This illustration shows the Contract Listing tab.
The Contract Maintenance page provides easy access to the:
-
Menu that lists application menu items
-
User menu that lists user-specific menu items
-
Command buttons that allow you to add new rate sheets or add new deals
-
Functionality area that you use to enter information into the system
Layout of the Deal Summary tab
The Deal Summary tab includes three sections: Customer Information, Deal Summary, and Rate Sheets.
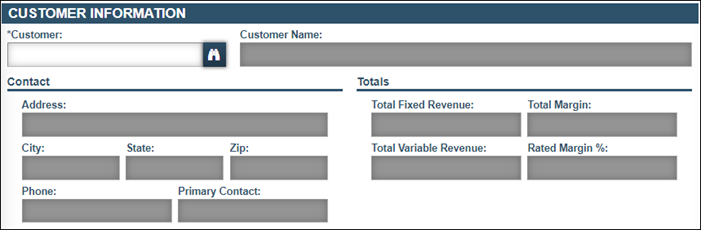
Customer Information
This section allows you to enter the customer’s ID, name, contact information, and basic financial information.
Required field: *
Read-only field: §
| Field | Definition |
|---|---|
Customer * |
Customer ID Note: As you begin to type an ID, the system tries to match your entry with the IDs on file. Immediately under your entry, it displays a list of companies having IDs that begin with the letter you typed. This automatic search for the proper ID is known as the instant best match feature. |
Customer Name § |
Customer’s name |
Contact |
|
Address § |
Customer’s physical address |
City § |
Customer’s city location |
State § |
Customer’s state location |
Zip § |
Customer’s ZIP/postal code |
Phone § |
Customer’s main phone number |
Primary Contact § |
Customer’s primary contact |
Totals |
|
Total Fixed Revenue § |
Actual total fixed cost revenue for the Deal Summary |
Total Margin § |
Actual total margin for the Deal Summary |
Total Variable Revenue § |
Actual total amount of revenue generated from the variable costs on the Deal Summary |
Total Margin % § |
Actual percentage of margin from the Deal Summary |
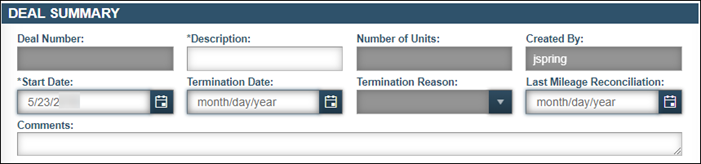
Deal Summary
This section contains information about the deal, such as the deal number, description, number of units, and dates.
Required field: *
Read-only field: §
| Field | Definition |
|---|---|
Deal Number § |
System-generated deal ID number |
Description* |
Defines the content of the deal Note: The deal’s description must be unique. It should describe the customer’s contract. |
Number of Units § |
Total number of units included in all Rate Sheets for a customer |
Created By § |
System ID of the person who created the deal |
Start Date * |
Date the deal started |
Termination Date |
Date the deal ended Leave this field blank unless the deal ends unexpectedly. |
Termination Reason |
Reason the deal ended Note: You must enter the Termination Date before you can select the termination reason. |
Last Mileage Reconciliation |
Most recent date the mileage was updated |
Comments |
General comments about the deal |
Rate Sheets
This section contains information about the rate sheets used with the deal, such as the rate sheet number, description, and type.
| Field | Definition |
|---|---|
Rate Sheet |
Rate sheet number Note: The system generates this number automatically. |
Description |
Rate sheet’s description |
Type |
The contact’s service level |
Stage |
Rate sheet’s current status |
Stage Date |
Date the rate sheet’s status changed |
Fixed Rate |
Fixed monthly rate |
Variable Rate |
Variable monthly rate |
Number of Units |
Number of units associated with the rate sheet |
Layout of the Contract Listing tab
The Contract Listing tab includes two sections: Contract Description and Results Grid.
Contract Description
This section allows users to enter search criteria to filter the list of customers with contracts in the Results Grid.

Read-only field: §
| Field | Definition |
|---|---|
Customer |
Customer ID Note: The system uses instant best match to limit the customer ID options. You must select the customer ID from the instant best match options to add that ID to this field. |
Customer Name § |
Customer’s name |
Inactive MSA Customers |
Customer’s current MSA status Options are:
|
Deal Start Date |
Date the deal started |
Deal Summary |
Deal Summary order number Note: You must enter the 12-digit order number. |
Rate Sheet |
Rate Sheet order number Note: You must enter the 12-digit order number. |
CPI Exempt |
Consumer Price Index exemption The CPI adjusts prices annually, based on the consumer price index. |
Shop |
Shop’s ID |
Shop Name § |
Shop’s name |
Peg at Cost |
The variable rate used for annual adjustments to the deal This value is based on the cost of maintenance. |
Results Grid
By default, this grid displays all customers that have the MSA feature enabled. For details, see Enabling Contract Maintenance for a customer. You use the Contract Description section to reduce the number of results in this grid.
| Field | Definition |
|---|---|
Customer |
Customer ID |
Name |
Customer name |
Number of Deals |
Number of deals with this customer |
Total Fixed Rate |
Total fixed rate for all contracts |
Total Variable Rate |
Total variable rate for all contracts |
Rated Margin (%) |
Profit margin (percentage) |
Actual Margin |
Actual margin |
Total Annual Revenue |
Total annual revenue for all contracts |
Total Number Units |
Total number of units under contract |
Using the instant best match data entry feature
Certain data entry fields allow you to identify a customer, a city, a shop, a state, etc. As you begin to enter the entity’s ID or name, the system displays an ID or name that begins with the characters you typed. This automatic search for the correct ID or name is known as the instant best match feature. You can use it in any searchable field that has the  Search icon.
| This functionality is available only in the Contract Maintenance module. |
To use the instant best match feature:
-
In a field with the
Search icon, enter the first few characters of the entity’s ID or name.
A drop-down list displays results that match your entry.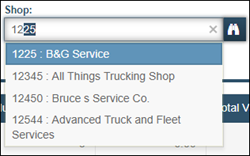
-
Continue entering characters until the appropriate ID/name appears in the list.
-
Select the correct ID/name from the list.
The system completes the entry based on your selection and advances to the next field.