Adding discount types
Before you can create discount filters or apply discounts to invoices, you must first set up discount types in your system.
To add a new discount type:
-
Go to Menu > Setup > Order Setup > Discounts.
For versions earlier than V. 2020.2, go to Menu > Setup > Discounts.
The Discounts page opens. -
Click Add.
The Discount Details - Inserting window opens and displays the Coupon discount type.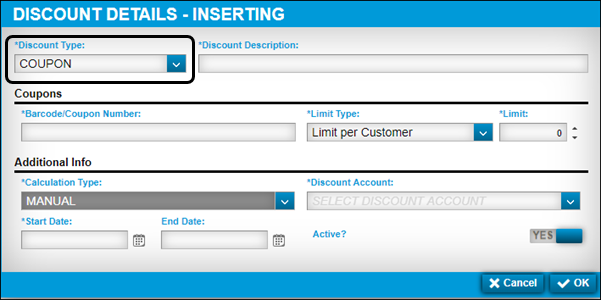
-
In the Discount Type field, select the discount type that you want to add.
-
Coupon
Note: For details about individual fields, see Discounts.
-
In the Discount Description field, enter the discount’s description.
-
In the Barcode/Coupon Number field, enter the discount’s coupon readout.
-
In the Limit Type field, select the max number of uses for this coupon.
-
Limit per Customer
-
Limit per Customer/Unit
-
-
In the Limit field, enter the maximum number of times this coupon can be used.
Note: Once the limit is reached, the coupon will not be able to be used again for that customer or customer/unit. However, if you set the limit to zero (0), the coupon does not have a limit.
-
In the Discount Account field, select the discount’s accounting code.
-
Specify the discount’s starting date and ending date.
-
If needed, update the discount’s active status.
-
When finished, click OK.
To close the window without saving your changes, click Cancel.
-
-
Discount
Note: For details about individual fields, see Discounts.
-
In the Discount Description field, enter the discount’s description.
-
In the Calculation Type field, specify how the discount is applied to invoices.
-
In the Discount Account field, select the discount’s accounting code.
-
Specify the discount’s starting date and ending date.
-
If needed, update the discount’s active status.
-
When finished, click OK.
To close the window without saving your changes, click Cancel.
-
-
Special
Note: For details about individual fields, see Discounts.
-
In the Discount Description field, enter the discount’s description.
-
In the Calculation Type field, specify how the discount is applied to invoices.
-
In the Discount Account field, select the discount’s accounting code.
-
Specify the discount’s starting date and ending date.
-
If needed, update the discount’s active status.
-
When finished, click OK.
To close the window without saving your changes, click Cancel.
-
-
Repeat Steps 2 and 3 as needed.