Approval levels
Approval levels are used with the Purchase Order approval and Repair Order approval features. You do not have to use both purchase order approvals and repair order approvals, however.
To open the Approval Levels page, go to Menu > Setup > Order Setup > Approval Levels.
For versions earlier than V.2020.2, go to Menu > Setup > Approval Levels.
|
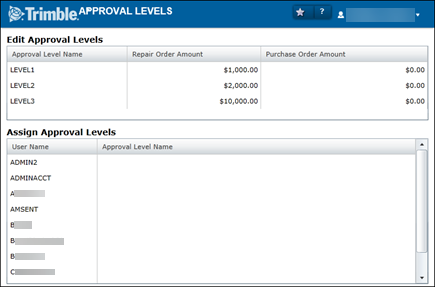
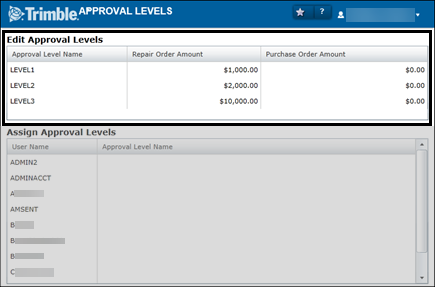
The Edit Approval Levels section
Lists all existing approval levels and allows you to insert, edit, and delete approval levels. The field entries on Approval Levels page show the information entered for an approval rate in the Add New Approval Level window. If a field name is different, it is provided below the page field name.
Approval Level Name |
The name you want to assign to the Approval level |
Repair Order Amount |
Repair order approval limit |
Purchase Order Amount |
Purchase order approval limit |
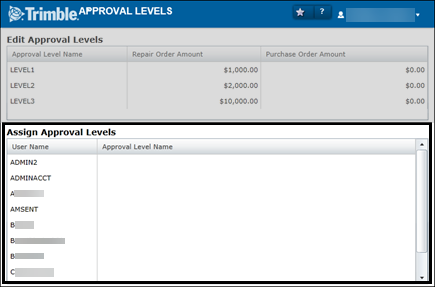
The Assign Approval Levels section
Lists all system users and allows you to assign and manage levels for users.
User Name |
User ID |
Approval Level Name |
User’s assigned approval level |
Working with approval levels
You use the Edit Approval Levels section on the Approval Levels page to:
-
Add approval levels to the system
-
Edit existing approval levels
-
Delete approval levels from the system
Adding approval levels
To add a new approval level:
-
Go to Menu > Setup > Order Setup > Approval Levels.
For versions earlier than V.2020.2, go to Menu > Setup > Approval Levels.
The Approval Levels page opens. -
In the Edit Approval Levels section, right-click and select Add new level.
The Add New Approval Level window opens.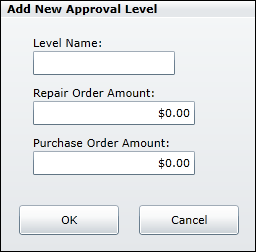
-
Make entries in the fields as needed.
If you want, you can make entries in all fields. For details about individual fields, see Approval Levels.
-
Click OK.
The approval level is displayed in the Edit Approval Levels section.
To close this window without saving your changes, click Cancel.
Editing approval levels
To edit an existing approval level:
-
Go to Menu > Setup > Order Setup > Approval Levels.
For versions earlier than V.2020.2, go to Menu > Setup > Approval Levels.
The Approval Levels page opens. -
In the Edit Approval Levels section, select the approval level that you want to edit.
-
Right-click and select Edit level.
The Edit Approval Level window appears.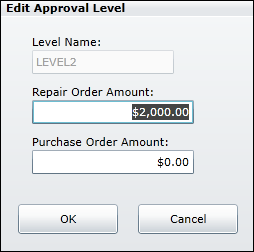
-
Make changes as needed.
For details about individual fields, see Approval Levels.
-
Click OK.
The changes are displayed in the Edit Approval Levels section.
To close this window without saving your changes, click Cancel.
Deleting approval levels
To delete an existing approval level:
-
Go to Menu > Setup > Order Setup > Approval Levels.
For versions earlier than V.2020.2, go to Menu > Setup > Approval Levels.
The Approval Levels page opens. -
In the Edit Approval Levels section, select the approval level that you want to delete.
-
Right-click and select Delete.
A confirmation message window opens. It asks, "Delete the selected approval level?" -
Click Yes.
The selected approval level is removed from the Edit Approval Levels section.
To close this window without saving your changes, click Cancel.
Assigning or removing user approval levels
You use the Assign Approval Levels section on the Approval Levels page to:
-
Assign approval levels to users
-
Remove users from an approval level
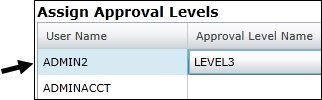
Assigning users to approval levels
-
Go to Menu > Setup > Order Setup > Approval Levels.
For versions earlier than V.2020.2, go to Menu > Setup > Approval Levels.
The Approval Levels page opens. -
In the Assign Approval Levels section, select the user.
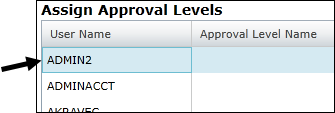
-
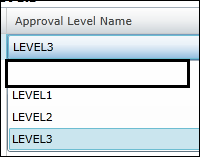
In the Approval Level Name field, select the approval level for this user.
Note: The section displays a list of all system users. You manage approval levels on a user-by-user basis.
-
Repeat Steps 2 and 3 for additional users as needed.
Removing users from approval levels
-
Go to Menu > Setup > Order Setup > Approval Levels.
For versions earlier than V.2020.2, go to Menu > Setup > Approval Levels.
The Approval Levels page opens. -
In the Assign Approval Levels section, select the user.
-
In the Approval Level Name field, select the blank approval level.
-
Repeat Steps 2 and 3 for additional users as needed.