Work Shifts
A work shift can be any combination of days of the week and hours during the day. The most common shifts are first shift, second shift, and third shift. Other shifts could include a weekend shift.
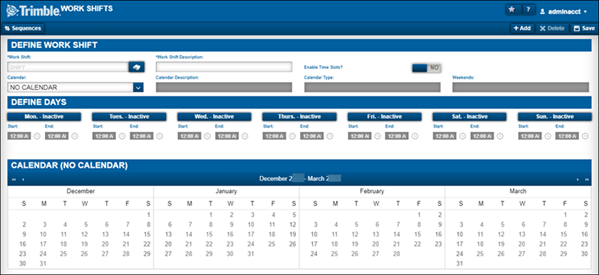
You use the Work Shifts page to create, edit, or delete work shifts.
Go to Menu > Setup > Work Shifts to load the Work Shifts page.
Work shifts are used with the following:
-
Employee master records
For an employee, the work shift identifies a mechanic’s work hours. -
Unit master records
For a unit, the work shift identifies a unit’s hours of operation.Note: Assigning a work shift to a unit is important if you will be performing downtime analysis.
-
Pay Grades
For a pay grade, a work shift can be assigned to the Shop Shift to define labor rates.
The Work Shifts page has the following sections:
-
Command buttons
You can use these command buttons to complete these actions:-
Sequences
Sorts work shifts in a sequence. For details, see Setting work shift sequences. -
Add
Adds a new work shift. For details, see Adding work shifts. -
Delete
Deletes the selected work shift. For details see, Deleting an existing work shift. -
Save
Saves changes to the selected work shift.
-
-
Define Work Shift
Displays the selected work shift details. -
Define Days
Displays active or inactive days and times for the selected work shift. -
Calendar
Displays the associated calendar details for the selected work shift. For details on the Calendar, see Calendar setup.
The Define Work Shift section

Field definitions
Required field: *
Read-only field: §
Work Shift * |
User defined identification for the work shift |
Work Shift Description * |
Description of the work shift Used to define the Work Shift (such as The Graveyard Shift, Day Shift, Night Shift) |
Enable Time Slots |
Toggle this option to enable time slots to be assigned to the days of the work shift
|
Calendar |
Displays a calendar assigned to the work shift (optional) Note: Calendars must be created prior to being available for assignments to work shifts. |
Calendar Description § |
Calendar description |
Calendar Type § |
Calendar type |
Weekends § |
Indicates whether weekend days (Saturday or Sunday) are included or excluded in the calendar calculations |
The Define Days section

Note: If the Define Work Shift option Enable Time Slots is set to YES, each day that is Active displays a Time Slots button.
Adding work shifts
To add a new work shift:
-
Go to Menu > Setup > Work Shifts.
The Work Shifts page opens. -
Click Add.
The New Work Shift window opens.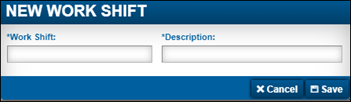
-
In the Work Shift field, enter the work shift’s name.
-
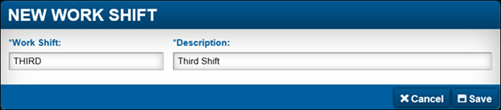
In the Description field, enter the work shift description.
This illustration shows a sample work shift.
-
Click Save.
The new work shift is displayed. -
If needed, select the work shift’s calendar in the Calendar field.
For calendar details, see Calendar setup.
-
Define the work shift’s active days and times.
-
Select the Day - Inactive icon above the day you want to activate.
Clicking on the icon changes the day status to active and enables the start and end time fields.
-
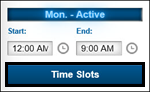
Enter the Start and End times.
-
Repeat Steps a and b for additional days as needed.
-
-
If needed, enable time slots on active days.
Note: The Enable Time Slots option must be set to YES to enable time slots. When you enable this option, a Time Slots button displays below the Start and End fields.
-
Click Time Slots to add a time slot assignment.
The Time Slots window opens.
Field definitions
Start
Time slot start time
End
Time slot end time
-
Click Add.
A new time slot is displayed.
-
Do one of the following:
-
To save this time slot, click Save.
The system saves the time slot. The window remains open. -
To save the time slot and add another time slot, click Save & Add New.
The system saves the time slot. The window remains open to allow you to add another time slot. -
To close the window without saving your changes, click Cancel.
-
-
When you are finished, click Done.
The window closes and the Work Shifts page is displayed.
-
-
Click Save.
Working with work shifts
You use the Work Shift page to:
-
Edit existing work shifts details
-
Change a work shift’s calendar
-
Update the work shift’s active days
-
Update or delete time slots
-
Update the work shift sequence
Editing an existing work shift’s details
To edit an existing work shift’s details:
-
Go to Menu > Setup > Work Shifts.
The Work Shifts page opens. -
In the Work Shift field, enter the needed work shift and press ENTER.
The work shift is displayed. -
Make edits in the Define Work Shift section as needed.
-
Click Save.
Changing a work shift’s calendar
To change a work shift’s calendar:
-
Go to Menu > Setup > Work Shifts.
The Work Shifts page opens. -
In the Work Shift field, enter the needed work shift and press ENTER.
The work shift is displayed. -
In the Calendar field, select the calendar needed.
The Calendar section updates to display the selected calendar. -
Click Save.
Updating a work shift’s active days
To update a work shift’s active days:
-
Go to Menu > Setup > Work Shifts.
The Work Shifts page opens. -
In the Work Shift field, enter the needed work shift and press ENTER.
The work shift is displayed. -
In the Define Days section, make changes as needed:
-
Update a work shift’s active/inactive days.
-
Update a day’s start/end time.
-
Delete a day’s time slot
-
Click Time Slots for the day you want to remove the time slot.
The Time Slots window opens.
-
Select the checkbox next to the time slot you want to delete.
-
Click Delete.

The Remove Time Slots message window opens. It asks, "Are you sure you want to remove Time Slots?"
-
Click OK.
-
-
-
Click Done.
The time slot is removed and the Work Shifts window is displayed. -
Click Save.
Setting work shift sequences
To set the work shift sequence:
-
Go to Menu > Setup > Work Shifts.
The Work Shifts page opens. -
In the Work Shift field, enter the needed work shift and press ENTER.
The work shift is displayed. -
Click Sequences.
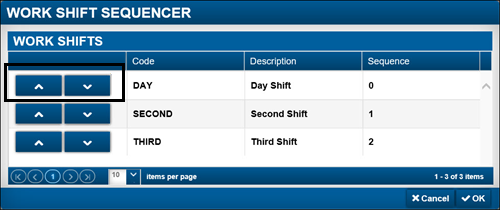
The Work Shift Sequencer window opens.
Field definitions
Up/Down arrows
Allows the work shift to be shifted up or down in the sequence
Code
Work shift name
Description
Work shift description
Sequence
Sequence order
-
Click the Up or Down arrows to move a work shift in the sequence.
-
Do one of the following:
-
Click OK.
Saves your changes and closes the Work Shift Sequencer window. -
Click Cancel
Closes the Work Shift Sequencer window without saving your changes.
-
-
Click Save.
Deleting an existing work shift
To delete an existing work shift:
|
You cannot delete a work shift if there are active assignments (Employees, Units, and Pay Grades). |
-
Go to Menu > Setup > Work Shifts.
The Work Shifts page opens. -
In the Work Shift field, enter the needed work shift and press ENTER.
The work shift is displayed. -
Click Delete.
The Delete Work Shift message window opens. It asks, " Are you sure you want to delete workshift: work shift ID? If you have time slots configured, they will be deleted as well." -
Click Delete.
The work shift is removed.
Click Cancel to close this window without saving your changes.