Add, edit, and remove repair order sections
A repair order (RO) tracks the costs to maintain equipment.
Each RO is made up of one or more sections. Each section requires a component code, which categorizes the type of maintenance needed for the repair.
For more information on sections and lines, see Repair order sections and lines overview.
Add sections to a repair order
-
Look up or create a repair order.
The Repair Order page opens. -
In the Sections/Lines pane, click Add Section.
The Add/Edit/View Section window opens. The window has three sections: Assignment Information, Section Details, and Comments. -
Make entries in the Assignment Information section as needed.
Your company may have set up the system to populate these fields automatically:
-
Description
-
Estimate Time
-
Component
For more information, see
[Repairs: Job Codes]Create Sections By Job Code Instead Of Component Code.
Field Definition Job Code
Job code’s ID
Job Codes are used to establish baseline hours for activities.
Description
Job code’s description
Estimated Time
Estimated time to complete the job
Mechanic
Mechanic (Employee ID) assigned to complete the job
-
-
In the Section Details section, make entries in the required fields. Make entries in other fields as needed.
Required field: *
Field Definition Component *
Enter a component code.
Component codes are based on the Vehicle Maintenance Reporting Standards (VMRS) standard component codes for Systems, Assemblies, and Parts on a unit. The codes are developed in three sets of three digits. They are separated by dashes:
-
XXX: Three digits represent a System on a unit. This is the highest level of a component. For example, 013 is the component code for Brakes.
-
XXX-XXX: Three digits dash three digits represent an Assembly on a unit. For example, 013-001 is the component code for the Front Brakes and Drums.
Note: Trimble recommends using an assembly code wherever possible.
-
XXX-XXX-XXX: Three digits dash three digits dash three digits represent a Part on a unit. For example, 013-001-014 is a Front Brake Shoe.
Note: The quick search for the component code enforces the max component code. If the max is set to system, the quick search displays 3-digit component codes. If the max is set to assembly, the quick search displays 3- and 6-digit component codes. If the max component level is set to part, the quick search shows 3-, 6-, and 9-digit codes.
Component Description
Component code’s description
Status
Section’s status
The default field value is Open. Section statuses include:
-
Open
The section is open.You can add assignments and lines to the section.
-
Complete
Work for the section is complete.You can enter additional assignments and lines.
-
Closed
The section is closed.You can make assignments and reset the section’s status.
-
Canceled
The section is canceled.You cannot add lines.
You can reset the section’s status.
Changing a repair order status affects a section’s status based on the following rules.
-
Changing a repair order status to Complete only changes any Open section on it to Complete. The section’s Completed Date changes to the date you set the repair order status to Complete. Sections already set to Complete or Closed do not change.
-
Changing a repair order status to Closed, changes its Open and Complete sections to Closed.
-
Changing a repair order status from Complete to Open, does not change any Complete or Closed sections.
Priority
Select a number from 1-5 to set the priority level for the section.
The number 1 represents the highest priority and 5 represents the lowest.
Alternatively, you can give each section a number to indicate the order in which to complete them.
Complaint *
Enter the complaint.
The complaint code represents the problem that prompted the repair. Complaint codes are based on the component code you select. Some examples of complaint codes include Broken, Worn Out, and Cracked.
Repair Reason *
Enter the reason for the repair.
By default, the system shows standard ATA reasons for repairs, based on the component code you enter.
Reason for Delay
Leave this field blank.
Warranty Type
Type of warranty in effect for the section
Valid types are:
-
Campaign
Start campaign -
Expired
Warranty expired -
Extended
Additional warranty on component -
No warranty
Item not covered by warranty -
Original Equipment Manufacturer (OEM)
Bumper-to-Bumper -
Policy Adj
Policy adjustment -
Recall
Recall issued by vendor -
Special
Special case
Opened
Date the section is opened
Defaults to the current date.
Completed
Date the section is completed
PO Number
Purchase order number
Vendor
If adding vendor charges to the section, enter the Vendor’s ID.
-
-
In the Comments section, enter remarks as needed.
Use this field to enter instructions associated with maintenance requirements.When available, you can add Job Code Messages in place of general section comments or in addition to section comments.
The Job Code Messages field becomes active when you enter a Job Code in the Assignment Information section.
-
When you are finished entering information, do one of the following:
-
To save the section, click Save.
The system saves the section information. The window closes. -
To save and add another section, click Save/Add New.
The system saves the section information. The window remains open to allow you to add another section. -
To close the window without saving your changes, click Cancel.
-
Edit RO sections
To make edits in a section:
-
Look up the repair order.
-
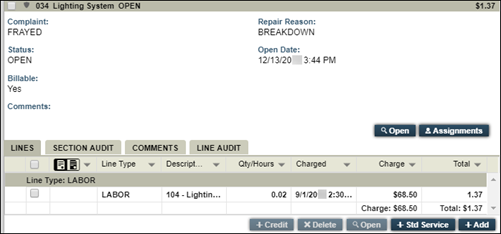
In the Sections/Lines pane, select a section.

Note: Do not select the checkbox in the row. It enables the Delete Selected button.
The section expands.
-
To edit the section, click Open.
The Add/Edit/View Section window opens.
-
Make entries in editable fields as needed.
For details on individual fields, see Add, edit, and remove repair order sections.
-
To edit an assignment, click Assignments.
The Work with Assignments/Tasks window opens. It displays information in the Assignments tab by default.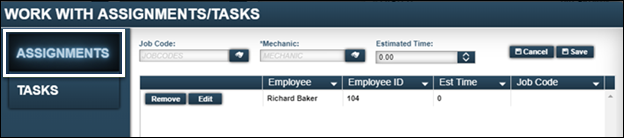
-
Click Edit in the assignment record that you want to change.
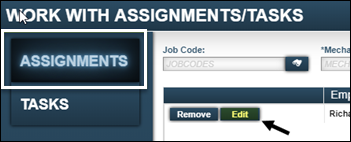
The Job Code, Mechanic, and Estimated Time fields display any existing information.

-
Add or edit information in the Job Code, Mechanic, and Estimated Time fields as needed.
For details on individual fields, see Add, edit, and remove repair order sections. -
When you no longer need to make changes, do one of the following:
-
To save your changes, click Save and then click Close.
The system saves the assignment. The window closes. -
To close the window without saving your changes, click Cancel.
-
To remove an assignment, click Remove in the assignment record, and then click Close.
The system removes the assignment. The window closes.
-
Remove RO sections
When a section includes charge lines, you must delete the charge lines before removing the section. You cannot delete a section with charge lines.
-
Look up the repair order.
-
In the Sections/Lines pane, select the checkbox next to the section you want to delete.
Selecting the checkbox enables the Delete Selected button.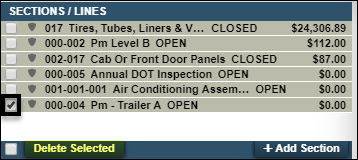
Note: Clicking the checkbox next to the Delete Selected button, selects all sections.
-
Click Delete Selected.
The Delete Section(s)? system message window opens. It asks, "Are you sure you want to delete Number section(s)?" -
Do one of the following:
-
To delete the section, click OK.
The system deletes the section. The window closes. -
To close the window without deleting the section, click Cancel.
-