Managing SQL reports
TMT Fleet Maintenance provides a web-based reporting interface that uses SQL statements to develop reports. You can create ad hoc or regularly-generated reports based on information in databases to which you have a connection.
When you set up the report, you assign it to user roles. Only users with those roles can access it. Reports are accessed through Report Viewer, as an individual menu option, or from a hyperlink to the report’s URL.
Defining restriction criteria
Using restrictions, you limit the report to records that meet specific requirements. When you create a report, you can handle restriction criteria in several different ways.
Predefining restriction criteria in your SQL query
When designing your report, you can identify restriction criteria when you write the SQL query. Predefining restriction criteria is useful when the report is to show the same data to anyone permitted to view it.
This example shows predefined restriction criteria for:
-
Domicile = 1
-
Cost Center Code = Delivery or Retail
-
Sorted by description

Creating and updating a SQL report
To create a new SQL web-based report or update an existing report, follow these steps.
-
Go to Menu > Reports > Reports - SQL > Manage Reports.
The Manage Reports page opens.If no other reports exist, enter a unique name for the report in the Report Name field.
If other reports exist, and you want to create a new report:
-
Click Add New Report.
A blank report form appears. -
In the Report Name field, enter a unique name for the report.
If you want to update an existing report, select the report you want to change in the Report Name field. The Manage Reports page displays the current settings and SQL query for the selected report.

-
-
In the Report Description field, enter the text you want to appear at the top of the report, below the report title.
-
If you want to add the report to a menu, select Add to Page Definition.
A report can be viewed using Report Viewer or added as a menu option.
-
If you want to be able to add this report as a menu option, select this checkbox.
-
If you want the report to be viewed only by using Report Viewer, clear the checkbox.
-
-
If you want to limit access to this report to specific roles, use the Role Assignment field to make a role selection.
-
From the Database Connection list, select the location of the database to be used as the source for the report.
Note: The list of available database locations is determined by the settings in the connections section of the web.config files for TMT Fleet Maintenance and Web Services. All connections preceded with "Report_" are shown in the Database Connection drop-down list. For more information on these settings, refer to the TMT Fleet Maintenance Installation Guide.
-
Define the Report Query in SQL.
You can include any of the following types of controls to define a variable.Notes:
-
Variables must start with one of the strings listed below and may need to be enclosed in single quotation marks.
-
Variables are not case-sensitive.
-
If you want the label (name) for the input field to contain blank spaces, use underscores in the name. For example, @dt_Date_From produces the label Date From for the input field.
-
-
If you want, change the report colors and fonts.
-
Save the report.
-
New report
Click Create.
A message appears confirming the report was successfully created.The new report is added to the list of available reports.
Note: The successful creation of a report does not guarantee the report will generate without error.
-
Existing report
Click Update.
A message appears confirming the report was successfully updated.Note: The successful update of a report does not guarantee the report will generate without error.
-
Changing SQL report colors and fonts
You can customize the appearance of a report by changing background colors, fonts, and font properties.
To customize a SQL report, follow these steps.
-
Go to Menu > Reporting > SQL Reports > Manage Reports.
The Manage Reports page opens. -
From the Report Name field, select the report you want to change.
The Manage Reports page opens with the current settings and SQL query for the report you selected. -
Click Show Report Properties.
The page expands to display the report properties.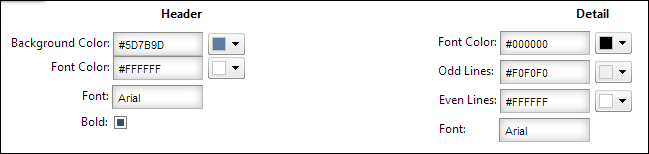
-
Determine the component of the report you want to change.
-
Header
This example shows the changes.
-
Detail
This example shows the background color of the odd rows within the body of the report changed and the font changed to Calibri.
-
-
To change the color of a report component, do one of the following:
-
Enter the HTML color code.
-
Click
 Pick Color and select a color from the palette.
Note: You may need to drag the arrow on the color bar up to a lighter color range before selecting from the palette.

-
-
Change the text font.
-
In the field of the item to change, enter the name of the font.
Notes:
-
You should select a standard font for web browsers, such as:
-
Arial
-
Helvetica
-
Courier New
-
Lucida Console
-
Lucida Sans Unicode
-
Tahoma
-
Times New Roman
-
Trebuchet MS
-
-
If the person running the report does not have the chosen font installed, the browser will display the next closest font.
-
-
Select or clear the Bold checkbox, if available.
-
-
Click Hide Report Properties to collapse the Properties portion of the window.
-
Click Update.
A message confirms the report was successfully updated.