Units master records
Units can include, but are not limited to, these items:
-
Construction equipment, such as dozers, forklifts, or cranes
-
Personal vehicles, such as cars, vans, or trucks
-
Public transportation vehicles, such as busses or taxi fleets
-
Trucking industry equipment, such as reefers, tractors, or trailers
A Unit master record is a critical part of TMT Fleet Maintenance. You must have a unit master record before you can assign that unit to a repair order (RO). The unit’s functionality depends on your TMT Fleet Maintenance license.
You use the Units page to:
-
Create unit records
-
Update unit information
-
Remove units
Go to Menu > Masters > Units to open the Units page.
Unit categories
There are four unit categories:
-
Company units (full units)
Company units belong to your company. They also count against your unit licenses.
-
Non-Company units (retail units)
Non-Company units are units you work on, but you do not own them. For example, if you run a repair shop and fix a customer’s vehicle, that vehicle is a non-company unit. Non-Company units do not count against your unit licenses.
-
Miscellaneous units
You use miscellaneous units to track non-rolling, non-road based equipment, such as:
-
Trash containers and roll off boxes in the waste industry
-
Pallet jacks, dock plates, and forklift batteries in warehouses
-
EMS equipment on emergency vehicles
-
Lawn mowers and weed trimmers in maintenance shops
-
Other low valued assets
Miscellaneous units have their own unit limits, which you can purchase separately from standard units.
-
-
Reports Only units
Reports Only units are units that you no longer have physically but that you want to run unit cost reports on. Reports Only Units do not count against the Unit Limit Count (that is, your license count). You can make Reports Only Units active again if needed, as long as reactivating the unit would not cause you to exceed the unit count.
The tabs and fields you see on the Units page depend on which category the unit belongs to.
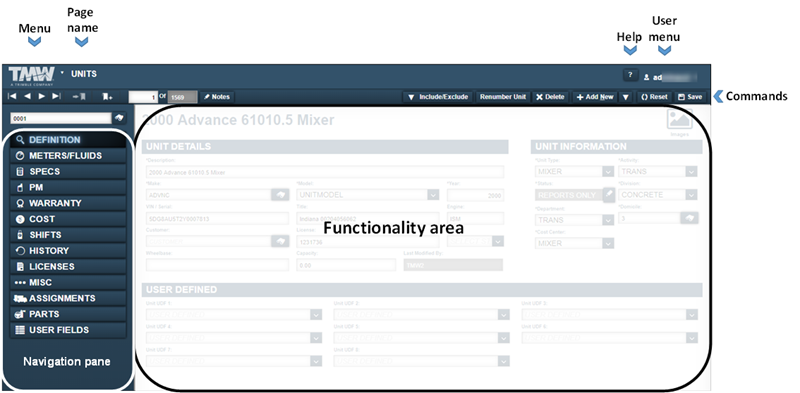
Layout of the Units page
This illustration shows the Units page.
| Pages are designed so that menus and functionality areas appear the same way throughout the application. While some elements are not part of every page, the basic layout of the page is consistent. |
The Units page provides easy access to the:
-
Menu that lists application menu items
-
User menu that lists user-specific menu items
-
Command buttons that allow you to Delete, Add, Reset, and Save unit records
-
Functionality area that you use to enter information into the system
-
Navigation pane includes the Unit lookup field and the
 Search icon
The identification number used to look up a unit is user defined. You can enter up to 24 alphanumeric characters in this field.
The tabs available on the Units page depend on the unit you select. This table lists the unit categories and which tabs they have available.
| Tabs | Company Unit | Non-Company Unit | Miscellaneous Unit |
|---|---|---|---|
Definition |
Yes |
Yes |
Yes |
Meters/Fluids |
Yes |
Yes |
Meters only |
Specs |
Yes |
No |
No |
PM |
Yes |
No |
Yes |
Warranty |
Yes |
Yes |
No |
Cost |
Yes |
No |
Yes |
Shifts |
Yes |
No |
Yes |
History |
Yes |
No |
Yes |
Licenses |
Yes |
No |
No |
Misc |
Yes |
No |
Yes |
Taxes |
Yes |
Yes |
No |
Assignments |
Yes |
No |
No |
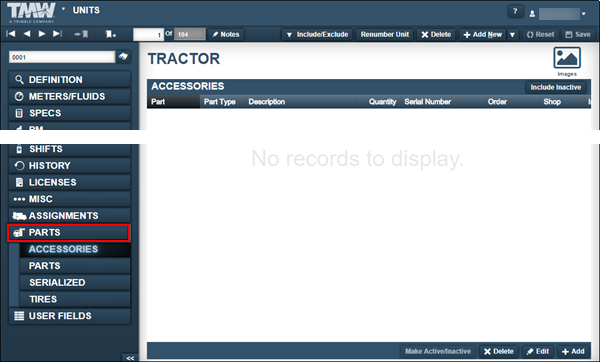
Parts |
Yes |
No |
No |
User Fields |
Yes |
Yes |
Yes |
Definition tab
The Definition tab includes three sections:
-
Unit Details
-
Unit Information
-
User Defined
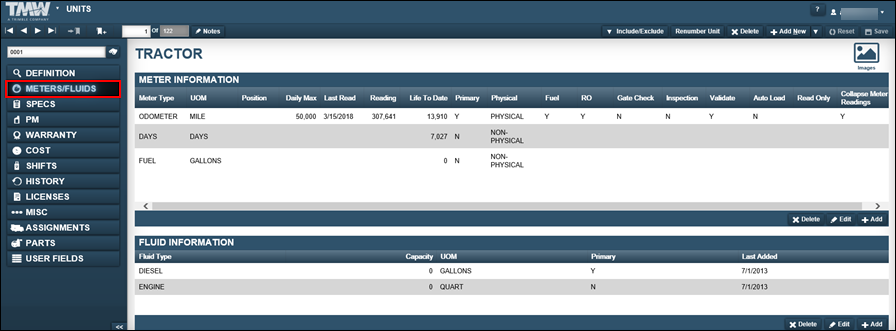
Meters/Fluids tab
The Meters/Fluids tab includes two sections: Meter Information and Fluid Information.
This illustration shows the Meters/Fluids tab sections.
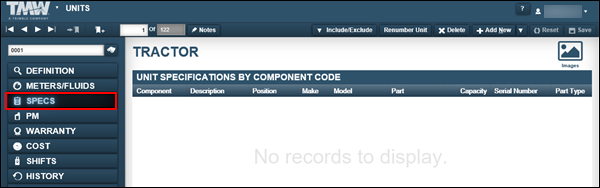
Specs tab
The Specs tab includes the Unit Specifications by Component Code section. It lists information about each unit specification based on the component code listed.
This illustration shows the Specs tab section.
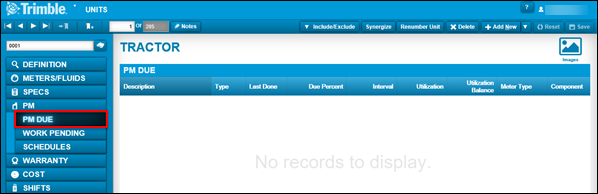
PM tab
The PM tab has three sub tabs: the PM Due, Work Pending, and Schedules sub tabs. When you select the PM tab, the system displays the PM Due sub tab automatically.
Warranty tab
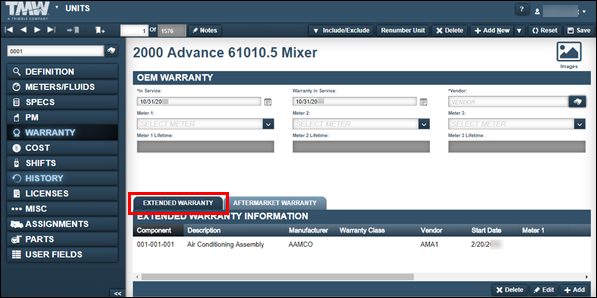
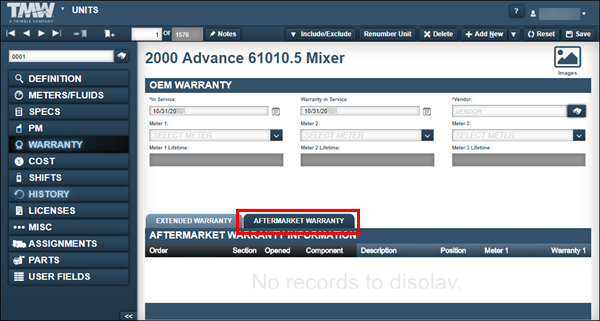
The Warranty tab has three sections:
-
OEM Warranty
-
Extended Warranty Information
This section is shown by default. -
Aftermarket Warranty Information
To view this section, click the Aftermarket Warranty sub tab.
This illustration shows the Warranty tab with the Extended Warranty sub tab selected.
This illustration shows the Warranty tab with the Aftermarket Warranty sub tab selected.
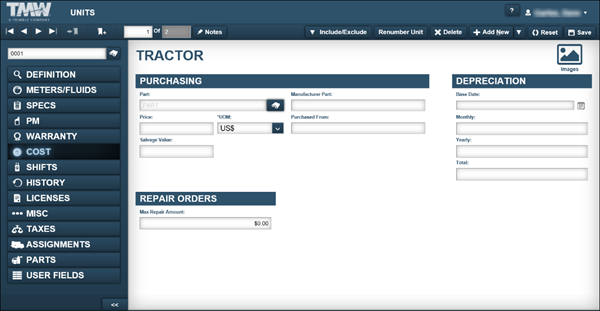
Cost tab
The Cost tab has three sections: Purchasing, Depreciation, and Repair Orders.
This illustration shows the Cost tab sections.
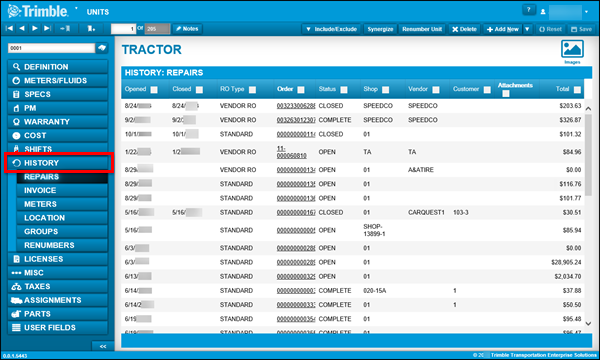
History tab
The History tab has five sub tabs:
-
Repairs
When you select the History tab, the system shows the Repairs sub tab automatically.
-
Invoice
-
Meters
-
Location
-
Groups
-
Renumbers
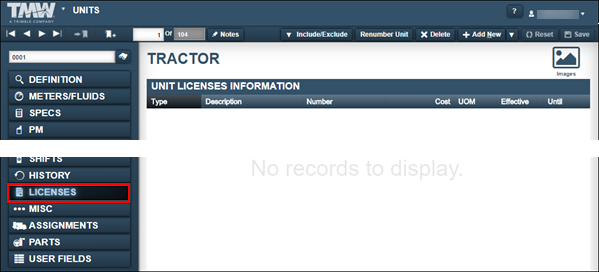
Licenses tab
The Licenses tab has the Unit Licenses Information section.
This illustration shows the Licenses tab sections.
Misc tab
The Misc tab has three sections: Unit Information, Parking Information, and Additional Information.
This illustration shows the Misc tab sections.