Using the Tire Module
After the Tire module has been set up, you can perform various tasks:
-
Access the Tire Data button in IWS
-
Charge tires on an RO
-
Use Tire Review to assign tires to Review, Scrap, or Recap
The following sections provide instructions on how to use the Tire Module.
Adding Tire Data
In IWS, you use the Tire Data button to get started entering tire depth and pressure for each tire listed in a unit’s Tire Configuration. It also allows you to make tire replacements from the Tire Data window.
In Mechanic Workstation or Interactive Workstation (using Gate In, Gate Out, Yard Check and Inspection Tickets), the button displays as Tire or Tire Data.
To access the Tire Data button in Mechanic Workstation, complete the following steps.
-
Go to Menu > Activities > Interactive Workstation > Interactive Workstation.
Note: For versions earlier than V.2020.2, go to Menu > Activities > Interactive Workstation.
The Interactive Workstation page opens.
-
Select a user.
-
Click Post.
The Interactive Workstation Menu is displayed.
-
Do one of the following to access the Tire Data (or Tire) button.
Access through Mechanic Workstation Repair Order-
From the IWS menu, select Mechanic Workstation.
The Job Activity page is displayed. -
In the Order category, select Tire Data.
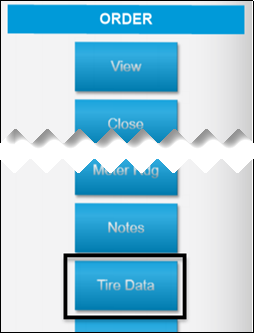
The Tire Data page opens.
Access through Interactive Workstation (Gate In, Gate Out, Yard Check)-
From the IWS menu, select one of the following: Gate In, Gate Out, or Yard Check.
Note: This example shows using the Gate In process.
-
Enter the Unit number.
-
Press TAB.
-
If you do not know the Unit number, complete the following:
-
Click
 Search.
The Unit Search page opens. -
Click Search.
A list of units is displayed at the bottom of the page. -
Select the unit you want.
-
-
Click Post.
-
Next to the unit number, click Tires.
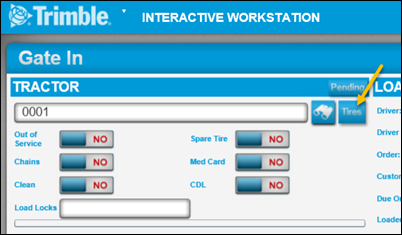
The Tire Data page opens.
Interactive Workstation (Inspection Ticket)-
From the IWS menu, select Inspection Tickets.
-
Enter the Unit number.
-
Press TAB.
-
If you do not know the Unit number, do the following:
-
Click
Search.
The Unit Search page opens. -
Click Search.
A list of units appears at the bottom of the page. -
Select the unit you want.
-
-
Click Post.
A list of inspection tickets is displayed for the unit. -
Click View.
The Inspection Ticket number you selected is displayed.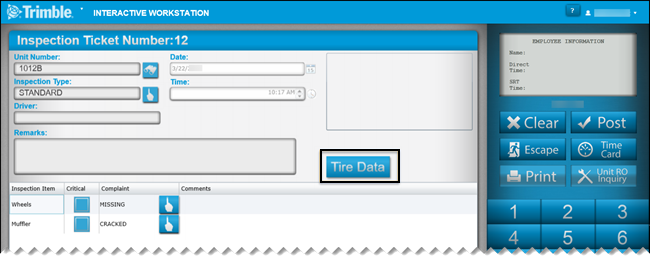
-
Click Tire Data.
The Tire Data page opens.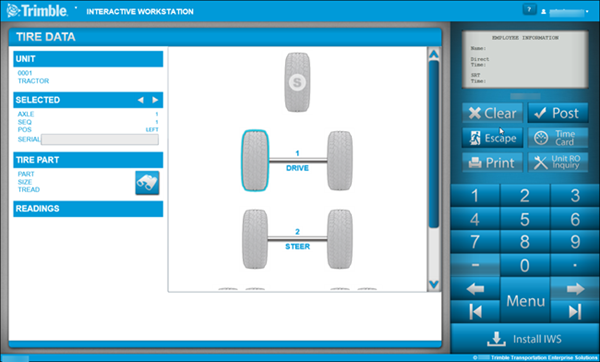
-
-
To move between tires, press
 or
or  .
.Note: The tire that you have selected is outlined in blue. If you select a tire on the Tire Data page that does not have a tire assigned to it yet, the tire on the grid appears inactive.
-
To assign a tire, under the Tire Part section, click
Search.
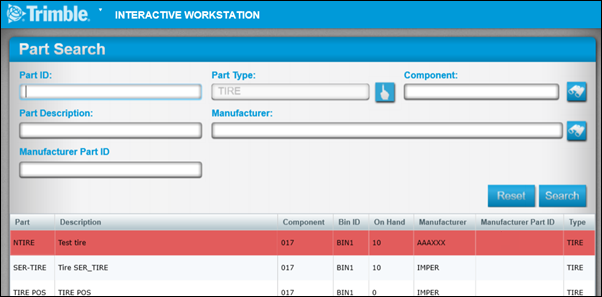
The Parts Search window opens with a list of tires.Note: If a tire has already been assigned to the location you selected in the tire grid, the
icon is not displayed. The Part Search window displays only records with a Part Type of tire. -
Select a tire from the list.
-
Click Post.
The Tire Data page is displayed. -
In the Readings section, enter the Pressure and Depth amounts.
Notes:
-
If a tire is above the Tread Depth Warning, it is displayed as green.
-
If it is equal to or below the warning, it is displayed as yellow.
-
If it is equal to or below the replace level it will display as red.
-
-
To replace a tire, click on the tire and drag it to the DRAG TIRE TO REPLACE icon under the Readings section.

The Replace Tire window opens. It has two sections: Tire On and Tire Off.
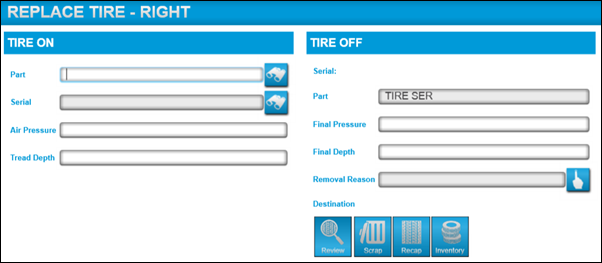 Field definitions - Tire On#
Field Definition Part
Enter the part number for the tire you are putting on the unit.
If needed, click
Search to look for the part.Serial
Enter the serial number for the tire that is replacing the tire you removed.
Air Pressure
Enter the pressure of the new tire.
Tread Depth
Enter the tread depth of the new tire.
Field definitions - Tire Off#Field Definition Serial
Enter the serial number for the tire you will be replacing.
Part
This field is filled in when you drag the tire to the replace icon.
Final Pressure
Enter the air pressure of the tire you removed.
Final Depth
Enter the final tread depth of the tire you are removing
Removal Reason
Click
 and select the reason from the list:
-
Brake Skid Tire Replaced
-
Flat Tire Replaced
-
Low Tread Replaced
Term
Definition
-
Charging tires on a repair order
You can use Mechanic Workstation to charge a tire to a repair order. When the tire is charged on the repair order, a graphical representation of the tire configuration includes a tread depth warning and tire pressure.
-
Go to Menu > Activities > Interactive Workstation > Interactive Workstation.
Note: For versions earlier than V.2020.2, go to Menu > Activities > Interactive Workstation.
-
Select a user from the list and click Post.
-
Select Mechanic Workstation.
The Job Logon page displays a list of ROs. -
Select the Job/RO you want.
-
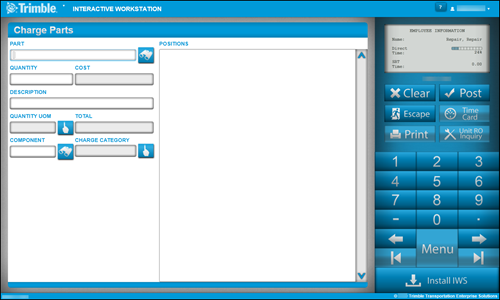
In the Job Activity window, under RO LINES, click Charge Parts.
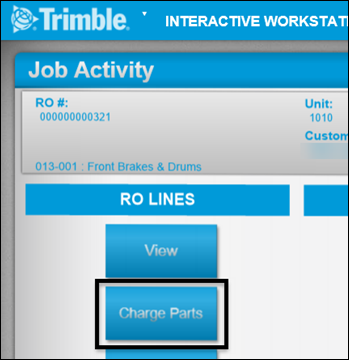
The Charge Parts window opens.
-
Enter the Part.
-
Press TAB.
The other fields are filled in automatically.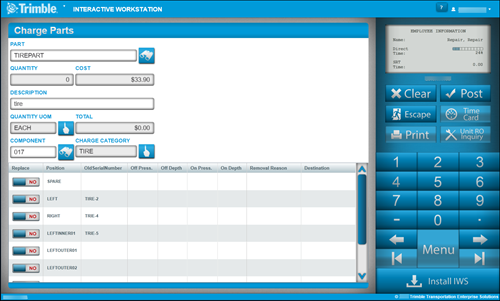
At the bottom of the page, a list of all positions on the unit that use the part number you entered is displayed.
-
In the Replace column, toggle the NO to YES for each tire you want to replace.
For each item you toggle to Yes, the Quantity and Total field values increase. -
For each line you toggle to YES, enter amounts in these fields:
-
Off Pressure
-
Off Depth
-
Removal Reason
-
Destination
Notes:
-
On a tire that has never been recorded in the application, when you charge a tire, you can only record the On Air and the On Depth.
-
If a tire has already been replaced in the application, then you can complete the information for the removed tire as well. These fields will now be active: Off Air, Off Depth, On Air, On Depth, and Removal Reason.
-
-
When you have entered information for all tires, click Post.
New lines are entered on the repair order for the credit, and the part and labor charge.
Using Tire Review
When you remove a tire from a unit, you can flag it to be reviewed, scrapped, or recapped.
-
Go to Menu > Activities > Tires > Tire Review.
The Tire Review page opens.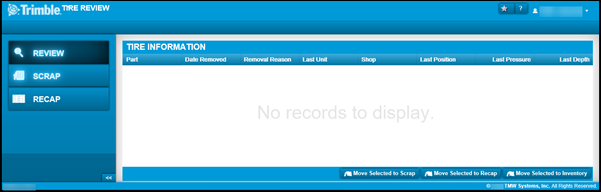
-
In the menu on the left of the page, select the option you need: Review, Scrap, or Recap.
If there are tires in each category, they are displayed in the Tire Information grid. -
If you want to select a tire shown in the Review category, select a tire that is displayed in the Tire Information grid.
Three options are displayed:-
Move Selected to Scrap
The tire is moved to the Scrap category. No confirmation is requested. A tire moved to Scrap cannot be moved again. -
Move Selected to Recap
The tire is moved to the Recap category. No confirmation is requested. A tire moved to Recap cannot be moved again. -
Move Selected to Inventory
When you select this option a quick repair order is created.
-
-
Click Move Selected to Inventory.
The Quick RO window opens. -
Enter the Used Tire Part number or click
Search to find it.
The Credit Amount is filled in with the average cost of the tire part record. -
If the Credit Amount needs to be adjusted, enter the correct amount.
-
Click OK.