TMT Fleet Maintenance V.2022.2 Release Notes
This document contains information on the latest version, including:
-
Enhancements (new or updated features)
-
Resolved issues (application improvements)
Warnings
PLEASE READ BEFORE UPGRADING
Starting with V.2022.2, the AMSLIC (license) database has been merged with the TMWAMS (TMT) database. The installer now works with the new merged database alone.
Existing customers must:
-
Run the provided installer migration script to copy all the data from their AMSLIC database to the TMT database.
-
Perform the upgrade using this merged TMT database. The AMSLIC database will become an invalid input in the SQL setup page of the installer.
After doing an upgrade, the web.config file should only have a TMT database, so that the application will launch without issues. The web.config file will still have two database connect entries, as they exist today, but both will refer to the same database.
New customers with a fresh database do not need to run the installer migration script. They can install the program using the TMT database alone.
|
If you are currently using an older Client-Server version, you must upgrade to at least V.2019.4 before running the merger script to upgrade to V.2022.2. |
Important information, please read
-
SQL Server Cardinality
Changes to SQL Server cardinality are affecting the performance of TMT Web. The issue happens when SQL Server compatibility mode is set to 120 or greater. This has been identified through Trimble benchmarking and customer feedback.
At this time, Trimble recommends that you set the SQL Server option for Legacy Cardinality Estimation to ON. This will lessen the effects of the new SQL Server cardinality behavior, which still needs further assessment/improvements in TMT Web.
-
Trimble Technician Portal (TTP) single sign-on (SSO)
-
If you will be using TTP SSO, you must allow pop-up windows. You cannot block them. This applies to Apple and Android phones and tablets. If you block pop-up windows, SSO will not work correctly.
Follow the directions for your tablet and browser to allow pop-up windows.
-
If you have issues with TTP after upgrading, you may need to clear your browser cache. Close the TTP application and follow the directions for your browser to clear the cache.
-
If you have bookmarked a TTP URL that has a version number, such as 21-3, you should delete that bookmark. Use and bookmark this URL instead: https://tmt-ttp.trimble-transportation.com/
-
-
TMT Client-Server (Delphi) 2019.4.1 or any earlier version cannot be used with TMT Fleet Maintenance 2022.1 or later. Do not upgrade unless you are ready to go to TMT Web only.
-
Customers using both Integration Options and Windows Authentication should set up their systems so that User drop-down lists use the WINUSER value, instead of the USERNAME value.
-
This version requires .Net Framework 4.8. See the hardware requirements for more information.
-
Customers who are on versions of TMT Web before 2021.3 may be exposed to a vulnerability documented by one of our third-party software vendors (Telerik). Guidance varies depending on the installed TMT Web version (see below). For information directly from Telerik, please use this xref: https://docs.telerik.com/devtools/aspnet-ajax/knowledge-base/common-allows-javascriptserializer-deserialization
-
2021.3, 2021.3.2, 2021.3.3, 2022.1, and later
These versions use an upgraded Telerik version that has patched the vulnerability. No changes are needed.
-
2019.4
A future service pack will include patched Telerik DLLs. In the meanwhile, remediation is possible via web.config changes.
-
2019.2
-
Remediation possible with web.config changes in this version and higher (2019.2-2021.2.X).
-
-
Before 2019.2:
-
Remediation is not possible with web.config changes. You must upgrade.
-
For Delphi/Web hybrid customers, see 2019.4 section above. For all others, we would suggest you upgrade to the latest version of TMT Web.
Telerik Vulnerability Remediation
Please refer to this link for detailed steps on patching this vulnerability:
-
This involves web.config changes, and it can be done without taking an upgrade. However, we strongly encourage you to upgrade to a later version of TMT Web for the greatest level of mitigation.
-
|
Before upgrading your production environment, Trimble recommends that you read the hardware requirements and install the latest version in a test environment. If you have questions, please contact your Trimble customer representative. |
Changes to hardware requirements
This version has new SQL Server requirements. You must be using SQL Server 2016 or later to use TMT Web V.2022.1 or later.
For SQL Server 2016, the minimum compatibility mode is 130. TMT Web will also support modes 140 and 150.
Two files from Microsoft are required for this version:
-
SQL Server 2016 CLR Types
-
SQL Server 2016 Shared Management Objects
You must download and run both files using these links before upgrading to TMT Web V.2022.1:
-
SQL Server 2016 SP2 feature pack
-
SQL Server 2016 SP3 feature pack
|
You must not delete the 2008R2 CLR/SMO SQL Server components from any TMT Web environment when installing or upgrading. The installer is still using these components at this time. |
Windows Server and SQL Server upgrades are included in TMT Web software as a service (TMT Web SaaS). For information about upgrading to TMT Web SaaS or other technical questions, contact Dawn Siegel at [email protected].
If you have technical questions, contact TMT Support:
-
Email
-
Phone
800-663-0626. Select option 6, and then option 3.
Windows Server and SQL Server Support
-
Windows Server 2012, 2016, and 2019 support SQL Server 2016.
-
Windows Server 2022 does not support SQL Server 2016.
-
Windows Server 2012, 2016, 2019, and 2022 support SQL Server 2017.
-
Windows Server 2016, 2019, and 2022 support SQL Server 2019.
-
Windows 2012 does not support SQL Server 2019.
Internet Explorer 11 End of Life
As of June 15, 2022, Microsoft stopped supporting Internet Explorer 11 (IE) for some operating systems. Users affected by the IE end of life can use Microsoft Edge in IE mode. The Edge IE mode supports sites that need IE.
IE is a part of the Windows operating system. As such, Microsoft will provide IE 11 security updates and support for Windows versions on which IE is installed. This will continue as long as Microsoft supports those versions. For more information, see https://docs.microsoft.com/en-us/lifecycle/faq/internet-explorer-microsoft-edge.
The end of IE affects Interactive Workstation (IWS) users. IWS users can use Edge in IE Mode or consider switching to Trimble Technician Portal (TTP). For details on TTP, see:
|
You must be logged in to learn.transportation.trimble.com to view the TTP Guides. |
Enhancements
Product wide
-
TMT-315359, TMT-313649
The program checks to see if the License server is available before interacting with it. If the program cannot reach the License server, or it times out, the program lets you continue to work. The program does let you know that you are in a grace period while it tries to connect to the License server. You can use the program until the grace period ends. This process:
-
Avoids intermittent timeouts
-
Reduces the frequency of requests to the License server
-
-
TMT-315398
Updated ATA/VMRS codes are now available. If you want to update your ATA/VMRS codes, download the AMS - ATA Codes Update.zip file. You can find it with the 2022.2 files at the Trimble ClientCenter.
-
Log in to ClientCenter.
-
Go to Build Delivery > Downloads > TMW Asset Maintenance > TMT Fleet Maintenance - Windows > 22.20 > View Details > AMS - ATA Codes Update.zip.
-
Activities menu
Accounting > Accounting
-
TMT-313603
On the Accounting page QuickBooks tab, you can add, remove, group, filter, and sort the columns for:
-
Accounts Payable (AP)
-
Accounts Receivable (AR)
-
General Ledger (GL)
-
Error Handling
-
Accounting > Accounting > TruckMate
-
TMT-313604
On the Accounting page TruckMate tab, you can sort and filter results in the TM Error Handler grid. You can also sort items by groups and clear filters.
Inquiries > Order Inquiries > Invoice Detail Report
-
You can select multiple invoices and combine them in one report file. The report groups the invoices by the bill to customer.
-
When you select more than one invoice and run the report, the first page of the report becomes a summary page. It shows details of the selected invoices based on the customer.
Inquiries > Order Inquiries > Invoice Summary Report
-
TMT-316204
See TMT-316204 in Activities menu > Inquiries > Order Inquiries > Invoice Detail Report.
-
TMT-316279
See TMT-316279 in Activities menu > Inquiries > Order Inquiries > Invoice Detail Report.
Installer
-
TMT-315466
The LIC (license) database has been merged with the TMT database. The installer now works with the TMT database alone.
Existing customers must:
-
Run the provided installer migration script to copy all the data from their LIC database to the TMT database.
-
Perform the upgrade using this merged TMT database. The LIC database will become an invalid input in the SQL setup page of the installer.
After doing an upgrade, the web.config file should only have the TMT database, so that the application will launch without issues. In the web.config file, there will still be separate database connect entries, as exists today.
New customers with a fresh database do not need to run the installer migration script. They can install the program using the TMT database alone.
-
-
TMT-315617
The new installer saves report setting values to the SERVER.API web.config file and the Pages web.config file. This ensures that pages and web APIs have the settings and values they need.
Note: This feature works as expected for one and two tier setups. You do not have to select SSRS Reports. If you have a three tier setup, however, you must choose SSRS Report Services to save and update the settings in the web.config file. For information on one, two, and three tier setups, see Hardware Requirements, V.2020.2 and later.
-
TMT-315807
The Web installer has these improvements:
-
It works with SQL Server 2016 common language runtime (CLR) types and SQL Server 2016 shared management objects (SMO).
-
It can run the DB Test Connection though the SQL Server 2008R2 CLR Types without errors, even if the server does not have SQL SMO.
-
It only checks the SQL Server 2016 minimum requirement on the SQL Server. It does not check for the requirement on the Web or Application servers.
-
The Install links on the Configuration requirements page let you install the 64-bit SMO and CLR types directly from the installer. If you want to install the 32-bit version, you must do it manually.
-
Inventory menu
Parts Price Update
-
TMT-315056
You can now delete multiple part prices at once on the Parts Price Update page.
Physical Inventory
-
On the Shop Inventory page’s Cost History tab, the values in the Physical Inv Number column are links. Click the link to open the Counts tab of the Physical Inventory page and see the counts.
Note: The Physical Inv Number values are links only if they have an actual value. If the value is N/A, there is no link.
Masters menu
Company
-
TMT-315740
The Company page tabs show the correct contents whether the Customize Page pane is open or closed. You open the pane by clicking your username in the upper-right corner of the page and selecting Customize.
Customers
-
TMT-315064
The new Customer DOT Number field has been added to the:
-
Customers page, Definition tab
-
Add New Customer pop-up window
-
Unit/Customer on the Fly pop-up window
If you enter a customer DOT number that is already in use, the program shows the warning message "Customer DOT Number number has already been applied to Customer Customer ID."
If the Require Customer DOT Number Application option is set to YES, you must complete the Customer DOT Number field when you create or update customer details. For details, see TMT-315064 in Setup menu > Options > Application Options > Invoicing.
-
-
TMT-315739
The Customers page tabs show the correct contents whether the Customize Page pane is open or closed. You open the pane by clicking your username in the upper-right corner of the page and selecting Customize.
Employees
-
TMT-315741
The Employees page tabs show the correct contents whether the Customize Page pane is open or closed. You open the pane by clicking your username in the upper-right corner of the page and selecting Customize.
Parts Catalog
-
The program prevents you from using a deactivated part type when you create a new part
-
TMT-315742
The Parts Catalog page tabs show the correct contents whether the Customize Page pane is open or closed. You open the pane by clicking your username in the upper-right corner of the page and selecting Customize.
Shop Inventory
-
TMT-313262
See TMT-313262 in Inventory menu > Physical Inventory.
-
TMT-315274
See TMT-315274 in Masters menu > Parts Catalog.
-
TMT-315745
The Shop Inventory page tabs show the correct contents whether the Customize Page pane is open or closed. You open the pane by clicking your username in the upper-right corner of the page and selecting Customize.
Shops
-
TMT-315746
The Shops page tabs show the correct contents whether the Customize Page pane is open or closed. You open the pane by clicking your username in the upper-right corner of the page and selecting Customize.
Units
-
TMT-315747
The Units page tabs show the correct contents whether the Customize Page pane is open or closed. You open the pane by clicking your username in the upper-right corner of the page and selecting Customize.
Vendor Parts
-
TMT-315274
See TMT-315274 in Masters menu > Parts Catalog.
-
TMT-315773
The Vendors page tabs show the correct contents whether the Customize Page pane is open or closed. You open the pane by clicking your username in the upper-right corner of the page and selecting Customize.
Orders menu
Campaign
-
TMT-313431
The Assign Units pop-up window has new options in the Items per page drop-down list. You can select 10, 20, 30, 100, 500, or 1000 results. Seeing more results per page lets you assign more units at once.
-
When you filter one or more columns, the column heading background changes color. This change marks the selected columns. Where applicable, the font color has been changed to improve readability.
-
You can control users' access to the Campaign Details page by role using the Manage Page Permissions page.
You open the Manage Page Permissions page by going to Menu > Security > Page Security > Manage Page Permissions. By default, all permissions are turned on. You can set permissions for each role and assign roles to each user. When there is a conflict between roles, the program gives precedence to options that are turned on.
For example, assume User A has two roles: *All Web Users and *Road Calls.
-
The *All Web Users role gives users access to the Repair Order page. The permissions are read-only. Users assigned this role cannot edit the Repair Order page.
-
The *Road Calls role also gives users access to the Repair Order page. Users with this role have read and edit permissions for the page.
When User A opens the Repair Order page, they can edit the page as part of their *Road Calls role.
-
Campaigns Listing
-
A new column has been added: Shop Region. The column behaves the same way as the previous columns. You can sort and filter by it. The column also has page persistence.
-
TMT-314759
See TMT-314759 in Orders menu > Campaign.
-
TMT-315236
You can control users' access to the Campaigns Listing page by role using the Manage Page Permissions page. See TMT-315237 in Orders menu > Campaign for more information on assigning permissions.
Estimates Listing
-
TMT-315238
You can control users' access to the Estimates Listing page by role using the Manage Page Permissions page. See TMT-315237 in Orders menu > Campaign for more information on assigning permissions.
Fuel Ticket Listing
-
TMT-314672
See TMT-314672 in Orders menu > Campaign Listing.
Indirect Charge
-
TMT-314759
See TMT-314759 in Orders menu > Campaign.
-
TMT-315235
You can control users' access to the Indirect Charge page by role using the Manage Page Permissions page. See TMT-315237 in Orders menu > Campaign for more information on assigning permissions.
Indirect Charges Listing
-
TMT-314672
See TMT-314672 in Orders menu > Campaign Listing.
-
TMT-315234
You can control users' access to the Indirect Charges Listing page by role using the Manage Page Permissions page. See TMT-315237 in Orders menu > Campaign for more information on assigning permissions.
Inspection Ticket Listing
-
TMT-314672
See TMT-314672 in Orders menu > Campaign Listing.
Invoice
-
TMT-314759
See TMT-314759 in Orders menu > Campaign.
-
TMT-311443
You can add discounts and coupons at the section level.
-
TMT-311997
When Override Auto Discounts is set to YES, you can:
-
Override an existing discount
-
Add a discount manually
-
Invoices Listing
-
TMT-314672
See TMT-314672 in Orders menu > Campaign Listing.
Invoices Listing > Invoice Detail Report
-
TMT-316204
See TMT-316204 in Activities menu > Inquiries > Order Inquiries > Invoice Detail Report.
-
TMT-316279
See TMT-316279 in Activities menu > Inquiries > Order Inquiries > Invoice Detail Report.
Invoices Listing > Invoice Summary Report
-
TMT-316204
See TMT-316204 in Activities menu > Inquiries > Order Inquiries > Invoice Detail Report.
-
TMT-316279
See TMT-316279 in Activities menu > Inquiries > Order Inquiries > Invoice Detail Report.
Purchase Order
-
TMT-315245
See TMT-315245 in Setup menu > Options > Application Options > Purchasing.
-
TMT-314759
See TMT-314759 in Orders menu > Campaign.
-
You do not have to select a printer when printing barcode labels. The labels automatically print to the default printer.
Purchase Orders Listing
-
TMT-314672
See TMT-314672 in Orders menu > Campaign Listing.
-
TMT-315531
See TMT-315531 in Orders menu > Purchase Order.
Repair Order
-
TMT-312764
You can see the Customer PO field even if you do not have the Invoicing module.
-
TMT-312883
When there is a bill to customer, the page shows this information under the Bill To Customer field:
-
Bill To customer name
-
City
-
State
When there is a vendor, the page shows this information under the Vendor field:
-
Vendor name
-
City
-
State
These changes were made to reduce entry errors.
-
-
TMT-313046
When you have the Tire Module, you can remove a tire from a unit that does not have a tire configuration.
-
TMT-314759
See TMT-314759 in Orders menu > Campaign.
-
TMT-315308
When Vendor Supplied is set to YES, you can edit the part Quantity field for vendor-supplied parts. When Vendor Supplied is set to NO, you cannot edit the part Quantity field. The part is not a vendor-supplied part.
-
TMT-315504
See TMT-315504 in Activities menu > Units > Meter Readings.
-
TMT-316008
PO numbers on the Parts on Order pop-up window now have links. You can open the PO by clicking the link.
-
TMT-316088
To protect employee privacy, the Employee Quick Search no longer shows the employee’s full address.
Repair Order > Repair Order Detail Report
-
TMT-316042
The report includes the bottom line of the report. It does not add an extra blank page.
Repair Order > Repair Request Form
-
TMT-315115
You can edit the Truck Arrival Date field only when the Repair Request Status is Initiate Awaiting. The field is read-only for any other status. This applies to all TravelCenters of America (TA) repair requests.
Note: The Truck Arrival Date field is also known as estimated time of arrival or ETA.
-
TMT-315598
The Repair Request Form for TA road call work orders has a new field: Tech Arrival Date. This field shows the estimated date and time that the technician will arrive at the vehicle. TA provides this data. The field is read-only in TMT.
-
TMT-315875
The Driver Name and Driver Phone number fields have been added to the TA Repair Request form. Before, these fields were only available for road calls. Now you can see these fields on orders classified as:
-
Repairs performed at a TA shop location
-
Repairs performed on site
The two fields are optional. If they are not filled out before submitting the repair request, TMT uses these default values:
-
Driver Name: UNKNOWN
-
Phone Number: 000-000-0000
-
-
TMT-316347
The Note History shows who submitted the note. The user ID replaces the generic term "TMT User."
-
TMT-316453
The Repair Request Form now shows the currently logged-in user’s first and/or last name in the upper-right corner. If the user does not have a first or last name saved in the system, the form shows the username instead. For example, assume John Smith has the username JSmith in the system, but not his first and last names. The form would show JSmith in the upper-right corner.
This change applies to TA and TMT ServiceConnect integrations.
-
TMT-316596
The TA Repair Request Form Tire Account Number field has been renamed to National Account Number. The change covers customers who do not use tire accounts.
-
TMT-316625
The TA Repair Request Form now shows comments in order from newest to oldest. Order is based on the time submitted. Before, comments submitted for the same request status were listed in chronological order (that is, from oldest to newest).
-
TMT-316716
The TA and TMT ServiceConnect Repair Request Forms now show a user icon next to the username in the top-right corner of the form. At this time, there is no functionality applied to the icon.
-
TMT-316838
TMT now verifies vehicle identification number (VIN) length for the TA Repair Request Form. Valid VINs must be 6, 8, or 17 characters in length. If you try to save a request form for a unit with an invalid VIN length, an error message opens. It states that the VIN must be 6, 8, or 17 characters in length. You cannot submit the form until you correct the error.
Repair Order > Vendor Parts on Fly
-
TMT-315274
See TMT-315274 in Masters menu > Parts Catalog.
Repair Order Template
-
TMT-310737
You can add fee line items to Standard Repair Order (RO) and Vendor RO templates.
Repair Orders Listing
-
TMT-312022
The Repair Orders Listing page has new columns in the Section view:
-
Component Description
-
Warranty Type
-
Billable
-
-
TMT-314266
The Repair Orders Listing Page has a new column: Vendor Name.
-
TMT-314672
See TMT-314672 in Orders menu > Campaign Listing.
Warranty Claim
-
TMT-314759
See TMT-314759 in Orders menu > Campaign.
-
TMT-315073
You can now edit the Warranty Status field at any time. It does not become read-only when the Order Status is changed to Closed.
Note: The Order Status field remains read-only once it is changed to Closed.
Warranty Claims Listing
-
TMT-314672
See TMT-314672 in Orders menu > Campaign Listing.
Warranty Potential Claims
-
TMT-314672
See TMT-314672 in Orders menu > Campaign Listing.
-
TMT-315880
The Warranty Potential Claims Listing page has a new column: Engine Serial. The data for this column comes from the Serial Number field of the Units page Specs tab.
Progressive Web Application Asset Inspection App
TMT Asset Inspection lets drivers perform pre- and post-trip inspections, review inspection reports, and confirm repairs from mobile devices.
Here are the major enhancements for V.2022.2:
-
New pages: Login and Employee Login (TMT-315966)
These let users log in to the Asset Inspection App. Logging in opens the Home page.
Before users can log in, they must have Mobile Permissions turned on for their assigned user role. You set permission and roles on the Manage Mobile Permissions page in TMT by going to Menu > Mobile Security > Manage Mobile Permissions.
Note: Users cannot log in if you do not have an Asset Inspection App license.
-
New page: Select Unit (TMT-316155)
The new Select Unit page lets you find units. The page has these fields:
-
Unit search
-
Unit description
-
Unit’s primary meter type (read-only)
-
Last meter reading for the primary meter (read-only)
Clicking the back arrow on the page takes you to the Home page.
Once you select a unit, you can use two new tabs (TMT-316163):
-
Next Services Due
Lists pending work and preventive maintenance (PM) due items
-
Open Tickets
Lists open inspection ticket items
-
-
New page: New Inspection (TMT-316154, TMT-316177)
The new Inspection Menu page lets you create inspection tickets. You open the New Inspection page from the Select Unit page. Once you select a unit, you can click Start Inspection. The New Inspection page opens.
The New Inspection page has three fields at the top of the page. The Unit and Description fields show the values for your selected unit. They are read-only fields.
The third field is Inspection Type. This field is required. Clicking in it opens the Inspection Type menu, where you can select from all the available active codes.
The bottom of the page has two tabs:
-
Meters
This tab is open by default. It shows the meters available for the selected unit. The tab only shows those meters that have the Require Inspection option set to YES on the Units page. Each meter shows the Last reading value by default.
-
User Defined (TMT-316125)
This tab is not available if the meters have incorrect values. You must enter valid readings before you can open it. It shows only UDFs with valid code. Clicking on a UDF opens a menu with the available codes for the field.
The User Defined tab shows only the fields that have active codes assigned on the System Setup page. You assign codes by going to Menu > Setup > System Setup > User Fields > Inspection.
-
-
New tabs on the Perform Inspection page (TMT-316252)
The Perform Inspection page has three new tabs that let you handle inspection items at various stages:
-
Pending
Lists the cards for pending inspection items. Each card has Pass and Fail buttons. You can move inspection items to the Passed tab by clicking Pass from the Pending tab (TMT-316254).
-
Failed
Lists cards for inspection items that failed. Each card has Edit and Pass buttons.
-
Passed
Lists cards for inspection items that passed. Each card has a Fail button.
The Perform Inspection page also has two buttons:
-
Cancel
Closes the page and returns you to the New Inspection page.
-
Inspection Complete
Marks the inspection item as complete.
-
-
Completing Inspections (TMT-316300)
You can complete inspections. When you click Complete Inspection, the Safe to Operate pop-up window opens. It shows the message "Is this equipment safe to operate?"
-
Click Yes if the equipment is safe.
-
Click No if the equipment is not safe to operate.
If the Signature Required Application option is set to YES, the Signature pop-up window opens once you click Yes or No. Enter your signature and click Done. The screen opens the Success message, which states, "Successfully Created Inspection." Clicking OK closes the message and redirects you to the Select Unit page.
Note: You can find the Signature Required Application option in TMT. Go to Menu > Setup > Options > Application Options > Mobile Applications > Driver Inspection Tickets.
-
Security menu
Page Security > Manage Page Permissions
-
TMT-315237
See TMT-315237 in Orders menu > Campaign.
-
TMT-315239
You can control users' access to the Campaigns Listing page by role using the Manage Page Permissions page. See TMT-315237 in Orders menu > Campaign for more information on assigning permissions.
-
TMT-315240
You can control users' access to the Inspection Tickets Listing page by role using the Manage Page Permissions page. See TMT-315237 in Orders menu > Campaign for more information on assigning permissions.
-
TMT-315241
You can control users' access to the Fuel Ticket Listing page by role using the Manage Page Permissions page. See TMT-315237 in Orders menu > Campaign for more information on assigning permissions.
Setup menu
Options > Application Options > Purchasing
-
There is a new purchasing option: Do Not Allow Misc Lines on Standard POs. It controls whether you can add miscellaneous lines on POs.
-
If set to NO (default), you can have miscellaneous lines on standard POs.
-
The Misc option is available in the Line Type field drop-down list. The field is in the Create New Line pop-up window.
-
Misc shows up as a column in the Order Totals grid. The value matches the total value of the miscellaneous lines, if any.
-
You can edit miscellaneous line rows in the Receive Purchase Order pop-up window.
-
Misc shows up in the summary in the Receive Purchase Order pop-up window.
-
-
If set to YES, you cannot have miscellaneous lines on standard POs.
-
The Misc option is not available in the Line Type field drop-down list. The field is in the Create New Line pop-up window.
-
There is a Misc column in the Order Totals grid, but the total is always $0.00.
-
You cannot edit miscellaneous line rows in the Receive Purchase Order pop-up window
-
Misc shows up in the summary in the Receive Purchase Order pop-up window, but the total is always $0.00.
-
This option applies only to the Application level.
-
Options > Application Options > Purchasing > Approvals
-
TMT-315940
There is a new node under the Purchasing section: Approvals. To see the Approval options, go to Menu > Setup > Options > Application Options > Purchasing > Approvals.
These options that were under Purchasing have been moved under Approvals:
-
Require PO Approval Levels
-
Allowed Cost Overage (only available if Require PO Approval Levels is set to YES)
-
Require VRO/PO Approval Levels
-
Allowed Cost Overage (only available if Require VRO/PO Approval Levels is set to YES)
-
Show Pending PO Number When PO Status Is Pending
-
Options > Integration Options
-
TMT-313503
The ability to select a <DEFAULT> or <OVERRIDE> value for Payment Method in the TA Default XREF has been removed. You must set a payment type cross-reference from TA to TMT.
If you click Repair Request for a TA VRO, but the payment method has not been set in the TMT TA Default XREF, an error message opens. It states, "Payment method for TravelCenters of America is not valid. Please check your Integration Options page."
To set a payment method cross-reference, open TMT and go to Menu > Setup > Options > Integration Options > TravelCenters of America > DEFAULT XREF. In the Options pane, select Pay Method.
Options > Integration Options > TMT ServiceConnect > General
-
TMT-314006
The General node has a new option: Link Open Road Call for VRO.
If you have a license for the Road Calls module, you can set this option.
-
NO (default)
New orders imported from ServiceConnect will not link to open road calls
-
YES
New orders imported from ServiceConnect will automatically link to open road calls if there is one for the assigned unit.
Note: This option applies to the TMT ServiceConnect integration only. The TA integration does not have this option, but TA orders will automatically link to open road calls.
-
Options > Shop Options
-
TMT-316360
See TMT-316360 in Setup menu > Option > Application Options > Repairs.
Options > User Options
-
TMT-315941
This option has been removed from the User options page: Allow User to Only Create Pending Purchase Requests. From this point on, the program only looks at the approval levels defined on the Approval Levels page. Go to Menu > Setup > Order Setup > Approval Levels to open the page.
For a vendor repair PO, if you do not have an approval level assigned when you create an order, the order is set to Needs Approval. The VRO order status is set to Open, but its PO is set to Pending and the number is masked.
For a vendor repair order PO, if you have an approval level of $100 when you create an order, its approval status is set to Approved if the line total stays within the Vendor Estimate. If the amount exceeds the estimate, the approval status changes to Needs Approval. The order status changes to Pending.
-
TMT-315942
-
Two options have been removed from the User options page:
-
Allow User to Approve Vendor Repair Order Requests
-
Allow User To Approve Pending Purchase Requests
From this point on, the program only looks at the approval levels defined on the Approval Levels page. Go to Menu > Setup > Order Setup > Approval Levels to open the page.
-
If you have an approval level, then you can approve orders. If you do not have an approval level, the program will prevent you from approving orders.
-
The Purchase Orders Listing page now shows the Approve button VRO POs when orders are in Needs Approval status.
-
-
TMT-315979
This option has been removed from the User options page: If PO Approval Amount is Exceeded, Create Pending PO. From this point on, the program only looks at the approval levels defined on the Approval Levels page. Go to Menu > Setup > Order Setup > Approval Levels to open the page.
If you open a PO where the Estimated Amount is above your approval limit, the PO changes to Pending status and the approval status changes to Needs Approval.
SSRS menu
Reports - SSRS > SSRS Report Viewer > Standard Reports > AMS SSRS Report Library
-
TMT-257222, TMT-315360
User-defined fields (UDFs) 1 through 8 now show their descriptions instead of their UDF numbers. For example, if you set UDF1 to Chassis Brand, the report now shows Chassis Brand.
The change affects these reports:
-
Customers > Customer Gross Profit
-
Customers > Customer Invoices Listing
-
Customers > Customer Listing
-
Customers > Customer Units Listing
-
Units > Unit Parts Usage Listing
-
Units > Unit Utilization Report
-
Trimble Technician Portal
-
TMT-313079
You can see the meter reading history for each meter in the Job Detail panel. The
 History icon is next to each meter in the Job Detail panel Meter Reading column. Clicking the icon opens a new Meter Reading History panel. It shows past readings for the meter.
There is an Include ignored field in the upper-right corner of the panel. It has these options:
-
NO (default)
The panel will not show meters marked as Ignore.
-
YES
The panel will show all meters, including ones marked as Ignore.
-
-
TMT-314950
-
Logging in
An Account Name field and a Sign In with Single Sign-On button have been added to the bottom of the Login page. TTP must be set up for single sign-on (SSO) for these items to be available. SSO users must be registered in TMT Web. If you are not registered, the application shows the error message "User not found in TMT."
TTP does not automatically redirect unauthenticated users to the SSO workflow. Unauthenticated users see the standard Login page.
-
Logging out
-
When you log out, TTP logs you out of SSO (that is, Azure) as well as the web framework. It also clocks you out. After logging out, TTP redirects you to the standard login page.
-
If you are logged in to TTP, then you can log in to TMT Web by clicking Single Sign-On. You do not have to go through the SSO workflow again.
-
If you are logged in to TMT Web, you can log in to TTP by entering the account name and clicking Sign In with Single Sign-On. You do not have to go through the SSO workflow again.
-
Currently, you have to log out of each application separately. For example, if you are logged in to both applications, and you then log out of TTP, you are still logged in to TMT Web until you manually log out.
-
-
Redirecting to different versions
TTP supports SSO for V.22.1. Once you enter the Account Name, the application shows the message "Based on the API entered, redirecting to the appropriate TTP version." TTP then redirects you to the V.22.1 Job Login page.
TTP V.21.3 does not support SSO. If you try to use SSO, the application shows the error message, "Single Sign-On is not supported for version 21.3."
-
Account Name
The Account Name is a required field if you want to use SSO. Account Name is the Tenant name. It should match your Trimble setup.
If there is a mismatch between the names, TTP shows the error message "No configuration found for [
Account Name]. Please contact support." -
Limitations
-
The user email address should be no more than 40 characters.
-
You must allow pop-up windows (that is, you cannot block pop-up windows) if you want to use TTP SSO. This applies to Apple and Android phones and tablets. If you block pop-up windows, SSO will not work correctly.
-
Follow the directions for your tablet and browser to allow pop-up windows.
-
-
TMT-315060
The drop-down lists for fields show the field options in alphabetical order.
-
TMT-315157
The new Display Last Meter Reading option lets you set TTP to show the last reading values for meters. You can apply this option at the Application and Shop levels. The values are:
-
NO
TTP hides the last reading value for meter fields.
-
YES (default)
TTP shows the last reading value for all meter fields.
The option is available in two places:
-
As an Application option
Go to Menu > Setup > Options > Application Options > IWS > Repairs.
-
As a Shop option
Go to Menu > Setup > Options > Shop Options > IWS > Repairs.
-
-
TMT-315459
You can open the Repair Order Detail report from the Job Activity screen. Clicking
 Report opens the Repair Order Detail report for that RO. You can also download and print the report.
 -
TMT-315478
TTP opens a confirmation message pop-up window when you try to go to the Incomplete/Complete/Pause menu without saving your Check-off list changes. The message states, "You have unsaved changes in the Check-off list. Do you want to continue?" The window has two options:
-
Yes
Clicking Yes discards your Check-off list changes and opens your selected menu.
-
No
Clicking No closes the pop-up window so that you can save your changes before proceeding.
-
-
TMT-315562
The RO Create command has been removed from the Filter menu. It has been replaced with the Unit command. Selecting Unit lists all units in the shop.
You now create ROs and sections with the new
 RO Create icon. Clicking the icon lets you create an RO and section. The rules of creating ROs and sections have not changed.
Notes:
-
Whether you can create ROs in TTP depends on the Allow RO Creation Application option set in TMT:
-
If the option is set to YES, you can create ROs and sections in TTP and the Job Dashboard shows
RO Create. -
If the option is set to NO, you cannot create ROs or sections in TTP. The icon is not shown on the Job Dashboard.
The option is set in TMT. Go to Menu > Setup > Options > Application Options > IWS > Repairs.
-
-
If you can create ROs in TTP, you can use the Unit command with the new
RO Create icon to create an RO for the selected unit.
-
-
Clicking
Report opens a report drop-down list. Two reports are available:-
Repair Order Detail
Lists the task details (that is, the job code checklist)
-
Repair Order Section Work Card
Shows the section work card details for the section you have selected
You can see, download, and print both reports.
-
-
TMT-315641
You can see, download, and print the Mechanic Signoff Sheet Report from TTP. The report automatically opens when you:
-
Complete a section
-
Complete an RO
-
Close an RO
Notes:
-
The Print Mechanic Signoff Sheet On RO Close option must be set to YES to use this feature. You can set this option at the Application and Shop levels.
-
To set the Application option, open TMT and go to Menu > Setup > Options > Application Options > IWS > Reports.
-
To set the Shop option, open TMT and go to Menu > Setup > Options > Shop Options > IWS > Reports.
-
-
You must have a custom Mechanic Signoff Sheet set up and complete Repair Order Signoff Sheet option with the path to an SSRS report. You can find the Repair Order Signoff Sheet Application and Shop options are child options of the Print Mechanic Signoff Sheet On RO Close options.
-
-
TMT-315642
The Check-off tab of the Job Activity has a new icon:
 Task Details Report. You can click the icon to see, download, and print the report. If the task has no details, the icon is not shown.
Note: You can find task details on the TMT Job Code Definitions page. You open the page by going to Menu > Setup > Repair Order Setup > Job Code Definitions.
-
TMT-315856
You can edit past meter reading values for each reading in the Meter Reading History panel. Clicking Edit opens the Edit Meter Reading card. It has three fields:
-
Edit Reading
If you set Edit Reading to YES, it turns on the Reading field and turns off the Mark as Ignored field.
-
Mark as Ignored
If you set Mark as Ignored to YES, it turns off the Edit Reading and Reading fields.
-
Reading
If you set Edit Reading to YES, you can edit this field.
Once you have made your changes, you can click OK to save them. Clicking Cancel discards them.
Note: This feature is only available when the Allow Meter Edit Application option is set to YES. You can set this option in TMT. Go to Menu > Setup > Options > Application Options > IWS > Repairs.
-
-
TMT-315897
The Unit Repair History panel has a new icon:
Report. Clicking the icon opens the Repair Order Detail report for the selected repair order selected in the repair history list. You can see, download, and print the report. -
TMT-315928
TTP has two new error messages to alert you when a customer has a suspended account:
-
When you try to start a job for a suspended customer, TTP shows the message "Customer is suspended. Cannot charge lines."
-
When you try to create an RO for a unit that is linked to a suspended customer from Unit Dashboard or RO Template pages, TTP shows the message "Customer is suspended. Cannot create RO for Unit [
Unit Number]".
-
-
TMT-315989
The Add button has been replaced with the
 Add icon. It is next to the Filter menu. Clicking Add opens a menu where you can select Add RO or Add Section.
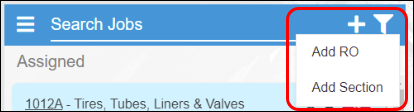
Whether you see the icon depends on your TTP setup.
-
If the Allow RO Creation and/or Allow Section Creation Application options are set to YES,
Add is available. -
If they are set to NO, the icon is hidden.
To set these options, open TMT and go to Menu > Setup > Options >Application Options > IWS > Repairs.
Note: This icon is not available if you are in the filter view for Unit or RO Template.
-
-
TMT-316074
You can open, download, and print the Repair Order Work Card report from the Job Activity screen. See TMT-315639 under Trimble Technician Portal.
-
TMT-316075
You can open, download, and print two reports from the Job Detail panel, which is located in the Job Dashboard and Job Activity screens. See TMT-315639 under Trimble Technician Portal.
Resolved issues
Activities menu
Accounting > Accounting
-
TMT-314655
The Purge All and Purge Selected Documents buttons work correctly. You can see the purged transaction again in Export Preview.
-
TMT-316379
You can use the TMT Web QuickBooks Interface to open these records without getting a 504 error:
-
General Ledger (GL)
-
Accounts Payable (AP)
-
Accounts Receivable(AR)
-
Error Handler
-
Invoice Payment
-
-
TMT-316426
The Export/Preview shows only the fields you selected on the Export Transaction tab.
-
TMT-316477
-
You can see details over a month range when using Export/Preview on the Export Transaction tab.
-
If the data takes too much time to load, the page shows an error message: "Preview timed out. Please restrict selection further or increase SQL Command Timeout setting."
-
Accounting > Accounting > IES
-
TMT-315998
When you click Search or refresh the page, exported orders are removed from the GL, AR, and AP tabs.
Fuel Data Import
-
TMT-314111
The program imports valid utilization ticket data without errors. In the past, the program had logged errors even when the data in the import file was valid.
-
You can add a negative quantity during the fuel data import. This lets you fix entry errors by changing the inventory on hand quantity.
-
TMT-315955
The program creates the correct number of fuel tickets and exceptions. This happens even if an imported file has an invalid unit.
Parts Workstation
-
TMT-315752
You cannot add invalid serial parts to an RO. If you try, the program shows you a warning message: "Serial Number [
number] does not exist in the Inventory." You cannot save your changes until you enter the correct serial number. -
TMT-316359
You can use Fill Request and Fill All Requests. You will not get errors as long as the Shop Inventory has enough of the requested parts on hand.
-
TMT-316652
Parts charged from Parts Workstation show the valid charge amounts.
Shop Scheduler
-
TMT-314761
See TMT-314761 in Activities menu > Shop Planner.
Database
-
TMT-316281
You can export more than 255 files without the program:
-
Creating a blank 256th file
-
Stopping the SQL stored procedure
-
-
TMT-316446
The execution process runs for all available orders even after finding an error.
Masters menu
Company
-
TMT-314226
The program takes any day that you enter in the Year Starts On field and creates a calendar year from that date.
Shop Inventory
-
TMT-314200
The Cost History tab updates correctly when you add, edit, or delete any part in a repair invoice.
-
TMT-315218
You can renumber local parts in the Shop Inventory.
-
TMT-315233
When you return a tire to inventory from the Tire Review page, the program applies the correct item value. It is based on the accounting method in use. The Shop Inventory page Cost History tab shows the correct item price.
-
TMT-315606
When you return a part on a PO using the Return button, the program adds that PO number to the Cost History tab for that part.
-
TMT-316071
The part value in the Shop Inventory’s Costs and Cost History tabs match the part value added to the RO. It matches the cost coming into inventory from the RO line.
Units
-
TMT-314662
Unit User Field labels match the Unit Search field’s drop-down list.
-
TMT-315232
Updates to a unit’s physical location remain consistent when updating the RO status for standard and vendor repair orders.
Note: The Set Unit Physical Location On RO Status Change Application option must be set to YES to use this feature. To set this option, go to Menu > Setup > Options > Application Options > Repairs.
-
TMT-315948
The Search feature works correctly after you update meter readings on the Units page PM Schedules tab.
-
TMT-316492
When the selected unit has no more open ROs (standard or vendor), the program sets the unit’s physical location back to its previous location. The previous location cannot be IN-SHOP or AT-VENDOR. If the unit has no previous location available, the program sets the location to IN-SERVICE.
McLeod Integration
-
TMT-315832
Transactions with a mix of inactive and active disbursements successfully generate XML files during batch export. To use this feature, the Ignore Inactive Disbursement Rules Application option must be set to YES. You can set this option by going to Menu > Setup > Options > Application Options > Accounting.
Mobile Mechanic Application
-
TMT-313312
The application syncs successfully after you correct a bad meter reading. This applies to cases where offline ROs were created with bad meter readings.
Orders menu
Estimate and Estimates Listing
-
TMT-315212
For details, see TMT-315212 in Orders menu > Campaigns Listing.
Fuel Tickets Listing
-
TMT-315212
For details, see TMT-315212 in Orders menu > Campaigns Listing.
-
TMT-315495
You can create consecutive fuel tickets without getting errors.
-
TMT-315743
For details, see TMT-315743 in Activities menu > Fuel Data Import.
-
TMT-316099
Fuel tickets created from edited exceptions are added to the correct batch.
Indirect Charge
-
TMT-315573
You can add parts to an indirect order correctly. The program uses the correct unit of measure (UOM) for the part and the correct decimals for the Quantity value.
Inspection Tickets Listing
-
TMT-313890
-
The Comments field shows the latest comment without duplication
-
The page uses the Append Complaint Comment Integration option, if applicable. To set this option, go to Menu > Setup > Options > Integration Options > PeopleNet Basic Info > DVIR.
-
Invoice
-
TMT-315212
For details, see TMT-315212 in Orders menu > Campaigns Listing.
-
The program uses custom invoice reports based on the Invoice Detail Report option. You can set this option at the Application, Customer, and Shop levels. If you have settings at more than one level, the program applies the settings in this order:
-
Customer level
-
Shop level
-
Application level
To set the Invoice Detail Report option, go to:
-
Application level
Menu > Setup > Options > Application Options > Reports > Invoicing -
Customer level
Menu > Setup > Options > Customer Options > Reports > Invoicing -
Shop level
Menu > Setup > Options > Shop Options > Reports > Invoicing
-
-
TMT-314995
You can update part line details on the Invoice page even if the part number contains a special character, such as a colon.
-
TMT-316019
When you adjust a price on an invoice, the program also adjusts the fee price based on the item you adjusted.
-
TMT-316514
The Invoice Closed Date shows the date and time when you closed the invoice. It does not use the current date and time.
Invoices Listing
-
TMT-311996
The program can calculate labor estimate hours correctly when you generate invoices. To do this, you must have these options set to NO:
-
Sum Labor By Job Code
-
Sum Labor By Task Time
You can set these options at Application, Shop, and Customer levels.
-
-
TMT-315212
For details, see TMT-315212 in Orders menu > Campaigns Listing.
-
TMT-314722
See TMT-314722 in Orders menu > Invoice.
-
TMT-315904
See TMT-315904 in Orders menu > Invoice.
Purchase Order
-
TMT-313759
You cannot return more parts than are listed on a Credit PO. If you try, the program shows an error message: "Cannot return more than inventory on hand." For example, you will see the message if there are two parts on the PO, and you try to return three.
-
TMT-314047
All line totals on Credit POs use negative values by default. If you need to, however, you can edit the negative values for these line types and make them positive:
-
Freight
-
Tax
-
Misc
-
TMT-315212
For details, see TMT-315212 in Orders menu > Campaigns Listing.
-
-
TMT-313149
The Invoice tab Amount Billed field updates itself automatically when you apply a receipt. This is true regardless of the Culture Override setting for the user.
-
Two users can edit the same VRO without causing line errors between the VRO and the PO. For example, assume Users A and B are working on the same VRO. User A deletes a line. User B makes a change and tries to save the VRO. The program alerts User B that someone has made a line change, and they must refresh the VRO before saving.
-
TMT-315543
You can delete PO sections after someone deletes a part from an RO, even if the part was directly received from a PO.
-
TMT-315549
You can edit these fields on a closed standard PO:
-
Check Date
-
Check Number
-
Amount Paid
-
Packing Slip Number
-
Invoice Comments
-
Purchase Orders Listing
-
TMT-315212
For details, see TMT-315212 in Orders menu > Campaigns Listing.
Repair Order
-
TMT-313492
Deleting a negative part line on an RO does not cause inventory violation errors when you have sufficient quantity on hand in the Shop inventory.
-
TMT-314810
The program keeps your selected Priority value when you close an RO.
-
TMT-314973
The Job Code field is not required when you:
-
Have the Default Existing Job Code & Allow Assignment W/O Job Code Application option set to YES
-
Create an RO section
-
Enter a component code
-
Assign a mechanic
To open the Application option, go to Menu > Setup > Options > Application Options > Repairs > Job Codes.
-
-
TMT-315062
The Job Code Search correctly returns all job codes associated with unit types.
-
TMT-315074
When you change an RO Order Status to CLOSED, the program updates the Accounts tab with the Account Disbursement Summary.
-
TMT-315212
For details, see TMT-315212 in Orders menu > Campaigns Listing.
-
TMT-315230
If you close an RO and get the Items on Request error message, it now includes more details, such as:
-
Request Type
-
Section
-
Parts
-
Quantity
For example, if you request the parts from Manual Requisition, the error message shows the Request Type MANUAL. If you request the parts from IWS or TTP, the Request Type is REQUEST. If you request the parts using picklist definitions, the Request Type is PICKLIST.
-
-
TMT-315446
See TMT-315446 in Orders menu > Purchase Order.
-
TMT-315563
The program saves meter readings when you create an RO from an RO template that has a unit with Auto Load Meter set to YES. On the RO header, the Unit and Customer fields are inactive.
Repair Order > Repair Request Form
-
TMT-315874
When TA repair requests reach Estimate Approved status, these fields become read-only:
-
Asset Location
-
Driver Name
-
Driver Phone Number
They will remain read-only for all other steps after Estimate Approved.
-
-
TMT-316697
The TA Repair Request Driver Phone Number field now defaults to a format of (000) 000-0000. You can only enter up to 10 digits. If you enter less than 10 digits, the program adds zeros at the front until all 10 digits are filled. You can modify this later.
Repair Orders Listing
-
TMT-314360
The Repair Order Listing page returns the correct results when you search for a shop.
-
TMT-315212
For details, see TMT-315212 in Orders menu > Campaigns Listing.
-
TMT-315997
-
The Repair Orders Listing page shows rows with a white background when the order is approved or auto approved.
-
The Needs Approval column shows the correct value (Y or N) based on the order’s current approval status.
-
Warranty Claim and Warranty Claims Listing
-
TMT-315212
For details, see TMT-315212 in Orders menu > Campaigns Listing.
-
TMT-315922
The program associates the correct RO when you create a direct claim from the Warranty Claims Listing page.
Reports menu
Reports - SSRS > SSRS Report Viewer > Standard Reports > AMS SSRS Report Library > Period Close > Period Close Account Analysis Report
-
TMT-315716
The report runs correctly for companies with more than 12 accounting periods in an accounting year.
Note: The maximum number of periods you can have in an accounting year is 15.
-
TMT-316172
The report includes all PO lines. In the past, the report omitted lines if the line had the same quantity and cost as another line.
Setup menu
Options > Application Options > Invoicing
-
There is a new invoicing option: Require Customer DOT Number.
-
If set to NO (default), the customer DOT number is not required when creating or updating customer details.
-
If set to YES, the customer DOT number is required for entry when creating or updating customer details.
This option applies only to the Application level.
-
-
TMT-315453
-
The Approval Levels page has a new button: Include Inactive Users/Exclude Inactive Users.
The page excludes inactive users by default, so when you first open the page, the button reads Include Inactive Users. If you click the button, the page includes inactive users and the button changes to Exclude Inactive Users.
-
The Assign Approval Levels grid has a new column: Active.
The column shows a checkbox for each user in the grid. If the user is active, the checkbox is selected. If the user is inactive, the checkbox is cleared. The checkboxes are read-only.
These new items work together to make sure you only assign approval levels to active users.
-
Options > Integration Options > QuickBooks > Connection
-
TMT-315786
There is a new Connection option: SSL Certificate Path. When you enter the path to your SSL certificate in this option, the program adds it to the end of the URL entry.
For example, assume you have these entries on your Integration Options page:
-
URL
https://myserver.mydomain.com:1234 -
SSL Certificate Path
C:\Folder\Certificates\mycertificate.cerThe program combines these entries into
https://myserver.mydomain.com:1234;SSLServerCert=<C:\Folder\Certificates\mycertificate.cer>. This final value is what TMT passes to the integration CData Connector.
If you leave the SSL Certificate Path option blank, TMT sends your CData Connector URL entry only.
-
Options > Shop Options
-
TMT-316055
See TMT-316055 in Setup menu > Options > Application Options.
SkyBitz integration
-
TMT-315964
The SkyBitz integration now supports Transport Layer Security (TLS) 1.2.
Trimble Technician Portal
-
TMT-315676
TTP now uses the same user lock out security as TMT Web. If you enter your password incorrectly five times, TTP locks you out. If you try to sign in again before the lock out time is over, TTP shows an error message. It states, "User Account Locked for number more minutes. If you need assistance, contact a system administrator."
-
TMT-315958
TTP correctly shows the Cause/Correction pop-up window in portrait and landscape view. All buttons are visible and available for use.
-
TMT-315990
When you add a job code to an RO, TTP adds the task checklist, if applicable.
To use this feature, these Application options must be set to YES:
-
Allow Employee Assignment Without A Job Code
-
Auto Create Tasks On Job Code Assignment
-
Auto Default Jobcode (Component/Complaint)
To set these options, open TMT. Go to Menu > Setup > Options > Application Options > Repairs > Job Codes.
-
-
TMT-316709
Time calculations are rounded without causing time record overlaps. TTP uses the same date and time for:
-
The labor line for the new activity that the user selected
-
Closing out the Lunch or Break record
-