Pay Grades
You use pay grades to:
-
Track an employee’s hourly rate on the employee master for use on repair orders and indirect charges
-
Reference an hourly rate for services rendered on the vendor master
-
Reference an hourly rate on warranty claims
-
Reference an hourly rate on national accounts
-
If you are using Invoicing, you use pay grades to charge an hourly rate on an invoice.
|
You must set up pay grades before you can create Employee master records. |
You use the Pay Grades page to create, edit, or delete pay grades. To access the page, go to Menu > Setup > Pay Grades.
A basic pay grade consists of an ID and description. Once you create the pay grade, you can add the details that determine when it applies.
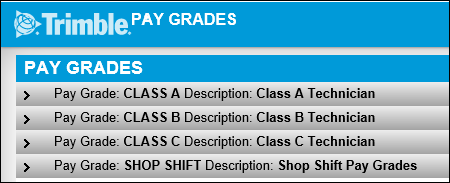
On the Pay Grade page, you can choose to see only a list of pay grade IDs and descriptions, as shown in this illustration.
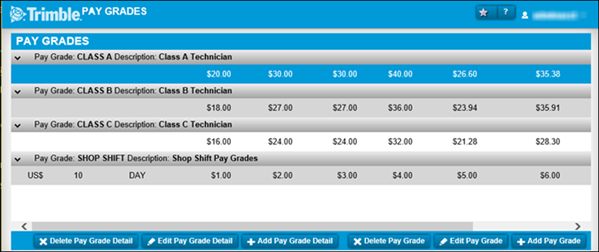
You can click  Expand to show the amounts recorded as details in additional rows. If you want, you can always show all pay grades in the expanded state.
Read-only field: §
| Pay Grade § | Unique ID for the pay grade You can enter up to 12 alphanumeric characters. |
|---|---|
Description § |
Describes the pay grade Use this field to further define the pay grade, such as This is the pay grade for entry level mechanics, etc. |
Shop |
Shop ID to which the pay grade detail applies If you leave the Shop field blank, the pay grade detail applies to all shops. Alternately, you can set up pay grades with different details for different shops. |
Currency |
The currency, such as US dollars or Canadian dollars, that applies to the pay grade If the Application option |
Work Shift |
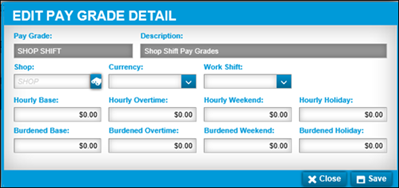
The shop workshift to which the pay grade details apply Note: This field applies only to the Shop Shift pay grade. |
Hourly Base |
The dollar amount for the pay grade’s regular hourly rate |
Hourly Overtime |
The dollar amount for the pay grade’s overtime hourly rate |
Hourly Weekend |
The dollar amount for the pay grade’s weekend hourly rate |
Hourly Holiday |
The dollar amount for the pay grade’s holiday hourly rate |
Burdened Rate |
The dollar amount for the pay grade’s burdened-based hourly rate A burden rate is an increased pay grade for rushed labor performed during regular working hours. Burden rates include payroll taxes and benefits for assigned employees. |
Burdened Overtime |
The dollar amount for the pay grade’s burdened-base overtime hourly rate A burden overtime rate is an increased pay grade for rushed labor performed during overtime hours. Burden rates include payroll taxes and benefits for assigned employees. |
Burdened Weekend |
The dollar amount for the pay grade’s burdened-base weekend hourly rate A burden weekend rate is an increased pay grade for rushed labor performed during weekend hours. Burden rates include payroll taxes and benefits for assigned employees. |
Burdened Holiday |
The dollar amount for the pay grade’s burdened-base holiday hourly rate A burden holiday rate is an increased pay grade for rushed labor performed on a holiday. Burden rates include payroll taxes and benefits for assigned employees. |
Adding pay grades
To add a new pay grade:
-
Go to Menu > Setup > Pay Grades.
The Pay Grades page opens. -
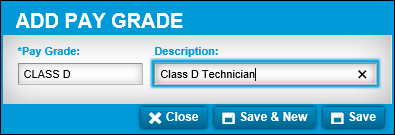
Click Add Pay Grade.
The Add Pay Grade window opens.
-
Make entries in the fields. For details, see the Pay Grade page field descriptions.
-
Do one of the following:
-
To keep your entries, click Save.
The Add Pay Grade window closes. -
To keep your entries and add another new pay grade, click Save & New.
A blank Add Pay Grade window opens. -
To abandon your entries, click Close.
The Add Pay Grade window closes.
-
Note: The new pay grade’s details are blank.
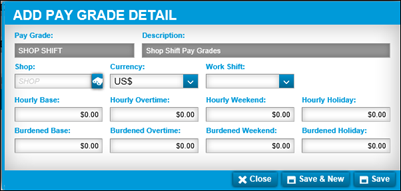
Adding a pay grade detail to a pay grade
The pay grade detail defines the dollar amount charged for hourly and burdened rates.
|
The details on a new pay grades are blank. You must edit the detail on the new pay grade to add the dollar amounts. See Editing an existing pay grade detail. |
When you add pay grade details, you can:
-
Leave the Shop field blank to have the pay grade detail apply to all shops.
-
Set up details specific to a shop.
You can also set up different details for different shops. To do so, add each shop’s details separately.
To add a new pay grade detail:
-
Go to Menu > Setup > Pay Grades.
The Pay Grades page opens. -
Select the pay grade.
-
Click Add Pay Grade Detail.
The Add Pay Grade Detail window opens. -
Make entries as needed. For details, see the Pay Grade page field descriptions.
-
Do one of the following:
-
To keep your entries, click Save.
The Add Pay Grade Details window closes. -
To keep your entries and add another detail to the same pay grade, click Save & New.
A blank Add Pay Grade Details window opens. -
To abandon your entries, click Close.
The Add Pay Grade Details window closes.
-
Creating Shop Shift pay grade details
If your company uses the Invoicing module, you can set up details for the Shop Shift pay grade. This pay grade lets you assign a Work Shift to the shop. Then, an Invoice Price Table can specify the Shop Shift pay grade option as the labor cost basis.
When someone creates an invoice for a customer using the invoice price table, the system determines whether the open date and time fall within the shift. If it does not fall within the shift, the Hourly Rate is used and applied to the labor on the invoice.
-
If the Application option
[Invoicing > Labor Time] Sum Labor By Job Codeis set to YES, the hourly base rate will be used for all labor. -
If the Application option
[Invoicing > Labor Time] Sum Labor by Pay Gradeis set to YES, hourly rates based on the type of labor (standard, overtime, weekend, or holiday) are used. -
If neither option is set to YES, the hourly base rate will be used for all labor.
If the open date/time does not fall within a shift assigned to the shop, then the actual rate is used.
-
If there is a Shop Shift pay grade detail created for the shop without a shift, then those labor rates are used.
-
If there is a Shop Shift pay grade detail created without a shop or shift, then those labor rates are used.
|
To add a Shop Shift pay grade detail, do the following:
-
Go to Menu > Setup > Pay Grades.
The Pay Grades page opens. -
Select the Shop Shift pay grade.
-
Do one of the following:
-
Add the default pay grade detail.
-
Click Edit Pay Grade Detail.
The Edit Pay Grade Detail window opens.
-
Add additional pay grade detail.
-
-
Click Add Pay Grade Detail.
The Add Pay Grade Detail window opens.
-
-
Select the Shop.
-
Select the Work Shift.
-
Make entries as needed in the remaining fields. For details, see the Pay Grade page field descriptions.
-
Do one of the following:
-
To keep your entries, click Save.
The window closes. -
To keep your entries and another new pay grade detail, click Save & New.
A blank window opens for you to add another pay grade detail. -
To abandon your entries, click Close.
The window closes.
-
Note: When you save the pay grade detail for a shop, the shift and pay grade information appears on the Shop Master page’s Shifts tab.
Working with existing pay grades
Once you have created a pay grade, you can edit its description. If it is not used, you can delete it. Once you have recorded details for a pay grade, you can edit or delete them.
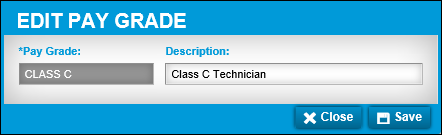
Editing a pay grade description
To edit an existing pay grade description:
-
Go to Menu > Setup > Pay Grades.
The Pay Grades page opens. -
Select the pay grade.
-
Click Edit Pay Grade.
The Edit Pay Grade window opens.
-
Edit the Description field entry, as needed.
Note: You cannot change the entry in the Pay Grade field. It is read-only.
-
Do one of the following:
-
To keep your entries, click Save.
The Edit Pay Grade window closes. -
To abandon your entries, click Close.
The Edit Pay Grade window closes.
-
Editing a pay grade detail
To edit an existing pay grade detail:
-
Go to Menu > Setup > Pay Grades.
The Pay Grades page opens. -
Select the pay grade.
-
Select the pay grade detail.
-
Click Edit Pay Grade Detail.
The Edit Pay Grade Detail window opens.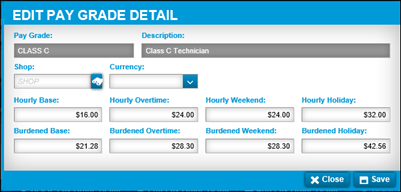
-
Make the needed changes. For details, see the Pay Grade page field descriptions.
-
Do one of the following:
-
To keep your entries, click Save.
The Edit Pay Grade Details window closes. -
To abandon your entries, click Close.
The Edit Pay Grade Details window closes.
-
Deleting a pay grade that is not in use
Only pay grades that are not in use can be deleted.
To delete an existing pay grade:
-
Go to Menu > Setup > Pay Grades.
The Pay Grades page opens. -
Select the pay grade.
-
Click Delete Pay Grade.
The Delete Pay Grade confirmation message window opens. It asks "Are you sure you want to delete Pay Grade Pay Grade Name?" -
Do one of the following:
-
To complete the deletion, click Delete.
The pay grade and all its associated pay grade details are removed. -
To keep the pay grade, click Cancel.
-
Deleting a pay grade detail
To delete an existing pay grade detail:
-
Go to Menu > Setup > Pay Grades.
The Pay Grades page opens. -
Select the pay grade.
-
Select the pay grade detail.
-
Click Delete Pay Grade Detail.
The Delete Pay Grade confirmation message window opens. It asks "Are you sure you want to delete Pay Grade Detail with Pay Grade Pay Grade Name and shop Shop ID? -
Do one of the following:
-
To complete the deletion, click Delete.
The pay grade detail is removed. -
To keep the pay grade detail, click Cancel.
-