Employee master records
An employee master record is a repository of information for an individual employee. You must create employee records before your employees can log into the Interactive Workstation and record time against repair orders.
You use the Employees page to:
-
Create employee records
-
Update employee information
-
Remove employee records
Go to Menu > Masters > Employees to open the Employees page.
Layout of the Employees page
This illustration shows the Employees page.
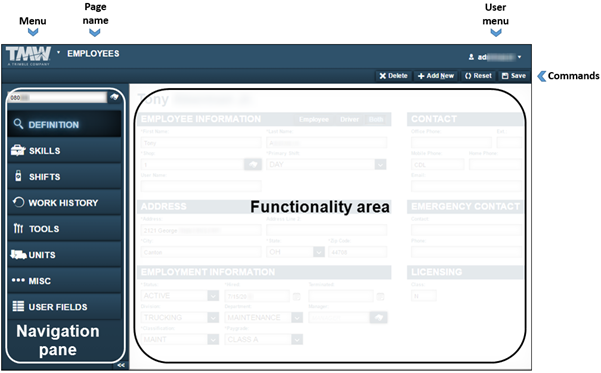
| Pages are designed so that menus and functionality areas appear the same way throughout the application. While some elements are not part of every page, the basic layout of the page is consistent. |
-
The Employees page provides easy access to the:
-
Menu that lists application menu items
-
User menu that lists user-specific menu items
-
Command buttons that allow you to delete, add, reset, and save employee records
-
Functionality area that you use to enter information into the system
-
Navigation pane that includes the Employee lookup field and the
 Search icon
The identification number used to look up an employee is user defined. You can enter up to 12 alphanumeric characters in this field.
Definition tab
The Definition tab includes six sections: Employee Information, Contact, Address, Emergency Contact, Employment Information, and Licensing.
The Employee, Driver, and Both buttons appear in this section. The button with blue highlighting indicates the employee’s Employee Type (Employee, Driver, or Employee/Driver).
This illustration shows the Definition tab sections.
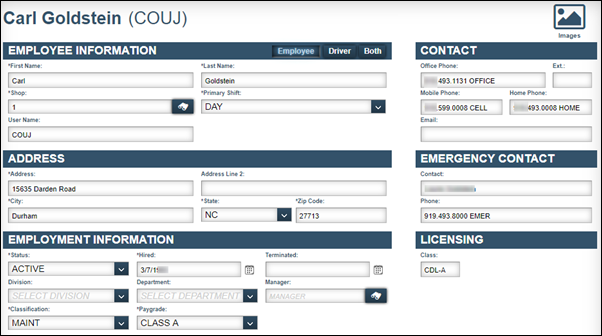
Employee Information
This section contains the employee’s name, shop, primary shift, and username.
Required field: *
| Field | Definition |
|---|---|
First Name * |
Employee’s first name |
Last Name * |
Employee’s last name |
Shop * |
Primary shop where the employee works |
Primary Shift * |
Employee’s main work shift |
User Name |
Employee’s computer username |
Contact
This section contains the phone numbers and email addresses.
| Field | Definition |
|---|---|
Office Phone |
Employee’s business phone number |
Ext |
Employee’s phone extension number, if there is one |
Mobile Phone |
Employee’s business or personal mobile number |
Home Phone |
Employee’s home or personal phone number |
Employee’s email address |
Address
This section contains the address information.
Required field: *
| Field | Definition |
|---|---|
Address * |
Employee’s residential street address |
Address Line 2 |
Employee’s secondary address, such as a suite number |
City * |
Employee’s city location |
State * |
Employee’s state location |
Zip Code * |
Employee’s ZIP/Postal code |
Emergency Contact
This section contains the employee’s emergency contact information.
| Field | Definition |
|---|---|
Contact |
Person to contact about an emergency involving the employee |
Phone |
Emergency contact’s phone number |
Employment Information
This section shows most of the work related information for the employee, such as the employee’s status, hire date, classification, and pay grade.
Required field: *
| Field | Definition |
|---|---|
Status * |
Employee’s current work status The default is Active. |
Hired * |
Employee’s hire date |
Terminated |
Employee’s termination date |
Division |
Company division in which the employee works |
Department |
Company department in which the employee works |
Manager |
Name of the employee’s manager |
Classification * |
Employee’s classification within your company Options for this field are set up by your company. Examples may include:
|
Paygrade * |
Hourly rate for the employee This field displays the employee’s hourly rate that appears on repair orders or indirect charge activities. Note: If you specify a different rate on a shop master record, the system uses the shop’s rate instead of the rate listed in this field. |
Skills tab
The Skills tab includes the Skill Information section. This tab displays sections and fields used to record information about the employee’s skill set. Employee may be certified for certain skills in their field.
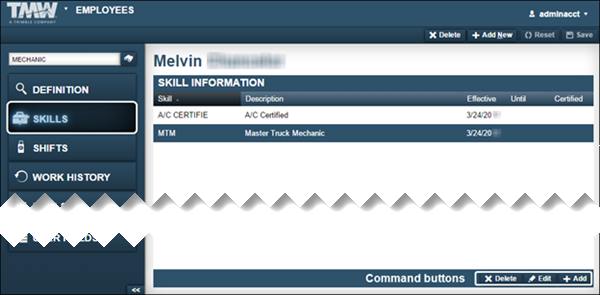
The Skill Information section allows you to Delete, Edit, or Add a skill.
| Field | Definition |
|---|---|
Skill |
A skill or skill set including those for which the employee is certified Values display for user defined options set up by your company. |
Description |
Description of the skill or skill set |
Effective |
Date the certification for the skill set became effective |
Until |
Date the certification for the skill set expires |
Certified |
Date the employee originally received certification for the skill |
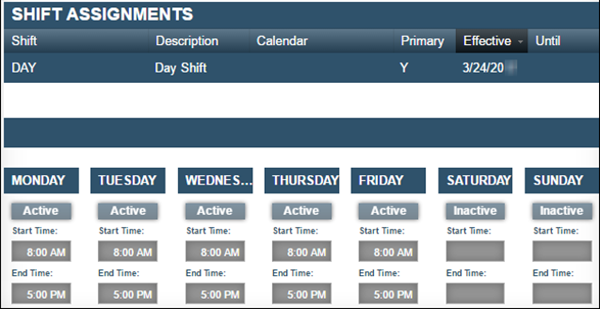
Shifts tab
This tab includes the Shift Assignments section, which displays the current and historic shift assignments for an employee. This is a read-only section.
You select an employee’s shift in the Employee Information section on the Definition tab.
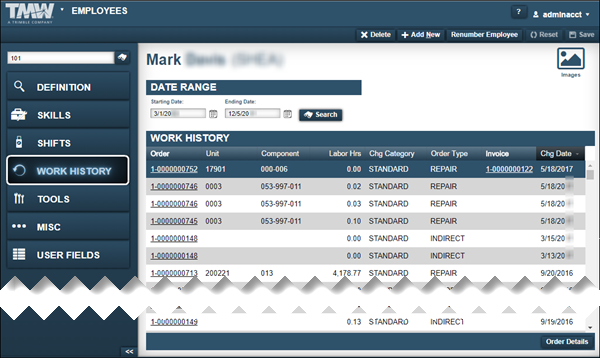
Work History tab
This tab includes two sections: Date Range and Work History. These sections allow you to view an employee’s detailed work history for a specified date range.
To display the work history, enter values in the Starting Date and Ending Date fields. Then click Search.
Date Range
Use this section to search for work records, based on a date range.
| Field | Definition |
|---|---|
Starting Date |
Beginning date range |
Ending Date |
Ending date range |
Work History
This section displays orders for which an employee performed labor during the date range specified.
| Field | Definition |
|---|---|
Order |
Order number |
Unit |
Unit number |
Component |
Component code |
Labor Hrs |
Number of hours the employee worked on the component or the total indirect charge time |
Chg Category |
Charge Category for the job assigned to the employee The default charge type is Standard. |
Order Type |
Order type Options are:
|
Invoice |
Invoice number Click the invoice number to view the SSRS invoice detail report. |
Chg Date |
Last date the order changed |
Order Details |
Opens the order’s Repair Order Detail page |
Tools tab
The Tools tab includes two sections: Filters and Tool Inventory. Use the fields in these sections to search for the technician’s tools, and show a list of tools assigned to the technician

Filters
Use this section to search for the technician’s tools. You can enter filter criteria to narrow your search results.
| Field | Definition |
|---|---|
Description |
Enter a keyword from the tool’s description in this field to search for parts in the tools catalog. Click Search to view a list of records that match your criteria. Note: The key to searching from the Description field is to use consistent terminology when naming parts. For example, you can search for a hammer using the keyword hammer, or the keywords, hammer type sledge, ball peen or claw. Include the keywords you want to search by in the part’s description. |
Category |
Use this field to search for a tool based on its assigned category. The system shows over 25 category options such as, Screwdriver, Hammers, Wrench, and 1/2 Drive. |
Include Standard, Metric, and Miscellaneous Groups |
All tools must belong to one of these three groups. To remove a group as a search filter, toggle its field option to NO. |
Tool Inventory
This section shows a list of all the tools assigned to the technician. The Add, Edit, and Delete commands allow you to alter the tools list.
| Field | Definition |
|---|---|
Description |
Tool’s description |
Manufacturer |
Tool’s manufacturer |
Quantity |
Quantity of a particular tool assigned to the employee |
Value |
Tool’s price |
Serial Number |
Tool’s serial number |
Purchased |
Date you purchased the tool |
Units tab
The Units tab displays the Unit Information section. It displays all the units currently assigned to the selected employee.
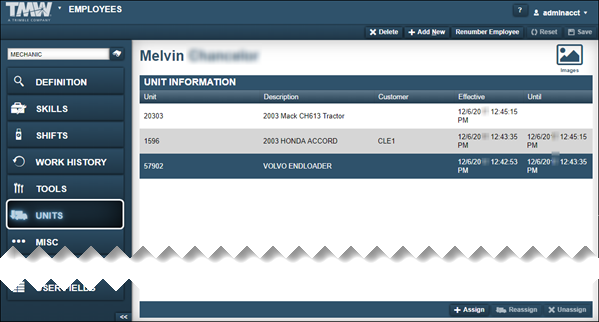
The Unit Information section allows you to Assign, Reassign, or Unassign units to an employee.
| Field | Definition |
|---|---|
Unit |
Unit’s ID |
Description |
Unit’s description |
Customer |
Customer assigned to the unit |
Effective |
Date the unit assignment went into effect |
Until |
Date the unit assignment ends |
Misc tab
The Misc tab includes three sections: Misc Information, Workstation, and Employee Permissions. Sections and fields display on this tab depending on whether you install specific options or modules in your system.
Misc Information
The Misc Information section shows these fields:
| Field | Definition |
|---|---|
|
For V.2022.2.2 and earlier. This option was removed in V.2023.1. |
This option sets the default mode for the Interactive Workstation (IWS) Valid options are:
|
Payroll Type |
Specifies the employee’s payroll type, such as Hourly |
Pager |
Employee’s pager number, if there is one |
Workstation
The Workstation section contains the employee’s password.
-
For V.2022.3 and later, the password field is labeled Workstation Password.
-
For V.2022.2.2 and earlier, the password field is labeled Interactive Workstation Password.
Employee Permissions
The Employee Permissions section allows you to set certain permissions for the employee.
| Field | Definition |
|---|---|
RO Enabled? |
When set to YES, you can select the employee’s ID to create a labor line on a repair order |
Mechanic Can Go Remote? For V.2022.3.4 and earlier. This option was removed in V.2023.1. |
When set to YES, the mechanic can sync a mobile device to upload the mechanic’s remote activity Note: To use this feature, you must:
|
Workstation Only? |
Determines which application the employee can use on a handheld device.
|
Allow Charging of Parts from Workstation? |
When set to YES, the employee can charge parts in Mechanic Workstation (for V.2022.2.2 and earlier) or Trimble Technician Portal (for V.2022.3 and later). If this option is set to NO, the system disables the Parts Charge button. |
Allow Creating of Units 'On the Fly' in Workstation? |
When set to YES, the mechanic can enter a new Unit on the fly. When this occurs, the system puts the customer ID first when creating a new RO. Notes: To use this process:
|
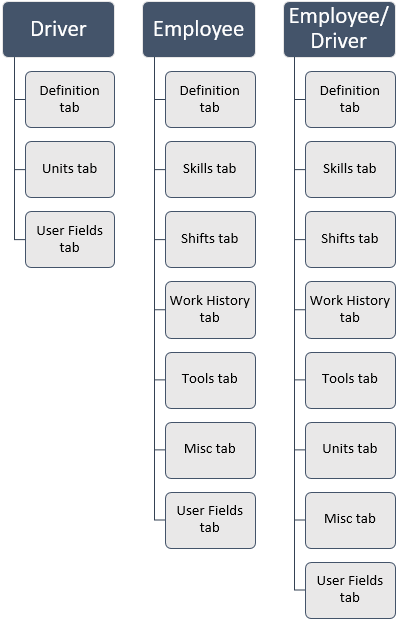
Understanding employee types
When you create a new employee master record, you must identify the employee by a specific Employee Type.
-
Driver
These employees move assets. Depending on the unit type, a CDL license may be required for this type of employee. -
Employee
These employees record their time against repair orders or indirect charge activities (such as shop maintenance). -
Driver/Employee
These employees perform both functions. -
Based on your Employee Type selection, the system displays different tabs on the employee master record. Each tab contains sections and fields in which you can record additional information about the employee.
This illustration shows the tabs available on the Employees page based on the Employee Type.