Vendor Parts master records
You use the Vendor Parts page to create and maintain vendor-supplied parts. A vendor-supplied part is provided and installed by a third-party vendor during a repair process. These parts do not affect a shop’s inventory. You can associate the part with a vendor alone, or with both a shop and a vendor combined.
On this page, you can:
-
Create, update, or remove vendor parts records
-
Specify a part manufacturer
-
Provide warranty information
-
Identify requirements for charging a part on a repair order
Go to Menu > Masters > Vendor Parts to open the Vendor Parts page.
Layout of the Vendor Parts page
This illustration shows the Vendor Parts page.

| Pages are designed so that menus and functionality areas appear the same way throughout the application. While some elements are not part of every page, the basic layout of the page is consistent. |
The Vendor Parts page provides access to the:
-
Menu that lists application menu items
-
User menu that lists user-specific menu items
-
Command buttons that allow you to delete, add, reset, and save vendor part records
-
Data Navigator used to page through part records
For details, see Searching and navigating the application. -
Functionality area where you enter information into the system
-
Navigation pane that includes the Shop, Vendor, Part lookup fields and the
 Search icons

All fields are required.
| Field | Definition |
|---|---|
Shop |
User defined shop identification number Identifies the shop assigned to the vendor part. |
Vendor |
User defined vendor identification number for the vendor providing the part You can enter up to 12 alphanumeric characters. |
Part |
User defined part identification number You can enter up to 24 alphanumeric characters. Notes:
|
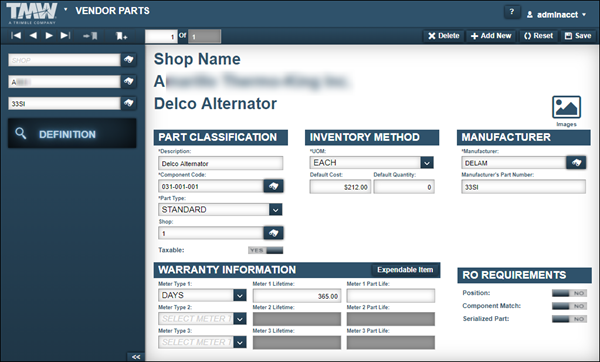
Definition tab
The Definition tab has five sections: Part Classification, Inventory Method, Manufacturer, Warranty Information, and RO Requirements. It shows:
-
The full name of the shop (if applicable) instead of the shop ID
-
The full name of the vendor instead of the vendor ID
-
The full name of the part instead of the part ID
Trimble recommends using the OEM part number.
This illustration shows the Definition tab sections.
Part Classification
You use the Part Classification section to enter specifics about the part, including its description, component code, and whether the part is taxable.
Required field: *
| Field | Definition |
|---|---|
Description * |
Part’s description |
Component Code * |
Component codes are based on the ATA standard component codes for Systems, Assemblies, and Parts on a unit. The codes are developed in three sets of three digits. The sets are separated by dashes:
|
Part Type * |
Part type classifies the part. The following are valid part types:
|
Shop |
Shop that purchased the part |
Taxable |
Determines if the part is taxable. Options are:
Note: To change the value, toggle to the needed option. |
Inventory Method
The Inventory Method section shows the UOM (Unit of Measure), Default Cost, and Default Quantity fields.
Required field: *
| Field | Definition |
|---|---|
UOM * |
Part’s unit of measure (such as Each, Dozen, Gross) |
Default Cost |
Vendor’s price for the part |
Default Quantity |
Quantity of part purchased |
Manufacturer
The Manufacturer section contains information on the part’s manufacturer.
Required field: *
| Field | Definition |
|---|---|
Manufacturer * |
Part manufacturer’s ID Note: The system uses the standard ATA codes for the manufacturer’s ID. |
Manufacturer’s Part Number |
Manufacturer’s specified number for this part Typically, this is the OEM part number. |
Warranty Information
This section allows you to identify the part as having a warranty.
If the part does not have a warranty, click the Expendable Item button. The fields used to record warranty information are disabled.

If the part does have a warranty, you can record the type and length of the warranty.
| Field | Definition |
|---|---|
Meter Type 1, 2, or 3 |
Meter type used to measure warranty information (such as ECM, Odometer, Days, Hour Meter). |
Meter 1, 2, or 3 Lifetime |
Warranty’s duration based on the selected meter type (such as 45,000 miles or 365 days) |
Meter 1, 2, or 3 Part Life |
Number that represents the complete life of a part |
RO Requirements
You use the RO Requirements section to specify requirements for the part when it is charged on a repair order.
| Field | Definition |
|---|---|
Position |
Determines whether a position is required to charge a part on a repair order Options are:
Note: To change the value, toggle to the needed option. |
Component Match |
Determines whether the part’s component code and the component code shown in the repair order section must match to charge that part out to the repair order For example, if the part component code is 034-001-001, the section component code must be 034 or 034-001, before the part can be charged on that section. Options are:
Note: To change the value, toggle to the needed option |
Serialized Part |
Determines whether a serial number is required when charging a part to a repair order Options are:
Notes:
|