Setting up the Tire Module
Tire module setup takes place in five stages:
-
Creating and assigning user roles
-
Setting Tire Module options
-
Setting up Codekeys
-
Tire configuration
-
Tire part records
User role assignments
A user’s role determines the TMT Fleet Maintenance functionality the user can access. After you have created a role defining what a user can do in the Tire Module, you can assign users to it. For details on creating users and assigning roles, see Working with user accounts.
Three default roles work with the Tire Module :
-
IWSUser
Allows the user to open Interactive Workstation (for V.2022.2.2 and earlier) or Trimble Technician Portal (for V. 2022.3 and later).Assigning the IWSUser role to a user requires that you also assign the user to a Shop. You make Shop assignments on the Create User page’s AMS Options tab.
-
The IWSUser role allows the user to load Interactive Workstation (IWS) or the Trimble Technician Portal (TTP).
-
The Shop assignment specifies the shop the user signs into for IWS or TTP.
-
-
Tire Configuration
Lets the user access Tire Configuration -
Tire Reviewer
Lets the user access Tire Review
A user can be assigned to any combination of roles.
| Assigning a user to the Administrators role includes all three tire module roles. Also, any role with the same pages assigned to them as the Tire Configuration and Tire Review will include all three roles. |
Setting Tire Module options
Option settings determine how the tire module functions. To set Options, go to Menu > Setup > Options > Application Options. For details on option settings, see Application Options.
Available options for the tire module include:
Setting up Codekeys
You must set up Codekeys before completing the tire module setup for tire configurations, part records, and units.
For details on setting up codekeys, see Working With Codekeys.
The codekeys used in the tire module include:
Axle Type
Axle types are used on tire part records and in the Tire Configuration setup. They are adapted from the VMRS Code Key 23 (Tire Position Codes), Data Element 1.
Recommended Axle Type codes include:
| Code | Description |
|---|---|
BOOSTER |
Booster Axle (B) |
DOLLY |
Converter Dolly Axle (C) |
DRIVE |
Drive Axle |
FREE |
Other Free Rolling Axles (F) |
LIFT |
Lift Axle (L) |
PUSHER |
Pusher Lift Axle before Tandem (P) |
STEER |
Steer Axle (S) |
TAG |
Tag Lift Axle after Tandem (G) |
TRAILER |
Trailer Axle (T) |
Position Codes
Position codes identify the position of the tire on the unit. They are adapted from VMRS Code Key 79 (Position Codes).
|
Tire Configuration
The recommended tire configuration makeup for customers with complex unit configurations consists of a combination of the number of axles, the wheel end, the types of axles (including the number of the types of axle if greater than one) and whether a Spare Tire is present. However, if the number of unit configurations is minimal, a simple TRACTOR, TRAILER, and other user defined codes can be used instead.
-
# of Axles
This is the total number of axles on the unit. -
Wheel End
This is the number of tires on the wheel end. This would be preceded with the total number of the axle type being identified (1, 2, 3, etc.).
Wheel End types include:
-
S = Single
-
D = Dual
-
T = Triple
-
Q = Quad
-
Axle Type
This identifies which axle types support this tire. See Axle Type abbreviation. -
Spare
This setting indicates if a Spare Tire is present (Z).
-
A standard three-axle Tractor would be defined as: (3) 3 Axles, (S) Single Wheel End, (S) Steer Axle, (2) # of this axle type, (D) Dual Wheel End and (D) Drive Axle, or 3SS2DD.
Examples of Tire Configurations include:
| Code | Description |
|---|---|
2DT |
2 Axles: 2 Dual Trailer |
2DTZ |
2 Axles: 2 Dual Trailer w/Spare |
2SC |
2 Axles: 2 Single Converter Dolly |
3SS2DD |
3 Axles: Single Steer, 2 Dual Drive |
3SS2SD |
3 Axles: Single Steer, 2 Single Drive |
4SSSG2DD |
4 Axles: Single Steer, Single Tag, 2 Dual Drive |
52SS3DD |
5 Axles: 2 Single Steer, 3 Dual Drive |
| Tire Configuration codekeys can also be added during the Tire Configuration identification process. |
Tire Size
Tire sizes define the tire size on units.
Codekeys are determined on the tire sizes in the customer’s fleet.
Examples of Tire Sizes include:
-
11R22.5
-
295/75R22.5
-
365/70R22.5
-
455/50R22.5
Tire Type
Tire types are identified on tire part records.
Recommended Tire Types include:
| Code | Description |
|---|---|
AIRLESS |
Airless Tire |
BELTED BIAS |
Belted Bias Tire |
BIAS |
Bias Tire |
RADIAL |
Radial Tire |
SEI-PNEU |
Semi-Pneumatic Tire |
SOLID |
Solid Tire |
STEEL RADIAL |
Steel Radial Tire |
Tire Out Of Service Codes
Tire Out of Service codes are used when tires are removed from the unit. They are from VMRS Code Key 21 (New & Retread Tire Out of Service Condition Codes).
Examples of the VMRS Code Key 21 codes include:
| Code | Description |
|---|---|
BE |
Bead Separation - Repair Related |
BS |
Brake Skid Damage |
CU |
Cuts and Snags |
DL |
Delamination |
EX |
Excessive Wear |
PG |
Ply Gap |
RF |
Run Flat/Run Flat - Only Sidewall Remaining |
RT |
Rib Tearing |
SP |
Sidewall Penetration |
TR |
Retread Separation - Repair Related |
| The complete list of Tire Out of Service codes can be obtained through Trimble or from The Maintenance Console (TMC). |
Tread Type
A tire’s tread type is identified on tire part records.
Recommended Tread Types include:
| Code | Description |
|---|---|
BLOCK |
Block type tread pattern |
BLOCK-LUG |
Block-Lug Combined type tread pattern |
LUG |
Lug type tread pattern |
RIB or RIBBED |
Rib type tread pattern |
RIB-BLOCK |
Rib-Block Combined type tread pattern |
An optional group for Tread Types include:
| Code | Description |
|---|---|
ASYM/DIRECT |
Asymmetric and Directional tread pattern |
ASYMMETRIC |
Asymmetric tread pattern |
DIRECTIONAL |
Directional (Unidirectional) tread pattern |
SYMMETRIC |
Symmetric tread pattern |
| A list of Tire Module Codekeys can be obtained from your TMT representative. |
Tire configuration setup
The Tire Configuration setup defines the axle and tire layout on a unit.
|
The recommended Tire Configuration consists of a combination of the number of axles, the wheel end, the types of axles (including the number of the types of axle if greater than one) and whether a Spare Tire is present. For details, see Tire Configuration in the Codekey section.
To set up the tire configuration:
-
Go to Menu > Activities > Tires > Tire Configuration.
The Tire Configuration page opens.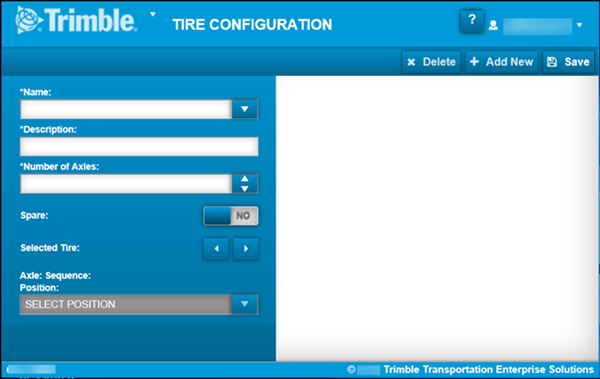
-
Click in the Name field.
If tire configuration codekeys are present, a drop-down list appears.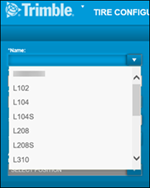
-
Do one of the following:
-
Select the Name.
The tire configuration for the name you selected is displayed in the right page. -
Enter a new name.
A Tire configuration pop-up message is displayed. It states, "Tire config name TRACTOR does not exist. Would you like to create?"
Note: If you select an existing tire configuration codekey that has not been set up, a message is displayed. It states, "Axles and tires have not been set up for this configuration."
-
-
If you selected an existing Name, the Descrip field is populated. If you entered a new Name, enter the new description.
-
Select the # of Axles from that field’s dropdown.
The system displays the number of axles selected.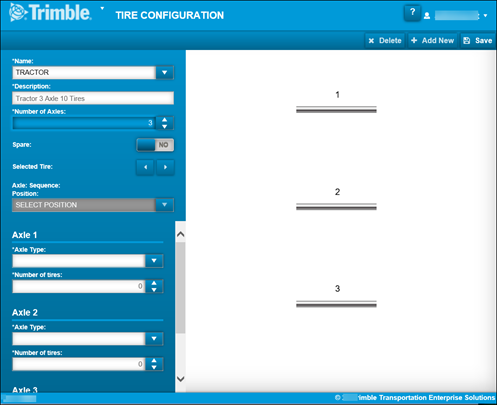
-
In the Spare field, select YES or NO to specify whether the tire configuration has a spare tire.
Note: This step is only available if the Application Option
[Repairs > Tires] Allow Spare Tireis set to YES. -
In the Axle 1, section, do both of the following:
-
Make a selection in the Axle Type field.
The tire configuration diagram in the pane on the right shows the axle type under the axle. -
In the # of Tires field, select the number of tires.
The tire configuration diagram shows the tire icons.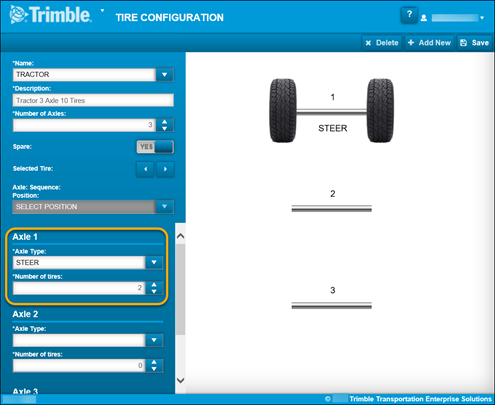
-
-
Repeat Step 7 for all additional axles.
-
Do both of the following:
-
In the tire configuration diagram, click on the first tire.
-
In the Position field, select the appropriate Position Code.
The diagram shows a check mark on the selected tire.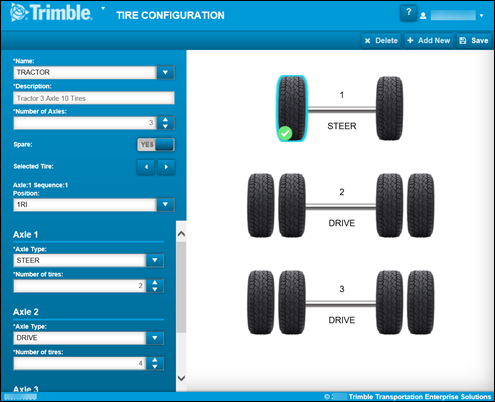
-
-
Repeat Step 9 for all additional tires.
-
Click Save.
A brief message appears at the top of the page. It states "Saving". -
Click Close.
The Tire Configuration page reappears. All fields are blank.
Adding tire part records
Before you add tire part records, you must have all tire module-related codekeys set up. See Setting up Codekeys for details.
To create tire part records in the Parts Catalog:
-
Go to Menu > Masters > Parts Catalog.
The Parts Catalog page opens. -
Click Add New.
The Add New Part window opens.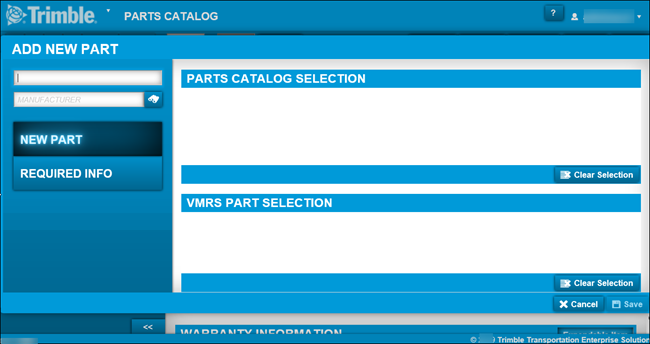
-
Enter the new part number (part ID) in the Part field.
-
Press ENTER.
Note: You can use the wildcard feature to help you find VMRS parts. For details, see Understanding the wildcard feature in the Parts Catalog.
One of the following happens:
-
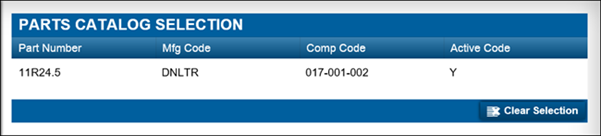
The part number appears in the Parts Catalog Selection section.
The part already exists in the Parts Catalog. Click Cancel to close this window.
-
The part number appears in both sections.
The part is already in the Parts Catalog. Click Cancel to close this window.
-
The part number appears in the VMRS Part Selection section.
The part record exists in the Vehicle Maintenance Reporting Standards (VMRS) part lookup file in the database.
Select the correct part and go to Step 4.
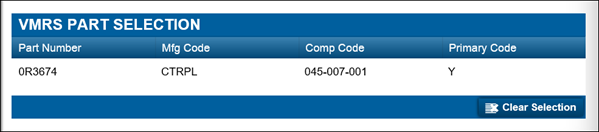
Note: If you select a part from this section, the Manufacturer field is filled in automatically.
-
No part number displays in either section.
Enter the part’s manufacturer in the Manufacturer field and press ENTER.
Go to Step 4.
-
-
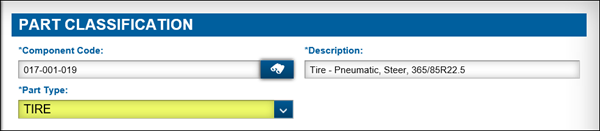
Click Next.
The Part Classification, Inventory Method, and Manufacturer sections are displayed.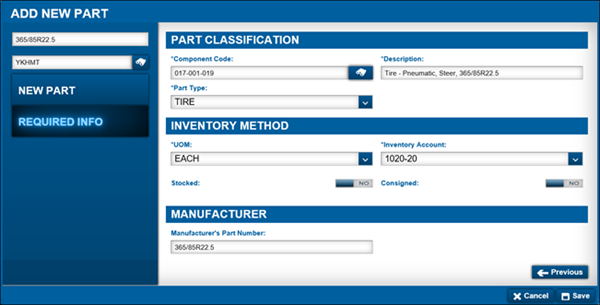
Note: If you selected a part from the VMRS Part Selection section, the system shows the component code and description automatically.
-
Make entries in the required fields.
-
For details about individual fields, see Definition tab.
-
In the Part Type field, select Tire.
-
-
Click Save.
The new part record is displayed.
-
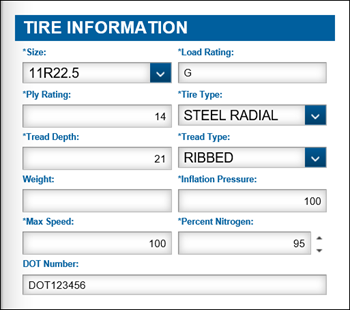
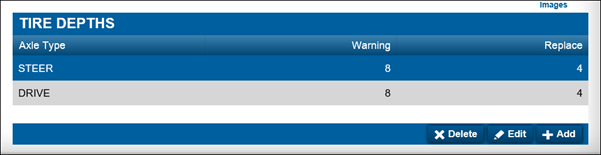
Click the Tire tab.
The Tire Information and Tire Depths sections are displayed. -
In the Tire Information section, make entries in the required fields.
For field descriptions, see Tire tab - Tire Information.
-
Click Save.
The system activates the Delete, Edit, and Add buttons in the Tire Depths section. -
In the Tire Depths section, click Add.
The Add Depth window opens.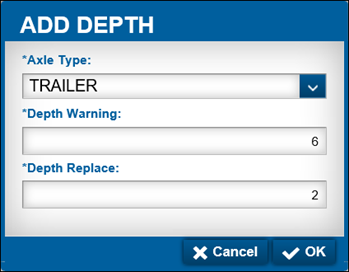
-
Make entries in all fields.
For field descriptions, see Tire tab - Tire Depths.
-
Do one of the following:
-
Click OK.
The window closes. The Tire Depths section reflects your entries. -
Click Cancel
Closes the window without saving your changes.
-
-
Repeat Steps 10 - 12 for additional Axle Types.
-
In the upper-right corner of the page, click Save.