Time Card Editor
The Time Card Editor allows managers to edit time cards created by employees using Interactive Workstation (IWS) or Trimble Technician Portal (TTP). Managers can also approve one to multiple time cards and export those time cards to Payroll using the Time Card Editor interface.
|
IWS applies to V.2022.2.2 and earlier. TTP applies to V.2022.3 and later. |
The Time Card Editor also enables management view a detailed analysis for labor time entered. The detailed analysis provides a breakdown of employee’s labor hours by Repair Order total, Indirect total, Lunch/Break total, Idle Time total, Total Shift Time, and Total Paid Time. Time for each of these is listed in Hours:Minutes and Hours:Hundredths formats.
A manager can perform the following tasks using Time Card Editor:
-
Add time entries manually
-
Edit existing time entries
-
Delete time entries
-
Delete time cards for employees
-
Close time cards for employees
-
Approve employee time cards
Setting up Time Card Editor
You must set your employee master records and global options before using Time Card Editor.
-
You must create employee records before your employees can log time spent on a repair order. See Creating an employee record to create employees.
-
Go to Menu > Setup > Options > User Options.
The User Options page opens. -
In the User field at the top, click
 Search.
The User Search window opens. The options under Category are not enabled until you select a user. -
Do one of the following:
Enter a username-
In the User field, enter the User Name.
-
Press TAB.
The global options for the user you entered are displayed under Category.
Click Search-
In the User field, click
Search.
The User Search window opens with a list of names. -
In the User Search window, click
Search. -
Select the user you want.
-
Click OK.
-
-
Click Payroll.
The Payroll options display on the right. -
In the Application Options page, select YES for the following global options:
Option Yes/No Results Allow User to Approve Payroll Time Cards
YES
The Approve Time Cards button is enabled.
The Payroll Export button is enabled.
Prompt for Editing Payroll Hours
YES
The Approve Time Cards button enables the user to preview selected time cards and edit values.
The preview will display differently based on whether you have GP or ADP license modules activated. If you have neither of these activated, the system will display the generic preview.
Editing time cards
To view and edit a list of time cards for your employees:
-
Go to Menu > Activities > Payroll > Time Card Editor.
The Time Card Editor Employee Listing page opens. -
Select and expand the employee.
The employee’s record expands to display a list of time cards.Note: If the Employee Listing page does not display a list of employees and each of their individual time cards, click
Search at the top left of the page. Select an employee and expand the list of time cards. If the Use Payroll Week Ending Day option is enabled, the dates in the employee listing search fields default based on the entry for the Payroll Week Ends at 11:59 PM option. To access the option, go to Applications Options > Payroll. -
Click and expand the time card you want to edit.
-
Select the line you want to edit.
Note: When editing lines, color-coding indicates whether you can edit the line. For example, black lines are closed and not editable, white lines can be edited, and red lines mean someone is currently logged in to IWS for the repair on this line.
-
Click Edit.
Depending on the line you select to edit, either the Time Card Line Editor window or the Edit window opens. For example, the Edit window displays when you select the Clock-In or Clock-Out lines.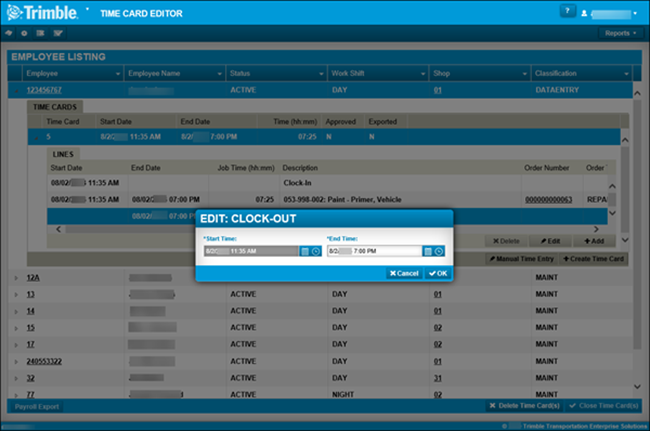
-
Update the fields you want to change.
-
Do one of the following:
-
For the Edit window, click Cancel or OK.
-
For the Time Card Line Editor window, do one of the following:
-
To cancel and return to the time card lines, click Cancel.
-
To save the changes you made, click Save.
-
To save your updates and add more changes to the time card lines, click Save and Add New.
-
-
-
To add lines to a time card, click +Add.
The Time Card Line Editor window opens.
-
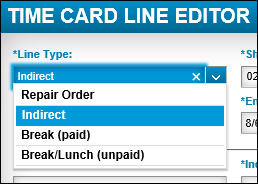
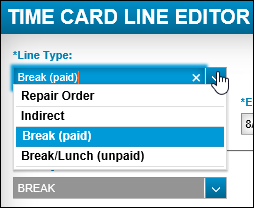
Select the Line Type you want to add and complete these steps for each type:
Repair Order-
To add a repair order to a time card, click +Add.
Note: If you add or edit a repair order or indirect time card line, it will update the corresponding repair order also.
-
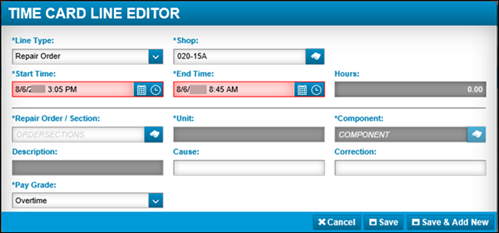
In the Line Type field, select Repair Order.
-
Select your Start Time.
Note: When you select a line type to add and update your start time, both the Start Time and End Time fields are highlighted in red, indicating that the time range is not valid. When you update the End Time, the red highlight disappears and the update is accepted. This happens regardless of whether you selected the line type of Repair Order, Indirect, Break (unpaid), or Break/Lunch (unpaid).
-
Select the End Time.
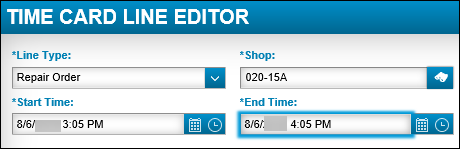
The red highlight is removed after the time span conforms to typical range.
-
In the Repair Order/Section field, click
Search.
The Repair Order Section Search window opens.
-
In the Repair Order Section Search window, click
Search to display a list of Open repair orders. -
Select the repair order you want to assign to the employee.
-
Do one of the following:
-
To cancel this transaction, click Cancel.
-
To accept the selected repair order for your employee, click OK.
The repair order is added to the employee’s time card.
-
Indirect-
To add an Indirect line type, click +Add.
The Time Card Line Editor window opens.Notes:
-
An Indirect line type can include the administrative tasks, washing equipment, data entry or other tasks not associated with a repair order.
-
If you add or edit a repair order or indirect time card line, it will update the corresponding repair order also.
-
-
In the Line Type field, select Indirect.
-
Select your Start Time.
-
Select your End Time.
-
Select your Indirect Charge Code from the drop-down list.
-
Do one of the following:
-
To cancel this line type and return to the time card, click Cancel.
-
To save the information you just entered, click Save.
-
To save and add another line to the time card, click Save & Add New.
-
Break (paid)-
To add a paid break line type, click +Add.
The Time Card Line Editor window opens. -
In the Line Type field, select Break (paid) as your line type.
-
Select your Start Time.
-
Select your End Time.
-
Do one of the following:
-
To cancel this line type and return to the time card, click Cancel.
-
To save the information you just entered, click Save.
-
To save and add another line to the time card, click Save & Add New.
-
Break/Lunch (unpaid)-
To add an unpaid break/lunch line type, click +Add.
The Time Card Line Editor window opens. -
In the Line Type field, select Break/Lunch (unpaid) as your line type.
-
Select your Start Time.
-
Select your End Time.
-
Do one of the following:
-
To cancel this line type and return to the time card, click Cancel.
-
To save the information you just entered, click Save.
-
To save and add another line to the time card, click Save & Add New.
-
-
Creating a new time card
As a supervisor or manager, you can create a new time card for your employees.
-
Go to Menu > Activities > Payroll > Time Card Editor.
The Time Card Editor Employee Listing page opens. -
Select and expand an employee.
-
To add a new time card for the employee, click Create Time Card.
The Add window opens.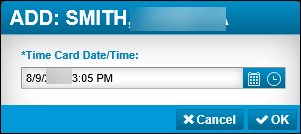
-
Click OK.
The Time Card Line Editor window opens with required fields for you to complete.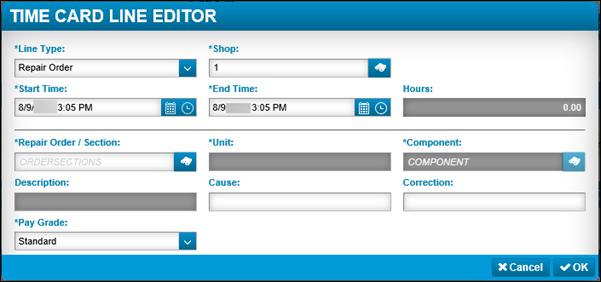
-
Complete all the required fields.
-
Click OK.
The new Time Card is added and editable.
Approving time cards
-
Go to Menu > Activities > Payroll > Time Card Editor.
The Time Card Editor Employee Listing page opens. -
Expand the employee whose time card needs approval.
-
Select the timecard or multiple timecards you need to approve.

-
If you need to make any edits on the time cards before you approve them, complete the following steps.
-
Expand the time card you want to edit.
-
Click the line you need to update.
-
Click Edit and follow the same process as shown in Editing time cards.
-
-
On the bottom right, click Approve Time Card(s).
The Approval Time Card window opens. It displays a list of all employees whose names you selected. -
To approve the timesheets listed, click Approve.
In the employee’s time card grid, the Approved column has now changed from N to Y. The time card is now ready to export to Payroll.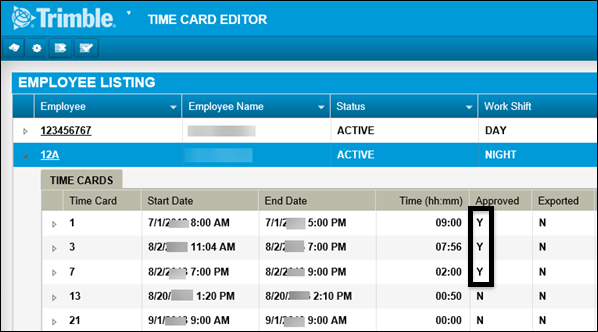
Exporting time cards to Payroll
-
Select the approved time cards.
-
Click Payroll Export.
The Payroll Export window opens.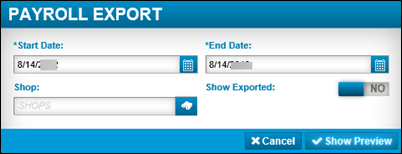
-
Complete all the required fields:
-
Start Date
-
End Date
-
Shop
-
Show Exported (Y/N)
-
-
Click Show Preview.
The Export Preview window opens. Review the time cards that are listed.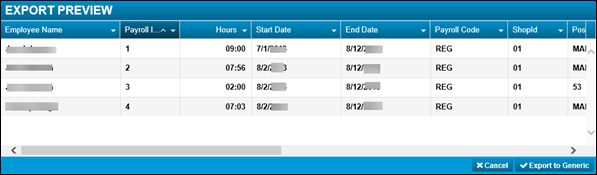
Note: If you have the ADP and GP license modules, the Export File window opens with the message "Both ADP and GP modules are licensed, please select the export type".
-
Do one of the following:
-
To cancel the export process, click Cancel.
-
To continue exporting to Payroll, click Export to Generic.
The information is exported to an Excel spreadsheet.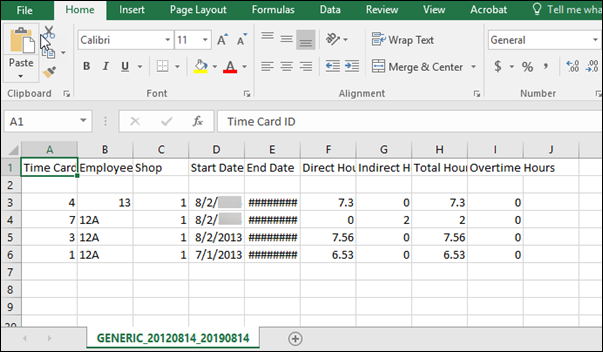
-
-
If you have the ADP or GP module licenses and received the message in the Export File window, select either ADP Export or GP Export format.
Depending on the format you select, the file will download in the bottom left corner of the window.You can open the file to review the contents.
Deleting time cards
To delete time cards from an employee’s records, complete the following steps.
-
Go to Menu > Activities > Payroll > Time Card Editor.
The Time Card Editor Employee Listing page opens. -
Select the employee whose time card you want to delete.
-
Click Delete Time Card(s).
The system displays the following message: "Are you sure want to delete the following 1 Time Card(s)?"
Note: The number of time cards you want to delete displays in the system message. So if you wanted to delete three time cards, the system displays: "Are you sure you want to delete the following 3 Time Card(s)?"
-
Do one of the following:
-
To cancel and go back to the Employee Listing page, click Cancel.
The system returns you back to the list of time cards. -
To proceed with deleting the time card, click OK.
The time card is deleted.
-