Vendors master records
A vendor master record is required if your company:
-
Uses the Automatic Parts Requisition feature
-
Creates new purchase orders
You use the Vendors page to:
-
Create vendor records
-
Update vendor information
-
Remove vendor records
Go to Menu > Masters > Vendors to open the Vendors page.
Layout of the Vendors page
This illustration shows the Vendors page.
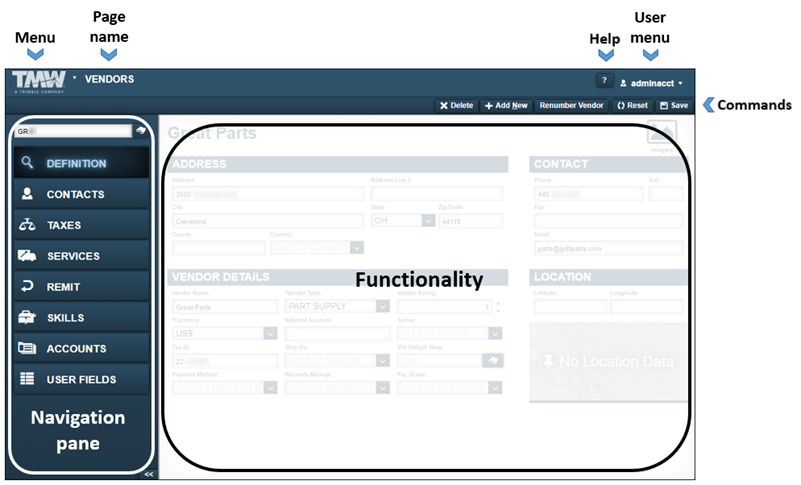
| Pages are designed so that menus and functionality areas appear the same way throughout the application. While some elements are not part of every page, the basic layout of the page is consistent. |
The Vendors page provides easy access to the:
-
Menu that lists application menu items
-
User menu that lists user-specific menu items
-
Command buttons used to Delete, Add, Reset, and Save vendor records
-
Functionality area where you enter information into the system
-
Navigation pane that includes the Vendor lookup field and the
 Search icon
The identification number used to look up a vendor is user defined. You can enter up to 12 alphanumeric characters in this field.
Definition tab
The Definition tab includes four sections: Address, Contact, Vendor Details, and Location.
This illustration shows the Definition tab sections.
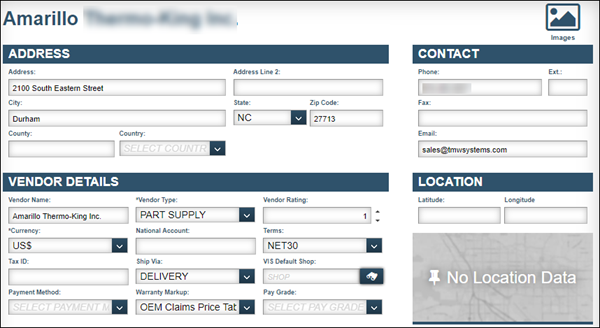
Address
The Address section shows details about the vendor’s physical location.
| Field | Definition |
|---|---|
Address |
Vendor’s physical address |
Address Line 2 |
Vendor’s secondary address (for example, Suite 300) |
City |
Vendor’s city location |
State |
Vendor’s state location |
Zip Code |
Vendor’s ZIP/postal code |
County |
Vendor’s county location |
Country |
Vendor’s country location |
Contact
The Contact section shows the vendor’s phone, fax, and email information. You use this section to record the contact information for the vendor’s primary contact.
| Field | Definition |
|---|---|
Phone |
Vendor’s main phone number |
Ext. |
Vendor’s phone extension, if there is one |
Fax |
Vendor’s fax number |
Vendor’s email address Note: A vendor’s email address is necessary to email purchase orders either manually or by using the eCommerce feature. |
Vendor Details
The Vendor Details section allows you to record items such as a national account number, terms of sale, tax ID, etc.
| The Vendor Information System (VIS) module fills some fields. If you are your company does not use this module, these fields will remain empty. Contact your TMT representative for details about this module. |
Required field: *
| Field | Definition |
|---|---|
Vendor Name |
Vendor’s name |
Vendor Type * |
Vendor type (such as Fuel vendor, Repair services, Vender supplies services) Note: Your company determines the options available in this field. |
Vendor Rating |
Vendor’s rating You can enter a value between 1 and 10, where one (1) is the best vendor and ten (10) is the worst vendor. Note: You can search for this field in the Vendor Search window. |
Currency * |
Vendor’s default currency (such as US$, CN$) Note: This field is required if you enable the Multi-Currency feature. |
National Account |
Vendor’s National Account number |
Terms |
Vendor’s terms (such as, Internet 10 days, Internet 20 days, or Internet 30 days.) |
Tax ID |
Vendor’s Federal Tax ID (read-only) |
Ship Via |
Vendor’s primary shipping method (such, UPS, FedEx, or the US Postal Service) |
VIS Default Shop |
Default shop when creating vendor repair orders with the Vendor Information System (VIS) module Note: Vendor Information System (VIS) is an add-on module. |
Payment Method |
Vendor’s default payment method (cash, Visa, MasterCard, or Discover) |
Warranty Markup |
Vendor’s warranty price structure |
Pay Grade |
Default pay grade when adding labor lines to vendor repair orders with the Vendor Information System (VIS) module |
Contacts tab
The Contacts tab includes the Contact Information section. This section displays contact information for the vendor, such as phone numbers and email addresses.
This illustration shows the Contact Information tab section.
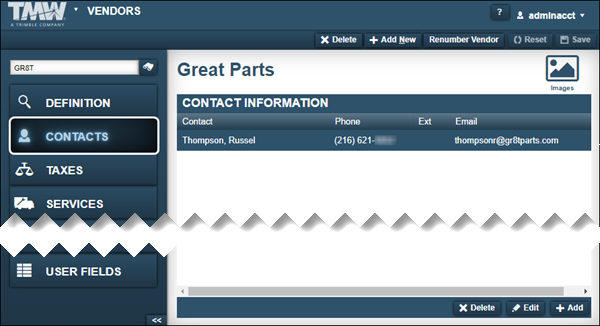
The Contact Information section shows the vendor’s contact information.
Required field: *
| Field | Definition |
|---|---|
Contact * |
Name of contact Note: The system displays the contact’s name as you entered it into the system. Trimble recommends using the same format for all contacts (for example, Smith, James). |
Phone |
Contact’s phone number |
Ext |
Contact’s phone extension, if there is one |
Contact’s email address |
Taxes tab
The Taxes tab includes the Tax Information section. Use this section to set up or change a vendor’s tax method and/or tax rates for purchase orders.
This illustration shows the Tax Information tab section.

The system supports two tax methods:
-
Standard
Taxes are calculated separately and then added together for a total. -
Tax On Tax
Taxes are calculated in a sequential method based on the value in the Sequence field. The tax rate with a one (1) in the Sequence field is calculated first and then that tax is added to any rate with a two (2) in the Sequence field. The system continues adding tax rates together for all sequences.Required field: *
Field Definition Tax Code *
Tax Code ID
Description
Tax Code ID description
Note: The system fills this field automatically based on the value in the Tax Code field.
Sequence *
Order in which taxes are calculated when using the Tax On Tax method
Tax %
Tax rate as a percentage
Note: This field is blank if the tax code uses the Flat Tax option.
Flat Tax
Tax rate as a flat rate
Note: This field is blank if the tax code uses the Tax % option.
Services tab
The Services tab includes the Services Information section. A vendor may provide specific services at set prices.
This illustration shows the Services Information tab section.
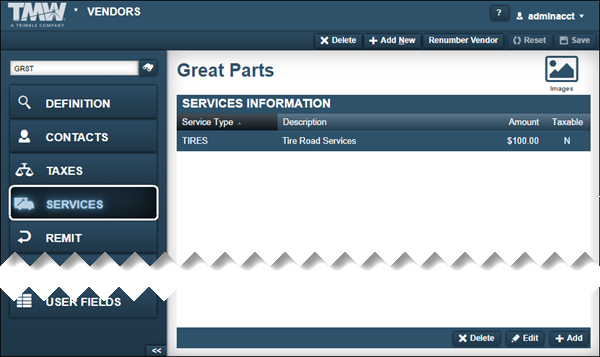
Required field: *
| Field | Definition |
|---|---|
Service Type * |
Code for the vendor’s service (such as Wrecker or Road Service) |
Description |
Complete description of the service type (read-only field) |
Amount * |
Amount the vendor charges for the service |
Taxable |
Determines if the vendor’s part or service is taxable |
Remit tab
The Remit tab includes two sections: Remit Vendor Information and Contact. You can use this tab to specify an address, other than the vendor’s physical location, for sending payments. For example, a company may want to use the address of their corporate headquarters, a local or regional office, or a corporate account office. The address prints on purchase orders generated for the vendor.
This illustration shows the Remit tab sections.
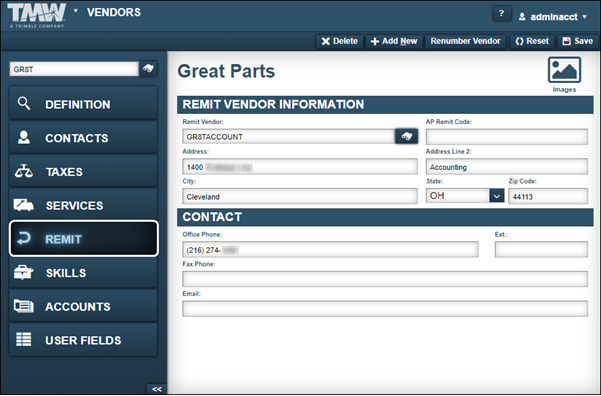
Remit Vendor Information
The Remit Vendor Information section shows details about the vendor’s remit information.
| Field | Definition |
|---|---|
Remit Vendor |
Vendor’s remit ID Note: Based on your selection in this field, the system enters the AP Remit Code, Address, and Contact field values available for this vendor. |
AP Remit Code |
Vendor’s remit code This field supports an entry of up to 24 alphanumeric characters. The field value is used with Microsoft Dynamics GP. Note: TMT Fleet Maintenance does not use this field. It is used with Microsoft Dynamics GP only. |
Address |
Remit vendor’s primary address Note: This address prints on vendor purchase orders. |
Address Line 2 |
Remit vendor’s secondary address (such as Suite 101) Note: This address prints on vendor purchase orders. |
City |
Remit vendor’s city location |
State |
Remit vendor’s state location |
Zip Code |
Remit vendor’s ZIP Code/Postal code |
Contact
Use this section to record information for the primary contact at the remit vendor site.
| Field | Definition |
|---|---|
Office Phone |
Remit vendor’s phone number for the primary contact |
Ext |
Remit vendor’s phone extension for the primary contact |
Fax Phone |
Remit vendor’s fax number for the primary contact |
Remit vendor’s email address for the primary contact |
Skills tab
The Skills tab includes the Vendor Skills section.
This illustration shows the Skills tab section.

Required field: *
| Field | Definition |
|---|---|
Skill * |
Vendor’s skill or skill set Note: Your company determines the options available in this field. |
Description |
Description of the vendor’s skill |
Effective * |
Date the certification for the skill set became effective |
Until |
Date the certification for the skill set expires |
Certified |
Date the vendor originally received certification for the skill |
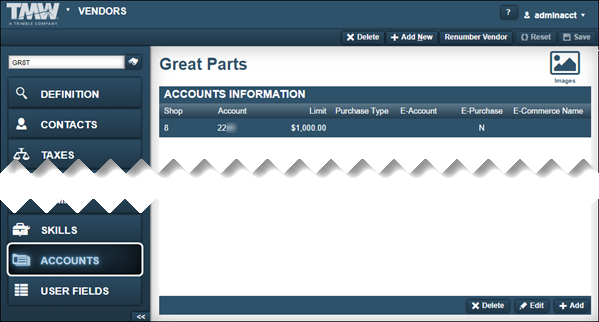
Accounts tab
The Accounts tab includes the Accounts Information section. Use this tab to track all the accounts established with a vendor.
This illustration shows the Accounts Information tab section.
Required field: *
| Field | Definition |
|---|---|
Shop * |
Shop ID Identifies the shop that has an account with the vendor |
Account * |
Account number between the shop and the vendor Note: Each shop has a unique account number. You cannot enter the same account number for multiple shops. |
Limit * |
Shop’s maximum spending limit with this vendor |
Purchase Type |
Currently not functional |
E-Account |
Currently not functional |
E-Purchase |
Identifies whether E-Commerce capabilities are activated for the vendor Note: If YES, the E-Commerce Name field is editable. |
E-Commerce Name |
Account name used to conduct commercial transactions online Note: Trimble recommends that you add the vendor’s email address to the vendor master record. |