Working with invoice line items
You can work with line items on direct sale or repair order (RO) invoices. The invoice must be in Open status.
For details on opening an invoice, see Finding or opening an invoice.
|
To create and manage invoices, you must have the Invoice module.
|
Adding line items
You can add lines on an invoice if it meets two standards:
-
The invoice type is Direct Sale or Repair Order.
-
The invoice status is Open.
|
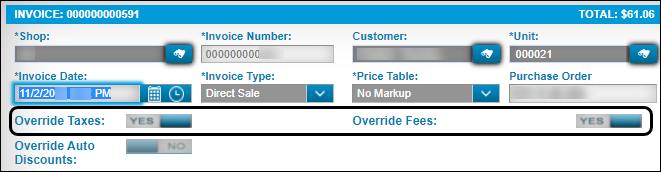
To add tax or fee lines on an invoice, you must toggle Override Taxes and Override Fees to YES on the Invoice page. Show me
|
To add an invoice line item:
-
Click the title bar of the section you want to edit.
The section expands to display its lines. -
Click +Add.
The Create New Line window opens. -
Select an option from the Line Type drop-down list.
The regular options are:-
PART
-
LABOR
-
SERVICES
-
COMMENT
If you toggle Override Taxes and Override Fees to YES, you also have the FEE and TAX options. The Create New Line window changes based on the option you select.
-
-
When you select the line type, the fields for that type are displayed. Make the needed entries for the line as defined in the following tables.
Required field: *
Read-only field: §PARTCharge Date §
The program fills in the invoice date.
Part Number *
Enter the part’s identification number. If you do not know it, click
 Search to find it.
Once you select the part number, the program completes these fields for you:
-
Description
-
Charge Category §
-
Qty UOM (Quantity/Unit of Measure) §
-
Component Description §
-
Price
This value is determined by the Invoice Price Table specifying the price category. -
Currency ( US$, CN$, etc.)
-
Component
-
Component Description §
Quantity *
Enter the number of parts to add to the invoice.
Total §
The value is calculated automatically. It is based on the entry in the Quantity field multiplied by the Price per Qty UOM shown for the part number.
Positions
If the part has a required position on the repair order, enter that information in this field
LABORCharge Date §
The program fills in the invoice date.
SRT Code
Enter the standard repair time code. If you do not know the time code, click
Search to find it.Once you select the time code the program completes these fields for you. Fields that become read-only are marked §:
-
SRT Description §
-
SRT Time §
Description *
Enter a labor description, such as Check all brake adjustments.
Hours *
Enter the number of hours the mechanic worked.
Labor Rate
Enter the labor rate per hour.
Total §
The value is calculated automatically. It is based on the entry in the Hours field multiplied by the entry in the Labor Rate field.
SERVICESDescription *
Enter a service description, such as Towing.
Charge Date §
The program fills in the invoice date.
Charge Amount *
Enter a charge amount for the service.
Currency §
The program enters the default currency, such as US$ or CN$.
Charge Category *
Select a charge category for the order. The options available depend on your setup, but usually include items such as STANDARD.
COMMENTCharge Date §
The program fills in the invoice date.
Description *
Enter your comment.
FEEThe FEE line item is available only when you toggle Override Fees to YES.
Charge Date §
The program fills in the invoice date.
Charge Category *
Select a fee charge category from the drop-down list. The options vary based on your setup.
Description *
The program enters a description based on the selected charge category. You can edit or add to the description.
Charge Amount *
Enter the fee amount.
TAXThe TAX line item is available only when you toggle Override Taxes to YES.
Charge Date §
The program fills in the invoice date.
Charge Category *
Select a tax charge category from the drop-down list. The options vary based on your setup.
Description *
The program enters a description based on the selected charge category. You can edit or add to the description.
Charge Amount *
Enter the fee amount.
-
-
After you complete the items in the Create New Line window, do one of the following:
-
Click Save.
-
The Create New Line window closes.
-
The new line appears in the Sections/Lines pane.
-
The invoice total is updated.
-
-
Click Save and New.
-
The new line appears in the Sections/Lines pane.
-
The invoice total is updated.
-
The Create New Line window refreshes so that you can another line.
If you change your mind, click Cancel to abandon your changes. The Create New Line window closes.
-
-
Adding Discounts and Coupons
A discount is anything that subtracts a part of the cost from an invoice. A loyalty card program is an example of a common discount.
A coupon is a type of discount. Buyers must present a coupon when paying for a good or service. The coupon can be physical, such as a piece of paper, or it can be virtual, such as a code.
You add coupon and discount invoices line items using the +Coupon and +Discount buttons.
To add a coupon to an invoice:
-
Click the title bar of the section you want to edit.
The section expands to display its lines. -
Click +Coupon.
The Invoice Coupon window opens. -
Type the coupon number in the Enter Coupon/Barcode Number field.
-
Click Add to add the coupon line to the invoice.
The page refreshes to show the new line.If you change your mind, click Cancel to abandon your changes. The Invoice Coupon window closes.
To add a discount to an invoice:
-
Click the title bar of the section you want to edit.
The section expands to display its lines. -
Click +Discount.
The Invoice Line Discount window opens. -
Select a discount from the table.
-
Click Add to add the coupon line to the invoice.
The page refreshes to show the new line.If you change your mind, click Cancel to abandon your changes. The Invoice Line Discount window closes.
Editing line items
You can edit lines on an invoice if it meets two standards:
-
The invoice type is Direct Sale or Repair Order.
-
The invoice status is Open.
To edit an invoice line item:
-
Click the title bar of the section you want to edit.
The section expands to display its lines. -
Do one of the following:
-
Double-click the line you want to edit.
-
Select the checkbox of the line that you want to edit and click Open.
The Edit Line window opens.
-
-
Make your edits using the Edit Line windows.
When you select the line type, the fields for that type are displayed. Make the needed entries for the line as defined in the following tables.Required field: *
Read-only field: §Part Edit Line windowYou can edit any field that is not read-only. The Part Edit Line window contains these fields:
Field Definition Line Type §
PART
Charge Date §
The program fills in the invoice date.
Description *
Part’s description
Part Number *
Part identification number
Valid entries include:
-
Part number from the Shop Inventory
-
Manufacturer’s Part Number
-
Cross-reference number for the original part record in the Parts Catalog
Charge Category *
The cost group or charge category for the part.
Quantity
The number of parts charged on the order
Qty UOM §
Part’s unit of measure, such as Each, Dozen, Gross
The value defaults to the UOM value specified in the part’s master record.
Price
This value is determined by the Invoice Price Table specifying the price category.
Currency *
Default currency (such as US$, CN$)
Total §
The value is calculated automatically. It is based on the entry in the Quantity field multiplied by the Price per Qty UOM.
Component
Defaults to the code entered for the section
A component code is a number that defines a unit. Each code has nine digits based on the standard VMRS codes. Dashes separate each set of three digits. For example, 013-001-014 is the component code for a front brake shoe.
Component Description
Component code description
By default, the program enters the description based on the component code selected.
Positions
If the part has a required position on the repair order, this field contains that information.
Labor Edit Line windowYou can edit any field that is not read-only. The Labor Edit Line window contains these fields:
Field Definition Line Type §
LABOR
Charge Date §
The program fills in the invoice date.
Description *
Labor description, such as Check all brake adjustments
Hours *
The number of hours the mechanic worked
Labor Rate
Default labor rate per hour
Total §
The value is calculated automatically. It is based on the entry in the Hours field multiplied by the Labor Rate field.
SRT Code
Standard repair time code
SRT Description §
If you selected an SRT code, this field displays its description.
SRT Time §
If you selected an SRT code, this field displays the standard time allotted to that code.
Services Edit Line windowYou can edit any field that is not read-only. The Services Edit Line window contains these fields:
Field Definition Line Type §
SERVICES
Charge Date §
The program fills in the invoice date.
Description *
Service description, such as Towing
Charge Amount *
Charge amount for the service
Currency §
Unit of measure for the charge or price, such as US$ or CN$
Charge Category *
The cost group or charge category for the part.
Comment Edit Line windowYou can edit any field that is not read-only. The Comment Edit Line window contains these fields:
Field Definition Line Type §
COMMENT
Charge Date §
The program fills in the invoice date.
Description *
The comment text
Fee Edit Line windowYou can edit any field that is not read-only.
Note: You cannot edit the FEE line item unless you toggle Override Fees to YES.
The Fee Edit Line window contains these fields:
Field Definition Line Type §
FEE
Charge Date §
The program fills in the invoice date.
Charge Category *
The cost group or charge category for the part.
Description *
Fee description, such as MISCELLANEOUS FEE
Charge Amount *
The fee amount
Tax Edit Line windowYou can edit any field that is not read-only.
Note: You cannot edit the TAX line item unless you toggle Override Taxes to YES.
The Fee Edit Line window contains these fields:
Field Definition Line Type §
TAX
Charge Date §
The program fills in the invoice date.
Charge Category *
The cost group or charge category for the part.
Description *
Tax description, such as STATE SALES TAX
Charge Amount *
The tax amount
Discount and Coupon Line windowCoupons and discounts both appear as discount line items. Some discount line items cannot be edited unless you toggle Override Auto Discounts to YES. Others cannot be edited at all. If you try to open a discount that cannot be edited, the program displays a system message stating, "You cannot edit a discount line."
You can edit any field that is not read-only.
The Discount Edit Line window contains these fields:
Required field: *
Read-only field: §Field Definition Line Type §
DISCOUNT
Charge Date §
The program fills in the invoice date.
Description *
Discount description, such as Loyal Customer Discount
-
-
After you complete your edits in the Edit Line window, do one of the following:
-
Click Save.
-
The Edit Line window closes.
-
The edited line appears in the Sections/Lines pane.
-
If your changes affected the prices, the invoice total is updated.
-
-
Click Save and New.
-
The edited line appears in the Sections/Lines pane.
-
If your changes affected the prices, the invoice total is updated.
-
The Edit Line window refreshes so that you can another line.
If you change your mind, click Cancel to abandon your changes. The Edit Line window closes.
-
-
Deleting invoice lines
You can delete lines on an invoice if it meets two standards:
-
The invoice type is Direct Sale or Repair Order.
-
The invoice status is Open.
|
To delete discount, tax, or fee lines, you must change these settings:
Show me
|

To delete an invoice line:
-
Click the title bar of the section you want to edit.
The section expands to display its lines. -
Select the checkbox of the line you want to delete.
-
Click Delete.
The program displays the Delete Line window. The confirmation message asks "Are you sure you want to delete number of line(s)?" -
Click OK.
The page refreshes. Your deleted line is no longer displayed. The program updates costs, prices, taxes, and so on.-
If you change your mind, click Cancel to abandon your changes.
The Delete Line window closes. The invoice is unchanged.
-