Creating invoices
Using the Invoicing module, you can bill customers and owner/operators for:
-
Repairs
-
Maintenance
-
Damages
-
Other services
|
To create and manage invoices, you must have the Invoice module.
|
You can create these types of invoices:
-
Contract Maintenance
-
Credit
-
Credit re-bill (for repair order invoices)
-
Direct sale
-
Fuel ticket
-
Repair order
Creating a Contract Maintenance invoice
If you have the Contract Maintenance module installed, you can use the Contract Maintenance Billing Generator application. This application creates invoices for units under active maintenance contracts. The invoices are for monthly billing or fixed and variable costs, and include a billing statement. For details, see Understanding the Contract Maintenance Billing Generator.
If you need to, you can create contract maintenance invoices manually.
-
Do one of the following:
-
Go to Menu > Orders > Invoices Listing.
-
Click Invoices on the Landing page.
The Invoices Listing page opens.
-
-
In the Command bar, click Create Invoice.
The Invoice page opens.
-
Do one of the following:
-
If you know the shop code, enter it in the Shop field and press TAB.
-
To search for the shop, click
 Search to find a shop.
Once you enter the shop, the program completes these fields:
Required field: *
Invoice Number *
The next available invoice number
You can edit the Invoice Number, but you must use numbers only.
Invoice Date *
The current date and time
You can change the date and/or time if you want.
Status
Open (default)
-
-
Complete the remaining invoice header fields:
Required field: *
Customer *
Enter the Customer or click
Search to find a customer.Invoice Type *
Select Contract from the drop-down list.
The Unit field is displayed.Unit *
Enter the Unit number or click
Search to select the Unit.Price Table *
Select Maintenance Contract from the drop-down list.
Purchase Order
If applicable, enter the customer’s purchase order number in the Purchase Order field.
Bill to Customer
The program completes this field for you. It enters the same customer that you selected for the Customer field.
-
Click Save.
The program saves the invoice header information. -
Add lines to the invoice.
Once you do, the program calculates the appropriate taxes and fees. Then, you can decide whether to use these override fields:Override Taxes
Options are:
-
NO (default)
Taxes are calculated based on your setup. The results are read-only. -
YES
The program calculates taxes, but you can add, edit, or delete them.
Override Fees
Options are:
-
NO (default)
Fees are calculated based on your setup. The results are read-only. -
YES
The program calculates fees, but you can add, edit, or delete them.
Override Auto Discounts
Options are:
-
NO (default)
Discounts are calculated based on your setup. The results are read-only. -
YES
The program calculates discounts, but you can edit or delete them.
-
-
If you make changes to the override options, click Save again.
The fields are updated with your changes.
Creating a credit invoice
There are three types of credit invoices. Each type is based on the process you use to create them:
-
Direct sale credit invoices
These invoices return or credit the money a customer paid through a direct sale. They also identify items that must be returned to inventory.
-
Repair order (RO) credit invoices
These invoices refund customers for goods and services purchased through an RO.
-
RO credit/re-bill invoices
These invoices correct RO billing errors. For example, if you charged an RO invoice to the wrong customer, you would use a credit/re-bill invoice to credit the first customer and re-bill the invoice to the correct customer.
To create any credit invoice, the original invoice must meet three criteria. The invoice must:
-
Have an order
-
Have a customer
-
Be in CLOSED status
|
The program closes any credit invoice by default after you create it. If you need to, you can reopen the credit invoice. |
Creating a direct sale credit invoice
To create a direct sale credit invoice:
-
Do one of the following:
-
Go to Menu > Orders > Invoices Listing.
-
Click Invoices on the Landing page.
The Invoices Listing page opens.
-
-
In Command bar, click Create Invoice.
The Invoice page opens. -
Enter the Shop code and press TAB, or click
Search to find a shop.
Once you enter the shop, the program completes the fields below.Required field: *
Invoice Number *
The next available invoice number
You can edit the Invoice Number, but you must use numbers only.
Invoice Date *
The current date and time
You can change the date and/or time if you want.
Status
Open (default)
-
Complete the remaining invoice header fields:
Required field: *
Customer *
Enter the Customer or click
Search to find a customer.Invoice Type *
Select Contract from the drop-down list.
The Unit field is displayed.Unit *
Enter the Unit number or click
Search to select the Unit.Price Table *
Select Maintenance Contract from the drop-down list.
Purchase Order
If applicable, enter the customer’s purchase order number in the Purchase Order field.
Bill to Customer *
The program enters the same shop as you entered in the Shop field.
-
Click Save.
The program saves the invoice header information. -
Add lines to the invoice.
Once you have added lines, the program calculates the appropriate taxes and fees. At that point, you can return to these override fields and decide whether to use them:Override Taxes
Options are:
-
NO (default)
Taxes are calculated based on your setup. The results are read-only. -
YES
The program calculates taxes, but you can add, edit, or delete them.
Override Fees
Options are:
-
NO (default)
Fees are calculated based on your setup. The results are read-only. -
YES
The program calculates fees, but you can add, edit, or delete them.
Override Auto Discounts
Options are:
-
NO (default)
Discounts are calculated based on your setup. The results are read-only. -
YES
The program calculates discounts, but you can edit or delete them.
-
-
If you make changes to the override options, click Save again.
The program saves your changes and updates the appropriate fields.
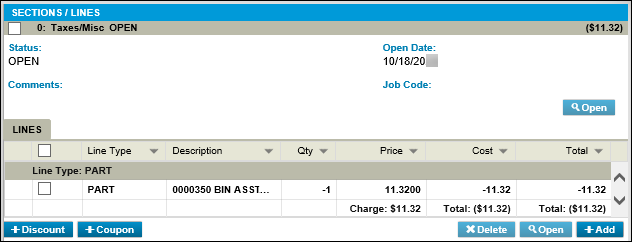
Note: Because you are creating a credit invoice, the page displays all costs and totals as negative numbers, such as -11.32, or encloses the figures with parentheses, such as Total: ($11.32).
This illustration shows the Sections/Lines pane of a credit invoice. The Taxes/Misc section shows a total of ($11.32), meaning a credit of $11.32.
The Part line shows a quantity (Qty) of -1 because the part is being returned to inventory. The Price column shows $11.32 because that is the price of the part. The Cost column shows the credit as -11.32 with a total of ($11.32).
Creating a credit RO invoice
An RO credit invoice:
-
Reverses the original repair order.
-
Creates a credit invoice for the customer.
|
When you credit an RO invoice, you must credit the entire RO invoice. After you create it, you can edit it to remove any items that should not be credited. For example, assume you created an RO invoice for six new tires (parts) and tire installation (service). The customer shows you that one of the tires is defective. You create a credit invoice for the entire RO invoice. Then you edit the credit invoice to remove five of the tires and the installation service. The credit invoice now credits the customer for the one defective tire. |
To create an RO credit invoice:
-
Do one of the following:
-
Go to Menu > Orders > Invoice.
-
Click Invoices on the Landing page.
The Invoices Listing page opens.
-
-
Highlight the row of an RO invoice from the list.
The Credit button in the Command bar becomes active. -
Click Credit.
The Credit Order window displays a confirmation message: "Are you sure you want to Credit order repair order number?" -
Do one of the following:
-
Click OK to create the credit invoice.
The Credits & Re-bills For Order window opens. The window contains the previous RO invoice number and the invoice number for the Credit invoice you just created. The window also displays the amount being credited back to the customer.Be sure to note the new credit invoice number for your records.
-
Click Cancel to close the Credits & Re-bills For Order window.
-
-
Click Cancel if you do not want to create the credit invoice.
The application returns to the Invoices Listing page.
-
Creating an RO credit/re-bill invoice
Creating a credit/re-bill invoice works much the same as an RO credit invoice with one additional step. An RO credit/re-bill invoice:
-
Reverses the original repair order.
-
Creates a credit invoice for the customer.
-
Recreates the repair order—with all the details of the original—except with your corrected data: a new customer, a new unit, or both, depending on your selections.
To create an RO credit/re-bill invoice:
-
Do one of the following:
-
Go to Menu > Orders > Invoice.
-
Click Invoices on the Landing page.
The Invoices Listing page opens.
-
-
Highlight the row of an RO invoice from the list.
The Re-Bill button in the Command bar becomes active. -
Click Re-Bill.
The Re-Bill Order window opens. The title bar displays the re-bill order number and the invoice total. -
Make changes to the following fields as needed.
Required field: *
Bill-to *
If applicable, enter a new Bill-to customer, or click
Search to find a customer.This customer is the one who receives the new bill (that is, the re-bill). If you are changing the invoice only because the wrong unit was billed, do not change the Bill-to customer.
Customer *
This customer is the one who receives the credit. If you are changing the invoice only because the wrong unit was billed, this customer also receives the new bill if there is a difference in cost.
Unit *
If applicable, enter the Unit number or click
Search to select the unit.Invoice Date *
The program enters the current date and time.
You can change the date and/or time if you want.
-
Do one of the following:
-
Click Re-Bill to create the credit and re-bill invoices.
The Credits & Re-bills For Order window opens. The window contains the previous RO invoice number and the invoice number for the credit invoice you just created. The window also displays the amount being credited back to the customer.-
Click Cancel to close this window.
Be sure to note the new credit invoice number for your records.
-
-
Click Cancel if you do not want to create the credit invoice.
The application returns to the Invoices Listing page.
-
-
Go back to the Invoices Listing page and confirm that the credit invoice you just created displays in the list.
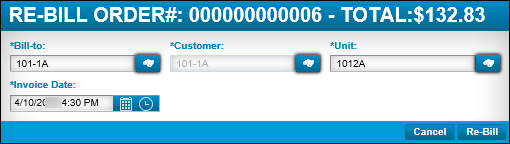
The illustration below shows a Re-Bill Order window. In this example, the user invoiced the correct customer, but charged them for the wrong unit. The user leaves the Bill-to and Customer fields the same (101-1A), but corrects the Unit from 1012B to 1012A. Now the user is ready to click Re-Bill and correct the mistake.
Creating a direct sale invoice
You can create a direct sale invoice for over-the-counter part sales, as well as labor and services sales that you cannot charge on a repair order.
To create a direct sale invoice:
-
Do one of the following:
-
Go to Menu > Orders > Invoice.
-
Click Invoices on the Landing page.
The Invoices Listing page opens.
-
-
In the Command bar, click Create Invoice.
The Invoice page opens. -
Enter the Shop code and press TAB, or click
Search to find a shop.
Once you enter the shop, the program completes these fields:Required field: *
Invoice Number *
The next available invoice number
You can edit the Invoice Number, but you must use numbers only.
Invoice Date *
The current date and time
You can change the date and/or time if you want.
Bill to Customer *
The same shop you entered in the Shop field.
You can change the Bill to Customer if you want.
Status
Open (default)
-
Complete the remaining invoice header fields:
Required field: *
Customer *
Enter the Customer or click
Search to find a customer.Invoice Type *
Select Direct Sale from the drop-down list.
The Unit field may be displayed based on your setup.Unit *
If applicable, enter the Unit number or click
Search to select the unit.Price Table *
Select the appropriate price table from the drop-down list.
Purchase Order
If applicable, enter the customer’s purchase order number in the Purchase Order field.
-
Click Save.
The program saves the invoice header information. -
Add lines to the invoice.
Once you have added lines, the program calculates the appropriate taxes and fees. At that point, you can return to these override fields and decide whether to use them.Override Taxes
Options are:
-
NO (default)
Taxes are calculated based on your setup. The results are read-only. -
YES
The program calculates taxes, but you can add, edit, or delete them.
Override Fees
Options are:
-
NO (default)
Fees are calculated based on your setup. The results are read-only. -
YES
The program calculates fees, but you can add, edit, or delete them.
Override Auto Discounts
Options are:
-
NO (default)
Discounts are calculated based on your setup. The results are read-only. -
YES
The program calculates discounts, but you can edit or delete them.
-
-
If you make changes to the override options, click Save again.
The program saves your changes and updates the appropriate fields.
For more information, see Tax rates and fees.
|
Direct sales invoices share a special feature with repair order invoices: You can override a customer’s credit limit. These two invoice types are the only ones where you can override a credit limit. For details, see Application Options: Invoicing. |
Creating a fuel ticket invoice
As customers create fuel tickets, each fuel ticket is added to the Fuel Ticket Listing page. From this page, you can batch specific fuel tickets together and create an invoice.
To create a fuel ticket invoice:
-
Go to Menu > Orders > Fuel Tickets Listing.
-
In the Invoice? column, select the checkbox for each fuel ticket you want to include on this invoice.
-
In the Command bar, click Create Invoice.
A system message opens stating, "Fuel Invoice: number created successfully!"
The Invoice column displays the new invoice number.
Show me
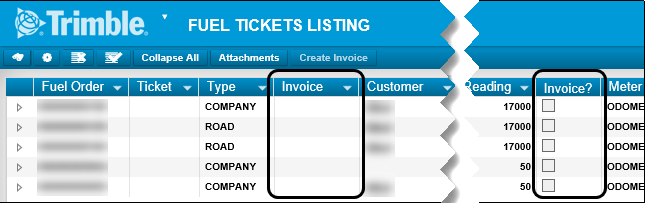
The illustration below shows the two invoice columns on the Fuel Tickets Listing page. Of the five fuel tickets listed, you can only create invoices for four of them. The fourth ticket has no customer, so you cannot create an invoice from this ticket. Once you select the fuel tickets you want to invoice, you click Create Invoice. When you are finished, the first Invoice column displays the invoice number(s).
|
For details on fuel tickets, see Fuel Data Import.
Creating an invoice from a repair order
The sections in a repair order (RO) must be billable if you want to create an invoice from them. You must set RO sections to billable when you set up the Invoicing module. When your RO sections are billable by default, the program creates an invoice from the RO as soon as you change the RO status to closed and posted.
To make RO sections billable:
-
Go to Menu > Setup > Options > Application Options.
-
Under the Category grid on the left, select Invoicing.
-
In the Options grid on the right, locate the Default Billable to Y On Repair Order Sections option.
-
Toggle this option to YES (if not already selected).
When you select YES at the Application level, the program sets the Customer level to YES too. Every section of an RO for those customers will have Billable selected. Sections marked billable are the only sections that users can invoice.
Note: Other users can change the Default Billable to Y On Repair Order Sections option at the Customer level. If this happens, the program does not keep the Application and Customer options synchronized.
For more information about the Invoicing option, see Customer options: Invoicing or Application options: Invoicing.
To create an invoice from a repair order:
-
Go to Menu > Orders > Repair Order Listing.
-
Select a repair order with a customer and at least one section marked billable.
-
Review the repair order and validate your details (Labor, Parts, Service Lines, whether PO is required, Odometer requirement, and so on) to make sure requirements are met.
-
If you want, you can change the Bill to Customer.
Sometimes you want to bill a customer who is different from the customer linked to the invoice unit. In this case, you can change the Bill to Customer to match the true customer.
-
Depending on your setup, closing or completing the repair order prompts the program to create an RO invoice.
The program only creates the invoice once. For example, if your program is set to create an invoice when the RO is closed, the program does not duplicate that invoice when the RO is complete. You can regenerate an RO invoice if you make changes to the RO.
|
RO invoices share a special feature with direct sales invoices: You can override a customer’s credit limit. These two invoice types are the only ones where you can override a credit limit. For details, see Application Options: Invoicing. |