Creating a unit record
You use the Units page to set up all pertinent information for tracking units. When you create a repair order, you must assign units to that order. Before your shop can make repairs to a unit, you must first create that Unit master record.

The system supports three unit categories:
-
Company units (full units)
-
Non-company units (retail units)
-
Miscellaneous units
For details on units and unit categories, see Unit categories.
To create a unit record:
-
Go to Menu > Masters > Units.
The Units page opens and displays information about the first record automatically.Show me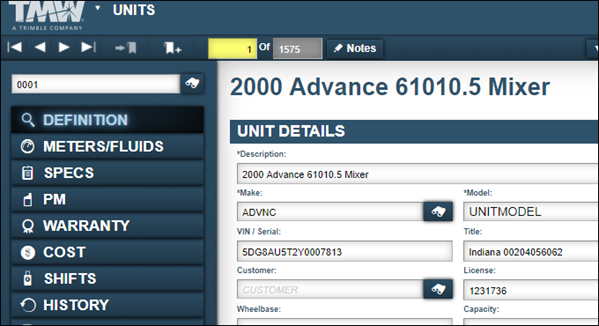
-
Click Add New.

The Add New Unit window opens.
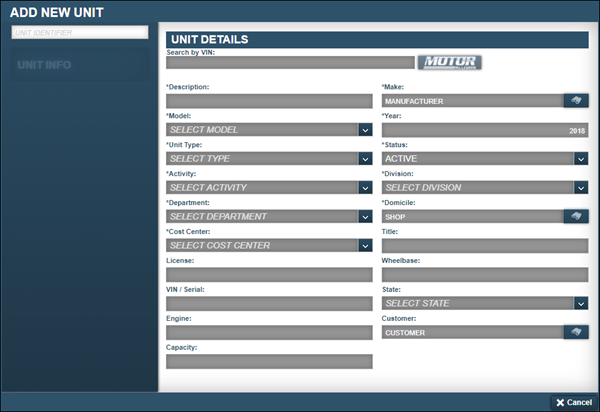
-
In the Unit Identifier field, enter the new unit’s ID and press ENTER.

The system activates the Unit Info tab and enables the fields in the Unit Details section.
-
Do one of the following:
-
If your company has the Motors module:
-
Enter the unit’s VIN number in the Search by VIN field.
-
Click the MOTOR ALLDATA icon.

Notes:
-
If you entered an incorrect VIN number, the system displays an error message that states, "No matching VIN in the system at this time!"
-
As of V.2020.1, the Motors module is no longer supported.
The system retrieves unit information based on the VIN number and then fills the following fields:
-
Description
-
Make
-
Model
-
Year
-
VIN/Serial
-
Engine
-
-
-
Go to Step 5.
-
-
If your company does not have the Motors module, go to Step 5.
-
-
In the Unit Details section, make entries in all required fields.
You can enter values in other fields as needed.Note: If you enter a customer ID in the Customer field, the system assigns the unit to that customer as a company unit.
Required field: *
Field Definition Description *
Unit’s description
Note: You can enter up to 60 alphanumeric characters.
Make *
Unit’s manufacturer
Model *
Manufacturer’s model number
Year *
Year the unit was manufactured
Note: This field defaults to the current year.
VIN / Serial
Serial number or Vehicle Identification Number (VIN)
Title
Title document number
Engine
Engine type
Note: The system recognizes D-466, D466, and D 466 as three different engine types.
Customer
Customer assigned to unit
Note: The system will disable this field if the unit is a non-company unit.
License
License plate number or other identification
State
State where the unit is licensed
Wheelbase
Distance between axles on the unit
Note: The system recognizes 110, 110", and 110 In. as three different wheelbases.
Capacity
Unit’s capacity
Note: The system recognizes 80000, 80,000, and 80K as three different capacities.
Last Modified By
User who last modified the record
-
When you are finished, click Save.
The system creates the new record and returns you to the Units page.To close the window without saving your changes, click Cancel.
Cloning a unit record
You can use the Clone Unit feature to assist with unit creation. When you clone a unit, the system copies information from an existing unit record, and it creates a new unit record.
To clone a unit record:
-
Go to Menu > Masters > Units.
The Units page opens. -
Do one of the following:
-
In versions prior to 2018.1, click the
 Clone icon and then select Clone Existing Unit.
-
In versions 2018.1 and after, click the drop-down arrow next to Add New and then select Clone Existing Unit.
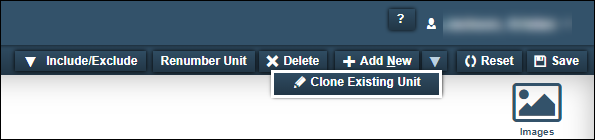
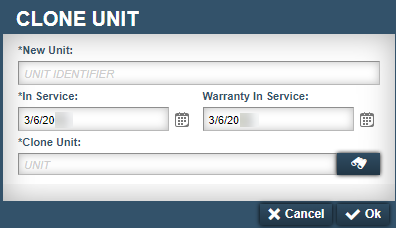
The Clone Unit window opens.
-
-
In the New Unit field, enter the new unit’s ID.
Note: If you entered an incorrect unit ID number, the system displays an error message that states, "ABC is not a valid unit." Click OK to close the message window. -
In the In Service field, enter the effective date for the new unit.
Note: This field defaults to today’s date. -
If applicable, in the Warranty In Service field, enter the effective date of the warranty.
Note: This field defaults to today’s date. -
In the Clone Unit field, enter the ID of the unit that you want to clone.
Note: You can use the Search feature if you do not know the unit’s ID number. -
Click OK.
The system creates the new record and returns you to the Units page.To close the window without saving your changes, click Cancel.