Working with purchase orders
A purchase order (PO) is a commercial document and first official offer issued by a buyer to a seller, indicating types, quantities, and agreed prices for products or services from external suppliers. You use purchase order pages to create, receive, view, and close POs.
Setting Application options for vendor-supplied parts
Vendor-supplied parts are supplied and installed by a third-party vendor.
Before you can add vendor-supplied parts to a standard or blanket purchase order, you must set your Application Options.
-
Go to Menu > Setup > Options > Application Options.
The Application Options page opens. -
In the Category section, click Purchasing.
A list of options is displayed on the right. -
Toggle the Do Not Allow Vendor Parts on POs option to NO.
This lets you add the vendor-supplied part to your purchase order. -
Click Save.
The System Message window opens. It confirms that your changes are saved. -
Click OK.
Adding vendor-supplied parts to a purchase order
-
In the Receipts section, on the Lines tab, click Add.
The Create New Line window appears. -
Enter the Line Type as Part.
-
Toggle the Vendor Supplied option to YES.
-
Enter the Part Number.
-
Press TAB.
If the vendor-supplied part you entered has an active record for the Shop and Vendor in the Vendor Parts Catalog, the part entry continues normally.If the vendor-supplied part you entered is not in the Vendor Parts Catalog, the Confirm message window opens. It asks, "Part Number Vendor Part record not found. Create?" For details, see Adding vendor-supplied parts to a purchase order On The Fly.
-
In the Create New Line window, enter the Quantity.
-
Enter the Repair Order / Section fields.
-
If you are entering additional line items for the same repair order/section combination, toggle the Use on next option to YES.
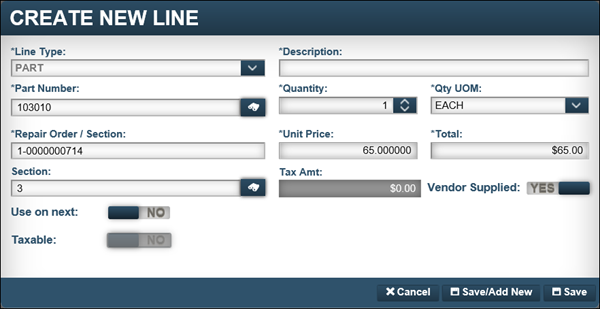
-
Do one of the following:
-
Click Save.
The part is added to the purchase order and the Create New Line window closes. -
Click Save/Add New.
The part is added to the purchase order and a new Create New Line window is displayed. -
Click Cancel.
The Create New Line window closes with no changes.
-
Adding vendor-supplied parts to a purchase order On The Fly
If the vendor-supplied part you entered is not in the Vendor Parts Catalog, you can add the part using the Vendor Part On The Fly window.
-
In the Receipts section, on the Lines tab, click Add.
The Create New Line window appears. -
Enter the Line Type as Part.
-
Toggle the Vendor Supplied option to YES.
-
Enter the Part Number.
-
Press TAB.
The Confirm message window opens. It asks, "Part Number Vendor Part record not found. Create?" -
Click OK.
The Vendor Part On The Fly window opens.Show me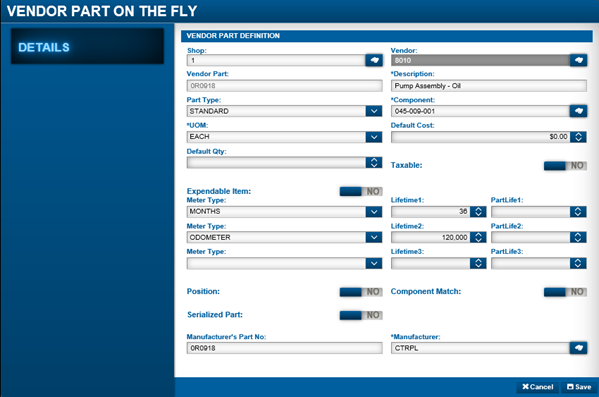
-
Complete the fields for a new Vendor Parts Catalog record:
Field definitionsRequired field: *
Read-only field: §
Shop Shop ID Already entered from the purchase order process Vendor §
Vendor ID
Already entered from the purchase order process
Vendor Part §
Part number
Already entered from the purchase order process
Description *
Part description
Part Type
Part category type
Default is Standard, change if needed.
Component *
Component code
UOM *
Unit of measure
Default Cost
Default cost for the individual part
Default Qty
Quantity being purchased
Taxable
Toggle the Taxable option based on whether the part is taxable.
-
Taxable
Toggle option to YES. -
Non-Taxable
Toggle option to NO.
Expendable Item
Toggle the Expendable Item option based on warranty parameters.
-
Part under warranty
Toggle the option to NO. -
Part has no warranty
Toggle the option to YES.
Meter Type
If the part is under warranty, there are three fields to select a meter type for warranty tracking purposes.
Note: You do not need to make entries in all three fields. Use the Meter Type 1 field first.
If the Expendable Item option is set to YES, the Meter Type fields become inactive.
Lifetime1-3
Length of time of the warranty parameters, based on the Meter Type selected
If the Expendable Item option is set to YES, the Lifetime fields become inactive.
PartLife1-3
Expected part life based on the Meter Type selected
If the Expendable Item option is set to YES, the PartLife fields become inactive.
Position
A position is required before the part can be charged
-
Position required
Toggle the option to YES. -
Position not required
Toggle the option to NO.
Component Match
The component code of the part must match the component code of the repair order section
For example, if the part component code is 034-001-001, the section component code must be 034 or 034-001 before you can charge the part on that section.
Serialized Part
Part is a serialized item
If the Application option
[Inventory] Track Serial Numbers For Serialized Partsis set to NO and this option is set to YES for a part, when the part is entered, the Serialized Parts window appears. A serial number is required when charging the part to a repair order. If the Application option[Inventory] Track Serial Numbers For Serialized Partsis set to NO, you are required to select a serial number when charging a part out on a repair order. You must also enter serial numbers when receiving the part to inventory. When a physical inventory adjustment is made, you must reconcile the on-hand serial numbers.Manufacturer’s Part No.
Manufacturer’s part number
Manufacturer *
Manufacturer of the part
-
-
Do one of the following:
-
Click Save.
The vendor parts catalog record is saved. -
Click Cancel.
The Vendor On The Fly window closes without saving your changes.
-
-
In the Create New Line window, enter the Quantity.
-
Enter the Repair Order / Section fields.
-
If you are entering additional line items for the same repair order/section combination, toggle the Use on next option to YES.
-
Do one of the following:
-
Click Save.
The part is added to the purchase order and the Create New Line window closes. -
Click Save/Add New.
The part is added to the purchase order and a new Create New Line window is displayed. -
Click Cancel.
The Create New Line window closes with no changes.
-
Adding items to a receipt
To add items to the Receipt section of a purchase order (PO):
-
Click Add.
The Create New Line window opens. -
Next to the Part Type field, click
 Search.
The Shop Inventory Search window opens.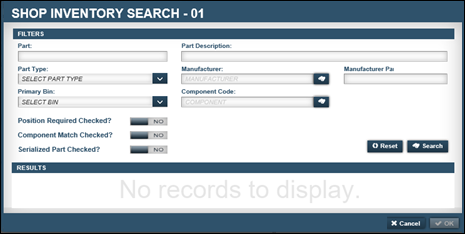
-
In the Part Type drop-down list, click the item you want to add.
-
Click Search.
-
Select the item from the Results list.
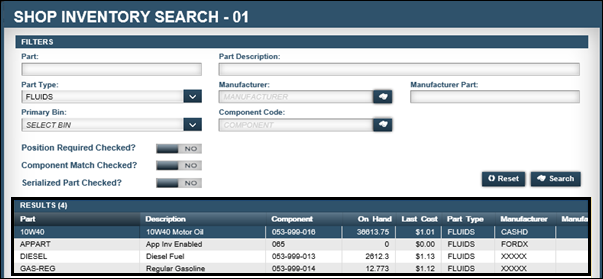
-
Click OK.
The Create New Line window opens. -
Select the Quantity of the additional item.
-
Do one of the following:
-
To add the one item to a receipt, click Save.
-
If you need to add more items to the receipt, click Save/Add New.
-
If you do not want to save your changes, click Cancel.
-
Viewing associated repair orders on a purchase order
You can view repair orders (ROs) that are associated with a purchase order (PO) in two ways:
-
Purchase Order Listing
-
Purchase Order
To view associated ROs on a PO:
-
Go to Menu > Orders > Purchase Order Listing.
The Purchase Order Listing page opens. -
Do one of the following:
View from Purchase Order Listing-
In the first column, click the arrow to expand the PO you want.
-
In the Action column, click the arrow to expand the details about each receipt.
If a line item on the PO is associated with an RO, the RO number is listed in the Repair Order column.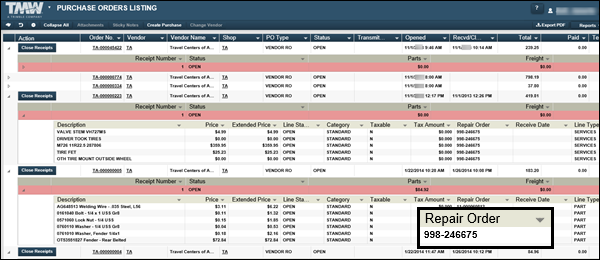
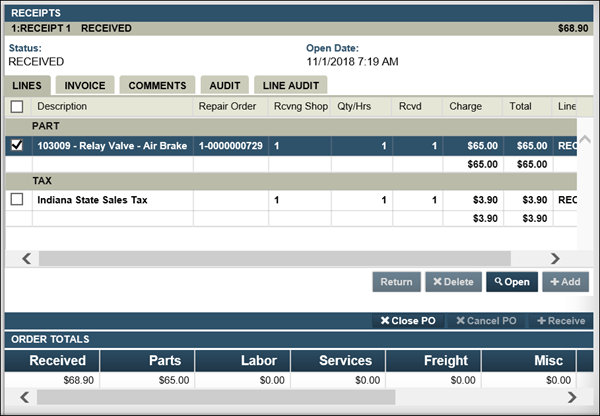
View within the Purchase Order-
Click the PO’s Order Number.
The Purchase Order page opens. -
Do one of the following:
-
Click the Repair Orders tab.
All ROs associated with the PO are displayed.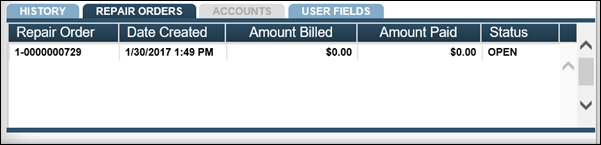
-
In the Receipts section, click a receipt.
Any associated ROs are listed in the Repair Order column for each line item listed.
Note: This step is only necessary if there are multiple receipts on the PO.
-
-
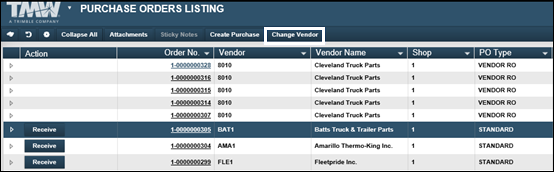
Changing a purchase order’s vendor
Sometimes, you may need to change the vendor on a purchase order. This can happen because the vendor was selected in error or because you have decided to place the order with a different vendor. You can change the vendor ID on the purchase order if these conditions are true:
-
The purchase order type is Standard.
-
There are no completed receipts on the purchase order.
To change the vendor ID on a purchase order:
-
Go to Menu > Orders > Purchase Order Listing.
The Purchase Order Listing page opens.
-
Select the purchase order on the listings page.
If the purchase order is standard with no completed receipts, the Change Vendor button is enabled. -
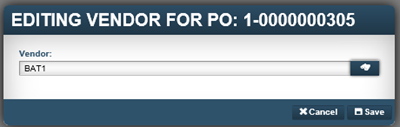
Click Change Vendor.
The Editing Vendor For PO: Purchase Order Number window opens. The Vendor field displays the current vendor assigned to the purchase order.
-
In the Vendor field, enter the new vendor ID.
-
Complete the action and close the window by clicking Save.
To cancel the action without saving your changes, click Cancel. This also closes the window.
Updating the paid amount on a purchase order
You can update the amount paid on a purchase order, regardless of its status. As long as an invoice is present, you can edit the paid amount.
To update the amount paid on a purchase order:
-
Do one of the following:
-
Go to Menu > Orders > Purchase Order Listing.
-
From the landing page, click Purchases.
The Purchase Order Listing page opens.

-
-
Click the Order Number with the paid amount you want to change.
The Purchase Order page opens.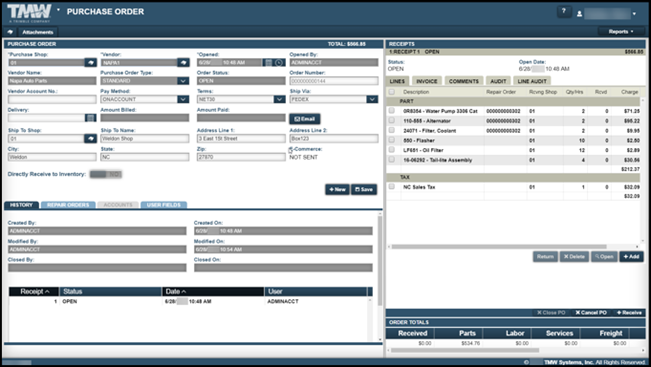
Note: If multiple receipts are available, click the receipt to update the amount paid.
-
In the Receipts grid, click Invoice.
The invoice information for the receipt is displayed.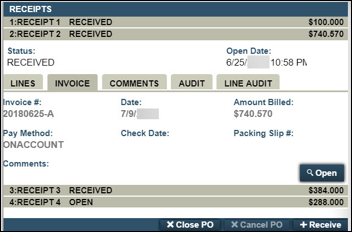
-
Click Open.
The PO # Purchase Order Number window opens.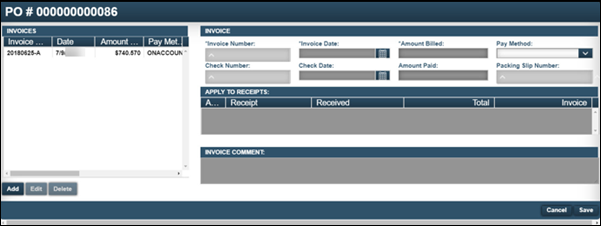
-
Click the invoice to apply the payment information.
The Edit and Delete buttons are enabled.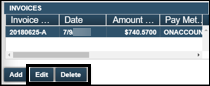
-
Click Edit.
-
Edit any of the following fields to update the payment information for this PO:
-
Check Number
-
Check Date
-
Amount Paid
-
-
Click Save.
The Receipts window refreshes. The Invoice tab shows the changed Check Date.
Printing purchase orders
To print purchase orders:
-
Go to Menu > Orders > Purchase Order Listing.
-
From the landing page, click Purchases.
The Purchase Order Listing page opens.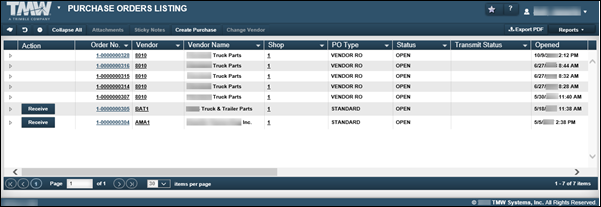
-
Click the Purchase Order you want to print.
-
In the top right of the Purchase Orders Listing page, click Reports.
A list of report options is displayed.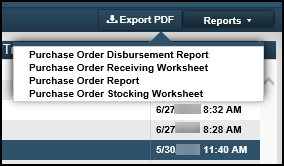
-
Click Purchase Order Report.
The Report Viewer window opens.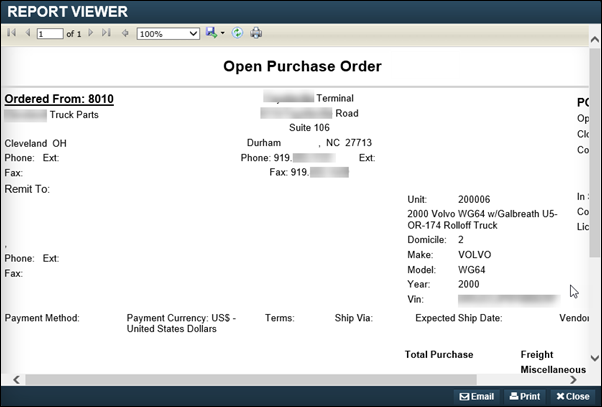
-
Click Print.
A message is displayed: "Do you want to open or save Purchase Order.pdf from database name?" -
Do one of the following (depending upon your browser):
Open-
Click Open.
The PDF opens. -
Click
 or go to File > Print.
Save-
Do one of the following:
-
Click Save.
The Purchase Order PDF is downloaded. Three options are displayed: Open, Open folder or View downloads. -
Click Save as.
The Save As window opens. You can select the location of where you want the PDF to download. Three options are displayed: Open, Open folder or View downloads. -
Click Save and open.
The Purchase Order PDF opens. You can print the PDF within the PDF interface.
-
-
After the PDF is opened, click
or go to File > Print.
Cancel-
Click Cancel if you no longer want to open or save the Purchase Order PDF.
The message closes. You are returned to the Report Viewer window.
-
-
Close the Report Viewer window.
Canceling purchase orders
To cancel a PO:
-
Go to Menu > Orders > Purchase Order Listing or from the landing page, click Purchases.
The Purchase Order Listing page opens. -
In the Order No column, click the Purchase Order you want to cancel.
The PO is displayed. -
In the Sections/Lines section, click Cancel PO.
The PO #0-0000000000 window opens. -
Do one of the following:
-
To cancel the PO, click Yes.
-
To keep the PO, click No.
-