Understanding reason codes
Reason codes are based on the VMRS reason for repairs codes (Code Key 14) managed by The Maintenance Council (TMC).
Reason codes represent how an issue was reported.
Reason codes are used when creating a repair order (RO) section and in shop and unit reporting as a potential filter.
They can be filtered by component code.
|
If reason codes are filtered by component code, they will be the only reasons for repair available on a RO Section for that component code. |
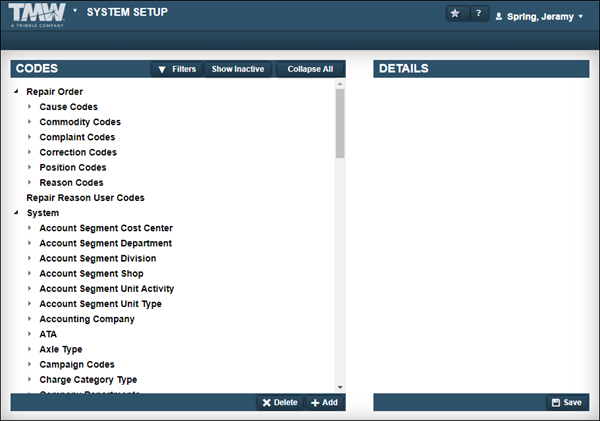
To manage reason codes, go to Menu > Setup > System Setup.
The System Setup page opens.
Adding reason codes
To add a new reason code:
-
Go to Menu > Setup > System Setup.
The System Setup page opens. -
In the Codes section, expand Repair Order.
-
Select Reason Codes.
The system displays the Mapping section. See Mapping reason codes for details. -
Click Add.
A temporary code called NEW: New Code is displayed under the parent Codekey and the Details section is displayed.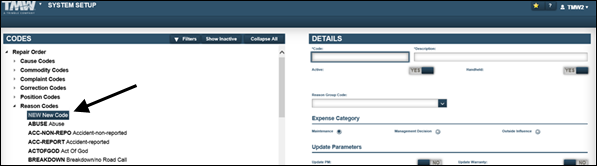
-
Enter the Code.
Note: The code is limited to 12 characters.
-
Enter the Description.
Note: The description is limited to 60 characters.
-
Do the following as needed:
-
To be available on the RO, the Active option must be set to YES.
-
To be available with the mobile computing add-on module, the Handheld option must be set to YES.
-
-
Select the Reason Group Code.
Note: Reason group codes must be created prior to being available on the reason code.
Field definitions
Accident
Code used for accident accounting disbursement rules
Maintenance
Code used for maintenance accounting disbursement rule
See Adding reason codes for accounting transactions (RCAT) for details.
-
Select the Expense Category.
Expense categories are used specific SSRS reports to help isolate costs.
Field definitions
Maintenance
Repairs for normal maintenance
Examples include:
-
PMs
-
Driver’s Reports
-
Breakdowns
Management Decisions
Repairs made based on management’s directives
Examples include:
-
Capital Improvement
-
Conversions
-
Modifications
Outside Influence
Repairs made due to an external force and unavoidable
Examples include:
-
Accidents
-
Acts of God
-
Vandalism
-
-
Specify the Update Parameters as needed.
-
Update PM
To have the PM updated, the Update PM option must be set to YES. When the RO Section is set to CLOSED, the PM Master will be updated.
-
Update Warranty
To have the warranty updated, the Update Warranty option must be set to YES. When the RO section is CLOSED, warranty records will be created.
-
-
Specify the User Defined Codes as needed.
See Specifying user defined repair reason codes for details.
-
Click Save.
The NEW: New Code is replaced with the code name and description.
Editing reason codes
|
Once a reason code has been created, you cannot edit the Code field. |
To edit an existing code:
-
Go to Menu > Setup > System Setup.
The System Setup page opens. -
In the Codes section, expand Repair Order.
-
Expand Reason Codes.
-
Select the code you want to edit.
-
Edit the fields as needed.
-
Click Save.
Deleting reason codes
|
Trimble does not recommend deleting reason codes. Instead, toggle the Active option to NO. |
To delete an existing code:
-
Go to Menu > Setup > System Setup.
The System Setup page opens. -
In the Codes section, expand Repair Order.
-
Expand Reason Codes.
-
Select the code that you want to delete.
-
Click Delete.
The Delete Code message window opens. It asks, "Are you sure you want to delete the selected code?"
-
Click Delete Code to delete the code and close the window.
Click Cancel to close the window without deleting the reason code.
Mapping reason codes
These rules apply when mapping reason codes to component codes:
-
If there are no reason codes mapped to a component code, all active component codes will be available for that component code.
-
If there are reason codes mapped to a component, those reason codes will be available when creating RO sections.
-
For PM component codes:
-
If the Application option
[Repairs: PMs] Validate Component Code Against PMs For That Unitis set to YES, the reason code list will populate with any reason codes that have Update PM set to YES, regardless of mapping. -
If the Application option
[Repairs > PMs] Validate Component Code Against PMs For That Unitis set to NO, then any reason codes mapped to the component code will be displayed.
-
-
The assignments work at a top level and filter down. So if a reason code is assigned at the System level, the assembly and part levels will automatically get that reason for repair.
For example, if ROADCALL is assigned as the only reason for repair to 034, then 034-XXX and 034-XXX-XXX codes will automatically get that code. Once a change is made at the assembly level, then only that level would have the different codes.
To map reason codes to component codes:
-
Go to Menu > Setup > System Setup.
The System Setup page opens. -
In the Codes section, expand Repair Order.
-
Select Reason Codes.
The Mapping section is displayed. -
In the Component field, enter the component code and press ENTER.
The Description field updates. -
Using a combination of the Shift and/or the Control keys, select the reason codes on the Available grid.

-
Click the
 Right Arrow.
The selected reason codes move to the Selected list.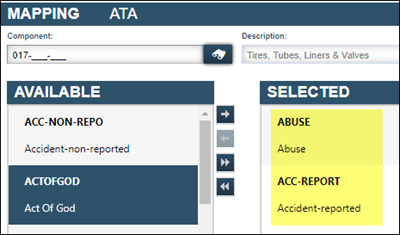
-
Repeat Steps 1-6 as needed.
Specifying user defined repair reason codes
You can define your own repair reason codes. These are called user-defined repair reason codes. You can assign your user defined repair reason codes to a reason code.
You can also set a code requirement to make it a condition that must be met before a users can close a RO.
To add a user defined repair reason code:
-
Go to Menu > Setup > System Setup.
The System Setup page opens. -
In the Codes section, expand Repair Order.
-
Expand Reason Codes.
-
Select the code needed.
The system displays the Details pane. -
In the User Defined Codes section, toggle the Prompt for Code option to YES.
The Code field and the Required option are enabled.
-
Do one of the following:
-
In the Code field, select the Code. Go to Step 7.
-
If there are no codes or no code that applies, click New Code.
The New Repair Reason User Code window opens.-
Enter the Code.
Note: The code field is limited to 12 characters.
-
Enter the code Description.
Note: The description field is limited to 60 characters.
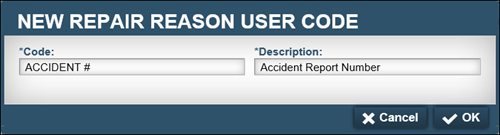
-
Click OK.
The new user code will be listed in the tree view under Repair Reason User Codes. It will be available for assignment to other reason codes.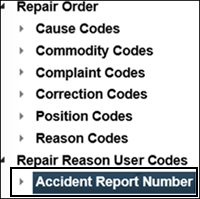
-
-
-
Do the following as needed:
-
If the code should be required when creating a RO section, toggle the Required option to YES. The option Required to Close RO enables.
-
If the code is required as a condition to close the order, the option Required to Close RO must be set to YES.
-
-
Click Save.