Working with parts in the Parts Catalog
Parts set up in the Parts Catalog are global parts. They are common to all shops. For example, 10W30 engine oil. The advantage of adding parts to the Parts Catalog is that you can add these parts to multiple shop inventories. Doing this ensures that all instances of a part have the same descriptive information. When you make changes to parts in the catalog, the system updates the changes in a shop’s inventory automatically.
The Parts Catalog provides a descriptive list of parts, for example:
-
Stock
-
Non-stock
-
Consignment
Before you can purchase or track a part in the system, you must add it to a shop’s inventory.
On the Parts Catalog page, you can:
-
Add parts to a local shop’s inventory
-
Renumber part records
-
Allow the system to use duplicate part numbers
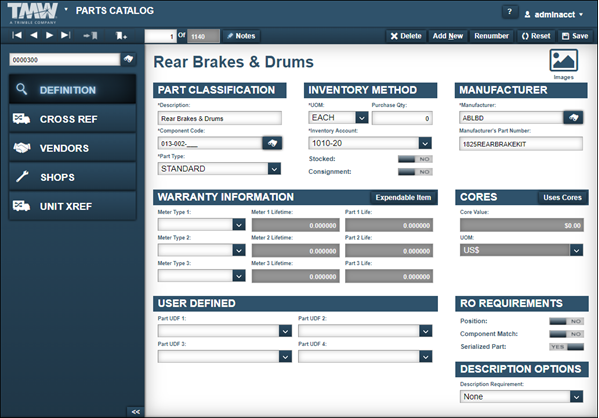
Opening a part in the Parts Catalog
To look up a part record:
-
Go to Menu > Masters > Parts Catalog.
The Parts Catalog page opens. -
In the Part field, enter the part’s ID and press ENTER.
The system displays information related to the part.
Adding parts to a local shop’s inventory
You use the Parts Catalog page to add parts to shop inventories. Before you can purchase or track a part in the system, you must add it to a shop’s inventory.
There are two ways to add parts to a local shop’s inventory.
-
To add multiple parts at one time, use the Add Parts To Local Inventory window.
-
To add a selected part to one or more local inventories, use the Add Current Part to Local Inventory window.
Adding multiple parts to a local shop inventory
To add multiple parts to a shop’s inventory:
-
Click the Shops tab.
The system displays the Shops Information section.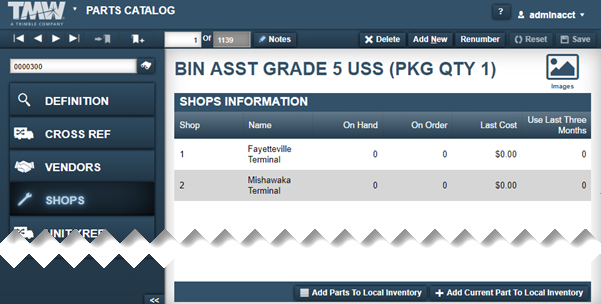
Note: Shop restrictions can affect the shops you can see. For details, see Shop Restrictions.
-
Click Add Parts To Local Inventory.
The Add Parts To Local Inventory window opens.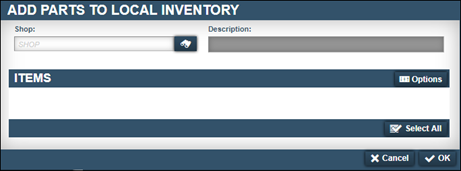
-
In the Shop field, enter the shop’s ID and press ENTER.
The Items section displays a list of available parts that do not exist in the selected shop’s inventory.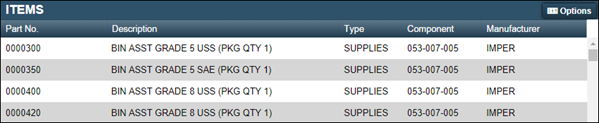
Notes:
-
Shop restrictions can affect the shops you can see and select. For details, see Shop Restrictions.
-
If you try to transfer parts a shop’s inventory and that shop does not have a default bin location, a system message window opens. It states, "Shop doesn’t have a default Bin, Please select another shop!"
-
-
If needed, narrow the list of available parts.
-
Click Options.
The Items section changes to display search categories.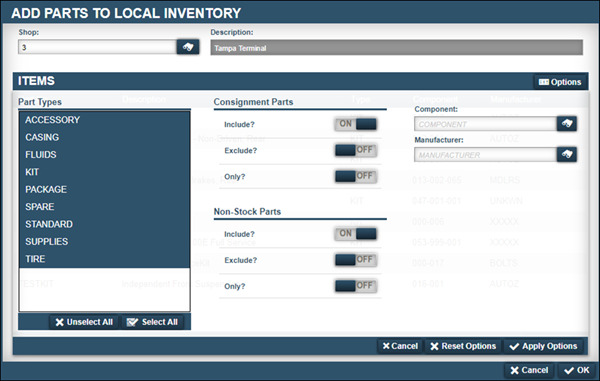
-
Use the search categories to narrow the list of available parts.
You can use the wildcard feature to narrow the list of parts. For details, see Understanding the wildcard feature.
You can use any combination of the following options.
-
Part Types section
Select the type of part or parts that you want to use in the search criteria. -
Consignment Parts section
Option Result Include?
Includes consignment parts in the parts list
Exclude?
Excludes consignment parts from the parts list
Only?
Include consignment parts only in the parts list
-
Non-Stock Parts section
Option Result Include?
Includes non-stock parts in the parts list
Exclude?
Excludes non-stock parts from the parts list
Only?
Include non-stock parts only in the parts list
-
Component field
Enter a component code in the Component field as needed. Use this option to filter the list by parts having a specific component code. -
Manufacturer field
Enter a manufacturer’s ID in the Manufacturer field as needed. Use this option to filter the list by parts having a specific manufacturer.
-
-
Click Apply Options.
The system displays a list of parts in the Items section based on your search criteria.To close the window and return to the list of parts, click Cancel.
To return to the default selections, click Reset Options and then click Options.
-
-
Select the part or parts that you want to add to this shop’s inventory.
Note: To select multiple parts, press and hold CTRL or SHIFT while selecting. -
Click OK.
An overlay message displays. It states that the parts were added to the shop’s inventory.To close the window without adding parts to the shop’s inventory, click Cancel.
Adding a selected part to one or more shop inventories
To add a selected part to a shop’s inventory:
-
Click the Shops tab.
The Shops Information section displays any shop inventories that include the selected part.Note: Shop restrictions can affect the shops you can see. For details, see Shop Restrictions.
-
Click Add Current Part To Local Inventory.
The Add Current Part To Local Inventory window opens.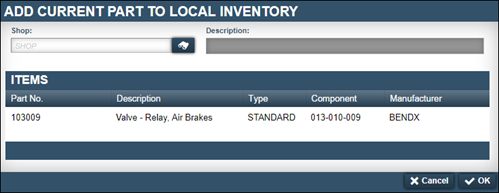
-
In the Shop field, enter the shop ID and press ENTER.
The Description field displays the shop’s description.Note: Shop restrictions can affect the shops you can see and select. For details, see Shop Restrictions.
-
Select the part record.

-
Click OK.
An overlay message displays. It states that the part was added to the shop’s inventory.
Renumbering part records
To renumber a part record:
-
Click Renumber.
The Renumber Part window opens.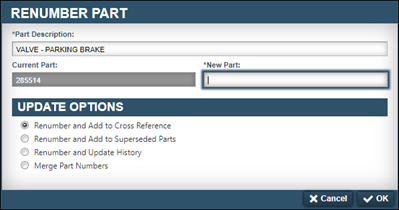
-
In the New Part field, enter the new part number.
Note: If the option
[Inventory] Use AMS Part Number For Manufacturer Numberis enabled, the system enters the new number in the part master record’s Manufacturer’s Part Number field automatically. -
In the Update Options section, select one of the following options:
-
Renumber and Add to Cross Reference
Use this option to renumber the part and add the old part number to the Cross Reference Information section in the part’s master record. The system updates open orders with the new part number. The change does not affect the part’s historical data. -
Renumber and Add to Superseded Parts
Use this option to:-
Create a new part with a new part number
-
Inactivate the original part and its part number
-
Add the old part and part number to the Superseded Parts list in the Cross Reference Information section of the new part’s master record. The system updates open orders with the new part information and number. The change does not affect the part’s historical data.
-
-
Renumber and Update History
Use this option to renumber the part. The old part number is added to the Cross References List in the Cross Reference Information section of the part’s master record. The system updates all orders with the new part number, regardless of status. -
Merge Part Numbers
Use this option to merge one part into another part. For example, you may have the parts 1308-D and 1308D in your Parts Catalog. With this option, you can consolidate both parts into one record and show 1308D as the part number.Notes:
-
When you select this option, the system merges all the Cross-Reference records, Vendor records, Cost records, Price records, and Cost History records found on the Parts Catalog Master and Shop Inventory Master into the selected destination part number at the catalog and shop level.
-
The system adds the part you eliminate (1308-D) to the Substitute Parts list in the Cross Reference Information section of the existing (1308D) part’s master record in the Parts Catalog.
-
The system updates open orders with the merged part description and part number. Closed orders remain unchanged.
-
Verify that the new kit includes the correct parts. If all the parts are in the new kit after the merge, delete the inactive part and adjust any quantities for the active part.
-
-