Working with Job Code assignments
All Job Codes must have at least one assignment before you can add them to repair orders.
Job codes can be assigned to any combination of Shop, Unit, Unit Type, Customer, Fleet, Estimated Time, SRT Time, and Flat Rate Time.
Creating Job Code assignments
-
Go to Menu > Setup > Order Setup > Job Code Definitions.
For versions earlier than V. 2020.2, go to Menu > Setup > Repair Order Setup > Job Code Definitions.
The Job Code Definition page opens. -
Select the Assignments tab.
By default, the Job Code Assignment sub tab is selected and the Job Code Assignments section is displayed. -
Select the needed Job Code.
Note: You must create Job Codes before creating Job Code assignments. For details, see Creating Job Codes.
-
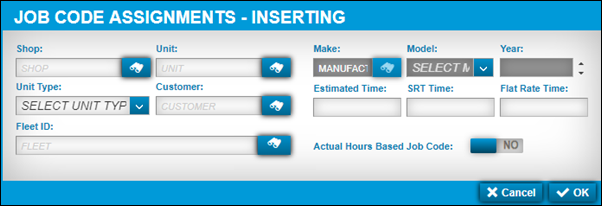
Click Add.
The Job Code Assignments - Inserting window opens.The Make, Model, and Year fields are read-only.
-
Make entries in the fields as needed.
For details about individual fields, see Job Code Assignment sub tab.
-
Click OK.
The assignment is associated with the Job Code. Expand the Job Code to see the associated assignments. -
Repeat Steps 3-6 to add more Job Code assignments.
If you want to close this window without saving your changes, click Cancel.
Editing Job Code assignments
You can edit existing Job Code assignments. When you edit an existing Job Code assignment, the system does not update existing repair order assignments. Only new assignments reflect the changes.
To edit Job Code assignments
-
Go to Menu > Setup > Order Setup > Job Code Definitions.
For versions earlier than V. 2020.2, go to Menu > Setup > Repair Order Setup > Job Code Definitions.
The Job Code Definition page opens. -
Select the Assignments tab.
By default, the Job Code Assignment sub tab is selected and the Job Code Assignments section is displayed. -
Expand the needed Job Code.
-
Select the needed Job Code assignment.
-
Click Edit.
The Job Code Assignments - Editing window opens.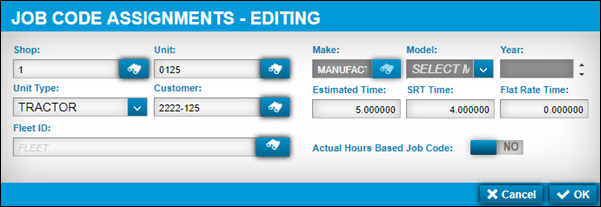
-
Make changes as needed.
-
Click OK.
The window closes and the page refreshes to display your changes.
If you want to close this window without saving your changes, click Cancel.
Deleting Job Code Assignments
If needed, you can delete a Job Code assignment. Deleting Job Code assignments does not affect existing repair order assignments.
To delete Job Code Assignments:
-
Go to Menu > Setup > Order Setup > Job Code Definitions.
For versions earlier than V. 2020.2, go to Menu > Setup > Repair Order Setup > Job Code Definitions.
The Job Code Definition page opens. -
Select the Assignments tab.
By default, the Job Code Assignment sub tab is selected and the Job Code Assignments section is displayed. -
Expand the needed Job Code.
-
Select the needed Job Code assignment.
-
Click Delete.
The Delete Job Code Assignment message window opens. It asks, "Are you sure you want to delete the Job Code Assignment?" -
Click Delete.
The Job Code assignment is removed from the Job Code.
If you want to close this window without saving your changes, click Cancel.