Shops master records
Shops are your repair facilities or the places where you perform work on units. Before setting up records for employees, units, and inventory, you must first create a shop master record. The system requires a shop number to create these master records.
You use the Shops page to:
-
Create, update, or remove shop records
-
Set up shop accounting and tax settings
-
View shop expenses
Go to Menu > Masters > Shops to open the Shops page.
Layout of the Shops page
This illustration shows the Shops page.
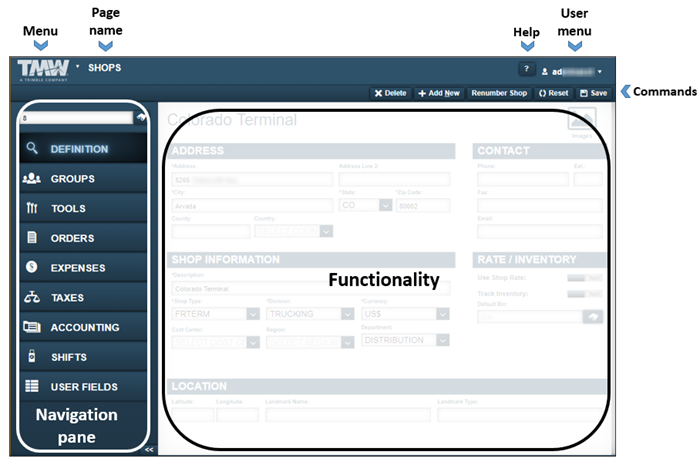
| Pages are designed so that menus and functionality areas appear the same way throughout the application. While some elements are not part of every page, the basic layout of the page is consistent. |
The Shops page provides easy access to the:
-
Menu that lists application menu items
-
User menu that lists user-specific menu items
-
Command buttons used to Add, Delete, Reset, and Save shop records
-
Functionality area where you to enter information into the system
-
Navigation pane that includes the Shop lookup field and the
 Search icon
The identification number used to look up a customer is user defined. You can enter up to 12 alphanumeric characters in this field.
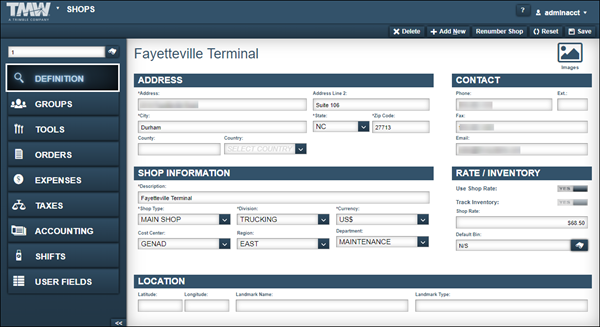
Definition tab
The Definition tab shows five sections: Address, Contact, Shop Information, Rate/Inventory, and Location.
Address
The Address section shows details about the shop’s physical location.
Required field: *
| Field | Definition |
|---|---|
Address * |
Shop’s physical address This address prints on invoices generated for this customer. |
Address Line 2 |
Shop’s secondary address (for example, Suite 300) |
City * |
Shop’s city location |
State * |
Shop’s state location |
Zip Code * |
Shop’s ZIP/postal code |
County |
Shop’s county location |
Country |
Shop’s country location |
Contact
The Contact section shows the shop’s phone, fax, and email information.
| Field | Definition |
|---|---|
Phone |
Shop’s main phone number |
Ext. |
Shop’s phone extension, if there is one |
Fax |
Shop’s fax number |
Shop’s email address |
Shop Information
The Shop Information section tracks data used mainly for reporting and accounting purposes.
Required field: *
| Field | Definition |
|---|---|
Description * |
Shop description The description should include the shop’s formal name. It appears in the Ship To section on purchase orders. |
Shop Type * |
Shop type (such as Main Shop with Parts, Plant without Parts, Satellite Shop - Limited Parts) Note: Your company determines the options available in this field. |
Division * |
Shop’s division of the company Company division associated with the shop. |
Currency * |
Shop’s default currency (such as US$, CN$) |
Cost Center |
Company cost center associated with the shop |
Region |
Shop’s geographical region |
Department |
Company department associated with the shop |
Rate/Inventory
Use this section to set up an invoicing rate for a shop.
| Field | Definition |
|---|---|
Use Shop Rate |
Determines whether the system displays the Shop Rate field, which is used to enter a shop rate value Options include:
|
Shop Rate |
Shop’s default labor rate per hour |
Track Inventory |
Connects or disconnects the Repair Order and Shop Inventory systems, allowing you to charge existing parts to a repair order Options include:
|
Default Bin |
Specifies the shop’s default bin location Note: This field applies to parts created in the Shop Inventory and not the Parts Catalog. |
Location
Use this section to enter Global Positioning System (GPS) coordinates and landmark information for the shop.
| Field | Definition |
|---|---|
Latitude |
North-south position of a point on the Earth’s surface |
Longitude |
East-west position of a point on the Earth’s surface |
Landmark Name |
Name of the location, for example Repair Shop 020-15A |
Landmark Type |
Recognizable natural or artificial feature used as a navigation landmark (such as a mall or repair shop) |
Groups tab
The Groups tab displays the Groups Information section. This section lists the current Cost Center, Department, Division, and Region to which the shop is assigned.
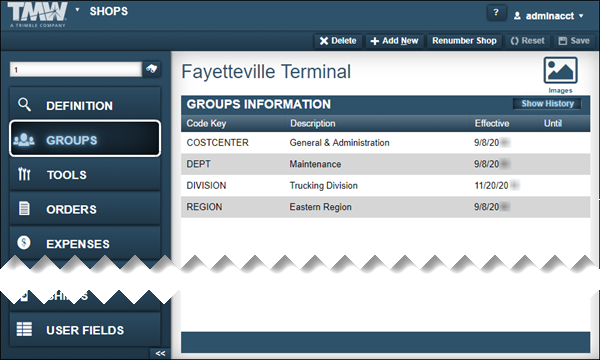
Click Show History to view a list of current and past group assignments.
| Field | Definition |
|---|---|
Code Key |
Identifies the Code Key |
Description |
Code Key’s description |
Effective |
Date the shop was added to the group |
Until |
Date the shop was removed from the group |
Tools tab
The Tools tab includes two sections: Filters and Tool Inventory. Use the fields in these sections to search for the technician’s tools or show a list of tools assigned to the technician.
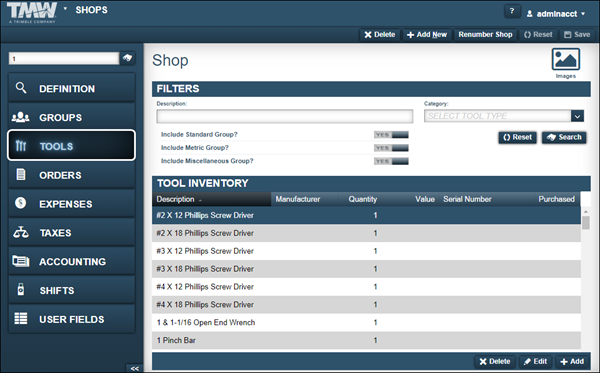
Filters
Use this section to search for the technician’s tools. You can enter filters to limit your search results.
| Field | Definition |
|---|---|
Description |
Enter a keyword from the tool’s description in this field to search for parts in the tools catalog. Note: The key to searching from the Description field is to use consistent terminology when naming parts. For example, you can search for a hammer using the keyword hammer, or the keywords, hammer type sledge, ball peen or claw. Include the keywords you want to search by in the part’s description. |
Category |
Use this field to search for a tool based on its assigned category. There are over 25 category options such as, Screwdriver, Hammers, Wrench, and 1/2 Drive. |
Include Standard, Metric, and Miscellaneous Groups |
All tools must belong to one of these three groups. To remove a group as a search filter, toggle the option to NO. |
Tool Inventory
This section contains a list of all the tools assigned to the technician.
| Field | Definition |
|---|---|
Description |
Tool’s description |
Manufacturer |
Tool’s manufacturer |
Quantity |
Quantity of a particular tool assigned to the shop |
Value |
Tool’s price |
Serial Number |
Tool’s serial number |
Purchased |
Date the tool was purchased |
Orders tab
The Orders tab shows two sections: Order Information and Invoicing Options. Use the Orders tab to control the next order number for all order types and invoicing options. The invoicing options function only when you install the Invoice module. You can:
-
Control the automatic order number generation for each order type
-
Modify the prefix and order count by entering your change in the appropriate field
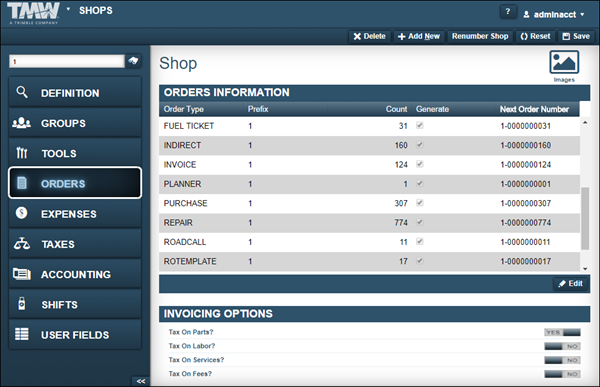
Orders Information
The Orders Information section shows a list of the shop’s orders, and includes information such as the order type and count.
| Field | Definition |
|---|---|
Order Type |
Type of order for which the number is generated Options include:
|
Prefix |
Alphanumeric field consisting of a prefix with a maximum of four characters preceding the order number Note: Typically, the order number has 12 characters. This prefix reduces the length of the numeric portion of the order number by the number of characters in the prefix, plus one character for a hyphen. For example, the order number 000000000001 with a prefix of *EAST*, becomes EAST-0000001. |
Count |
Displays a preview of the next order number or it is blank Note: If the Generate checkbox is cleared, this field is blank. |
Generate |
Specifies whether order numbers are generated automatically or manually
|
Next Order Number |
Identifies the next order number Note: If the Generate checkbox is cleared, this field is blank. |
Invoicing Options
Use the Invoicing Options section to specify whether to apply a tax on parts, labor, services, and fees.
Toggle the options as needed.
| Field | Definition |
|---|---|
Tax On Parts? |
Apply tax on parts |
Tax On Labor? |
Apply tax on labor |
Tax On Services? |
Apply tax on services |
Tax On Fees? |
Apply tax on fees |
Expenses tab
The Expense tab shows two sections: Date Range and Expenses. You use the Expense tab to generate the total Expenses by Order Type and Charge Category for a particular date range.
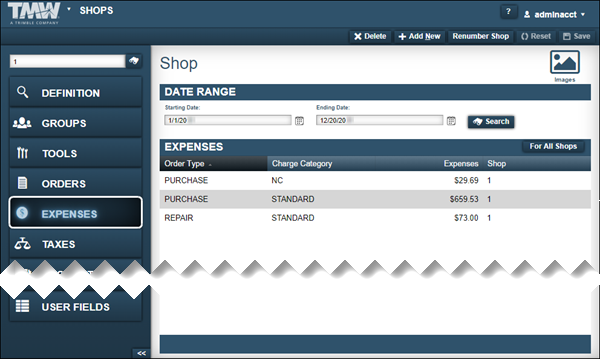
Date Range
Use the Date Range section to filter expense records based on a specific date range.
| Field | Definition |
|---|---|
Starting Date |
Start date of an expense report |
Ending Date |
End date of an expense report |
Expenses
The Expenses section shows a list of a shop’s expense records. To view expenses for all of your shops, click For All Shops.
| Field | Definition |
|---|---|
Order Type |
Type of order (such as Repair, Fuel, Indirect) |
Charge Category |
Assigned expenses for an order type (such as Standard, Direct) |
Expenses |
Total dollar amount for an Order Type and Charge Category |
Shop |
Shop ID that incurred the expense |
Taxes tab
The Taxes tab shows the Tax Information section. You can set up or change a shop’s tax method and/or tax rates for invoicing or purchasing. If you want to use the shop’s taxes for purchasing, set Use Shop tax Instead Of Vendor Tax=YES.
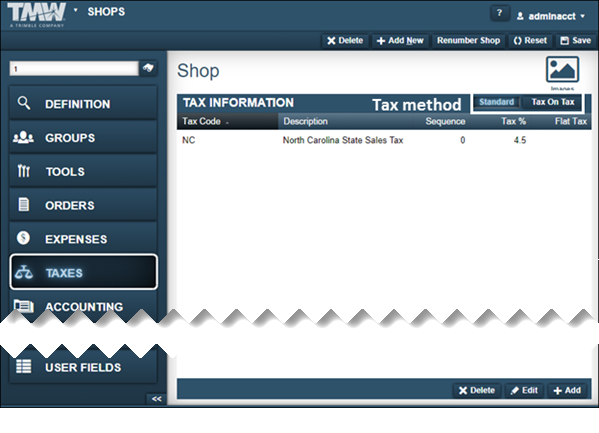
The system supports two tax methods:
-
Standard
Taxes are calculated separately and then added together for a total. -
Tax On Tax
Taxes are calculated in a sequential method based on the value in the Sequence field. The tax rate with a one (1) in the Sequence field is calculated first and then that tax is added to any rate with a two (2) in the Sequence field. The system continues adding tax rates together for all sequences.
Required field: *
| Field | Definition |
|---|---|
Tax Code * |
Tax Code ID |
Description |
Tax Code ID description Note: The system fills this field automatically based on the value in the Tax Code field. |
Sequence |
Order in which taxes are calculated when using the Tax On Tax method |
Tax % |
Tax rate as a percentage Note: This field is blank if the tax code uses the Flat Tax option. |
Flat Tax |
Tax rate as a flat rate Note: This field is blank if the tax code uses the Tax % option. |
Accounting tab
The Accounting tab includes two sections: Accounts Payable and Accounts Receivable.
Use this tab to associate payment methods for Accounts Payable and Accounts Receivable transactions with specific accounts. You use the Payment Method window to specify a payment method.
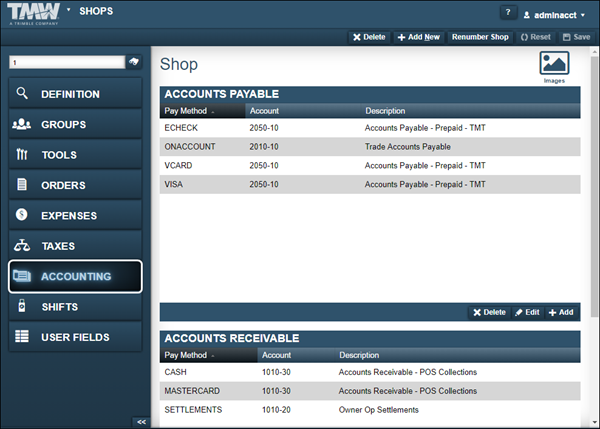
Accounts Payable
Use the Accounts Payable section to record a shop’s method for sending payment to vendors and suppliers for items and services received on credit. This feature is available for purchase orders only at the following levels:
-
Blanket
-
Credit
-
Standard
-
Vendor RO
If a payment method is not provided and the Use Payment Account option is set to YES, the disbursement will roll to the purchase level transaction.
Required field: *
| Field | Definition |
|---|---|
Shop |
Defaults to the shop’s ID |
Shop Name |
Defaults to the shop’s name |
Payment Method * |
Method the shop uses to pay a vendor or supplier for items and services received on credit |
Account * |
Account to which the payment method applies |
Accounts Receivable
Use the Accounts Receivable section to record a shop’s method for receiving payment from a customer for items and services provided, on credit. This feature is available for invoices only at the following levels:
-
Credit
-
Direct Sale
-
Fuel Ticket
-
Repair
If a payment method is not provided and the `Use Payment Account `option is set to YES, the disbursement will roll to the invoice level transaction.
Required field: *
| Field | Definition |
|---|---|
Shop |
Defaults to the shop’s ID |
Shop Name |
Defaults to the shop’s name |
Payment Method * |
Method the shop uses to receive a payment from a customer |
Account * |
Account to which the payment method applies |
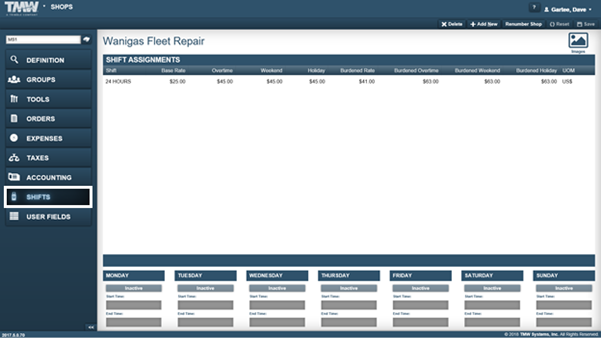
Shifts tab
You use the Shifts tab to assign multiple shifts to a shop. It displays the shift assigned to a pay grade associated with an invoice. A pay grade defines the hourly rate used for labor on the invoice. The tab displays current and historic shift assignments.
| Field | Definition |
|---|---|
Shift |
Typical shift length in hours (such as 8 hours, 24 hours) |
Base Rate |
Shop’s default labor rate |
Overtime |
Pay grade for overtime labor |
Weekend |
Pay grade for weekend labor |
Holiday |
Pay grade for labor on a holiday |
Burdened Rate |
Increased pay grade for rushed labor during regular working hours |
Burdened Overtime |
Increased pay grade for rushed labor during overtime hours |
Burdened Weekend |
Increased pay grade for rushed labor during weekend hours |
Burdened Holiday |
Increased pay grade for rushed labor on a holiday |
UOM |
Shop’s default currency (such as US$, CN$) |