Managing tires with the TTP Tires screen
To open the Tires screen from the Job Activity screen, select  Tire.
Tire.
The Job Activity screen only shows the Tire icon if:
-
The Tire module is installed and turned on.
-
The RO Unit has a Tire setup.
-
The selected RO section is a Tire section.
The Tire icon is not available for non-tire sections and RO units without a tire setup.
-
Log in to TTP using:
The Job Dashboard opens.
-
Select Start or Continue on a job card that has involves tires.
The Job Activity screen opens. -
Select
Tire.
The Tires screen opens.
The Tires screen shows information about the selected tire on the right. The unit’s tires are shown on the left.
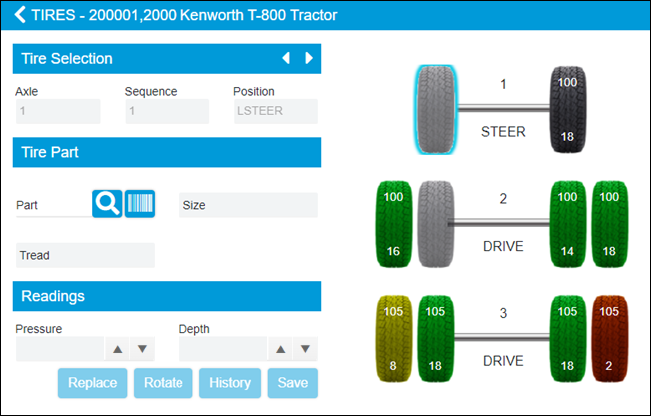
Tires are color-coded:
-
Gray
There is no tire installed on this axle and position. You can assign tires to gray tires without charging items from shop inventory.
-
Black
There is no warning or replacement tread depth set for this tire in the Parts Catalog. The tire does show its pressure and depth readings, if available.
-
Green
The tire is above its tread depth warning level.
-
Yellow
The tire is at or below its tread depth warning level.
-
Red
The tire is below its tread depth replacement level.
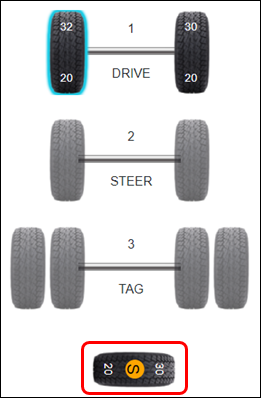
Adding tires using the Tires screen
You can add tires to most empty positions without reducing shop inventory. The exception is the Spare tire position. If you add a tire to the Spare position, the Do you want to charge from inventory? pop-up window opens. It has two options:
-
YES
TTP assigns the tire to the Spare position and reduces the shop inventory on hand.
-
NO
TTP assigns the tire to the Spare position, but it does not reduce the shop inventory quantity.
This illustration shows a tire screen for a unit that has a spare tire. In this case, the Spare position has a tire already installed.
To add a tire to a unit:
-
Select an empty tire position from the tires shown on the screen.
TTP completes these Tire Selection fields:-
Axle
-
Sequence
-
Position
Note: The Tires screen shows empty tire positions in gray. This illustration shows a selected empty tire position.

-
-
Complete the Tire Part section by selecting a Part. Do one of the following:
-
Select
 Parts Search and scan the tire’s bar code label.
 -
Select the Part field and enter one or more search criteria. You only have to enter a portion of the part number to use the search.
Once you select a tire part, TTP completes the Size and Tread fields for your selected tire.
-
-
Complete the Readings section:
-
Enter the tire’s Pressure.
-
Enter the tire’s tread Depth.
-
Select Save.
|
For information on the icons shown on the Tires screen, see the TTP icon Quick Reference. |
Replacing tires using the Tires screen
On the Tires screen, selecting Replace lets you switch the selected tire with another tire. You can search for the new tire using the Tire Part section.
-
To select a tire, do one of the following:
-
Complete the Tire Selection section.
-
Select a tire from the tires shown on the screen.
-
-
Select Replace.
The Replace Tires pop-up window opens. TTP completes the first three fields of the Tire Off section based on the tire you selected.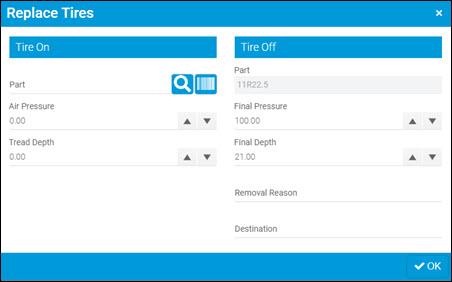
-
Complete the Tire On fields:
-
Enter the tire you want to add using the Part search. You can select
Parts Search and scan a part bar code label, or you can enter the part by selecting the Part field and entering one or more search criteria. You only have to enter a portion of the part number to use the search. -
Enter the Air Pressure. You can enter the numbers or use the up or down arrows.
-
Enter the Tread Depth. You can enter the numbers or use the up or down arrows.
-
Enter the Removal Reason.
-
Enter the Destination.
-
Select OK.
The Replace Tires pop-up window closes. TTP returns you to the Job Activity screen.Note: If you want to add a tire to the Spare position, the Do you want to charge from inventory? pop-up window opens. It has two options:
-
YES
TTP assigns the tire to the Spare position and reduces the shop inventory on hand.
-
NO
TTP assigns the tire to the Spare position, but it does not reduce the shop inventory quantity.
-
Rotating tires using the Tires screen
Selecting Rotate lets you move a tire from one position to another.
To rotate a tire:
-
To select a tire, do one of the following:
-
Complete the Tire Selection section.
-
Select a tire from the tires shown on the screen.
-
-
Select Rotate.
The screen refreshes to show the Tire Changes section. It shows the message "Select Tire to Begin."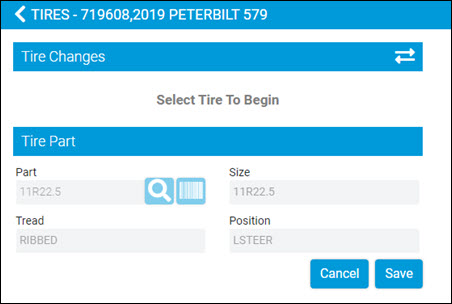
-
Select a tire on the left side of the screen.
The Tire Changes section refreshes. It shows that the selected tire has moved from its original position to the PLACEHOLDER position. The Tire Part section shows the tire and position details for the selected tire.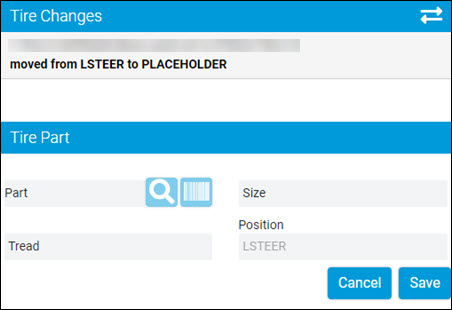
From the Placeholder, you can assign the tire to any empty position. You can also switch it to other positions. A tire in the Placeholder continues to show its initial position until you make a change and save it.
-
Select Save.
TTP returns you to the Tires screen.
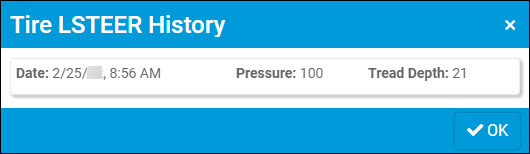
Viewing tire history on the Tires screen
To view a tire’s history:
-
To select a tire, do one of the following:
-
Complete the Tire Selection section.
-
Select a tire from the tires shown on the screen.
-
-
Select History.
The Tire History pop-up window opens. -
When you have finished reviewing the history, select OK to close the window.
This illustration shows the history for the tire in LSTEER position.