RO approval
Beginning with version 2019.3, the Shop Planner contains the Repair Order (RO) Approval functionality to create plans for repairs on a unit. The plan begins with an estimate for required repairs and the RO Approval process is used to manage the potential cost of repairs in the plan closely. In addition, RO Approval helps monitor associated overages by creating a set of escalating approval levels.
The RO approval process ensures that approval levels for plans are adhered to and helps to control repair costs more efficiently. After a plan for repairs has begun, it can be linked to a repair order and monitored from start to completion of work.
To enable RO Approval, you must set the applicable global option and approval levels.
Setting up RO Approval
To enable the RO Approval functionality, complete the following steps.
-
Go to Menu > Setup > Options > Application Options.
The Application Options window opens.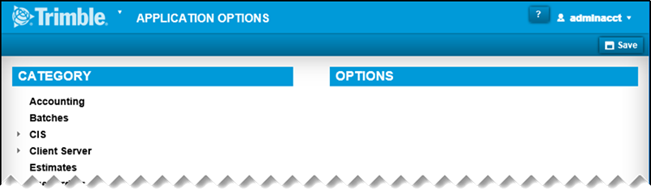
-
In the Category grid, expand Repairs and select Approvals.
-
In the Options grid, toggle the Require RO Approval Levels option to YES.
-
To verify that RO Approval has been enabled:
-
Go to Menu > Activities > Shop Planner.
The Shop Planner page opens.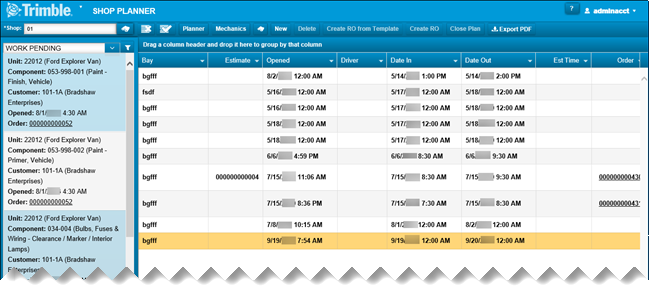
-
In the top line of command buttons, click New.
The Add/Update Appointment window opens.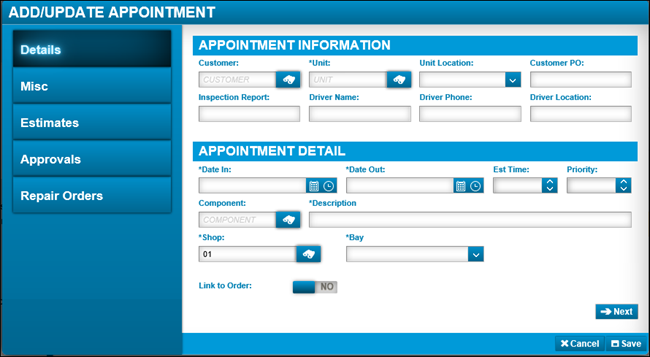
Three tabs have been added for RO Approval:
-
Estimates
-
Approvals
-
Repair Orders
-
-
If these tabs do not appear, return to the Application Options page to configure the Repairs > Approval option.
Creating a plan for a unit
When a unit requires repairs, you must create a plan or appointment for the unit in Shop Planner. This includes estimates for the cost of the work that is required to complete repairs on the unit.
| You cannot create more than one plan per unit. |
To set up a plan for a unit:
-
Go to Menu > Activities > Shop Planner.
The Shop Planner page opens.Plans highlighted in orange indicate that approval is required to proceed. After the plan is approved, the color changes to white.

-
In the top line of command buttons, click New.
The Add/Update Appointment window opens.Note: If the Add/Update Appointment window does not display the Estimates, Approvals, and Repair Orders tabs, you must set up RO Approval on the application options page before proceeding with the following steps.
-
In the Details tab, enter appointment details as required.
Field definitionsRequired field: *
Field Definition Customer
Customer ID
Unit *
Unit ID
Unit Location
Location of the unit
Options include:
-
At Plant
-
At Vendor
-
Deadline
-
In-Bound
-
In-Service
-
In-Shop
-
Loaned Out
-
Out-Service
-
Ticketed
-
Yard
Customer PO
Customer’s purchase order number
Inspection Report
Report with details of an inspection
Driver Name
Driver of the unit that needs repairs
Driver Phone
Phone number of driver
Date In *
Date the unit came in for repairs
Date Out *
Date the unit left with repairs completed.
Est Time
Amount of time estimated for the repairs
Priority
Assigned level of priority for a unit
Component
Component code that categorizes the repair
Description *
Description of what repairs the plan entails
Shop *
User defined shop identification number
The repair shop field may have Shop Restrictions.
Enter up to 12 alphanumeric characters.
Bay *
Location where repair occurs
Link to Order
YES or NO to link to a Repair Order
-
-
Click Next.
The Misc tab is displayed. -
In the Misc tab, complete the fields as required.
Field definitionsRequired field: *
Field Definition RO Number
Repair Order number (unavailable until linked to the Repair Order is created or linked)
Estimate
Plan estimate for repairs (not enabled until Estimate is completed)
Vendor
Definition
Status *
Order status
Options include:
-
Open
-
Closed
-
Complete
-
Canceled
Date Opened *
Date the plan is opened
Date Closed
Date the plan is closed
-
-
Click Next.
The Estimates tab is displayed. -
In the Estimates tab, complete the fields as required.
Field definitionsRequired field: *
Field Definition Repair Estimate *
Estimated cost of the repair
Unit Repair Limit
Maximum amount allowed for a unit repair
Authorized Amount
Authorized amount for the current user in charge of the plan
Line/s Total
Lines total for all repair orders associated a unit’s plan
Note: You cannot complete a plan without the Repair Estimate. Also, you cannot have more than one plan on a unit at one time.
-
Click Next.
The Approvals tab is displayed. The Approvals tab enables you to approve the estimate amount or the Line/s Total amount, whichever is greater. -
In the Approvals tab, click +Add Approval to approve the estimate amount or the repair order lines total.
The Add Approval window opens.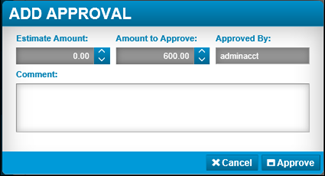
-
Enter a comment regarding the approval.
Note: If you attempt to add approval without adding the comment, the system displays a red highlight around the Comment box and the Approve button is not enabled.
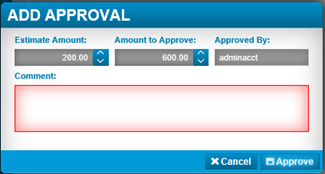
-
Click Approve.
The Approvals grid displays the Estimate Amount, Approved Amount, Approved Date, and Approved By columns for your approval.
-
After you have completed the approval, the system generates a note in the Estimate Notes section of the Estimate tab.
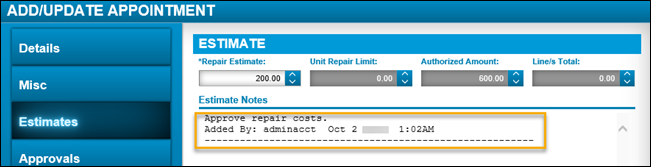
You can add more notes to this section by clicking +Add Notes.
-
Click Next to advance to the Repair Order tab.
After the approval has been completed, all repair orders associated with the plan display in the Repair Orders grid.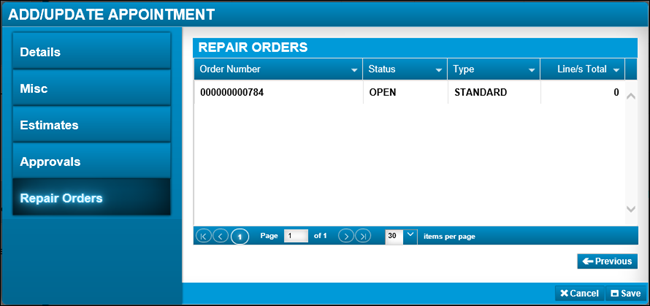
-
To save all the updates to the tabs in the Add/Update Appointment window, click Save.
Setting up RO Approval levels
You can set up different levels of approval for your repair orders.
| Approval levels are graduated. So if you have Approval levels of $250, $500, and $1,000, and the repair comes to $750, the $250 person must approve the repair, and then the $500 person must approve it. Lastly, the $1,000 level approver must approve it. The dollar amount for each level represents the maximum amount of money that person can approve. |
To set up RO Approval Levels:
-
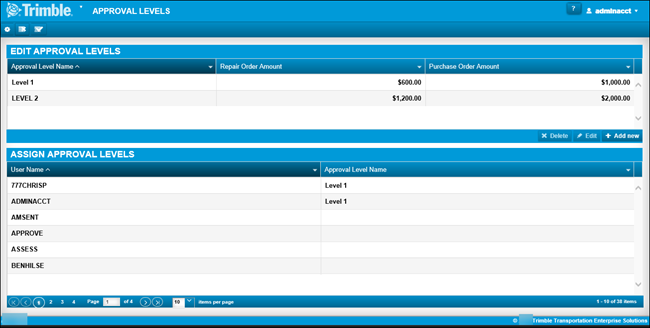
Go to Menu > Setup > Order Setup > Approval Levels.
Note: For versions earlier than V.2020.2, go to Menu > Setup > Approval Levels.
The Approval Levels page opens.
-
To add an approval level, click +Add New.
The Add Approval Level window opens.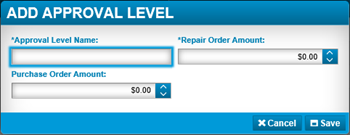
-
Add an Approval Level Name.
-
In the Repair Order Amount required field, select a specific amount to assign to the previous approval level name.
ExampleAction User 1 ($250) User 2 ($500) User 3 ($1000) After plan created for $300
Can approve
Cannot approve
Cannot approve
After User 1 approved for $250
Add approval button deactivated
Can approve
Cannot approve
After User 2 approved for $500
Add approval button deactivated
Add approval button deactivated
Add approval button deactivated
After RO Total exceeds Approved amount
Add approval button deactivated
Add approval button deactivated
Can approve
After User 3 approved for $1000
Add approval button deactivated
Add approval button deactivated
Add approval button deactivated
-
If applicable, add the Purchase Order Amount.
-
Click Save.
-
To assign users to approval levels, in the Assign Approval Levels grid, in the Approval Level Name field, click the cell beside the name of the user.
A drop-down list displays all the approval levels available.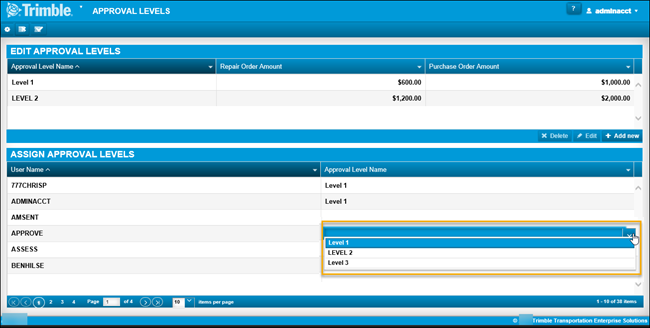
-
Select the level you want for each user.
Note: The User Name grid allows you to sort the list of users, select columns, and filter the users.
-
If you need to create users to add to your User Name column, see Creating a user account.
Approval Level matrix
You can create a hierarchy of approval levels based on the values you assign to each user. Users cannot provide approval above the amount you have assigned to them.
| Action | User 1 ($250) | User 2 ($500) | User 3 ($1000) |
|---|---|---|---|
After plan created for $300 |
Can approve |
Cannot approve |
Cannot approve |
After User 1 approved for $250 |
Add approval button deactivated |
Can approve |
Cannot approve |
After User 2 approved for $500 |
Add approval button deactivated |
Add approval button deactivated |
Add approval button deactivated |
After RO Total exceeds Approved amount |
Add approval button deactivated |
Add approval button deactivated |
Can approve |
After User 3 approved for $1000 |
Add approval button deactivated |
Add approval button deactivated |
Add approval button deactivated |