TTP Job Dashboard overview
The Job Dashboard is your TTP control center. From the Job Dashboard, you can:
-
Review and filter your assigned jobs
-
Sort jobs by:
-
Estimated time
-
Priority
-
Scheduled Date
-
Unit Number
-
-
Log in to ROs and indirect orders
-
Indicate when you are on a break, at lunch, and when you clock out
-
Search jobs by shop, unit, customer, etc.
Each job on the dashboard has its own panel or card. This illustration shows a card assigned to user TIMTM.
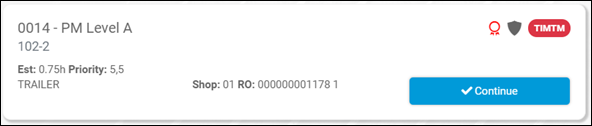
Each card has information about the job:
-
The unit number and job code name, such as 0014-PM Level A
-
Customer name or ID, such as 102.2
-
Original equipment manufacturer (OEM) warranty information
-
If the icon is green
 , the unit is under warranty.
 -
If the icon is red
 , the unit is out of warranty.
-
-
Extended warranty information
-
If the icon is gray
 , the unit does not have an extended warranty.
 -
If the icon is green
 , the unit has an extended warranty. The warranty is still in effect.
 -
If the icon is red
 , the unit had an extended warranty, but it expired. The warranty is no longer in effect.
-
-
User ID
The User ID icon shows the technician’s employee ID. It is also color-coded by job status.Job Status Color Example Unassigned
Green

Assigned to you
Red

Assigned to a different user
Blue

Completed
Black

-
Estimated time to complete the job
-
Priority by order and section, such as 5,5.
-
Shop number
-
RO number
-
Unit description
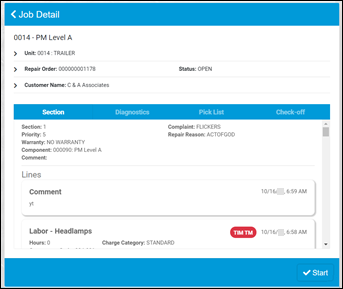
You can open a card in TTP to see the job’s details without logging in to the section.
|
For information on the icons shown on the Job Dashboard screen, see the TTP icon Quick Reference. |
Selecting jobs in TTP
Selecting a job card and selecting  Add lets you add a section to an existing RO. Action icons on the card let you Start or Continue working on an RO section.
|
If you are using a tablet or phone, a long press on the RO section opens the Job Detail screen. You do not have to start or continue the job. You do not have to log into the job to see its details. |
-
Log in to TTP using:
The Job Dashboard opens.
-
Select the job you want.
The Job Code Assignment card opens.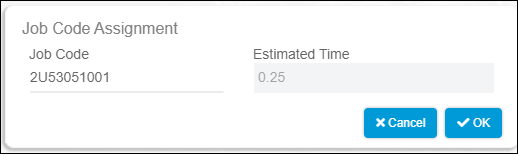
You use this card to enter a job code and estimated time. When you select OK, the Job Activity screen opens.
You can also open the Job Activity screen by selecting Start or Continue on a job card.
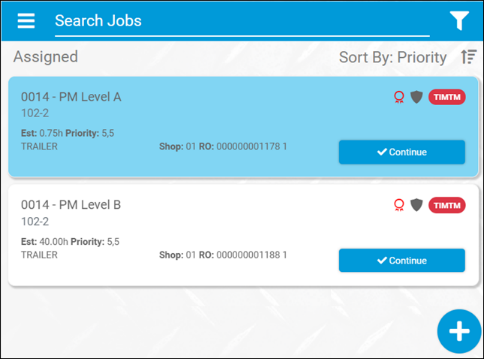
This illustration shows a selected card in pale blue. It also shows Add in the screen’s lower-right corner.
Filtering job cards in TTP
You can use the  Filter to set which jobs show on your screen. It also lets you create ROs and open an RO template.
-
Log in to TTP using:
-
The Job Dashboard opens.
-
Select
Filter.
The selection menu opens. -
Select a command:
-
Assigned
Shows all sections assigned to you regardless of shop.
Note: If you see a blank screen, contact your manager to make sure you have sections assigned to you.
-
Completed
Shows all sections you have completed regardless of shop
-
All
Shows all that are either unassigned or assigned to other employees in your domicile shop.
-
RO Create
Lets you add a new RO
-
RO Template
Lets you add a new RO from a template
-
Searching for jobs on the TTP Job Dashboard
You can search job cards by entering a search term in the Search Jobs box. You can search with or without using TTP keywords.

For example, if you wanted to search for shop 01, you could enter the TTP keyword Shop, followed by a colon and the shop ID: Shop:01. You could also search without keywords by entering the shop ID, such as 01. The screen shows all cards that match your search entry.
TTP keywords are not case-sensitive. TTP gives you the same results whether you enter Shop or shop, Unit or unit, and so on.
You can search by:
-
Shop name (keyword Shop)
Note: Shop search only works in technician mode. In kiosk mode, you can only see jobs in your assigned shop.
-
Unit (keyword Unit)
You can enter the unit ID and/or the unit description.
-
Customer (keyword Cust)
You can enter the customer ID, customer name, and/or the customer description.
-
Component (keyword Comp)
You can enter the component value and/or the component description value.
-
Job (keyword Job)
You can enter the job code value and/or the job code description value.
-
Repair order number (keyword RO)
You can enter the RO number.