Interactive Workstation overview
The Interactive Workstation (IWS) reduces data entry time and increases production levels in your shop.
|
IWS is available only in V.2022.2.2 and earlier. As of V.2022.3, IWS has been replaced with Trimble Technician Portal (TTP). |
As a member of the shop staff, you can log and manage your time on:
-
Direct and indirect time in Mechanic Workstation
-
Gate In/Gate Out activities
-
Inspection Tickets
-
Yard Checks
You can access the Interactive Workstation (IWS) module in two ways:
-
Go to Menu > Activities > Interactive Workstation > Interactive Workstation.
Note: For versions earlier than V.2020.2, go to Menu > Activities > Interactive Workstation.
-
Use the desktop icon on the device.

This access depends on whether your company allows it to be installed on the desktop of the device being used.
Note: When using the desktop icon, you must log in with a valid web application username and password.
The Interactive Workstation page contains two sections:
-
Log In area
-
Keypad
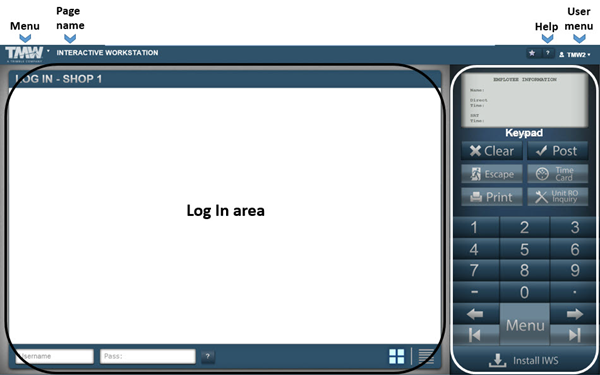
Log In area
The Log In section shows:
-
The shop
-
Employees that are logged into the program
There are two views available in this section:
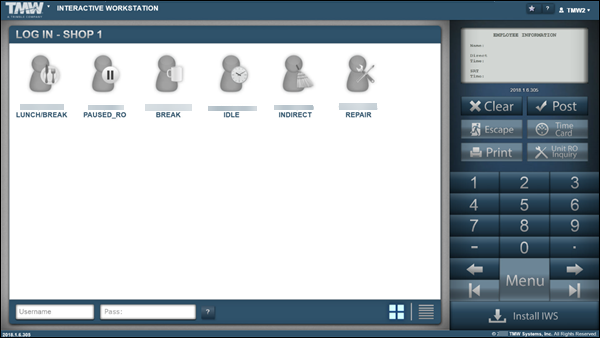
Icons view
This is the default view. It shows an icon for each employee logged into the system. The icons identify the person’s current activity or status.
| Field | Definition |
|---|---|
Break |
The mechanic selected the Break activity within Mechanic Workstation (MWS). Labor hours are not calculated during this activity. Break time is calculated as paid time on the time card. It counts as productivity for the employee.
|
Idle |
The mechanic is logged into MWS, but is not performing any work. Idle time is calculated as paid time on the time card. It counts as productivity for the employee.
|
Indirect Charge |
The mechanic is logged into an Indirect Charge Order. Indirect labor hours are recorded and are calculated as paid time on the time card. It counts as productivity for the employee.
|
Lunch/Break |
The mechanic selected the Lunch/Break activity within MWS. The Lunch/Break time is calculated as unpaid time on the time card. It is not counted as productivity for the employee.
|
Paused |
The mechanic is logged into an activity in MWS, but has Paused an activity to perform another function. Paused time is allocated to another activity when the employee logs back into MWS. See Pause for details.
|
Repair Order |
The mechanic is logged into a Repair Order. Direct labor hours are recorded.
|
Break |
The mechanic selected the Break activity within MWS. Labor hours are not calculated during this activity. Break time is calculated as paid time on the time card. It counts as productivity for the employee.
|


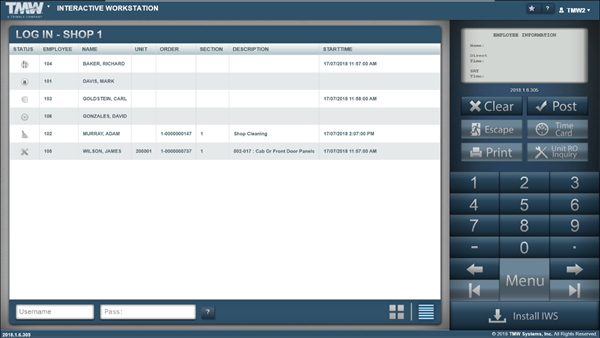
Details view
The Details view shows a list of employees logged into the system in a grid.
| Field | Definition |
|---|---|
Status |
The icon representing the employee’s activity or status |
Employee |
Employee’s ID |
Name |
Employee’s name |
Unit |
If the employee is logged into a repair order, the unit number is displayed |
Order |
If the activity is related to an order, the order number is displayed |
Description |
If the activity is related to an order, the description of the activity is displayed |
Start Time |
The date and time the activity started |
You can switch from one view to the other.
-
Click
 Details to view information in the grid.
 -
Click
 Icon to view information as icons.
Logging into the IWS
To log into the program:
-
Go to Menu > Activities > Interactive Workstation > Interactive Workstation.
Note: For versions earlier than V.2020.2, go to Menu > Activities > Interactive Workstation.
-
In the Username field, enter your Employee ID.
-
In the Password field, enter your Password.

-
In the Keypad section, click Post.
This starts the time-tracking feature in IWS.
The system displays the IWS Menu.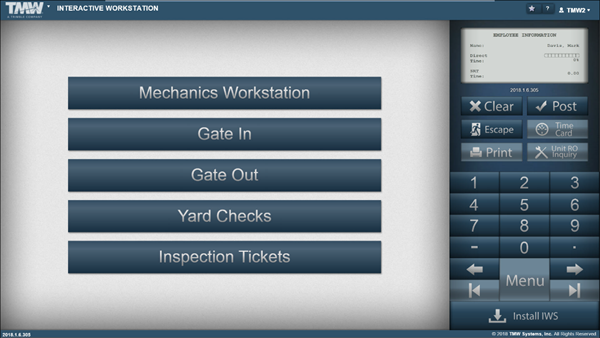
Note: Your company may set up the system to assign employees to a default login module. See Workstation Default Mode for details.
-
Click the module.
Using the IWS menu
Within IWS you can access these modules:
-
Mechanic Workstation (MWS)
Repair Orders, Indirect Charges, Lunches and Breaks are recorded within MWS. This is also where an employee clocks out for their shift.If selected, the Job Logon page opens.
-
Gate In
The Gate In feature allows a set of checks to be performed whenever a unit comes into the yard.If selected, the Gate In page opens.
-
Gate Out
The Gate Out feature allows a set of checks to be performed whenever a unit leaves the yard.If selected, the Gate Out page opens.
-
Yard Checks
Yard Checks allow a physical check of the units that are already in your yard. This process is the same as the Gate In process.If selected, the Yard Checks page opens.
-
Inspection Tickets
Inspection Tickets allows a more detailed inspection of the unit. Inspection Tickets within IWS have slightly different rules than Inspection Tickets created outside IWS. Inspection Tickets created in IWS also create a Gate In record.If selected, the Inspection Tickets page opens.
Layout of the IWS keypad
The Interactive Workstation Keypad (also known as the IWS keypad) is located on the right side of the Interactive Workstation page.
It contains four sections:
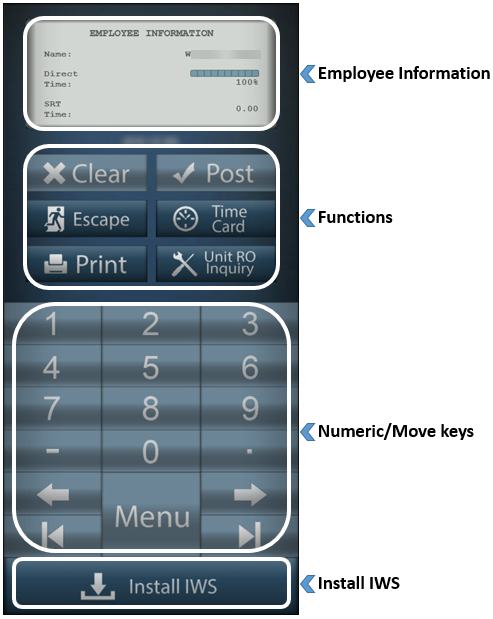
Employee Information
| Field | Definition |
|---|---|
Name |
Employee’s name |
Direct Time |
Total percentage of time during the current shift that the employee spent working on repair orders |
SRT Time |
Total SRT time logged during the current shift Note: SRT time displays a value when repair order sections have SRT times associated with corresponding Job Codes. |
Functions
| Field | Definition |
|---|---|
Clear |
Clears information from text fields, unless the text has been posted
|
Post |
Saves your changes or advances the current process being performed
|
Escape |
Goes back one page
|
Time Card |
Shows a user’s time card For details, see Layout of an employee’s Time Card. Note: The employee must be logged in to an active screen to be able to view a time card.
|
Prints/view the current selected Interactive Workstation page Note: Not all pages support this feature.
|
|
Unit RO Inquiry |
Shows Closed ROs, Open/Pending ROs, PM Info, and Specs for a unit by clicking on the appropriate tab For details, see Layout of the Unit RO Inquiry section. Note: If the employee is logged in to an RO Section, the unit defaults to the assigned unit on that repair order section.
|


Numeric/Move keys
| Field | Definition |
|---|---|
Numeric Keys (0-9) |
Enter numbers |
Dash |
A dash/hyphen
|
Period/Decimal |
A period or decimal
|
Left Arrow |
Moves the cursor one character to the left
|
Right Arrow |
Moves the cursor one character to the right
|
Menu |
Takes the user to the Job Selection page See Modes (add link) for details. Note: The Menu button is disabled if the user is logged in to an order.
|
First Record |
Currently not functional
|
Last Record |
Currently not functional
|


Install IWS
You can install the Interactive Workstation (IWS) as a stand-alone application. When you do this, users do not need to log into TMT Fleet Maintenance to access the IWS features.
|
To install the desktop access:
-
Click Install IWS.
The Security Warning message window opens. It asks, "The publisher could not be verified. Are you sure you want to install this application?" -
Click Install.
The Interactive Workstation shortcut is added to your Desktop.
-
Double-click on the shortcut to launch the application.
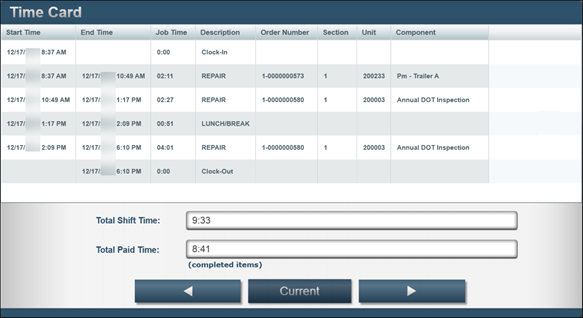
Layout of an employee’s Time Card
You use the Time Card section to view your time card. You must be logged in to an active page to view it.
| Field | Definition |
|---|---|
Start Time |
Task start time Note: The Clock In action does not have an end time. |
End Time |
Task end time Note: The Clock Out action does not have a start time |
Job Time |
Total task time |
Description |
Activity task time Activities include:
|
Order Number |
Shows the indirect charge number or the repair order number |
Section |
Order section number Note: An order number must exist for this field to display a value. |
Unit ID |
Unit number assigned to the repair order |
Total Shift Time |
Total time accrued between the Clock In and Clock Out times for closed time cards Note: Open time cards do not display a value in this field. |
Total Paid Time |
Total time accrued between the Clock In and Clock Out times minus any lunch/break times Note: Open time cards do not display a value in this field. |
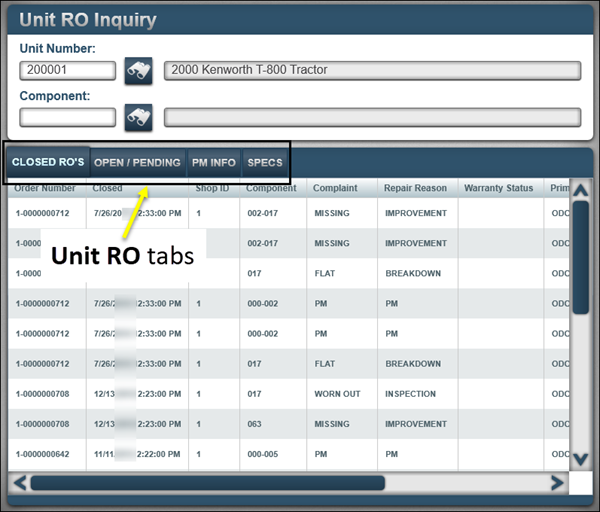
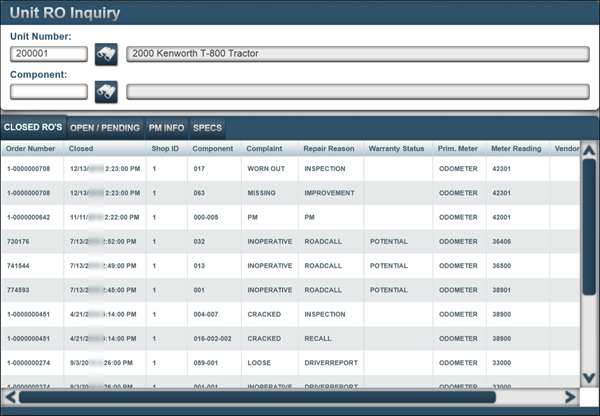
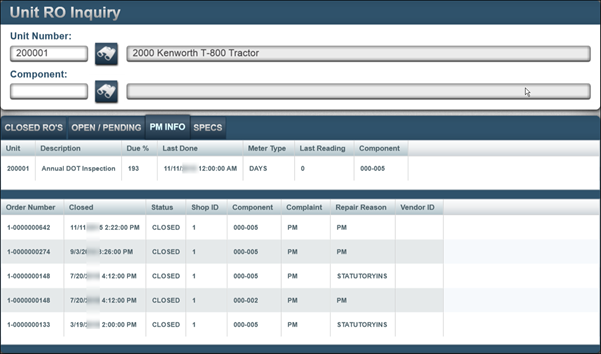
Layout of the Unit RO Inquiry section
You use the Unit RO Inquiry section to see the unit’s Closed ROs, Open/Pending ROs, PM Info and Specs. Each type of information appears on its own tab.
-
Closed ROs
This tab displays all orders having an RO status of Closed.
-
Open/Pending
The Open/Pending tab displays repair order sections that have a status of Open or Pending. The Status column differs between the two.

-
PM Info
The PM Info tab has two grids:
-
The top grid displays PMs that are due.
-
The bottom grid displays Closed PMs.
-
-
Specs
The Specs tab displays component information assigned to the unit master.
