Managing invoices
Using the Invoice module, you can perform many tasks associated with existing invoices, including:
-
Add comments
-
Record/edit payments
-
Apply discounts
If you need to make a new invoice, see Creating invoices.
|
To create and manage invoices, you must have the Invoice module.
|
Looking up an invoice
You can use the Landing page or the Invoices Listing page to locate the invoice you need to work with.
-
Do one of the following:
-
On the Landing page, click Invoices.
Show me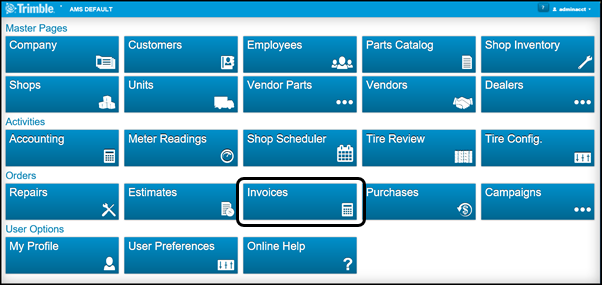
-
Go to Menu > Orders > Invoices Listing.
The Invoices Listing page opens.
-
-
If you see the invoice you want to open, click its link in the Invoice column.
The invoice opens. -
If you do not see the invoice you want to open, you can look for it with the data navigator, or you can search for it. To search for an invoice:
-
Click
 Search Invoices.
The Invoice Search pane opens.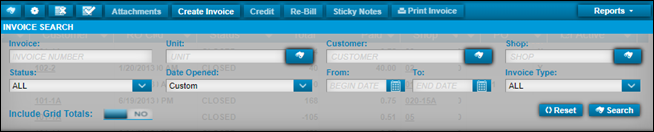
-
Enter the filter criteria you want to use. Available options are listed in the field definitions.
Field definitionsAll fields are optional.
Field Definition Invoice
Invoice number
Note: By default, an invoice number contains 12 digits. If your company uses the
Auto Zero-fill Order Numbersoption, and they have set up shop prefixes, the system replaces leading zeros with the prefix. When you search for an invoice, enter the prefix and the order number (for example, 1-749) and then press TAB. The system adds the correct number of zeros in this field.Unit
Unit ID
Customer
Customer ID
Shop
Shop ID
Status
Invoice status
Options include:
-
All
-
Canceled
-
Closed
-
Complete
-
Open
Date Opened
Date the invoice was opened
Options include:
-
Today
-
Yesterday
-
Week to Date
-
Month to Date
-
Year to Date
-
Custom
From
Start date for a range
To
End date for a range
Invoice Type
Type of order
Options include:
-
All
-
Contract
-
Credit
-
Direct Sale
-
Fuel Ticket
-
Repair
-
-
Click Search.
The Invoice Search pane closes. The Invoices Listing grid displays your search results. -
In the Invoice column, click the invoice number that you want to open.
Your selected invoice opens.
-
Editing an invoice header
In accounting, all invoices are accounts receivable (AR). Invoices represent money that you will receive.
The Invoice module breaks down AR invoices into five invoice types. The Invoices overview reviews each invoice type.
Only three invoice types can be edited:
-
Repair invoices
Used for maintenance performed. There are two types of repair invoices: those created from a Standard Repair Order (SRO) and those created from a Vendor Repair Order (VRO). -
Direct Sale invoices
Are not related to maintenance performed. They are created manually and most often represent the direct sale of items to the consumer. -
Credit invoices
Used to refund the customer for items and/or services performed.
Before you can edit an invoice header, you have to know whether it was created as a Direct Sale, created from an SRO, or created from a VRO.You also have to know if the invoice status is Open or Closed.
-
Open invoices: You can edit parts of the header, tabs, and sections.
-
Closed invoices:
-
SRO or Direct Sale invoices
You cannot edit anything. -
VRO invoice
You can edit parts of the header, tabs, and sections.
-
To edit an invoice header:
-
If you want to, you can edit these fields in the header pane. Other fields are disabled.
Note: Depending on the invoice type, some fields may be in a different order from the table below, or they may not be displayed.
Field definitionsRequired field: *
Field Definition Shop *
Your repair facility or the place where you work on units
Note: You can only change the shop on open repair order invoices. The open repair order invoice must not have:
-
Lines added to it
-
A mechanic to it
-
An assigned shop-related job code
Invoice Number *
The invoice number
Estimate
Estimated cost of repair
Applies to repair order invoices only.
Customer
If the invoice is still open, you can change the customer if you need to.
Invoice Date *
The date the invoice was created
Purchase Order
The purchase order provided to you by the customer. The order may contain letters, numbers, and some punctuation marks such as hyphens. There is a 12-character limit.
Override Taxes
Options are:
-
NO (default)
Taxes are calculated based on your setup. The results are read-only. -
YES
The program calculates taxes, but you can add, edit, or delete them.
Override Fees
Options are:
-
NO (default)
Fees are calculated based on your setup. The results are read-only. -
YES
The program calculates fees, but you can add, edit, or delete them.
Override Auto Discounts
Options are:
-
NO (default)
Discounts are calculated based on your setup. The results are read-only. -
YES
The program calculates discounts, but you can edit or delete them.
Bill to Customer
By default, an invoice displays the customer linked to the order’s shop or unit. In some cases, the party you need to bill is not connected with the default customer. You can change the Bill to Customer field to bill the right person or group.
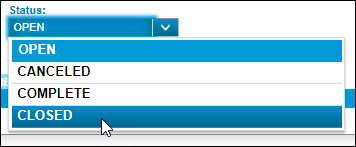
Status
You can leave the status as OPEN, or you can change it to:
-
CANCELED
-
COMPLETE
-
CLOSED
-
-
To save your edits, click Save in the Header pane.
The page displays the message "Header Saved."
Adding comments to an invoice
-
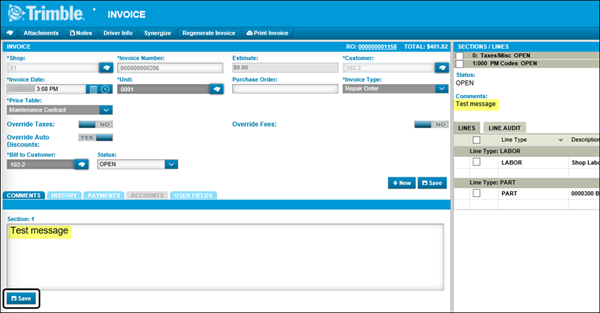
Open the invoice.
The COMMENTS tab is active. Section 0 (Taxes/Misc) is selected by default. After you select a different section, the tab displays the active section number. -
If you want, you can type your comment in the text box for Section 0. Otherwise, select a section from the Sections/Lines pane on the right.
-
Add your comment in the text area.
The page displays your comment in two places:-
The COMMENTS tab text box
-
Below Comments in the Sections/Lines pane
-
-
Click Save below the text box.
This illustration shows an invoice with the COMMENTS tab active. The user’s test message is highlighted in yellow and the COMMENTS Save button is called out.
Viewing an invoice’s history and audit trail
The HISTORY tab shows basic information about an invoice, such as who created it and when. It also displays the invoice’s audit trail. All information on the HISTORY tab is read-only.
-
On the left, select the HISTORY tab.
The tab displays the invoice history and the audit trail section. -
To view the audit trail for any section, click its section header in the Sections/Lines pane.
The section audit trail is displayed under the message "Please select a section to view audit trail."Show meIn this illustration, the user clicked the History tab, then selected section 4 in the Sections/Lines pane. Section 4 is displayed under "Please select a section to view audit trail."
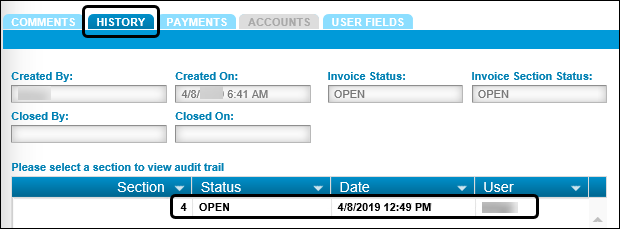
The corresponding audit trail displays on the left.

Working with invoice payments
The invoice page Payments tab lets you
Adding an invoice payment
You can apply payments to an invoice as parts are received or when all sections have been closed.
-
On the left, select the Payments tab.
The Payments section opens to display three read-only fields:-
Order Total
-
Amount Paid
-
Balance Due
There is a fourth field, Buyer’s Name, where you can enter the name of the person who made the payment.
-
-
Click Make Payment.
The Make Payment window opens. -
Complete these fields:
Field definitionsRequired field: *
Field Definition Payment Method *
Select a method from the drop-down list.
Amount *
Enter the amount to apply to the invoice balance.
Reference Number *
Enter the unique identifier for the payment you entered, such as a check number, credit card receipt, credit memo number, journal entry number, and so on.
Comments
If you want, you can enter a comment about this payment.
-
Click Process.
The payment is applied to the invoice.
Editing an invoice payment
You can only edit payments on open invoices.
-
On the left, select the Payments tab.
The Payments section opens. -
Select the payment row.
The Edit button becomes active. -
Click Edit.
The Invoice Payment - Edit window opens. -
Make your changes.
Only these fields can be changed:
-
Reference Number
-
Date
-
Amount
-
Comments
-
-
Click Save.
The Payment tab displays the updated information.
Deleting an invoice payment
You can only delete payments on open invoices.
-
On the left, select the Payments tab.
The Payments section opens. -
Select the payment row.
The Delete button becomes active. -
Click Delete.
The program displays the confirmation message, "Are you sure you want to delete the selected payment." -
Click Yes to confirm the deletion.
The message window closes and the Payment tab displays the updated information.If you change your mind, click Cancel to abandon your changes.
Adding user fields to an invoice
-
On the left, select the USER FIELDS tab to view and add fields.
For details, see Working with user fields.
Editing sections and lines on an invoice
-
Click the title bar of the section you want to edit.
The section expands to display its lines. In the illustration below, the user selected the Front Brakes and Drums section.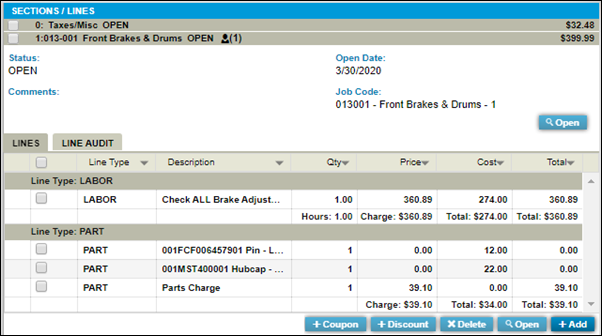
-
Select the checkbox beside the line item you want to edit. You can edit these line types:
-
Comment
-
Labor
-
Part
-
Services
-
-
Click Open.
The program opens one of four Edit Line windows. Each window contains different fields. For details, see The Edit Line windows. -
Update the fields in your selected Edit Line window as needed.
-
Do one of the following:
-
To cancel any edits or return to the Sections/Lines view, click Cancel.
-
To save the edits you made and edit another line of the same line type, click Save and New.
-
-
To save your edits and close the Edit Line window, click Save.
Applying discounts and coupons to an invoice
You can apply discounts and coupons to sections of invoices with Open status.
-
In the Sections/Lines pane, select a section.
The section expands to display each line. -
Select the checkbox for the line item.
-
Do one of the following:
-
To apply a discount to the line, click Discount.
The Invoice Line Discount window opens.-
Select one of the discount options.
The Add button is enabled. -
Click Add to apply the discount.
-
-
To apply a coupon to the line, click Coupon.
The Invoice Coupon window opens.-
Enter the barcode number for the coupon.
-
Click Add.
The coupon is applied to the section.
-
-
Closing invoices
Once you have created an invoice, there are two ways that you can close it:
-
You can open the Invoices Listing page and click Close Invoice in the invoice row.

-
You can open the invoice and select CLOSED from the Status menu.
Printing invoices
You can print invoices from the Invoices Listing page or from an invoice.
-
Do one of the following:
-
From the Landing page, click Invoices.
-
Go to Menu > Orders > Invoices Listing.
The Invoices Listing page opens.
-
-
In the Invoices column, click the invoice that you want to print.
-
In the Command bar, click Print Invoice.
The Report Viewer window opens. -
Do one of the following:
-
To receive this report by email, click Email.
-
To print a copy of this report, click Print.
-
To close this window and return to the invoice view, click Close.
-
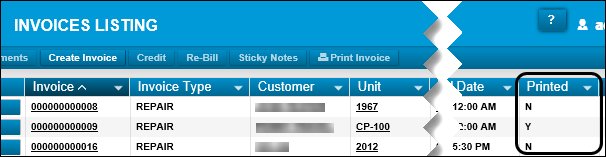
You can see whether an original invoice was printed on the Invoices Listing page. The Printed column displays N for No and Y for Yes, as shown in this illustration.
For details on printing draft, original, and duplicate invoices, see Invoices Listing Page Overview.
Regenerating repair order invoices
The program can create invoices for repair orders (ROs) with billable sections. Depending on your setup, this happens when you change the RO status to COMPLETE or CLOSED.
You can make changes to any RO that is not in CLOSED status. If the RO’s invoice is in OPEN status, you can use the RO to update the invoice. You do this by replacing or regenerating the invoice.
You can also regenerate an RO invoice if you saved changes to an invoice that you now want to undo.
In this case, regenerating the invoice returns it to its original state. Regeneration is always an option as long as the invoice is in OPEN status. If a repair order linked to an open invoice is in CLOSED status, you cannot update it until you close or cancel the invoice. Then, you can reopen the RO and make your changes. Depending on your setup, you can set the updated RO to COMPLETE or CLOSED. This creates a new invoice containing your RO changes.
|
You can regenerate an RO invoice from the RO or from the invoice.
Regenerating an RO invoice from the invoice
-
Do one of the following:
-
From the Landing page, click Invoices.
-
Go to Menu > Orders > Invoices Listing.
The Invoices Listing page opens.
-
-
In the Invoices column, click the link for the invoice you want to regenerate. The invoice opens.
-
In the Command bar, click Regenerate Invoice.
A confirmation message opens. It states, "Warning: Regenerate Invoice will undo all changes made to the invoice after it was initially created. This includes changes made to section comments, labor, parts, and services. Do you wish to continue?" -
Click Yes to regenerate the invoice.
A message appears stating that the invoice was regenerated successfully.
Regenerating an RO invoice from an RO in Complete status
-
Click the RO link in the invoice header bar.
The repair order page opens. -
Make your change, such as deleting a line.
A confirmation message opens. The text depends on your edit. For example, if you delete a line, the confirmation message asks, "Deleting these line(s) will cause the invoice to be regenerated. Are you sure you want to delete number line(s)?" -
Click OK to make your change or click Cancel.
-
Click OK to make your change.
The message window closes. The message "Invoice has been regenerated successfully" is displayed briefly at the bottom of the page.To abandon your changes, click Cancel.
Reopening a closed RO and generating a new invoice:
-
Change the invoice status to CANCELED or COMPLETE.
This allows you to reopen the RO.Note: You cannot reopen an RO attached to an open invoice.
-
Follow the steps in Reopening an order.
The program deletes the original invoice when you reopen the RO. Now you can update the RO. When you set the RO status to COMPLETE or CLOSED (based on your setup), the program creates a new invoice.
Overriding taxes on invoices
You can override the tax rates that you have set in your price tables.
To override tax rates:
-
Do one of the following:
-
From the Landing page, click Invoices.
-
Go to Menu > Orders > Invoices Listing.
The Invoices Listing page opens.
-
-
In the Invoices column, click the invoice you want to view.
-
In the invoice header section, toggle the Override Taxes field to YES.
-
Click Save.
You can edit the tax lines now.
Setting labor time and job codes for invoicing
You can set up labor time and job codes for invoicing. These settings are located in the Invoicing: Labor Time section on the Application Options page. For details on the proper settings for labor and job codes, see these topics:
Running the Invoice Summary report
To check the balance on invoice line items, you can run the Invoice Summary report. This report summarizes your totals.
-
In the Command bar, expand the Reports list.
-
Select the Invoice Summary Report.
The Report Viewer window opens displaying the invoice summary. -
Do one of the following:
-
To receive this report by email, click Email.
-
To print a copy of this report, click Print.
-
To close this window and return to the invoice view, click Close.
-