Add, edit, and remove repair order lines
A repair order (RO) tracks the costs to maintain equipment. You use the Repair Order page to create a repair order.
Each RO is made up of one or more sections. Each section requires a component code, which categorizes the type of maintenance needed for the repair.
Each RO section is made up of one or more lines. Lines detail the exact parts, labor, and services used by the RO. Lines can also track comments made about the section.
For more information on sections and lines, see Repair order sections and lines overview.
Add lines to a repair order section
After you add a section, you can add line items to it. There are two times, however, when you cannot add a line item to a section:
-
When the section has a status of Closed or Pending.
-
When adding a line item would exceed
the Enforce Unit Max Repair Amountlimit, if applicable.
When the Enforce Unit Max Repair Amount option is set to YES, it sets a maximum total cost limit for unit ROs. You cannot add lines that exceed the limit. If you try, the program displays the system message "The repair order total cannot exceed the max unit repair amount."
Line you can add to an RO include:
When you change the line type, the Add/Edit/View Line window updates automatically to show the appropriate fields for each line type.
-
Look up or create a repair order.
The Repair Order page opens. -
In the Sections/Lines pane, select a section to open it.
The section expands to display section details.Note: If no sections appear, add a section to the repair order.
-
Follow these steps to add a Part, Labor, Comment, Services, or Fee line:
-
Select Add.
The Add/Edit/View Line window opens. -
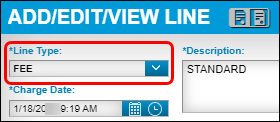
In the Line Type field, select the line item you want to add.
Your entry determines which fields appear in the Add/Edit/View Line window for each line type. -
Make entries in all required fields.
-
When you are finished, do one of the following:
-
To save the line, select Save.
The system saves the line. The window closes. -
To save and add another line, select Save/Add New.
The system saves the line information. The window remains open to allow you to add another line. -
To close the window without saving your changes, select Cancel.
-
-
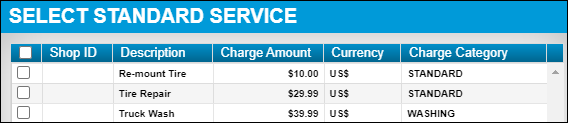
Add a standard service line
Standard Services are services that get performed frequently. You can use standard service lines to reduce the time it takes to add repetitive charges to ROs. Instead of typing the charge’s description on the RO, you can select it from a list.
-
Look up or create a repair order.
The Repair Order page opens. -
In the Sections/Lines pane, select a section to open it.
The section expands to display section details.Note: If no sections appear, add a section to the repair order.
-
Select Std Service.
The Select Standard Service pop-up window opens.
-
Select the checkbox for the standard service you want to add.
-
Do one of the following:
-
To add the line, select OK.
The system adds the line. The window closes. -
To close the window without saving your changes, select Cancel.
-
-
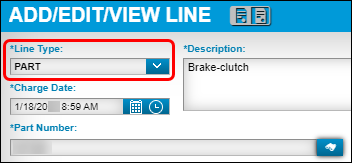
Add a part line
Part lines record information related to the quantity and cost of parts needed for the repair.
The Line Type value is Part.
This table reviews the fields used to add a Part line.
Required field: *
Read-only field: §
| Field | Definition |
|---|---|
Line Type * |
By default, the system shows Part as the line type. |
Description * |
Part’s description |
Charge Date * |
Date the line item is charged on the RO Value defaults to the current date. |
Part Number * |
Part’s identification number You can enter a valid:
|
Quantity * |
Enter the quantity of parts you want to charge on the repair order. |
QTY UOM § |
Part’s unit of measure, such as Each, Dozen, Gross Value defaults to the UOM value specified in the part’s master record |
Component * |
Defaults to the code entered for the section Component codes are based on the VMRS standard component codes for Systems, Assemblies, and Parts on a unit. The codes are developed in three sets of three digits. They are separated by dashes:
Note: The quick search for the component code enforces the max component code. If the max is set to system, the quick search displays 3-digit component codes. If the max is set to assembly, the quick search displays 3- and 6-digit component codes. If the max component level is set to part, the quick search shows 3-, 6-, and 9-digit codes. |
Component Description |
Component code description By default, the system enters the description based on the component code selected. |
Charge Category § |
Charge category for the repair order By default, the system enters the value from the part’s record in Shop Inventory. |
Charge Amount § |
Charge amount for the part By default, the system enters the value from the part’s record in Shop Inventory. |
Charge UOM § |
Unit of measure for the charge or price Examples:
By default, the system enters the value from the part’s record in Shop Inventory. |
Positions |
Physical location of the component on the unit The number of positions that you can select must be divisible by the quantity charged. For example, if the quantity is 2, you can select either one or two positions. If the quantity is 5, you can select either one or five positions. |
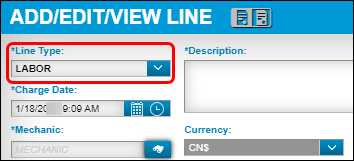
Add a Labor line
In a best practice environment, the technician manages labor lines within the appropriate application:
-
For V.2022.2.2 and earlier, Interactive Workstation (IWS) system using Mechanic Workstation (MWS).
-
For V.2022.3 and later, Trimble Technician Portal (TTP).
The technician can add a labor line in a repair order section to record labor information after the repairs are completed.
The Line Type value is Labor.
This table reviews the fields used to add a Labor line.
Required field: *
Read-only field: §
| Field | Definition |
|---|---|
Line Type * |
By default, the system shows Part as the line type. Select Labor in the Line Type field. |
Description * |
Labor’s description When the field does not show a value, the system uses a combination of the section component description, cause, and correction codes to add a description automatically. |
Charge Date * |
Date the line item is charged on the repair order Value defaults to the current date. |
Mechanic * |
Mechanic’s identification number |
Currency § |
Currency to be used for the charge or price Examples:
By default, the system enters the value from the part’s record in Shop Inventory. |
Charge Category § |
Charge category for the repair order By default, the system enters the value from the part’s record in Shop Inventory. |
Labor Rate § |
Rate used to charge out labor |
Pay Grade |
Defines the hourly rate used for labor on an invoice Value defaults to Standard |
Hours * |
Number of hours worked Enter the total hours worked. Use the Labor Entry Via Start And End Times option to determine whether to enter time based on start and end times. |
Start Time § |
Time when mechanic’s labor begins Time value defaults to the time you create the line item |
Stop Time § |
Time when mechanic’s labor ends Time value defaults to the time you log off the line item |
Component * |
Defaults to the code entered for the section Component codes are based on the VMRS standard component codes for Systems, Assemblies, and Parts on a unit. The codes are developed in three sets of three digits. They are separated by dashes:
Note: The quick search for the component code enforces the max component code. If the max is set to system, the quick search displays 3-digit component codes. If the max is set to assembly, the quick search displays 3- and 6-digit component codes. If the max component level is set to part, the quick search shows 3-, 6-, and 9-digit codes. |
Component Description § |
Component code description By default, the system enters the description based on the component code selected. |
Cause |
Failure that caused the repair to be performed Select the primary cause code for reporting purposes. |
Correction |
Work performed to repair the cause of the repair Select the primary correction code for reporting purposes. |
Add a Comment line
Use the comment line to enter remarks about the work performed in the section.
The Line Type value is Comment.

All fields are required.
| Field | Definition |
|---|---|
Line Type |
By default, the system shows Part as the line type. Select Comment in the Line Type field. |
Description |
Enter a comment pertaining to the section. |
Charge Date |
Value defaults to the current date |
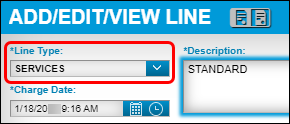
Add a Services line
Typically, services lines are charges to a unit that are not part or labor-related. These service lines, by definition, are vendor-supplied and appear on vendor repair orders.
By default, the system does not allow you to add a non-vendor supplied service line on a standard repair order. Your company may have set up the system to allow a service line directly on the repair order. However, this option is not recommended as a best practice for the TMT Fleet Maintenance application. See [Repairs]Allow Non-vendor Service Lines On Orders.
All fields are required.
| Field | Definition |
|---|---|
Line Type |
By default, the system shows Part as the line type. Select Services in the Line Type field. |
Description |
Service description |
Charge Date |
Date the line item is charged on the RO Value defaults to the current date. |
Charge Amount |
Charge amount for the service |
Currency |
Currency to be used for the charge or price Examples:
|
Charge Category |
Charge category for the repair order By default, the system enters the value from the part’s record in Shop Inventory. |
Add a Fee line
Fee lines are charges to a unit that apply to the repair being done. For example, replacing a tire may require a tire disposal fee.
All fields are required.
| Field | Definition |
|---|---|
Line Type |
By default, the system shows Part as the line type. Select Fee in the Line Type field. |
Description |
Service description |
Charge Date |
Date the line item is charged on the RO Value defaults to the current date. |
Charge Amount |
Charge amount for the service |
Currency |
Currency to be used for the charge or price Examples:
|
Charge Category |
Charge category for the repair order By default, the system enters the value from the part’s record in Shop Inventory. |
Edit lines on a repair order section
-
Look up the repair order.
-
In the Sections/Lines pane, select a section.
The section information is displayed. -
Select the checkbox for the line that you want to edit.
The Open button is enabled. -
Select Open.
The Add/Edit/View Line window opens. -
Make changes as needed.
-
When you are finished, do one of the following.
-
To save the line, select Save.
The system saves the line. The window closes. -
To save and add another line, select Save/Add New.
The system saves the line information. The window remains open to allow you to add another line. -
To close the window without saving your changes, select Cancel.
-
Remove lines from a repair order section
If you create a line item in error, you can delete it as long as the repair order status is Open.
To remove a line:
-
Look up the repair order.
-
In the Sections/Lines pane, select a section.
The section information is displayed. -
Select the checkbox in the line that you want to delete.
The Delete button is enabled.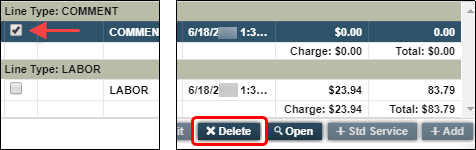
-
Select Delete.
The Delete Line system message window opens. It asks, "Are you sure you want to delete Number line(s)?" -
Do one of the following:
-
To delete the line, select OK.
The system deletes the line. The window closes. -
To close the window without saving your changes, select Cancel.
-