Fixed Assets

The Fixed Assets program allows you to manage costs and depreciation rates against your Power Units, Trailers, Equipment, or anything else you want to declare as a Fixed Asset.
| Previously, under GDS, the method used in the calculations in the Fixed Assets program was forced/hard-coded to 200% SD (IRS Publication 179 tables A-1 thru A-5). You now have the option of instead using the GDS 150% SD method (tables A-14 thru A-18) or GDS straight-line method (tables A-8 thru A-12). For ADS, the method is still forced to use the straight-line method (tables A-8 thru A-12). |
To access Fixed Assets:
| From this location | Go to |
|---|---|
TruckMate Menu and TruckMate Task List |
|
Windows Start Menu |
TruckMate 20xx > Fixed Assets |
Windows Explorer |
C:\Program Files (x86) > TruckMate 20xx > FA.exe |
How Do I?
How do I Configure my Depreciation settings using the Application Configurator?
If your Company only operates in the United States or Canada, you will might not have a use for 'CRA' or 'IRS' Depreciation functionality. Removing the ability to use these options may cut down on possible input errors.
-
Open the Application Configurator program (CONFIGEXPLORER.EXE); to do this, click: Start > Programs > TruckMate > Utilities > Application Configurator
-
In the Application Configurator program’s left-side tree menu, click the entry for FA.EXE. From the options that appear in the right-side menu, select the 'Both C & U Deprec.' option. When this option iis set at the default of 'TRUE' you will calculate both Canadian and US types of depreciation. When you double-click in the 'value' field and change the setting to 'FALSE' your programs will reflect your default settings depending on your currency settings.
For example: if all of your base currency setting is for Canadian funds, then your depreciation calculations will be too. And vice-versa, if your base currency unit is US funds, then your depreciation settings will reflect those relevant to US depreciation accounting principles.
-
Open the Fixed Assets program (FA.EXE); to do this, click: Start > Programs > TruckMate > Accounting & Finance > Fixed Assets > Fixed Assets
-
Your screen view of the Fixed Asset-Depreciation tab may have changed depending on your default settings. For example, if you chose to enter 'FALSE' in the 'Both C & U Deprec.' field, and your default currency settings are in Canadian funds, then your screen view will only show settings relevant to Canadian accounting principles, i.e., no 'IRS' radio button on the Depreciation tab.
-
Synchronize your settings to reflect your current Fixed Asset postings. Select the 'Re-calculation' option (on Depreciation Tab) to bring forward all posted information.
How do I Add my Fixed Assets to the Fixed Assets program?
-
There are two methods. You can begin by selecting the 'ADD' button on the bottom right-hand side of the program or choose the '' sign in the navigation bar. When you choose the 'ADD' button, you will have the option of importing fixed asset information already in the TruckMate programs such as TRAILERS, POWER UNITS, etc., into this Fixed Asset program. When choosing the '' button, you can add OTHER ASSETS, such as furniture, computers, etc.,
-
Go to the Setup Tab first. Choose the asset home-base location. The default will be set at HO, Head Office, but you can easily add further locations into the grid. View Fixed Assets - Setup tab for further detailed information.
-
Complete the tabbed information in the order of your choice: Acquisitions, Disposal, Depreciation, Warranty (for some fixed assets—this will link to information added to the Power Unit/Trailers/Equipment program(s)), Jobs (for some fixed assets—this will link to information added to the Power Unit/Trailers/Equipment program(s), Pictures, User, and Notes (for some fixed assets—this will link to information added to the Power Unit/Trailers/Equipment program(s).
How do I Add set Accumulated Depreciation to match what is currently on the books?
The Fixed Asset program does allow you to set up the accumulated depreciation to match what is presently on your books.
-
There is an Application Configurator configuration option 'in set-up mode' (initially set to true) that allows you to manually enter depreciation amounts for past, posted periods (and then double click on the last such month to set the 'posted to' so that the re-calculation (re-calc) will not overwrite your figures).
-
It is up to you if you wish to put just one lump sum figure for each asset in the final 'posted' month, or go back and enter monthly or yearly figures from the acquisition date forward.
-
The calculation of future depreciation amounts will not be affected; it is just a trade-off: is it worth the extra work to have your reports accurate period-by-period for past/closed periods?
-
Once the 'posted' figures in Fixed Assets match the figures in your G/L, you can set the config (configuration) to false and nobody will be allowed to make manual changes anymore (they must let the program calculate and they must use the 'post' button to actually flag the rows as posted).
How do I Setup the Depreciation History of an Asset?
There is a new section on the bottom of the Acquisition Tab that can be used to quickly setup the depreciation history of an asset (to match GL postings made previously):
-
Make sure the Application Configurator program configuration option 'In Set-up Mode' is set to 'True'.
-
Open the Fixed Assets program (FA.EXE), click: Start > Programs > TruckMate > Accounting & Finance > Fixed Assets > Fixed Assets
-
Create or import (from Power Unit, etc. via the toolbar button).
For each asset:
-
Go to Acquisition Tab and fill out fields in Acquisition box at top left (Net Acq.Cost is read-only and calculated based on Purchase Price, Adj’s and Personal Use).
-
Set new fields 'As At Fiscal Year-End' (click on search button to select from list) and 'Accum.Deprec'.
-
Save changes and the informational-only field NBV will calculate (as difference between Net Acq.Cost and Accum.Deprec).
-
Go to the Depreciation Tab and click 'Re-Calc'. A new row 'Bal.Fwd' is created below 'Initial' and rows below that are after the selected fiscal year-end.
-
In the 'period' view (radio button at bottom of depreciation tab) overwrite any period figures below Bal.Fwd that do not agree with your GL.
-
Double-click the last (highest date) row that has already been posted to your GL (the NBV on that row should match your GL).
The period you selected will now appear in the 'Posted To' box at bottom left.
-
If you re-click 'Re-Calc' button, all figures up to and including 'Posted To' will remain unchanged - ones after that date may change due to recalculation.
-
Once you have setup the depreciation history on all your assets, change the Application Configurator program configuration option 'In Set-up Mode' to False (from now on, no manual changes allowed - all postings to be done via red checkbox toolbar button).
| If you want to automate this process (help from TMW Systems Training and Implementation personnel is recommended), the 2 new fields are FA.BALFWD_YR and FA.BALFWD_AMT. Also note that if config 'Allow re-calc all' is set to True, you will prompted whether you wish to recalc just the currently selected asset (default) or all assets; so, to save time, you could enter all the histories for all the assets and not click 'Re-Calc' until the very end (or do a Re-Calc at the very end anyway to make sure you did not miss Re-Calc’ing any asset). |
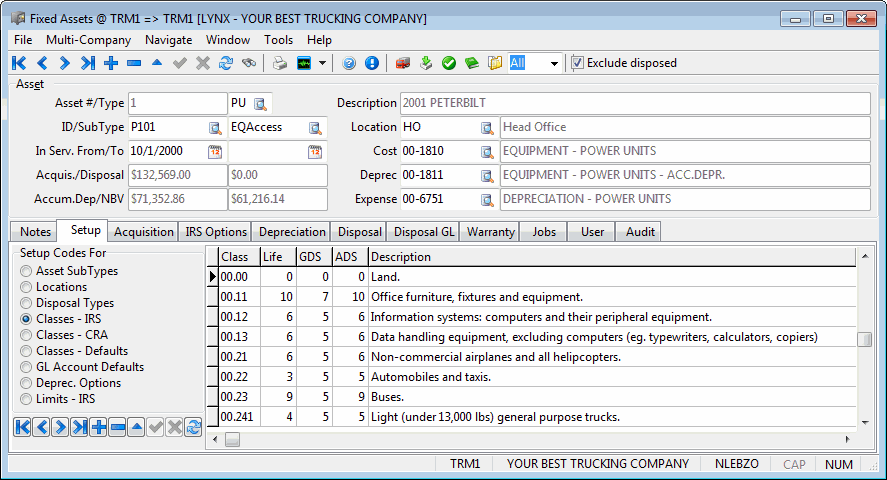
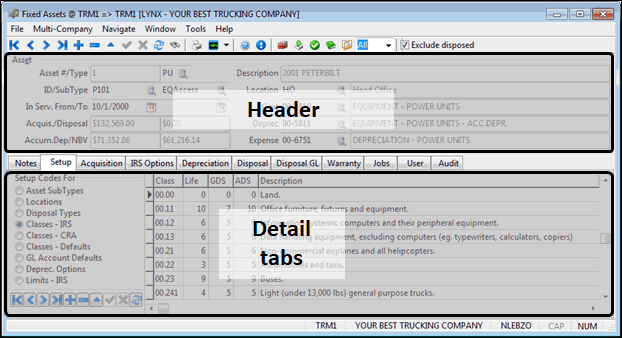
Layout of the Fixed Assets window
The Header section contains basic asset data and the tabs at the bottom contain additional detailed information.
Menu and toolbar options
This topic describes menu and toolbar options and functionality that are specific to the Fixed Assets window.
For information about common menu and toolbar options (i.e. File menu, Refresh, Multi-Company, etc.), see General menu and toolbar options in TruckMate basics.
Window Menu
GL Chart of Accounts
![]() Selecting this option will open an instance of the GL Chart of Accounts program.
Selecting this option will open an instance of the GL Chart of Accounts program.
GL Journal Entries
![]() Selecting this option will open an instance of the GL Journal Entries program.
Selecting this option will open an instance of the GL Journal Entries program.
GL Journal Entries Register
![]() Selecting this option will open an instance of the GL Journal Entries Register program.
Selecting this option will open an instance of the GL Journal Entries Register program.
Tools Menu
TruckMate Monitor
![]() Click the down arrow next to this button to access the various functions of the TruckMate Monitor.
Click the down arrow next to this button to access the various functions of the TruckMate Monitor.
Remember Position / Size
Selecting this option will maintain the program window position and size upon close. When the program is re-opened, it will appear the same.
More / Profiles
![]() Click this button to open an instance of the Trailer Profiles program with the details of the currently highlighted Trailer displayed.
Click this button to open an instance of the Trailer Profiles program with the details of the currently highlighted Trailer displayed.
Add / Import
![]() Clicking this button will automatically add active Company-owned (or leased) Assets from the Power Unit, Trailer and/or Misc. Equipment Profiles programs to the currently displayed Fixed Asset. A window will appear outlining the additions. Click 'OK' to add the new Assets.
Clicking this button will automatically add active Company-owned (or leased) Assets from the Power Unit, Trailer and/or Misc. Equipment Profiles programs to the currently displayed Fixed Asset. A window will appear outlining the additions. Click 'OK' to add the new Assets.
Post
![]() Select this button to Post your Fixed Asset information to your general ledger-chart of accounts as specified in the Fixed Asset program. On first usage, a dialog box will open asking you to verify your 'Fixed Assets - Post Depreciation' preferences.
Select this button to Post your Fixed Asset information to your general ledger-chart of accounts as specified in the Fixed Asset program. On first usage, a dialog box will open asking you to verify your 'Fixed Assets - Post Depreciation' preferences.
The Post Depreciation screen has a new checkbox ('Include Disposal GL'), which will inform the system to include the details from the Disposal GL Tab in the report (and posted if Post button clicked) provided:
-
There are GL entries in the grid in Disposal GL Tab (i.e. you have entered an out of service date, clicked disposal GL Tab’s 'Re-calc' button and 'Total Debits' & 'Total Credits' are balanced).
-
You have checked the 'Approved' flag (i.e. you have reviewed the GL and made any necessary corrections).
-
The period you are posting includes the out of service date.
-
The disposal GL has not been posted.
-
The asset will also get stamped with the audit number (column FA.DISP_GL_AUDIT displayed on Disposal GL Tab).
Diary
![]() Clicking this button will open the Diary window. You can also access the Diary by using the <CTRL><D> hotkey combination.
Clicking this button will open the Diary window. You can also access the Diary by using the <CTRL><D> hotkey combination.
Attach/Open Related Files
![]() Selecting this option will open the Attach / Open Related Files window, which replaces the 'Files Tab' from TruckMate 7.0.
Selecting this option will open the Attach / Open Related Files window, which replaces the 'Files Tab' from TruckMate 7.0.
Toolbar
Filter
Use the pull down menu to select a Filter option. The available records in the database will be filtered depending on the option you choose.
Exclude Disposed
Selecting this checkbox will disable viewing any information on Asset’s that have been disposed of. For example, you may only want to view current Fixed Assets but at some date you may desire to view previous Fixed Asset information.
Header Information
Asset #/Type
Asset # is automatically generated once you select either the 'Add' or '+' button.
To enter value in the type field select the search button and from there choose EQUIPMENT, OTHER FIXED ASSETS, POWER UNIT, CONTAINER or TRAILER. The 'Type' OA can be sub-categorized for types such as leasehold improvements, buildings, etc. The Asset 'type' field (PU, TR, EQ or OA) only indicates how the Asset was created in FA. For example, for PU, you must first create an entry in the Power Unit program and then basically 'import' it into Fixed Assets (using the 'Add' button above the 'Post' button). Similar for TR=Trailer and EQ=Equipment. Any other Asset (buildings, office equipment, etc) that is 'manually' added directly in FA (via the '+' on the nav-bar) is automatically set to OA=other Asset. Next to the OA field, a new field has been added where you can enter a brief alphanumeric descriptor. There is also a 'location' field for which you can create your own codes on the setup tab. These codes are used simply for grouping Assets for informational purposes (for Crystal reports or for searching, etc - they do not trigger any of the logic within the program) and do not actually have to refer to a location. So, you could create a code for buildings and use it in the 'location' field. Alternatively, if you do want to categorize by both type and location, you could create codes like BLDGS-A and BLDGS-B for buildings at locations A and B, etc (you have 10 characters).
ID/Sub Type
The ID is the asset type ID, it’s only enterable by the user when a new asset of type 'OTHER FIXED ASSETS' needs to be defined from this screen. For any other type this field is not enterable and must be populated by selecting one of the pre-defined types.
In Service From/To
Will revert to the date placed in the Fixed Assets Acquisition Tab, which is the purchase date. Sometimes, these dates are not the same. Once there is a date in the Acquisition tab—date, then double-click in the 'in service from/to' area and choose the start of service date from the calendar that appears.
Acquisition/Disposal
Shows the Net Acquisition Cost as per the Fixed Assets Acquisition Tab.
Accumulated Depreciation/NBV
The value of the Accumulated Depreciation is incremented at each accounting period by the amount set to be the depreciation value for the asset in the Setup Tab.
NBV (Net Book Value) is the arithmetic difference between the original value of the asset (plus or minus any asset modifications that caused a change in the asset value) and the accumulated depreciation for that asset.
Description
Enter a relevant, brief description of this Fixed Asset.
Location
Enter the Asset home-base location. To add a new purchase location, go to the Fixed Assets Setup Tab, and choose the radio button: 'Location'.
Cost
On an 'ADD', defaults to account code information entered in the Fixed Assets Setup Tab.
Depreciation
On an 'ADD', defaults to account code information entered in the Fixed Assets Setup Tab.
Expense
On an 'ADD', defaults to account code information entered in the Fixed Assets Setup Tab.
Setup Tab
It is recommended to add setup information for all of the radio buttons indicated. Selecting a radio button changes the information required in the Grids below. For example, you have the choices of: 'Asset Sub Types', 'Locations', 'Disposal Types', 'Classes-IRS', 'Classes-CRA',' Classes-Defaults', 'Account Defaults', and 'Depreciation Options'. See below for an explanation of all required items.
Asset Sub Types

Double click within the 'Type' and 'SubType' fields to set these values for the selected Asset. Enter a description by typing it manually into the 'Description' field.
Locations
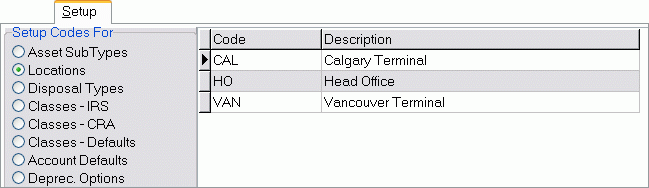
Double click in the 'Code' field to choose the purchase location for this Asset. To add another row to the Grid, select the '+' sign and create a new location.
Disposal Types
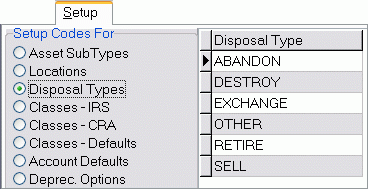
Choose a class from those shown in the Grid. Double click on your choice to choose the correct class for this Asset. To add another row to the Grid, select the '+' sign and create a new row.
Classes - IRS
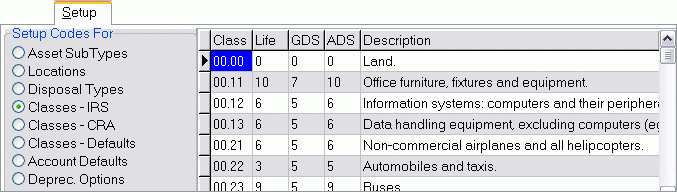
Double click in the correct Class field Type field to choose the disposal type for this Asset. To add another row to the Grid, select the '+' sign and create a new row.
Classes - CRA
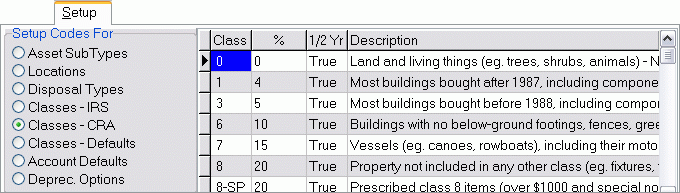
Double click in the correct Class field Type field to choose the disposal type for this Asset. To add another row to the Grid, select the '+' sign and create a new row.
Classes - Defaults
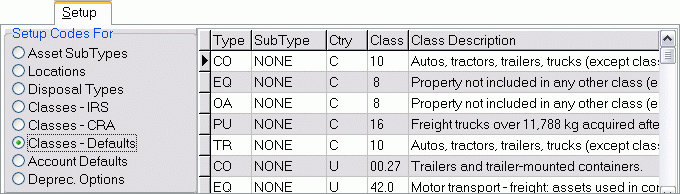
Double-click in the Type of your choice and a Select CCRA Class ID dialog box will appear where you can choose the appropriate class code for this item. The addition of new rows is disabled in this Grid.
GL Account Defaults
Three areas require an account code attached: 'COST', 'DEP' (Depreciation), and 'EXP' (Expense). Choose the correct accounts from those shown. To add a new account code, refer to the GL Chart of Accounts program. On an 'ADD', the information defaults to account code information entered in the Setup Tab. The addition of new rows is disabled in this Grid.
There are now three additional rows available to allow for combinations of type and sub-type: 'DISP', 'GAIN', and 'LOSS' (i.e. six rows per type / subtype). These new rows are used as defaults for the Disposal GL Tab postings. If the 'COST' account is set in the header (this was previously optional as it was not used for depreciation postings), then it, rather than the default one from the Setup Ttab, will be used when generating the Disposal GL.
| You can title-click all of the columns on this Tab to sort the records list (besides the 'Account Description' column). |
Context Menu
Default the Defaults
Selecting this option brings up a pop-window in which you can select a GL Account for each of the six GL Account Types (see above). This allows you to quickly assign the same GL account to all rows in the grid of the same type (e.g. 'GAIN'), regardless of asset type / subtype.
Even if you want to use different GL accounts for different types (e.g. a different 'GAIN' account for Power Units than for Trailers), when doing the initial setup, you can use this option to assign the most common account choices, then over-write the combinations you want to differ from the others.
| This option will over-write existing GL Accounts in the grid. |
When you add a new sub-type, six new rows will automatically be added to this grid, all with a blank GL Account, so when first setting up Fixed Assets, you should create all your subtypes before applying this right-click option.
Depreciation Options
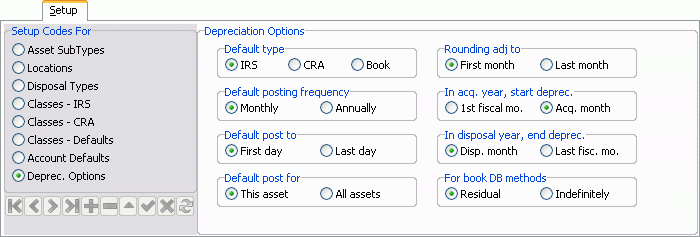
Default type
Choose from IRA, CRA, or Book.
Default posting frequency
Select either 'Monthly' or 'Annually'.
Default post to
Select 'First Day' or 'Last Day' of whatever your default posting frequency is above. For example, if you selected monthly as your default posting frequency, and then choose first day for your default 'Post To'. This would mean that depreciation postings would occur on the first day of every month.
Default post for
Select 'This Asset' or 'All Assets'. This allows you the choice of posting your depreciation information for each Assets, or all Assets together in one posting.
Rounding adjustment to
Often there is a rounding adjustment made reflecting on a few pennies over/below your usual depreciation posting amount. Select to post this information for the 'First Month' or 'Last Month' of the year.
In acquisition year, start depreciation
Select either the 'First Month' of the Fiscal Year, or the First Month you 'Acquired' this Asset.
In disposal year, end depreciation
Select to either end depreciation posting on this Asset in the 'Disposal Month', or the Last Month of the your Company’s 'Fiscal Year'.
For Book Declining Balance (DB) methods
Select either 'Residual' or 'Indefinitely'.
Limits - IRS
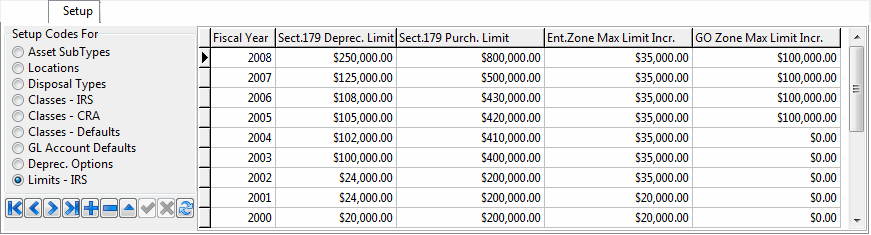
On selection of the 'Limits - IRS' option, the program will display a fairly static grid containing limits for IRS Section 179 amounts by Fiscal Year (in descending order so that the most recent year is at top).
The data in this section is used for the Section 179 Maximum Limit Calculation Form accessed from the IRS Options Tab. You can ignore this section if:
-
You are a Canadian company and do not have to file IRS tax returns
-
You do not claim any (optional) Section 179 amounts
-
You claim Section 179 amounts, but do not need TruckMate to confirm whether your total claim amount is within the annual limit.
The Table / Grid is normally already populated (by TMW Systems patches), but if a row is missing for the current year, you can add a row manually by using the TruckMate Navigation Bar, after getting new limits information from the IRS Publication 946 for the applicable tax year. For each fiscal year, the table contains four dollar limits:
-
Sect.179 Depreciation Limit*: Basic limit on total amount you may claim for all assets placed into service for the fiscal year. If you acquire and place in service more than one item of qualifying property during the year, you can allocate the section 179 deduction among the items in any way, as long as the total deduction is not more than this limit. You do not have to claim the full limit.
-
Sect.179 Purchases Limit*: This is basically a "r;rich person penalty". If the total cost of your qualifying section 179 property (from all assets) placed in service in a year is more than this limit, you must reduce the section 179 depreciation limit (but not below zero) by the amount of cost over this limit.
-
Enterprise Zone Max Limit Increase*: Depending on the fiscal year, an increased section 179 deduction may be available to liberty zone businesses, enterprise zone businesses, and renewal community businesses for qualified zone property or qualified renewal property placed in service in an empowerment zone or renewal community. You may increase your total section 179 limit by the total qualifying assets purchases, but only up to a fixed maximum.
-
GO Zone Max Limit Increase*: This is similar to the Enterprise Zone Max Limit Increase, except it is for Gulf Opportunity (GO) Zone qualified assets (certain property in a specific areas affected by hurricanes Katrina, Rita, and Wilma).
Acquisition Tab
The Acquisition Tab is divided into three main areas where you will add information in the Grids or fields provided. The three main areas are Acquisition, Ownership, and Miscellaneous.
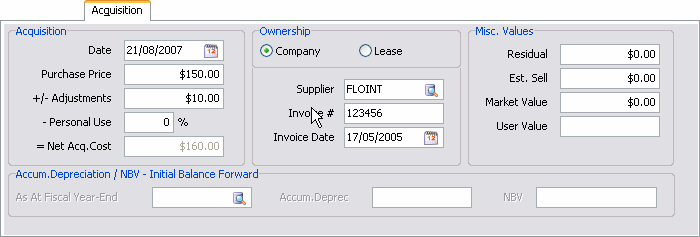
Acquisition
Date
Enter the date you acquired this Asset.
Purchase Price
Enter the purchase price of this Asset.
+/- Adjustments
Enter any adjusted costs, say, legal costs to acquire this Asset.
Less Personal Use
Enter a percentage, if you are using, or have used, this Asset for personal use. For example, if you purchase a truck and you use the truck 50% of the time for personal use, you would enter 50% in the Personal Use field.
| You will get an error message if you set personal use to >= 50% when the 'IRS System' = GDS on the Depreciation Tab (you must use ADS instead). |
Net Acquisition Cost
Automatically generated based on the figures above.
Ownership
Notice that when you choose the radio button 'Lease', information will show as above. However, when you choose the radio button 'Company', the information changes.
Miscellaneous Values
Residual Value
Enter your future estimated residual value of this Asset.
Estimated Selling Value
Enter your future estimated selling value of this Asset.
Market Value
Enter your future estimated market value of this Asset.
User Value
Enter your future estimated user value for this Asset. Refer to the Application Configurator option for FA.EXE to change the label on the 'user value'
Accumulated Depreciation/NBV - Initial Balance Forward
This new addition to the Acquisition tab can be used to quickly setup the depreciation history of an asset (to match GL postings made previously).
As At Fiscal Year-End
Enter a Fiscal Year Code in the space provided by typing an integer value (ie: '2005') or by clicking the search button. A selection menu will appear with the various Fiscal Year Codes setup in your system. Fiscal Year information is setup in the GL Chart of Accounts program.
Accum. Deprec
Enter a dollar amount that will represent the Accumulated Depreciation value in the space provided.
NBV
When you save changes by clicking the 'checkmark' button, this informational-only field will calculate (as difference between Net Acq.Cost and Accum.Deprec values).
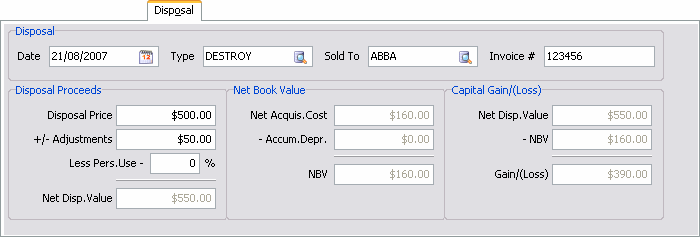
Disposal Tab
The main intention of the Fixed Assets program is to calculate and post the tedious, repetitive (and often voluminous) monthly depreciation figures. The program was NOT intended to make postings based on the disposals. Firstly, Canada and the U.S. have different ways of calculating and reporting gains/losses (basically, Canada pools changes for the year by Asset category, whereas in the U.S. you must track gain/loss Asset by Asset). Secondly, most companies do not have a lot of disposals during the year and when they do, it is usually a fairly simple GJ entry; which most accountants prefer to do manually (more control). Thirdly, calculation of depreciation for the internal accounting and for the external income tax reporting are often two different processes and depending on the company may require subjective decisions and manual adjustments; this means that upon disposal, the entries will have to be scrutinized and re-allocated at that time or as part of the year-end accounting. So, the only really 'required' field on the Disposal Tab is the disposal date (and only to stop depreciations from calculating beyond that point); all the other disposal fields are optional info-only fields.
The Disposal Tab is divided into four main areas: 'Disposal', 'Disposal Proceeds', 'Net Book Value (NBV)', and 'Capital Gain/Loss'.
Disposal
Date
Enter the date of disposal here.
Type
Select the search button and choose from one of the following: Abandon, Destroy, Exchange, Other, Retire, and Sell.
Sold to
Double-click to view a dialog box allowing you to select the client/salvager to whom the Asset was sold.
Invoice #
Enter the appropriate invoice number.
Disposal Proceeds
Where you configure the Net Disposable Value.
Disposal Price
Enter the selling price of the Asset.
+/- Adjustments
Enter any adjusted costs, say, legal costs to dispose of this Asset.
Less Personal Use
Enter a percentage, if you are using, or have used, this Asset for personal use. For example, if you purchase a truck and you use the truck 50% of the time for personal use, you would enter 50% in the Personal Use field.
Net Disposable Value
Automatically generated based on the figures above.
Net Book Value
Net Acquisition Cost
Amount taken from Fixed Asset Acquisition Tab.
Accumulated Depreciation
Tallies up the accumulated depreciation for this Asset as found on the Grid under the column Accumulated Depreciation located in the Fixed Assets Depreciation Tab.
Net Book Value
Automatically generated based on posted (tallies up the posted accumulated depreciation for this Asset) figures above.
Disposal GL Tab
The Disposal GL Tab has been added to the Fixed Assets program to allow the User to configure special one-time postings for the disposal of an asset.
Disposal GL Grid
The fields in this grid are populated by the FA_DISP_GL Table. This grid contains the special one-time postings for the disposal of the asset. If the asset is disposed (out-of-service date set) and Disposal GL has not been posted yet, you may edit any column in the grid (except description) and add/delete rows. A pick-list for both 'GL Account' and 'Account Type' is available via double-click (or selecting the <Enter> key when in a cell).
Re-calc
Provided that the Disposal GL has not yet been posted, selecting this button will clear and re-populate the grid (overwriting any manual changes that have been made).
The GL posting amounts generated by the 'Re-calc' button are:
-
'Net Acq.Cost' and 'NBV' amounts posted to reverse the original balance sheet (asset section) postings (credit to COST account and debit to DEP account).
The NBV figure is the projected NBV at disposal time, which is not necessarily the same figure displayed in the Disposal Tab (it only shows the NBV after posted, not projected, depreciations).
-
'Disp.Value' from the Disposal Tab is debited to DISP account.
-
'Gain/Loss' figure calculated on the Disposal Tab is either credited to PROFIT account or debited to the LOSS account.
Before populating the grid, clicking the 'Re-calc' button will effectively auto-select the Depreciation Tab’s 'Re-calc' button (deleting depreciation for fiscal years beyond the out of service date and possibly reducing the depreciation amount for the final fiscal year).
| The rows are generated into the grid by the stored procedure, CALC_FA_DISP_GL, which in turn calls a stub procedure (from the very end), CUSTOM_AFTER_CALC_FA_DISP_GL. This allows customization of the generation of the grid / table data. |
Clear
This will clear the grid (delete all rows) provided the GL has not been posted yet.
Total Debits / Total Credits
These fields display the totals of the data in the grid. If these are not balanced (equal), you will not be able to Approve or Post the Disposal GL.
Balanced
The 'Balanced' checkbox, when selected, will check if the 'Total Debits' is equal to the 'Total Credits' value, and ensure that all the rows in the Disposal GL Grid are set to valid GL Accounts. You cannot approve the disposal GL if it is not balanced.
Approved
Select this flag when you have reviewed the GL and are ready to post. This flag is disabled if the 'Balanced' checkbox is not flagged, or if the GL has already been posted. The person who last checked this flag (and when) is recorded and displayed both here and on the Audit Tab. If another user changes the GL, then the flag is automatically unchecked (as the first person did not see, let alone approve, the second person’s changes).
Posted
This flag is simply based on whether or not an audit number is displayed.
Audit #
If the Disposal GL has been posted, this field indicates the audit number (so you can re-print that audit if necessary). If this field is blank, this means the GL has not been posted yet.
IRS Options Tab
The IRS Options Tab allows you to set some taxation options that have been hard coded in previous versions of TruckMate. This Tab will only appear in the Fixed Assets program if the Application Configurator program > FA.EXE > 'Both C & U Deprec.' option is set to 'True', or if your Company’s default currency is set to 'USD' in the Company Profiles program.
Qualified Property
This section contains three checkboxes allowing you to indicate whether the asset is eligible property for 'Section 179', 'Enterprise Zone (or Liberty Zone)', or 'Gulf Opportunity (GO) Zone'.
The 'Section 179' option is checked by default as most assets are eligible for Section 179; the other two are unchecked by default. If Section 179 is unchecked, you may not claim a Section 179 amount in the 'Section 179 Claim Amount' field, for it will be disabled.
All three checkboxes are used in calculating your annual limit (see below).
Optional First Year Accelerated Depreciated
Net Acquisition Cost
This figure is read-only and is carried forward from the Acquisition Tab.
Section 179 Claim Amount
This field is only enabled if you have flagged the 'Section 179' option in the Qualified Property section (see above). You may enter any amount between $0 and the Net Acquisition Cost. This amount will be added to your first year’s depreciation amount for the displayed Fixed Asset.
The starting amount for depreciation calculations, usually the Net Acquisition Cost, is reduced by this Section 179 Claim Amount (difference is displayed as a read-only field below the claim amount).
Check Limit Button
Selecting this button will display the new modal Section 179 Maximum Limit Calculation Form.
Pre-Bonus Net Value
Displays the net value prior to any bonus claim amounts that may be applied.
Bonus Claim Amount
Starting in 2008, after deducting the section 179 claim amount from the net acquisition cost, you may also depreciate a further 50% of the net amount in the first year. Like the section 179 claim, the regular depreciation starting figure is reduced - final net figure for regular depreciation is displayed below this field (read-only).
In years prior to 2008, you could take either a 30% or 50% bonus, but only on certain qualifying assets. It is left to the user to study the IRS Publication 946 document for the given year to determine:
-
Whether an asset is eligible for a bonus, and
-
Whether the bonus rate is 30% or 50%.
If you decide to take a bonus, there is a right-click option on the field to automatically calculate either '30%' or '50%'.
| You will get an error if you enter a Section 179 claim (or bonus amount) and enter a 'Balance Forward Figure' (on the Acquisitions Tab). The two features conflict; you cannot use both options on the same asset. |
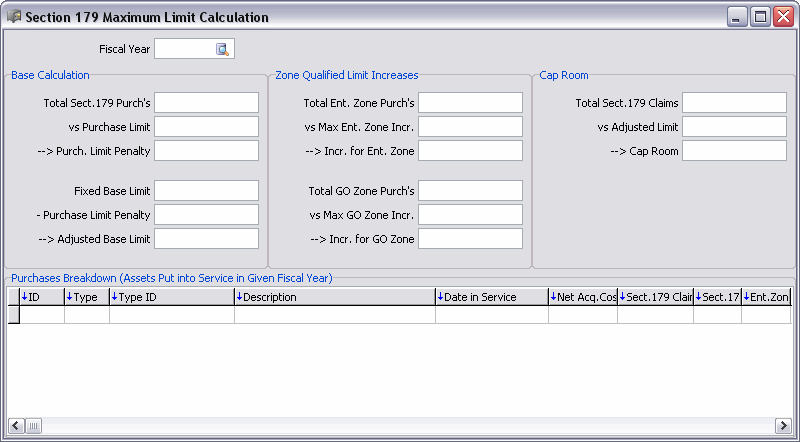
Section 179 Maximum Limit Calculation Form
The Section 179 Maximum Limit Calculation form is accessed from the 'Check Limit' button on the IRS Options Tab. It will list (in a grid in lower section) all assets put into service for the given year. It calculates total purchase values for each 'Qualified Property' type. Using these totals and the amounts from the Setup Tab > Limits - IRS section, it summarizes your purchase and claim amounts re: section 179 for a given fiscal year to help you determine how much cap room you have left (i.e. how much you may increase your total section 179 claim amount by on one or more assets), or whether you have gone over the limit (and need to reduce your claim amount on one or more assets). Except for the 'Fiscal Year' value (which you may select from years listed in the Setup Tab > Limits - IRS section), all fields on this form are read-only.
| Your Section 179 maximum limit may actually be less than the calculated figure in this screen because there is also a Business Income Limit. The total cost you can deduct each year after you apply the dollar limit is limited to the taxable income from the active conduct of any trade or business during the year. Any cost not deductible in one year under section 179 because of this limit can be carried to the next year. So, this screen is a guideline only; it is up to you, the user, to make sure you are not exceeding your maximum allowed section 179 limit for the year. |
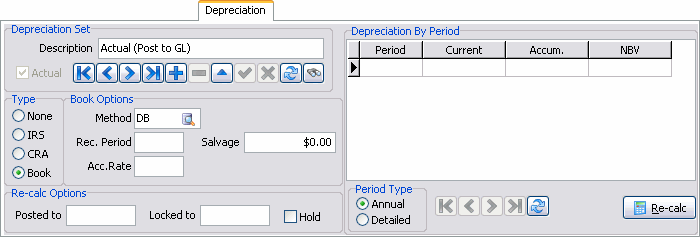
Depreciation Tab
The Depreciation Tab contains a variety of functionality to configure your Depreciation methods. Selecting one of the radio options on the left side of the Tab ('IRS', 'CRA', or 'Book') will change your data input settings. Your selections will appear in the Depreciation Grid on the right.
| You must configure your programs to reflect your current Fixed Asset postings. To do this, see How do I Configure my Depreciation settings using the Application Configurator? |
Depreciation Set
Description
This field displays a short description concerning the Depreciation Type.
Type
Depreciation Type
Select 'IRS', 'CRA', or 'Book'. This will depend on your Application Configurator settings, as discussed in the Need to know How? page for Fixed Assets.
IRS Depreciation
System
Select GDS, or ADS. Generally, accounting principles use GDS unless you choose or are specifically requested by law, to use ADS.
Class / RP
Select the search button to open the appropriate class for this client.
Convention
Select your conventional accounting principle preference from one of: mid-month, mid-quarter, mid-year.
Posted to
Shows the date your depreciation postings are completed at, which should coincide with the last date in the Grid shown to the right.
CRA Depreciation
Class
Select the search button to open the appropriate class for this client.
Rate %
Automatically generated once you choose the correct class above.
1/2 Year Rule
Automatically generated.
Book Depreciation
Method
Select the search button and a depreciation method dialog box will appear. Choose one of the following depreciation methods: DB-Fixed declining balance, DBA-accelerated declining balance, SL-straight line, or SYD-sum-of-the years' -digits.
| For book method straight-line depreciation, for the final posting year, you can either: (a) continue posting the same Fixed monthly amount as in prior years (and stop posting at some point during the year when you have fully depreciated down to the salvage value) or (b) split the remaining depreciation amount (NBV less salvage) evenly over the 12 months (or whatever your periods per fiscal year). To choose which method, set the 'In disposal year, end deprec.' option in 'Deprec. option' of the setup tab to either (a) 'Disp. month' or (b) 'Last fiscal month'. |
Recovery Period
Enter the recovery period, in years.
Acc. Rate
Enter a percentage rate. This is for the accelerated declining balance method only. Common choices are 125, 150, and 200.
Salvage Value
Enter the minimum or final NBV where the depreciation amounts would no longer be calculated.
Posted to
The date shown here occurs after you’ve chosen to post the depreciation amounts shown in the Grid. You can modify this date by double-clicking in row in the depreciation Grid in SETUP MODE (an Application Configurator program option). If you are not in SETUP MODE, this field can only be changed via the POST button (i.e., it cannot be set manually).
Re-Calc Options
Select the 'Re-Calc' button in the bottom right of the Tab to post depreciation amounts. RECALC only re-calculates the depreciation figures for periods AFTER 'posted to'. Modify your Application Configurator settings as follows:
Allow Re-Calc All
The default is set at 'False' and this means that when you select the 'Re-calc' button on the Depreciation tab the program will only recalculate amounts for the current Asset. If you set this option to 'True', then upon selecting the 'Re-calc' button you will be prompted with a message allowing you to re-calculate for only the current Asset or for all Assets (in the current filter).
Hold
Select to prevent depreciation postings (via the POST button) for this Asset. Even if you’ve selected ALL ASSETS in the Fixed Assets - Setup Tab, this selection will override the Setup Tab setting and allow you to prevent depreciation postings for this particular Asset.
Annual
Select if you would like to show annual depreciation amounts.
Monthly
Select if you would like to show monthly depreciation amounts.
Locked To
New field "Locked To" at bottom left of depreciation tab works similar to 'Posted To' in that when you click the 'Re-calc' button, no figure will be over-written for any period up to either of these 2 dates. The 'Posted To' can still be set by double-clicking a row in the grid in detailed (monthly) view. Both 'Posted To' and 'Locked To' can be set via right-click from the grid.
| Adjusting 'Posted To' requires the Application Configurator option 'In Set-up Mode' to be set to 'True'; adjusting 'Locked To' has no such requirement. If you try to set 'Locked To' to a date earlier than 'Posted To', you will get a warning because this does not make sense (posted periods are already locked). |
Depreciation Grid
Should automatically generate amounts depending on your chosen settings.
Period
Will show correct date as per preferences, i.e., month/year, etc., To view depreciation amounts projected into the future, add future fiscal years to the GL Chart of Accounts program.
Cost Adj.
When a component is added to the asset to enhance the asset’s utilization and is considered as an integral part of the asset, a cost adjustment can be made. The additional cost can be added to the book value of the asset and must be depreciated over the remaining life of the asset (along with the original cost). This field allows TruckMate users to adjust the cost of the asset based on the changes made to the asset.
| The cost adjustment can only be done for the Canadian CRA depreciation type, it’s not available for any other type. |
Current Dep.
Will show corresponding depreciation amount for the period.
Accumulated Dep.
Will show accumulated depreciation amount up to that period.
NBV
Will show current net book value with accumulated depreciation deducted.
Warranty Tab
The Warranty Tab contains information related to your Fixed Assets warranties.
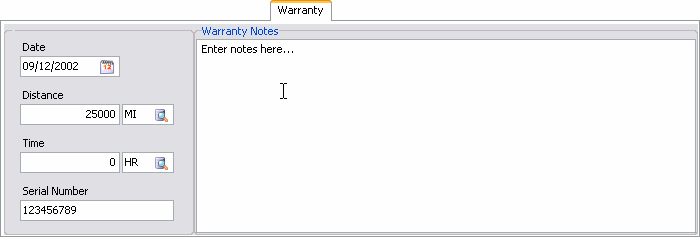
Date
Is used to store the date that the warranty began. Double click for a calendar selection form.
Distance / Unit
If the warranty is valid for a specific distance, enter the distance in the field on the left. Double click in the field on the right to select the distance unit (as configured in the Codes Maintenance program).
Time / Unit
If the warranty is valid for a specific time period, enter the amount of time in the field on the left. Double click in the field on the right to select the time unit (as configured in the Codes Maintenance program).
Serial Number
Enter the Serial Number in the space provided.
Notes
Is a Free Format field where general Notes about the warranty can be entered.
Jobs Tab
You may add maintenance jobs to an Asset using the Jobs Tab. Double-click on the Job Code field to select a job code. Jobs are predefined codes that contain parts and labour details for a maintenance task. Job codes are configured in the R&M Configuration program. Adding a maintenance job to an Asset on this tab is the same as adding a maintenance job in the R&M Maintenance program.
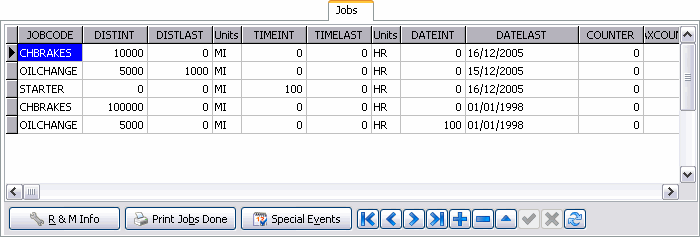
R&M Info button
Opens to a Fixed Assets - Maintenance info dialog box.
Print Jobs Done button
Opens to a Report Selection where you can select the R&M Jobs Report.
Special Events button
Opens to a Special Events dialog box where you can add information about the special event. This is exactly the same as the Special Events dialog box shown in the Power Unit Profiles program’s Repairs and Maintenance section.