Menu and toolbar options

This topic describes menu and toolbar options and functionality that are specific to the Multi Mode Dispatch window.
For information about common menu and toolbar options (e.g., File menu, Refresh, Multi-Company, etc.), see General menu and toolbar options in TruckMate basics.
Pickups menu
| Icon | Menu Option | Definition |
|---|---|---|
|
Create New Pickup |
Opens the Short Form Pickup Entry window used to enter Pickup information. |
|
Clear Pickup Summary Section |
Clears all information from the Pickup Summary Section. |
|
Refresh |
Refreshes the details on the Unassigned Freight tab > Pickups tab to reflect any recent changes. |
|
Filter |
Opens the Freight Bills Filters window to create custom filters for the Pickups/Cross Dock grids. |
|
Clear Filter |
Clears any custom filters currently being applied to the Pickups grid. |
|
Map Pickups |
Opens the Trimble Map view window, with all your scheduled pickup locations highlighted. |
|
Print Pickup Route Summary |
Opens the Report Selection window where you can select and print the Pickup Route Summary report. (cityd_pu_route_summary.rpt) |
Deliveries menu
| Icon | Menu Option | Definition |
|---|---|---|
|
Clear Delivery Summary Section |
Clears all information from the Delivery Summary Section of the Multi Mode Dispatch program window. |
|
Refresh |
Refreshes the details on the Unassigned Freight section > Deliveries tab to reflect any recent changes. |
|
Filter |
Select this button to open the Freight Bills Filters window, which allows the user to create custom filters for the grid. |
|
Clear Filter |
Clears any custom filters currently being applied to the Deliveries grid. |
|
Map Deliveries |
Opens the Trimble Map view window, with all your scheduled delivery locations highlighted. |
|
Print Delivery Route Summary |
Opens the standard Report Selection window where you can select and print the Delivery Route Summary report. (cityd_del_route_summary.rpt) For more details on report functionality in TruckMate, see the Crystal Reports Reference. |
Trip menu
| Icon/Keybd | Menu Option | Definition |
|---|---|---|
<Ctrl+O> |
Optimize Trip |
Opens the Trip Optimizer window to edit the trip legs and assign Freight Bills to be picked or dropped in whatever order required. (Same function as is offered in the Dispatch program.) |
<Ctrl+A> |
Load Offer |
Sends a 'Load Offer' message to the Driver for review/acceptance. The message is sent though the Mobile Dispatch system to the mobile device installed on the power unit that is assigned to the trip. You can also send a different macro than the Load Offer macro, or a free form message. The Load Offer macro is configured in the Communication Macro Setup program with the specific information required for your Load Offer communication and displayed on the Load Offer window. Note: Load Offer functionality is now enabled for Resources that have multiple Mobile Communications devices. When sending a Load Offer you will be prompted for the Mobile device to send to if more than one is available, and the load offer macro to use if more than one is available. |
|
Filter |
Opens the Filter Trips window, which allows the user to create field-specific or SQL-based custom filters for the Trip grid. A default filter can be set for each of the 'Active Trips Section' grids in Security Setup > Security > Business Events > Filters. |
|
Clear Filter |
Clears any custom filters currently being applied to the Trip grid. |
<Ctrl+D> |
Match Driver |
Allows you to assign a Driver to the selected Trip in the Trip grid. The Driver Selection window will open, allowing you to see the Driver Codes setup in your system, as well as the Driver’s current location and status. Driver Codes are maintained by the Driver Profiles program. |
<Ctrl+U> |
Match Power |
Allows you to assign a Power Unit to the selected Trip in the Trip grid. The Power Unit selection window will open, allowing you to see the Power Unit Codes setup in your system, as well as the Unit’s location and status. Power Unit Codes are maintained by the Power Unit Profiles program. |
<Ctrl+T> |
Match Trailer |
Allows you to assign a Trailer to the selected Trip in the Trip grid. The Trailer selection window will open, allowing you to see the Trailer Codes setup in your system, as well as the Trailer’s location and status. Trailer Codes are maintained by the Trailer Profiles program. |
Match Chassis |
Allows you to assign a Chassis to the selected Trip in the Trip grid. The Chassis selection window will open, allowing you to see the Chassis Codes setup in your system, as well as the Chassis' location and status. Chassis Codes are maintained by the Trailer Profiles program. |
|
Match Container |
Allows you to assign a Container to the selected Trip in the Trip grid. The Container selection window will open, allowing you to see the Container Codes setup in your system, as well as the Container’s location and status. Container Codes are maintained by the Container Profiles program. |
|
<Ctrl+M> |
Match Freight Bill |
Allows you to select and assign a Freight Bill to the selected Trip in the Trip grid. |
<Ctrl+R> |
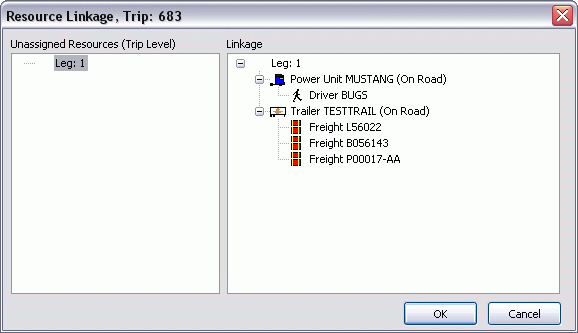
Show Linkage |
Provides a split window view for the selected leg that includes any unassigned resources in the left pane and the resource linkage in the right pane of the Resource Linkage window.
|
|
Map Trips |
Opens the Trimble Map View window, showing geographic details for all of the Trips selected in the Trips List. |
<Ctrl+L> |
Copy Trip |
Allows you to make copies of a selected trip, as well as copy all the freight bills assigned to that trip. |
Window menu
The Window menu items provide a convenient way to access other related TruckMate programs.
-
Customer Service
-
Driver Call-In
-
Terminal Maintenance
-
Trip Tracer
Tools menu
For information about common menu and toolbar options (e.g., TruckMate Monitor, Screen Design, etc.), see General menu and toolbar options.
| Icon | Menu Option | Definition |
|---|---|---|
Reload Configuration Options |
Reloads your current Application Configurator program settings for the Multi Mode Dispatch program. |
|
|
Terminal Select |
Opens a popup window that allows the user to switch to a different terminal. |
|
Driver Pay Information |
Opens the Driver Pay Information window consisting of a large grid that details all Driver Dispatch information, such as 'Pickups Assigned', 'Pickups Complete', 'Deliveries Loaded' etc. The details of this grid are for informational purposes only and thus cannot be edited. The user does, however, have the option of printing the Driver Summary information by selecting the 'Print' button on the Driver Summary window.
|
|
Generate Trips from Schedule |
Opens the Generate Trips from Schedule window and allows you to generate trips from defined schedules. Filters can be used for Process Dates range (From / To) and Terminals range (From / To), the 'Refresh' button on the tool bar will fetch the available schedules that satisfy the selected filter ranges. If you select a schedule and click the 'Generate Trips' button on the tool bar, the system will auto generate trips from the selected schedule. Click on the title of any column on the grid to sort the data based on that column.
|
|
Edit Trip Schedules |
Opens the Trip Schedules window, which allows you to create/edit new Trip Schedule templates (used by the Generate Trips from Schedule window) for the currently selected City Dispatch Terminal. |
|
Booking Numbers |
Opens the Booking Numbers window which allows you to manually create booking information records, and/or assign them to a trip leg, and store the data associated to them. |
|
Match Bills to Scheduled Trips |
Will auto match all freight bills created from LTL quotes to schedule trips, a warning window will popup requesting user confirmation to go on with the process. |
|
LTL Daily Quotes |
Opens the Daily LTL Quotes for terminal window displaying all quotes available for the currently selected terminal. Quotes that appear here have had the 'LTL Daily Order' flag selected and a terminal code chosen in the 'LTL Terminal' field on the Customer Service program > Quotes window. |
Show Reefer Alarms |
Opens the Reefer Alarms window to view a grid list of any reefer alarm events. |
|
|
Schedule View |
Opens the Schedule View window with a time-based view of trips and resources. |
|
Trimble Map View |
Opens the Trimble Map view window. |
|
Export to Direct Route |
This option exports current pickups and deliveries to Appian Direct Route. An XML file will be generated that can then be imported in Appian Direct Rout. Once done, Direct Route returns the result in XML format to a TruckMate web service. TruckMate then translates the XML file by assigning freight bills to Trips and Legs as optimized by direct route. |
Interactive Mileage |
Opens the Interactive Mileage IDSC Expert Fuel Advice / IDSC Fuel Request / IDSC Netwise Selecting these options will open their (respective) external application (if available). For more information, see the Expert Fuel Optimization window documentation. |
Toolbar - Multi Mode Dispatch

Except where noted, the Toolbar options also appear in the menus. This topic only describes toolbar options specific to the Multi Mode Dispatch window and not already described in the menu options.
For information about common menu and toolbar options (e.g., File menu, Refresh, Multi-Company, etc.), see General menu and toolbar options in TruckMate basics.
| Icon/Keybd | Menu Option | Definition |
|---|---|---|
|
Reset Screen to Default |
Resets the window layout to a default state if you have been rearranging the layout and want a quick way to reset. |
|
Trimble Dispatch Advisor |
Opens the Trimble Dispatch Advisor (TDA) load-planning aid that recommends the drivers and tractors that are a better match for specific loads. |
Menu option details - Multi Mode Dispatch
Short Form Pickup Entry window
![]() The Create New Pickup option opens the Short Form Pickup Entry window, which you can use to enter Pickup information from within the Multi Mode Dispatch program.
The Create New Pickup option opens the Short Form Pickup Entry window, which you can use to enter Pickup information from within the Multi Mode Dispatch program.
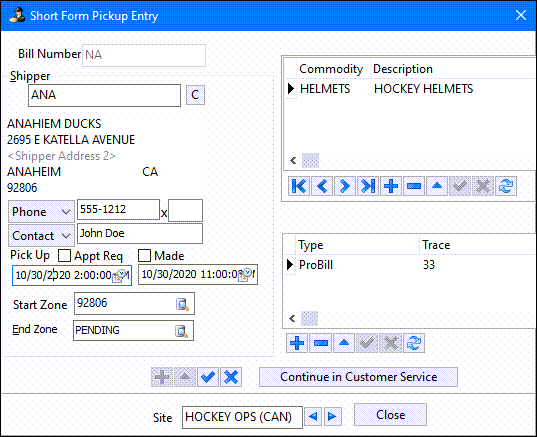
Double-click the Shipper field to open the Customer Search grid window and select a shipper to start the entry process and auto-populate some of the information.
| Field | Definition |
|---|---|
Bill Number |
This field will automatically populate (with NA for a new bill) when a shipper is selected for the new Freight Bill. |
Shipper |
Click the Shipper field and hit the 'Enter' key on your keyboard or double-click the field to access a grid listing the available shippers in your system. After you select a shipper, their address information will appear in the fields below. You can edit this information just for this bill by clicking within the fields and using your keyboard. When the Pickup Freight Bill is created, the Shipper field will automatically default back to the shipper code that was last selected, making it easier to enter multiple Pickup Bills for a single shipper: you can just change the Start/End Zones and post the record. |
|
Because the Create Pickup window remembers the previous Shipper’s information (to make multiple Freight Bill entry for a single Client easier,) you may have to clear this information if you are switching to a different Client. Simply select this button to remove the Shipper (and origin) information from the fields on this window. |
PickUp > Appt Req / Made |
Select the checkboxes to indicate if an appointment is required or already made and enter the start and end times to define the appointment window time frame. |
Start Zone |
The Start Zone will automatically populate based on the shipper you selected. (The shipper’s Starting Zone is configured in the Customer & Vendor Profiles program.) You may change this Start Zone Code by clicking the |
End Zone |
Choose the Delivery Zone for the freight bill you are creating by clicking the |
Freight Bill Details grid |
Click the '+' button to begin adding commodities to the new freight bill. This grid functions similarly to the grid found on the Details tab of the Customer Service program. |
Trace Numbers grid |
Click the '+' button to begin adding trace number information to the new freight bill. This grid functions similarly to the grid found on the Trace# tab of the Customer Service program. |
Continue in Customer Service |
As the Short Form Pickup Entry window only contains a small number of options concerning the creation of a Freight Bill, this button is included. By clicking this button you will invoke an instance of the Customer Service program with the partial Freight Bill details automatically copied from the fields you have setup in this window. This way, you save time in creating the new Freight Bill, and can quickly modify your already started Bill using the advanced functionality of Customer Service. |
Site |
Select the Site to be used when creating this new freight. |
Freight Bills Filters window (Pickups / Deliveries)
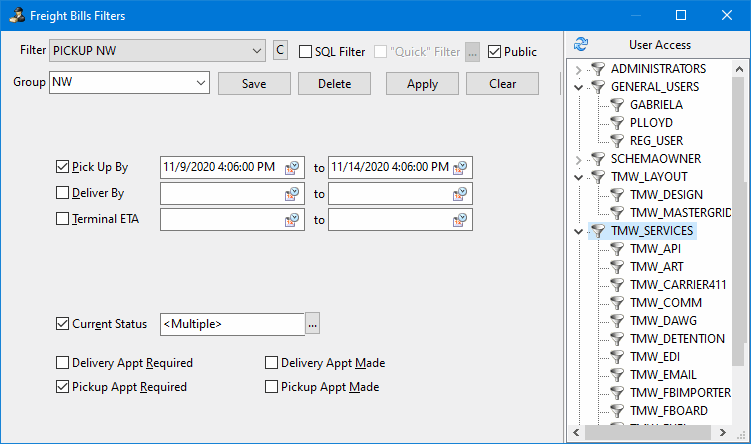
![]() The Filter option for Pickups and Deliveries opens the Freight Bills Filters window window, which you can use to filter which trips to display in the Pickups or the Deliveries grids.
The Filter option for Pickups and Deliveries opens the Freight Bills Filters window window, which you can use to filter which trips to display in the Pickups or the Deliveries grids.
| Field | Definition |
|---|---|
Filter |
After saving a configured filter, the filter name will appear in this field. You can use the drop-down menu to view the list of previously configured filters and to load a previously saved filter into the Multi Mode Dispatch program and filter your records accordingly. |
Clear |
Selecting this button will remove all of the filtering options you have selected for the displayed filter. |
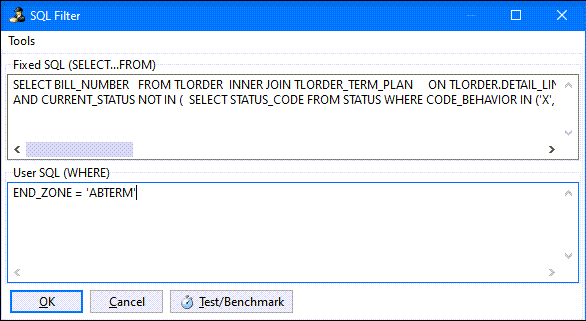
SQL Filter / Configure SQL |
Selecting the SQl Filter checkbox will display a "Convert current filter to SQl" message where selecting Yes opens the SQL Filter configuration window. Selecting the
TIP: Use the Tools menu > Insert Column Name option to select a column name for this table from a list. |
Public |
Selecting this checkbox will allow other users to access and use this filter. |
Group |
Any filters you create can be associated to a group. Groups are defined in the Profiles > Customer & Vendor Profiles program > Customer Profile window > Groupings tab. Customer Grouping Codes are also typically used for reporting purposes, as well as for determining Shipper / Consignee Detention Rates per Group in the Rates Maintenance program > Detention tab. For example, you could create a group containing all B.C. customers. |
Save |
Once you have configured some filtering options, select the Save button to save the details and provide a name for the filter. |
Delete |
To delete a previously configured filter, use the drop-down menu in the Filter Name field and select the Delete button. The filter will be removed from the list. |
Apply |
Once you have configured some filtering options, select the Apply button to filter the data. |
Clear |
Removes any filters currently applied. |
Pickup By |
If you would like to filter records on the Pickups or Deliveries tab by the freight bill Pickup By date, configure a date range by selecting the calendar buttons in the Start and End range fields. |
Deliver By |
If you would like to filter records on the Pickups or Deliveries tab by the freight bill Deliver By date, configure a date range by selecting the calendar buttons in the Start and End range fields. |
Terminal ETA |
If you would like to filter records on the Pickups or Deliveries tab by the freight bill Terminal ETA date, configure a date range by selecting the calendar buttons in the Start and End range fields. |
Terminal ETA |
If you would like to filter records on the Pickups or Deliveries tab by the freight bill Terminal ETA date, configure a date range by selecting the calendar buttons in the Start and End range fields. |
Delivery Appt Required / Delivery Appt Made |
These flags filter the freight bills available by only displaying those bills that have a Delivery Appointment Required or if they have had their delivery appointment completed. |
Pickup Appt Required / Pickup Appt Made |
These flags filter the freight bills available by only displaying those bills that have a Pickup Appointment Required or if they have had their pickup appointment completed. |
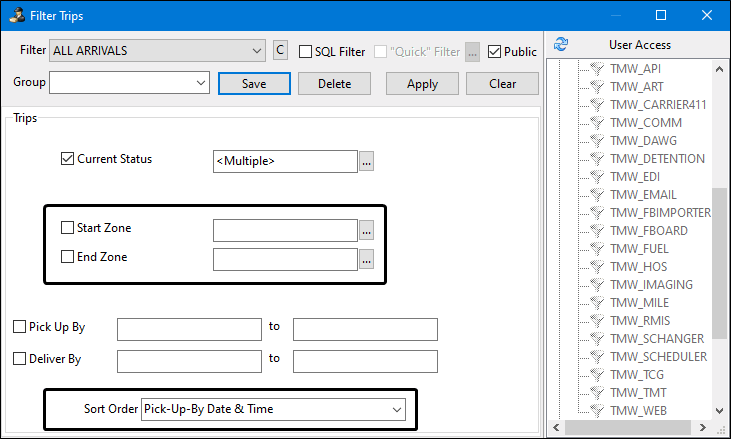
Filter Trips window (Trips)
The Filter Trips window accessed by selecting the ![]() Filter option in the Trips menu / Trips grid is similar to the Freight Bills Filters window except that the Terminal ETA date fields are removed and the following fields are added:
Filter option in the Trips menu / Trips grid is similar to the Freight Bills Filters window except that the Terminal ETA date fields are removed and the following fields are added:
| Field | Definition |
|---|---|
Start / End Zone |
Use the pick-select button to select a starting and ending zone. |
Sort Order |
Use the drop-down list to indicate the sort order. |
Driver Pay Information
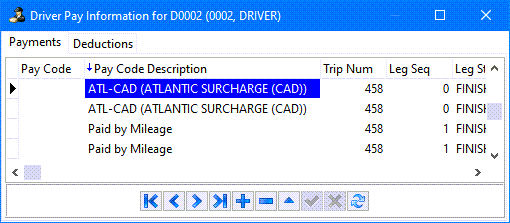
The Tools > Driver Pay option opens the Driver Pay Information window displaying Payment and Deduction information for the selected driver using the same grid as the Accounting & Finance > Driver Payables > Driver Pay Audit program.
You can also create new driver pay entries using the navigation tools at the bottom of the window.
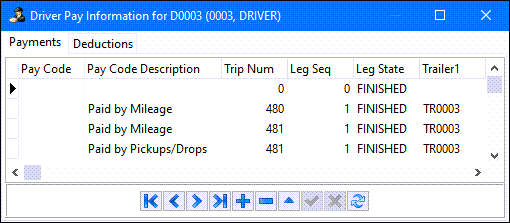
See the Accounting & Finance > Driver Payables > Driver Pay Audit program for details about driver payments and deductions.
Generate Trips from Schedule
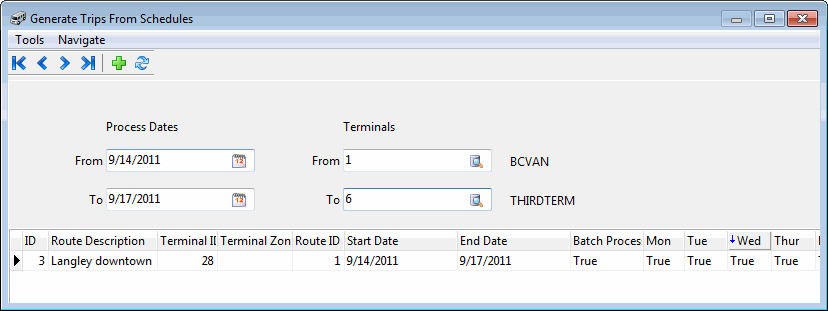
The Tools > Generate Trips from Schedule option opens the Generate Trips from Schedule window. This window is used to create recurring trips (e.g., setup daily trip schedules), based on templates created by the Trip Schedules window.
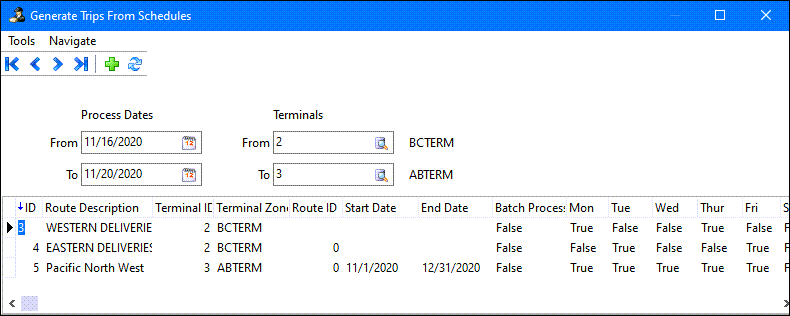
Enter the Process Dates and Terminals to define a time range and the from/to locations and click the ![]() Refresh to see a list in the bottom grid describing the trips that would be created with these settings.
Refresh to see a list in the bottom grid describing the trips that would be created with these settings.
Click ![]() Create Trips to actually create the trips.
Create Trips to actually create the trips.
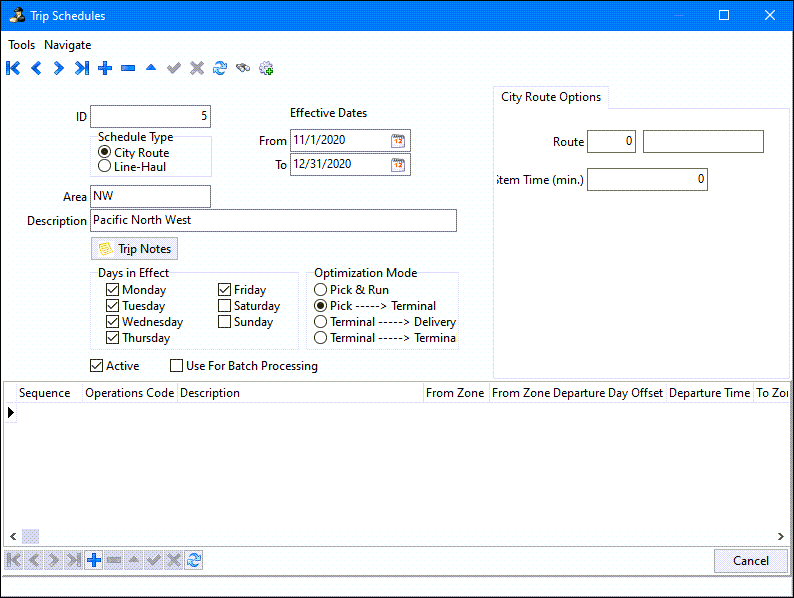
Trip Schedules window
The Tools > Edit Trip Schedules option opens the Trip Schedules window.
The Trip Schedules window consists of two main sections, the general information on the upper part of the window where different attributes and descriptions can be defined and the detailed multiple legs section where the details of the different legs of the trip can be defined and sequenced.
This table lists field definitions.
| Field | Definition |
|---|---|
ID |
This value is automatically generated when the User selects the '+' button on the TruckMate Navigation Bar in order to create a new Trip Schedule. |
Schedule Type |
The Schedule Type value allows you to specify if the selected trip schedule is a pickup / delivery route or a line-haul route scenario. |
Area / Description |
These two options are used to identify the Trip Schedule. Enter a text name for the Trip Schedule in the 'Area' field (corresponding to the location the Trip Schedule services) and enter a short text description in the 'Description' field. Note: For best performance and to avoid any possible faults, it is recommended that you are logged into the terminal that is intended to be served by the schedule you are creating. You can use the 'Change Current Terminal' button from the Tools Menu of the main window to log in to the desired terminal. |
Effective Dates - From / To |
Defines the effective period of this schedule. If specified, the schedule will only be in effect during the indicated period. The dates defined in those fields are not part of the schedule, but rather they are attributes of the schedule and define how the schedule should behave. |
Days in Effect |
The 'Days in Effect' checkbox flags allow you to specify the days of the week that the displayed Trip Schedule will be available for generating trips (via the 'Generate Trip Schedules' option). |
Optimization Mode |
Select one of the four available optimization modes for the trip schedule. The optimization modes behave as follows: Pick Run: a trip designed for several local pickups. Pick → Terminal: a trip that is to pick up some freight and then move it to a specific terminal. Terminal → Delivery: a trip that delivers freight to its destination zone from the terminal. Terminal → Terminal: a trip that moves freight between two terminals. |
Active |
This checkbox sets the displayed trip schedule to 'Active' Status, making it available for generating trips (via the 'Generate Trip Schedules' option). |
Use for Batch Processing |
This checkbox determines whether to run the trip schedule by the automated batch creation procedure or not. If checked (Batch Process = 'True') this schedule will be part of a batch process to create the Freight Bills, create the trips and then match the freight bills to the trips, all done through setting up an automated batch in the TruckMate DAWG program. |
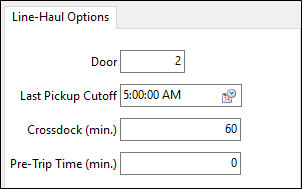
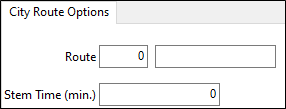
Line-Haul Options/City Route Options tabs One of two tabs will be displayed depending on the type of trip this schedule is associated with. |
|
Line-Haul Options |
Door Indicate the door where this trip is planned to park at. Last Pickup Cutoff Indicates the latest pickup cutoff time from all the loads on this trip. Crossdock (min.) An estimate of the minimum amount of time expected to be spent on crossdock operations. Pre-Trip Time (min) An estimate of the minimum amount of time expected to be spent on pre-trip activities. |
City Route Options |
Route Double-click this field to select a default City Dispatch Route for this Trip Schedule. The Route ID and Description are displayed in the two fields. City Dispatch Routes are configured in the CrossDock Traffic Lanes program. Stem Time (min.) Stem time is the time in minutes from the Terminal to the route. (This field is for informational purposes only at this point.) |
This table lists toolbar options.
| Field | Definition |
|---|---|
Select Schedule |
|
Generate Trip Schedules |
|
Booking Numbers window
The Tools > Booking Numbers option opens the Booking Numbers window.
This window allows the user to manually create booking information records, and/or assign them to a trip leg, and store the data associated to them.
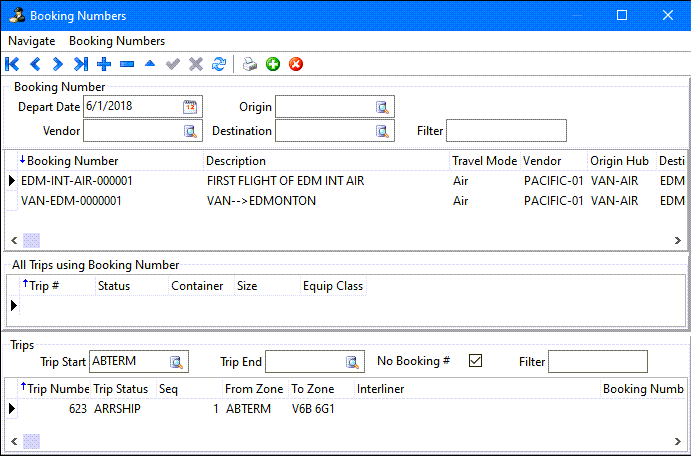
The window is divided into four sections, a search filter section at the top, a grid to display the booking numbers, a grid to display the trips associated with the selected booking number and a grid to display trips that match the search criteria but are not associated with a booking number.
Use ![]() Assign Booking Number and
Assign Booking Number and ![]() Remove Booking Number to assign and remove the selected booking number to a trip.
Remove Booking Number to assign and remove the selected booking number to a trip.
| The user can right-click and select 'Copy' to copy the booking number. |
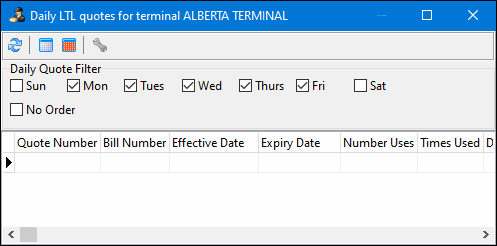
Daily LTL Quotes for terminal
The Tools > LTL Daily Quotes option opens the Daily LTL quotes for terminal x window displaying all quotes available for the currently selected terminal. Quotes that appear here have had the 'LTL Daily Order' flag selected and a terminal code chosen in the 'LTL Terminal' field on the Customer Service program > Quotes window.
| Field | Definition |
|---|---|
|
Refreshes the quotes displayed in the Daily Quotes grid depending on changes in the Filtering Criteria (or in the case that additional qQuotes have been added in the Customer Service program). |
|
Clears any quote records that have been selected by the user in the Daily Quotes grid. |
|
Selects all of the Quote records displayed in the Daily Quotes grid. |
|
Allows you to create an order from a single (or multiple) quote(s). Once a quote has been turned into a order, the quote will be removed from the Daily LTL Quote grid. |
Daily Quote Filter
The various checkboxes in the Daily Quote Filter section correspond to the days of the week. When the Daily LTL Quotes window opens, the current day of the week will be automatically checked. You may select more than one day of the week to filter on those daily quotes that are for multiple days (if you select more than one checkbox, quotes for only one of the days will not appear).
No Order
This checkbox will Filter on those Quote records that have not yet been turned into orders (via the 'Create Order' option on the Toolbar).
Daily Quote Grid
The Daily Quote grid will display all of the Customer Service program quotes that fit the specified filtering criteria. You can select multiple rows in this grid, and then use the Create Order toolbar option to quickly create a freight bill for the quotes.
Shortcut Menu
The Daily Quote grid’s right-click shortcut menu contains all of the options described in the toolbar section for the Daily Quotes window.
Reefer Alarms
The Tools > Show Reefer Alarms option opens the Reefer Alarms window to display a grid list of any reefer alarm events.
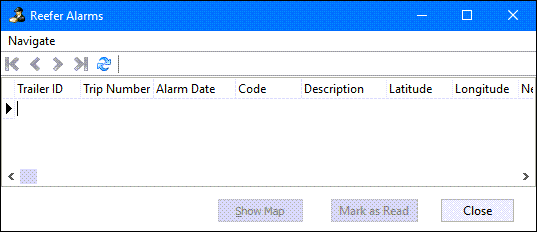
From the Reefer Alarm window you can use the Show Map button to find the trailer with an alarm. The View Reefer Events option in the right-click shortcut menu provides access to the Reefer Events for Trailer window.
Schedule View
The Tools > Schedule View option opens the Schedule View window designed to assist dispatchers in load planning by providing a time-based view of trips and resources. (This window is also available in the regular Dispatch program by selecting Planning from the shortcut menu.)
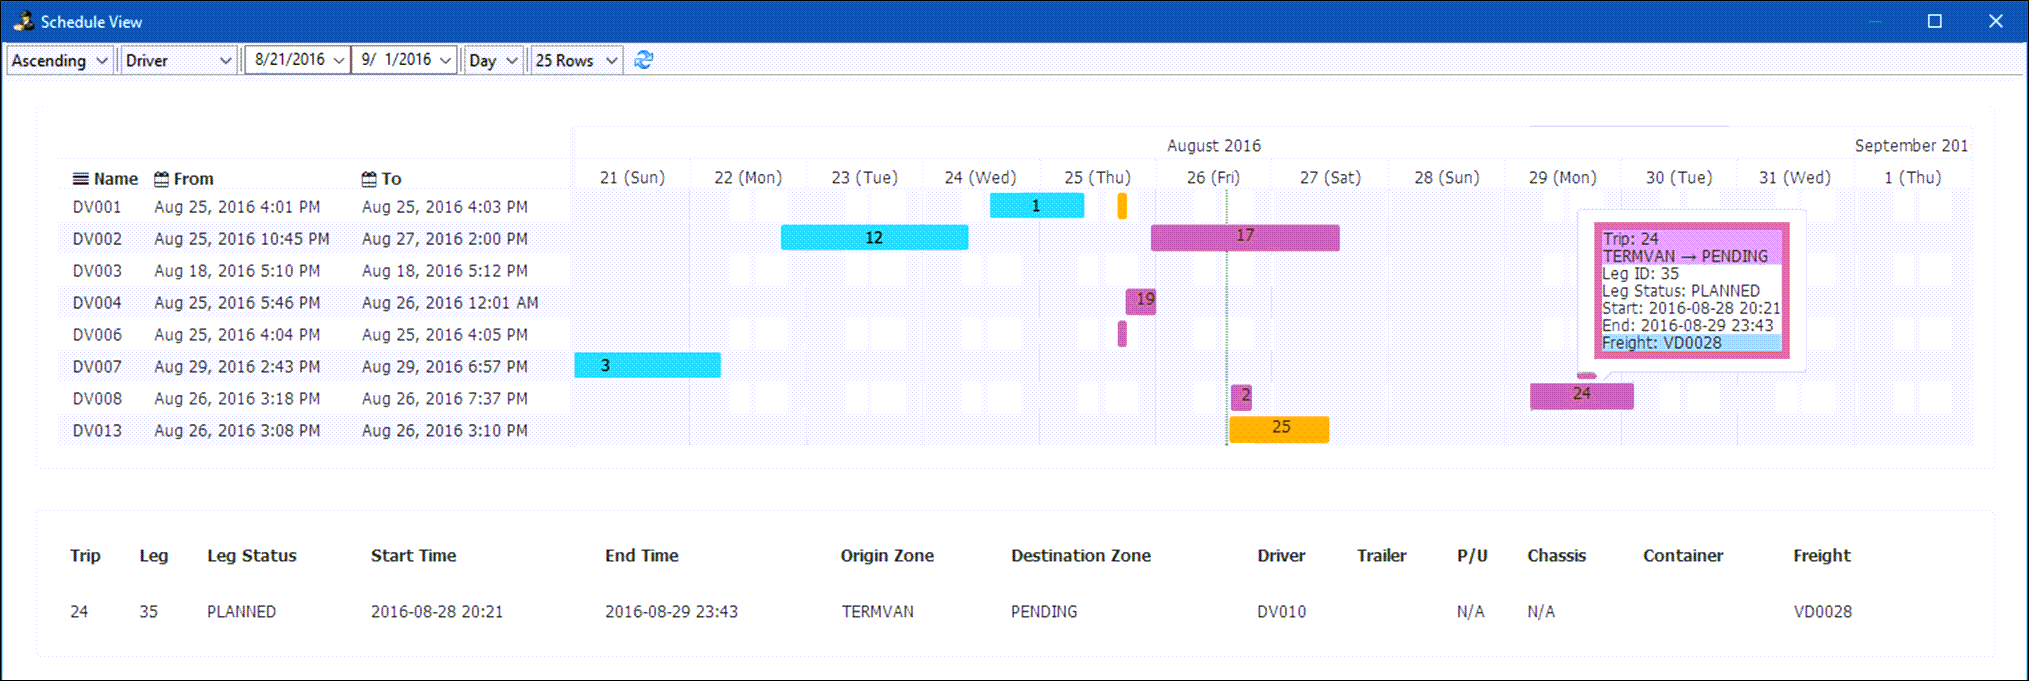
Filtering can be done based on resources, and by defining time frames.
Each trip is represented by a numbered bar, with each trip leg color-coded based on planned, active, or completed status. Clicking a trip displays additional detailed information in the footer.
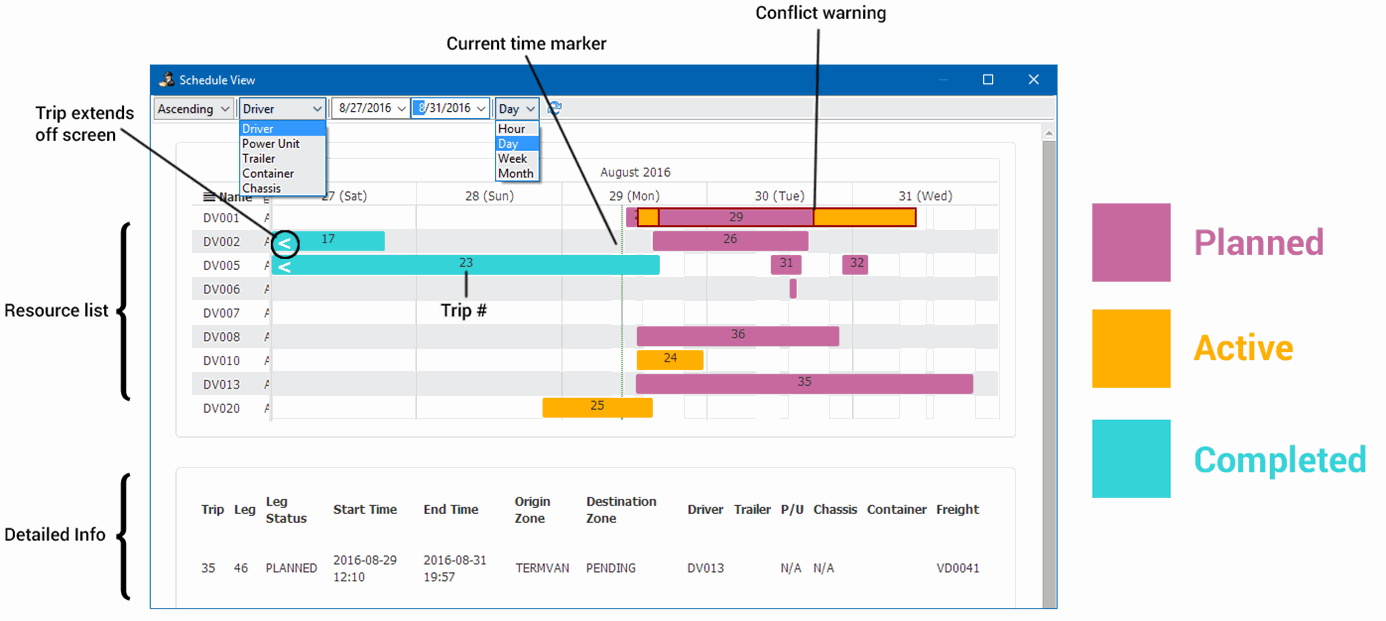
As a trip progresses through its lifecycle, the relevant time frames are displayed. Time frame representation will reflect trip status from planning through completion.
Planned legs: When a trip is still in the planning phase, the ETA value used is the planned departure time provided by the dispatcher, and the latest delivery window of any freight bill on the trip.

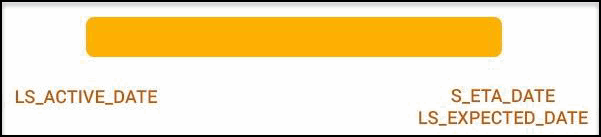
Active legs: Once a leg is made active, the display of the start time is updated to reflect actual operational information. The end time can be provided through standard ETA generation from a mileage provider.
Completed legs: Once a leg is completed, leg time frames are updated to display actual operational information. The actual time when a trip came to completion is now displayed instead of an ETA.

Notes:
-
The Schedule View does not allow trips to be created.
-
The Schedule View does not currently support drag-and-drop.
-
The Schedule View is displayed in a separate floating window and therefore it is best used by dispatchers in a multi-monitor setup where they can have their dispatch board on one monitor and the Schedule View on the other monitor.