Local Dispatch
| As of TruckMate 2023.1, Local Dispatch is no longer an option in the TruckMate Menu or Task List. If you want this option added, contact Trimble Transportation Support. |

The Local Dispatch program is used to manage freight bill pickups and deliveries in a courier situation, where freight is time-sensitive over a period of hours, rather than days. Freight bills are not assigned to trips, as they are in the Dispatch program. Instead, drivers and equipment are assigned directly to freight bills, and status changes processed for freight bills rather than trips.
To access Local Dispatch in TruckMate 2022.4 and earlier:
| From this location | Go to |
|---|---|
TruckMate Menu and TruckMate Task List |
Dispatch > LTL > Local Dispatch |
Windows Start Menu |
TruckMate 20xx > Local Dispatch |
Windows Explorer |
C:\Program Files (x86) > TruckMate 20xx > LocalDispatch.exe |
How Do I?
How do I Process a Status Change for a Freight Bill rather than a Trip?
-
Open the Local Dispatch program (LOCALDISPATCH.EXE), click: Start > Programs > TruckMate > Dispatch > LTL > Local Dispatch
-
Select the Freight Bill with your cursor, right click, and select `Change Status'.
-
In the pop-up dialog box, select the `New status' you want to assign from the drop down menu. Click on the down arrow to view a selection of statuses, highlight and click on the status, or press `Enter', to select.
-
Type in any relevant comments in the `Comment' field and a date and time in the `Date Time' field. You can change the date and time by clicking on the search button to the right of the field.
-
Select `Okay' to save your changes.
| You cannot change the status of a Freight Bill that has already been processed through Billing (status of Billd). |
How do I Assign a Driver and Equipment to a Freight Bill?
-
Open the Local Dispatch program (LOCALDISPATCH.EXE), click: Start > Programs > TruckMate > Dispatch > LTL > Local Dispatch
-
You can assign a Pick Up Driver by double clicking in the Pickup Driver field. To assign a Pick Up Trailer, you can double click in the Pickup Trailer field. Use the same method to assign a Pickup Power Unit—double click in the Pickup Power Unit field. To assign a Delivery Driver—double click in the Delivery Driver field. To assign a Delivery Trailer, you double click in the Delivery Trailer field. To assign a Delivery Power Unit—double click in the Delivery Power Unit field. Or use your context menu, and select "Assign Resource".
How do I Manage Freight Bill Pickups and Deliveries in a Courier situation?
Local dispatch allows the user the opportunity to work a Dispatch scenario without having to create a trip; the work is done directly with the Freight Bill. Using the Route Designation filter will provide a filter option to organize pick-ups and deliveries by specific P&D routes. The time sensitivity of each Freight Bill can be viewed in the Pick Up By and Deliver By column of this module.
-
Open the Local Dispatch program (LOCALDISPATCH.EXE), click: Start > Programs > TruckMate > Dispatch > LTL > Local Dispatch
-
Double click on the "Driver" to assign a P/U or Delivery driver.
-
Double click on the "Pick Up Trailer" and assign the trailer the bill will be assigned to (optional).
-
Change the status of the Freight Bill by double clicking and selecting correct status the "Freight Bill" is going to be changed to.
-
When the driver gets back to the terminal, select all the Freight Bills that driver has picked up (hold down the control key and click on each of the bills) then update the status of the bills to docked.
-
At this point the bills can be manipulated in the Crossdock program.
-
If a "DELD status" has been applied to the Freight Bill, that Freight Bill will not appear on the Crossdock program. (If both programs are open at the same time, the Crossdock program will need to be refreshed to see the change)
How do I Manage Time-Sensitive Freight Bills?
-
Open the Local Dispatch program (LOCALDISPATCH.EXE), click: Start > Programs > TruckMate > Dispatch > LTL > Local Dispatch
-
Set up a filter to take advantage of the pickup/deliver by dates (Local Dispatch - context menu - FilterBy Date: the Pick Up By From, Pick Up By To, Delivery By From and Deliver By To date fields are used to specify a ranges of dates that do not have to be modified every day). These fields work in conjunction with the date set on your workstation. For example, to view Freight Bills whose Pick Up By Date is tomorrow, check the Pick Up By From box and enter "1" in the "days" field. This sets the start of the date selection range to tomorrow. Check the Pick Up By To box, and enter "0" in the "days" field. This sets the end of the date selection range to tomorrow. By entering the number of days to add to today’s date, you can configure the range of Pick Up By and Deliver By dates.
-
Use the colour coding - (Local Dispatch - context menu - Configure Colours). The Configure Colours option is used to assign colour codes to the Deliver By and Pick Up By dates and times for the Freight Bills. Note
The colour codes will only display for the sort column specified in the Sort By field. This option is also used to configure display colours for the Dispatch program. In the Dispatch Freight Bill grid, each Freight Bill’s Pick Up By and Delivery By Date and Time will be colour coded according to the configuration here. Also, in the Trip grid, the Planned Departure, Pick Up By and Delivery By fields also use this colour scheme. The Hours and Minutes fields for each level determine the category in which the Pick Up By or Deliver By date and time are sorted. The numbers of hours and minutes specified in these fields are added to the time on the user’s workstation clock, then compared against the Pick Up by or Deliver By date and time value for the Freight Bill. If the Freight Bill’s Pick Up By or Deliver By date and time is less than the workstation clock plus the hours and minutes in the category, the pickup date or deliver date value in the Freight Bill grid will display in the colour assigned to this category. You can change the colour for each category by clicking on the colour example and selecting another colour from the palette.
-
Configure the miscellaneous options to use the time element - (Local Dispatch - context menu - Config Misc Options - Show Dates: you can either show Pick Up By dates and Deliver By dates as date and time values, or you can display the times alone).
| This does not affect the sort order (selected by clicking on a column header or choosing a Sort By option at the top of the screen). Freight bills will still sort by date and time when the grid is sorted according to the Pick Up By date or the Deliver By Date. |
How do I Reposition a Driver and even change their Trip status?
-
Open the Local Dispatch program (LOCALDISPATCH.EXE), click: Start > Programs > TruckMate > Dispatch > LTL > Local Dispatch
-
The Reposition function is used to move a driver or piece of equipment from their Current Location to a new location. In order to do this, the selected driver and / or equipment are assigned to a trip with no Freight Bill. Generally, driver and equipment repositions are taken care of automatically, through trip activities. For example, when you assign drivers and equipment to a trip that was created by double clicking on a Freight Bill, empty legs are created at the beginning of the trip to show the movement of the power unit to the trailer, and the power unit and trailer to the start location of the first Freight Bill that is being picked up. However, if you wish to reposition a driver or equipment without assigning them to a trip with a Freight Bill, you can use the Reposition option.
-
By default, the driver or piece of equipment that was selected when the Reposition function was invoked will default in the Resource Type and Resource Code fields. You can select a different Resource Type and Code if you wish. Enter the Zone Code of the zone to which you want to reposition the driver or equipment. To quickly find the zone, enter the first few characters of the zone code or the short description in the field, then click the search button or strike the <Enter> key to display a search form. When you’ve completed this step, click on the Reposition button.
-
The' Select Additional Items to Reposition' window is displayed. Equipment and / or drivers that were assigned to the same trip as the selected driver or equipment’s last trip are available to include in the reposition. To reposition all the drivers or equipment displayed in the 'Available for Reposition' section, click on the button labeled with two arrows. To reposition one of the drivers or equipment displayed in the Available for Reposition window, click on the item you wish to include in the reposition, then click on the button labeled with one arrow. You can remove items from the Selected to Reposition section by following the same procedure, but using the buttons that point in the opposite direction. Click the "Repos." button to continue. You will be prompted "Automatically reposition resources on trip x?" If you click the "Yes" button, the trip will be created and completed automatically, without requiring manual status changes. However, driver pay amounts (if applicable) will be calculated, and mileage entries will be stored for any equipment included on the reposition (for the purposes of Scheduled Repairs and Maintenance). If you click the "No" button, a trip will be created in the trip grid, which you must complete by applying the usual status changes.
Menu Bar / Toolbar
File Menu
Print Reports
![]() Selecting the Print Reports button will bring up the report selection window, common to many TruckMate applications. Here, you will select a report file from those available in your system and a Crystal Report will be generated.
Selecting the Print Reports button will bring up the report selection window, common to many TruckMate applications. Here, you will select a report file from those available in your system and a Crystal Report will be generated.
For more information on Report functionality in TruckMate, see the Crystal Reports Reference.
Exit
![]() Selecting this option will close the Local Dispatch program.
Selecting this option will close the Local Dispatch program.
Multi-Company Menu
For more information on the Multi-Company options available from the Menu Bar, see the Multi-Company documentation.
Navigate Menu
The Navigate Menu contains the standard TruckMate Navigation Bar, used to browse through your Database records.
Tools Menu
TruckMate Monitor
![]() Click the down arrow next to this button to access the various functions of the new TruckMate Monitor.
Click the down arrow next to this button to access the various functions of the new TruckMate Monitor.
Remember Position / Size
Selecting this option will maintain the program window position and size upon close. When the program is re-opened, it will appear the same.
Help Menu
TruckMate Help
![]() Selecting this button will open the Local Dispatch topic in the TruckMate Online Help file (the page you are currently viewing).
Selecting this button will open the Local Dispatch topic in the TruckMate Online Help file (the page you are currently viewing).
Service Portal
![]() Selecting this button will open an instance of your default Internet browsing software, with the https://www.tmwcare.com login page displayed.
Selecting this button will open an instance of your default Internet browsing software, with the https://www.tmwcare.com login page displayed.
About
![]() Selecting this button will open the standard TruckMate About window, which contains important information about the application you are currently using, including its version number (important for support calls).
Selecting this button will open the standard TruckMate About window, which contains important information about the application you are currently using, including its version number (important for support calls).
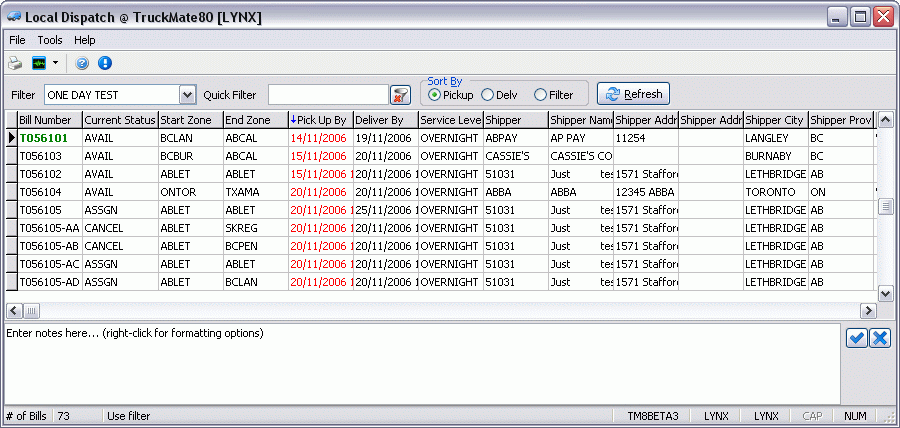
Filter and Quick Sort Options
At the top of the Local Dispatch screen, you can configure filter and sort criteria for the freight bills that display in the grid.
Filter
To assign a previously defined filter to the freight bill grid, select the filter code from the drop down list box. Filters are configured using the Filter option in the context menu invoked from the freight bill grid.
Quick Filter
Works in conjunction with the sort column. A blue arrow in the column label indicates the sort column. To select a sort column, click once on any column label field. Freight bills will be sorted alphanumerically according to the contents of the fields in the sort column. To filter freight bills based on the selected sort column, enter characters in the Quick Filter field, then select <Enter>. Only data that matches the characters entered in the Quick Filter field will be displayed.
|
Erase
Click the ![]() Erase Button to clear the contents of the Quick Filter field.
Erase Button to clear the contents of the Quick Filter field.
Sort By
Instead of clicking on a column heading to assign the sort column, you can select the sort column by choosing one of these radio buttons. 'Pickup' will sort the freight bills according to their Pickup Date. 'Delv' will sort the freight bills according to the Delivery By Date. 'Filter' will use the column that is currently selected as the sort column, indicated by a blue arrow in the column label field.
Refresh
Will re-read the freight bill data in the grid, so that any changes that have been made in other programs (such as new freight bills being entered in the Customer Service program) will be displayed.
Active Freight Bills Grid
Some of the functions that can be invoked from the context menu can also be invoked by double clicking in the corresponding grid field. Data entry forms or special functions can be invoked by double clicking in the following grid fields. Most of the fields in this Grid are populated with Freight Bill information from the Customer Service program.
Bill Number
This field displays the Freight Bill Number of the selected Bill. Double-clicking in this field will access the Notes window.
Destination / Origin / Caller / Bill To
If the customer code in any of these fields is displayed in bold green text, it indicates that Directions to Customer have been entered in the Customer & Vendor Profiles program for this customer. Double click on the field to display the Directions to Customer.
Current Status
You can invoke the Status Change form by double clicking in the Current Status field.
Pick Up Driver
You can assign a Pick Up Driver by double clicking in the Pickup Driver field. Pick Up drivers can also be assigned in the Quick Bill Entry program, and can be viewed on the Customer Service program > Driver Pay Tab. Pay will be automatically generated for drivers if their assigned pay contract is configured to pay by percent of freight bill revenue (in the Driver Pay Contracts program).
Mileage based pay can also be configured. The mileage entered on the freight bill in the Customer Service program will form the basis for the calculation. Automatically generated driver pay can be viewed on the Driver Pay tab in the Customer Service program, or in the Driver Pay Audit program. See the Driver Pay Contracts program for further information about automatic driver pay.
Pick Up Trailer
You can assign a Pick Up Trailer by double clicking in the Pickup Trailer field.
Pickup Up Power Unit
You can assign a Pick Up Power Unit by double clicking in the Pickup Power Unit field.
Delivery Driver
You can assign a Delivery Driver by double clicking in the Delivery Driver field. Delivery drivers can also be assigned in the Quick Bill Entry program, and can be viewed on the Customer Service program > Driver Pay Tab. Pay will be automatically generated for drivers if their assigned pay contract is configured to pay by percent of freight bill revenue. Mileage based pay can also be configured.
The mileage entered on the freight bill in the Customer Service program will form the basis for the calculation. Automatically generated driver pay can be viewed on the Driver Pay tab in the Customer Service program, or in the Driver Pay Audit program.
See the Driver Pay Contracts program for further information about automatic driver pay.
Delivery Trailer
You can assign a Delivery Trailer by double clicking in the Delivery Trailer field.
Delivery Power Unit
You can assign a Delivery Power Unit by double clicking in the Delivery Power Unit field.
Context Menu
Change Status
Status changes are completed on the Status Change window, and are used to indicate the process of freight pickup and delivery. Status codes, configured in the Codes Maintenance program (on the Status Tab), are assigned to freight bills using this form. Status changes are only applied to the freight bill. The status of Drivers, Power Units and Trailers assigned to the freight bill is not affected.
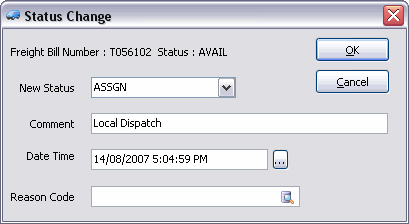
| Field | Definition |
|---|---|
New Status |
Select the freight bill’s current status from the drop down list box. If the freight bill’s current status is specified as a Previous Code value (configured in the Codes Maintenance program) the new status code will default. |
Comment |
You can enter a comment about the status change. This comment can also be viewed in the Customer Service program, on the Status Tab. |
Date / Time |
Will default to the current date and time. Double click, use the '<Enter>' key or click on the button to the right of the Date / Time field to display a calendar selection form. |
Reason Code |
Click the search button to select a 'Reason Code' from the menu. |
You can also change freight bill status by using the <CTRL><number key> hot key combination specified in the Configure Status Keys form.
Assign Resource
Drivers, Power Units and Trailers are assigned to freight bills. Drivers and equipment can be assigned regardless of their current status in the Dispatch program. Assigning drivers and equipment in the Local Dispatch program has no affect on their status in the Dispatch program.
You can view the Pickup and Delivery drivers assigned to a freight bill on the Driver Pay Tab in the Customer Service program. You can also assign Pickup and Delivery Drivers and Pickup and Delivery Trailers using the Quick Bill Entry program. If you assign Pickup and Delivery Drivers and Trailers here, they will be also be displayed in the Quick Bill Entry program.
| Driver pay can be automatically generated by assigning Drivers to Freight Bills. |
The driver’s contract (as configured in the Driver Pay Contracts program, and assigned in the Driver Profiles program) must be configured to generate pay based on a percentage of freight bill revenue, or on the mileage assigned to the freight bill in the Customer Service program. Automatically generated driver pay can be viewed on the Driver Pay tab in the Customer Service program, and in the Driver Pay Audit program.
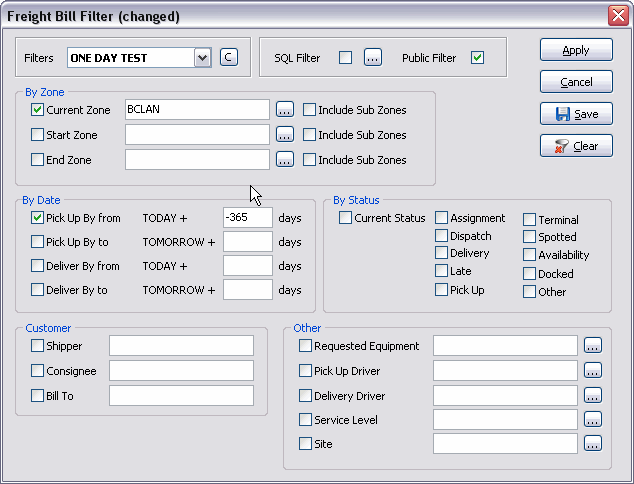
Filter
To select a filter that has been previously created and saved, select the 'Filter Title' from the drop down list box. Click the 'C' button to clear the selected filter (that is, to clear it from the display in the Filter Setup window).
| Field | Definition |
|---|---|
SQL Filter |
You can create complex filters using SQL (Structured Query Language) on the SQL Filter window. To access the Filter Editor Window, flag the 'SQL Fitler' option then select the ellipsis button. The primary advantage of using SQL filters is that you have access to more fields than are provided with the standard Filter Setup. |
Public Filter |
If this box is checked, this filter will be available to all TruckMate users. If the box is not checked, only the user who created the filter will be able to use or edit the filter. |
By Zone |
To filter records in the freight bill grid according to the freight bill’s Current Zone, Start Zone or End zone, check the box and enter the desired zone code in the field. To select multiple zones, click the button labeled with ellipsis. The Multiple Zone Selector form will be displayed. You may select up to 8 zone codes. Double click in any of the fields to view a zone code search form. Use the 'C' buttons to clear any of the fields. |
Include Sub Zones |
If there are zones positioned under the selected zone in the Zone Code Hierarchy (as configured in the Codes Maintenance program) you can include those zones in the filter by checking this box. |
By Date |
The Pick Up By From, Pick Up By To, Delivery By From and Deliver By To date fields are used to specify a ranges of dates that do not have to be modified every day. These fields work in conjunction with the date set on your workstation. For example, to view freight bills whose Pick Up By Date is tomorrow, check the Pick Up By From box and enter '1' in the 'days' field. This sets the start of the date selection range to tomorrow. Check the Pick Up By To box, and enter '0' in the 'days' field. This sets the end of the date selection range to tomorrow. By entering the number of days to add to today’s date, you can configure the range of Pick Up By and Deliver By dates. |
By Status |
To filter records in the freight bill grid according to the freight bill’s Current Status, check the Current Status box and select the behavior categories of the Status Codes you want to include. Status codes and behavior categories are configured in the Codes Maintenance program. |
Customer |
To filter records in the freight bill grid according to the freight bill’s Shipper, Consignee or Bill To customer, check the desired box and double click in the field to display a customer selection form. |
Other |
To filter records in the freight bill grid according to the freight bill’s Requested Equipment (as entered on any Detail line on the freight bill), or by the Pickup or Delivery driver that has been assigned to the freight bill (using the Assign Resource right menu option), check the desired box and enter the desired Equipment Class (as configured in the Codes Maintenance program) or Driver (as configured in the Driver Profiles program) code. To select multiple codes, click the button labeled with ellipsis. The Multiple Code Selector form will be displayed. You may select up to 8 codes. Double click in any of the fields to view a code search form. Use the 'C' buttons to clear any of the fields. |
OK |
Will apply the filter to the grid and close the Filter Setup form. |
Clear |
Will clear all filter fields, and will remove the filter from the grid. |
Save |
To store the parameters of your filter, click the Save button. You will be prompted to enter a title for the filter. If it is an SQL filter, the filter will not display on the main Filter Setup screen. Instead, the SQL Filter box will be checked. |
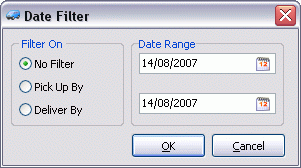
Quick Date Filter
Selecting this option will allow you to setup a Quick Filter using the Date Filter window.
| Field | Definition |
|---|---|
Filter On |
Select one of the available radio options. Depending on which option you choose, the Date Range you configure will be applied to either the 'Pick Up By' or 'Deliver By' Date of the Freight Bill. |
Date Range |
Use the two available fields to configure a Date Range for filtering the Freight Bills. Select 'OK' to apply the Filter to the Local Dispatch Freight Bill Grid. |
Set Quick Filter
Selecting this option will immediately apply a Filter based on the data contained in the field you right-clicked on. The 'value' that is used to Filter will be displayed in the 'Quick Filter' field in the Local Dispatch program header.
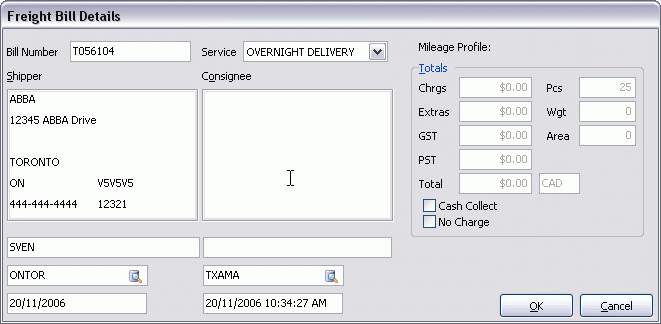
Detailed Information
The Detailed Information window displays information about the freight bill that is currently selected. You can also make certain changes to freight bills using this form. The fields that you can change are described below.
| Field | Definition |
|---|---|
Service |
To change the Service Level on the freight bill, select a Service Level description from the drop down list box. Service Levels are configured in the Codes Maintenance program. A freight bill’s service level is displayed on the Details tab in the Customer Service program, and in the top right corner of the Quick Bill Entry program. The Deliver By date defaults according to the configuration of the Service Level. |
Shipper / Consignee |
You can change the shipper name, address, phone number and contact name for the freight bill’s Shipper or Consignee. Note that this will only change these values on this freight bill, and will not change the profile for the customer (as configured in the Customer & Vendor Profiles program). You can only change these details on freight bills that have not been updated by the Billing Register program. |
Start Zone |
Under the Shipper Contact field, the Start Zone of the freight bill is displayed. To select a different Start Zone, click the search button for a selection form. |
Pick Up By Date |
Is displayed under the Start Zone. To change the Pick Up By date for the freight bill, double click in the field and select a date and time from the calendar selection form. |
End Zone |
Under the Consignee Contact field, the End Zone of the freight bill is displayed. To select a different End Zone, click the search button for a selection form. |
Deliver By Date |
Is displayed under the End Zone. The Deliver By Date defaults according to the Service Level. That is, the Service Days and Service Hours configured for the Service Level in the Codes Maintenance program are added to the Pick Up By Date in order to arrive at the Deliver By Date. |
User Defined Fields
There are ten user defined fields available for each freight bill. You can view and edit the contents of these fields using this menu option. You can change the labels that are assigned to these fields by using the Application Configurator program > NOTES > 'TLORDER Tab 1 - 9' options.
Intermodal User Fields
Selecting this option will open the Intermodal User Defined Fields window, which allows you to configure the values of the 25 included Intermodal User Fields. See the Customer Service program for more information.
View Notes
This menu option will display the same Notes form that is available in the Customer Service program and Quick Bill Entry program. You can view and edit the notes for the freight bill using this function. There are several Tabs available on the Notes form: Billing, Container, Driver, OSD, Other, Write Off and three User Tabs. You can apply special formatting characteristics (such as bolding or coloured text) to the freight bill notes. Right click in the Notes form for a menu of formatting options. After entering notes, be sure to click the 'Post' (checkmark) button at the bottom right corner of the notes form.
View Direction Notes
This menu option will display the contents of the View / Edit Directions to Customer form of the Customer & Vendor Profiles program. Because there may be directions for both the shipper and the consignee, this option will only function if the mouse pointer is located over the Caller code field, the Bill To code field, the Origin code field, or the Destination code field. Also, this menu option will only function if the customer has directions stored in the Customer and Vendor Profiles program. These codes are indicated by bold, green text.
View Freight Bill
This menu option will load the Customer Service program (if not already loaded) and display the freight bill that was selected when the option was invoked.
View Status Graph
This menu option will display a graph that indicates the number of freight bills of each Status Code. Note that filters that have been applied to the freight bill grid do not affect the graph; all freight bills will be included in the graph calculations.
Configure Colours
The Configure Colours window is used to assign colour codes to the Deliver By and Pick Up By dates and times for the freight bills. Note that the colour codes will only display for the sort column specified in the Sort By field. This option is also used to configure display colours for the Dispatch program. In the Dispatch Freight Bill grid, each freight bill’s Pick Up By and Delivery By Date and Time will be colour coded according to the configuration here. Also, in the Trip grid, the Planned Departure, Pick Up By and Delivery By fields also use this colour scheme.
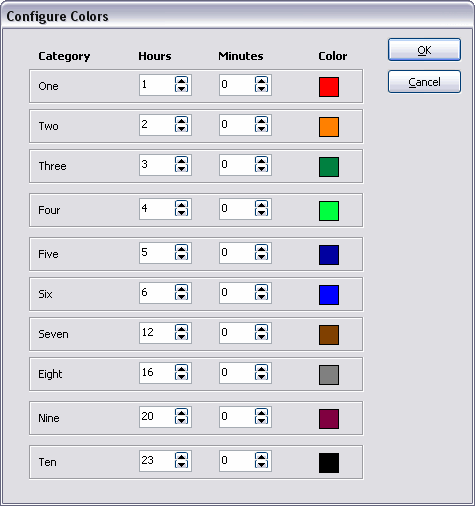
The Hours and Minutes fields for each level determine the category in which the Pick Up By or Deliver By date and time are sorted. The numbers of hours and minutes specified in these fields are added to the time on the user’s workstation clock, then compared against the Pick Up by or Deliver By date and time value for the freight bill. If the freight bill’s Pick Up By or Deliver By date and time is less than the workstation clock plus the hours and minutes in the category, the pickup date or deliver date value in the freight bill grid will display in the colour assigned to this category. You can change the colour for each category by clicking on the colour example and selecting another colour from the palette.
Configure Status Keys
To quickly change the status of a freight bill, you can configure hot key combinations that will assign a status code to a freight bill directly from the freight bill grid using the Status Change Keys window. For each hot key combination, enter the status code (as configured in the Codes Maintenance program) that you want to assign when that key combination is used. Double click for a code selection form. To use the status code hot keys, click on the freight bill for which you want to the change the status in the freight bill grid, then hold down the <CTRL> key and press the number key that corresponds with the desired status code.

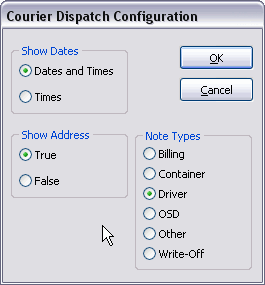
Config Misc Options
Selecting this option will open the Courier Dispatch Configuration window, which contains some other miscellaneous program options.
| Field | Definition |
|---|---|
Show Dates |
You can either show Pick Up By dates and Deliver By dates as date and time values, or you can display the times alone. Note that this does not affect the sort order (selected by clicking on a column header or choosing a Sort By option at the top of the screen). Freight bills will still sort by date and time when the grid is sorted according to the Pick Up By date or the Deliver By Date. |
Show Address |
If this option is set to true, a yellow 'pop-up' box will display the Shipper and Consignee addresses for the freight bill when the mouse pointer rests over a freight bill in the grid. |
Note Types |
At the bottom of the Local Dispatch screen, there is a blank space where you can enter notes for the freight bill that is selected in the grid. Indicate the type of notes that are being added at the bottom of the screen by selecting a Note Type here. You can view and notes of all types by using the View Notes option from the context menu. |
Select a Bill
To make the same status change to a group of bills, or to assign a driver or piece of equipment to a group of bills, you must first select the bill group. To select multiple bills, use this menu option. Alternatively, you can hold down the '<Ctrl>' key while clicking on the desired bills.
Clear Selected Bills
To clear the selection of bills that have been selecting using the Select a Bill option (or by using the '<Ctrl>' key in combination with the mouse), use this menu option.
Attach / Open Related Files
Selecting this option allows you to attach external files (images or separate documents) to the selected record. See the Attach / Open Related Files documentation for more information.
Notes Section
At the bottom of the Local Dispatch screen, you can view and enter notes for the freight bill selected in the grid. To increase or decrease the size of the display, hold your mouse pointer over the edge of the form, and when the cursor changes to an arrow, click and drag the border to the desired position.
| The type of note (Billing, Container, Driver, etc) that is viewed and updated in this field is configured in the Config Misc Options window, invoked from the Available Freight Bill Grid’s Context Menu. These notes are saved to the TLORDER Table, and can be viewed and updated in the Customer Service program and by using the 'View Notes' option in the Available Freight Bill Grid’s Context Menu.. |
There is a right mouse menu of special text - formatting characteristics, such as bolding and underlining, that can be used for these notes. Use the <CTRL><T> key combination to have the system automatically enter the date, time and user name (as configured in the Security Setup program) in the notes field. After entering notes, be sure to click the Post button to the right of the field to save the entry. Alternatively, click the cancel button to abandon the changes.
To modify the text style, type your notes into the note area and then use your right-click Context Menu. You have the option of selecting a preferred font style, colour and size, plus formatting your text with bold, italic, or strike-out. The sample below shows all of the options available.