GL Reconciliation


The GL Reconciliation program is used to reconcile Intercompany Accounts, and it functions in a way similar to the Bank Reconciliation program.
The program allows users to automatically process selected records in order to determine matches between accounts and mark them as reconciled. All freight bills and IP records are linked so that this can occur across many records. There is also a function that allows the user to report on timing differences between, which would be useful in a situation in which an entry has been posted through one company but the matching entry has not been posted through another company it is identified.
When records can’t be reconciled, the program creates an error report that contains enough detail that the user can then track down the cause of the mismatch. These records can then be manually cleared once appropriate action is taken (that is, journal entry or correct original record). Users can also select non-intercompany control accounts for ease of reconciliations across the company.
This application also requires the use of multiple intercompany accounts any time one company’s base currency is different than another’s. It is optional as to whether a company chooses to use intercompany accounts of multiple currencies or not. If the auto reconciliation capabilities of the reconciliation tool will be used, multiple currency intercompany accounts must be used.
In GL Reconciliation, you can reconcile almost any GL account you like. The only exceptions are: a) inactive accounts and b) ones that are control accounts for TruckMate modules and are already reconciled by a categorizing resource (client, vendor, etc.) and so it would not make sense to do duplicate reconciliation (specifically, Accounts Receivable, Accounts Payable, Driver Payable, Interline Payable, Payroll Payable, and Supplier Payable). Some examples of accounts you may wish to use this program to reconcile are: inter-company accounts (where the "due from" reconciled balance in one company is always equal but opposite to the "due to" reconciled balance in another company), pre-paids, accruals, petty cash, taxes payable, and miscellaneous payables.
| The GL Reconciliation application only works on committed GL transactions. This means ones that have been posted via both the sub-ledger register and the GL Journal Entries Register program (unless you select an option in the Application Configurator program that does the 2-step process in a single step). |
To access GL Reconciliation:
| From this location | Go to |
|---|---|
TruckMate Menu and TruckMate Task List |
Accounting & Finance > General Ledger > GL Reconciliation |
Windows Start Menu |
TruckMate 20xx > GL Reconciliation |
Windows Explorer |
C:\Program Files (x86) > TruckMate 20xx > Glrec.exe |
How Do I?
How do I reconcile intercompany transactions?
There are three ways to reconcile I/C transactions, which range from the totally manual to the totally automatic.
Open Tab
The Open tab in GL Reconciliation is geared toward reconciling one account at a time, with the aim to keep the reconciled balance either zero (e.g. accrued and prepaid) or matched to a particular amount (e.g. bank statement balance). Intercompany (I/C) accounts are a bit different in that two accounts are involved; you are reconciling a debit amount from one ("due to" or "due from") account against a credit for the same amount from a different account (from a different company).
You can still use the Open tab to reconcile I/C accounts, you just need to open two instances. To do so, login to GL Reconciliation for one company. Then, select another company from the Multi-Company drop-down, making sure that the shift key is pressed when you select. Now find the relevant GL account in each company. If this is the first time you are doing reconciliation on the pair, the "Rec. Balance" shown in the status bar should be $0 for both accounts. Otherwise, assuming past reconciliations were done correctly, the "Rec.Balance" shown in the status bar should be the same figure for both accounts. Select one or more rows for reconciliation in one company. Note that the "Rec.Amount" and "New Rec.Balance" (below the grid) change. Select matching rows in the other company. Make sure the two "New Rec. Balance" figures match. Finally, commit the rows in both companies.
I/C Batch Tab
This Open tab process is totally manual and, despite the options to highlight many rows at once, can be tedious and time-consuming if you have a large volume of transactions. As an alternative, you can go to the I/C Batch tab.
Note that the account number at the top disappears (as does the Rec. Balance in the status bar). Unlike in the Open tab, in this tab, you are not working on a single account, but on a pair of accounts. Use the pick button beside either the due to or due from account. The pick list shows pairs of due to/from accounts (that you have setup in company profiles) and when you select a row from the pick list, both accounts in the main screen are set. Optionally check "Restrict Date Range" and set your date range. Then click the "Reconcile" button. The app will populate the grid with all "matching" (unreconciled) pairs of transactions it can find for the given pair of accounts and (possibly) given date range.
By "matching", we mean that a pair of transactions from the two GL accounts must have: a) the exact same dollar figure, to the penny, except one is debit and one is credit, b) the same source register and source ID (except for FBs, which must be relationally joined by entries in IC_TRANSFER_DATA), and c) the same GL period (month). To make this work, if the two companies you are reconciling have different base currencies, you should setup due to/from accounts in company profiles for both CAD and USD (see details in company profiles). And to prevent pooled figures that can’t be auto-matched, you should set the Application Configurator option 'Subtotal GLTRANS Postings' (see below) to False for every register that posts to the I/C accounts.
(Consider the scenario where company A runs the GL Journal Entries Register on a June I/C transaction before closing June and so DATE_TRANS is set to June, but company B runs the GL Journal Entries Register after June is closed so DATE_TRANS is set to July 1st. The two amounts will NOT auto-reconcile. This makes things easier if you are trying to reconcile the accounts for your June 30th balance sheet; otherwise, you would have great difficulties getting the accounts to reconcile to the same figure. The trade-off is that the company A June items would never auto-reconcile to the company B July items. You will have to go in and reconcile them manually via the Open tab when reconciling July 31st. But a) this scenario should not happen very often, and b) this is preferable to being unable to reconcile month-end balance sheet figures properly.)
If transactions populate in the grid (after clicking "Reconcile"), you may review the rows to see what you are about to commit. But, more importantly, make sure that the "due to" and "due from" totals below the grid match. Once this is confirmed, click "Commit".
Note that all the transactions from the grid, from both accounts, will be posted to a single "Rec.ID" on the Reconciled tab (using the Open tab method, you would have two different Rec.ID’s, one in each company, because you clicked "Commit" twice). As the Reconciled tab is filtered by the selected GL account at top, you will only note this subtlety if you open two instances of GL Reconciliation (described above).
I/C Register Tab
If you have many companies, the list of due to/from account pairs can be fairly long (basically n x (n-1) where n = number of companies if not using multi-currency and twice that if using multi-currency) and so the batch process can still seem quite manual as you must select each account pair one at a time. In that case, you can make the entire process totally automatic by doing setup in the I/C Register tab.
The register tab lists all the due to/from GL account pairs (that you have setup in company profiles) and all the TruckMate posting registers (other than GL Journal Entries Register). In both grids, there is a True/False column to auto-reconcile. You can toggle this individually via double-click or quickly set them all true/false via the buttons. Once you have "turned on" one or more account pairs and one or more registers, then whenever GL Journal Entries Register is run, it will try to auto-reconcile transactions immediately upon posting (for the "turned on" accounts/registers, using the same matching criteria described for the batch process above).
Note that not all TruckMate registers currently generate I/C transactions, but they have all been listed in the register tab for completeness (for possible future I/C integration).
Also note that the register tab is simply a setup screen - no actual reconciliation is actually done until transactions are posted. So, turning on options in the tab will not go back and auto-reconcile transactions that have already been posted (run through GL Journal Entries Register).
Finally, note that all reconciliations from a GL Journal Entries Register run are grouped together under a single Rec.ID, even if transactions from multiple account pairs and multiple registers are reconciled.
GL Journal Entries Register (gju.exe)
For all three methods, note that GL Reconciliation only works with posted transactions (transactions after GL Journal Entries Register has been run - unless you are using the app config 'Auto-Post Registers'). So, after running GL Journal Entries Register in one company, transactions will show up in the Open tab for accounts in that company, but there will be nothing to match to for the corresponding accounts in the other company (yet). It is not until after you run GL Journal Entries Register on both companies that reconciliation (by whatever method) will be possible.
Combination / Last Step
You will probably end up using a combination of all three methods. The batch and register methods are only meant to clear out the obvious matches. Then, you need to use the open tab to see which transactions are left unreconciled (i.e. the discrepancies) and resolve them (e.g. create manual GL Journal Entries entries and then reconcile using the open tab).
Differences from Bank Reconciliation
There are several differences between GL Reconciliation and Bank Reconciliation, such as:
Accounts
In Bank Reconciliation, you can only reconcile bank type (BA001) GL accounts. In GL Reconciliation, you can reconcile almost any GL account you like. The only exceptions are: a) inactive accounts and b) ones that are control accounts for TruckMate modules and are already reconciled by a categorizing resource (client, vendor, etc) and so it would not make sense to do duplicate reconciliation, namely: Accounts Receivable, Accounts Payable, Driver Payable, Interline Payable, Payroll Payable, and Supplier Payable. Some examples of accounts you may wish to use GL Reconciliation to reconcile are: inter-company accounts (where the "due from" reconciled balance in one company is always equal but opposite to the "due to" reconciled balance in another company), pre-paids, accruals, petty cash, taxes payable, and miscellaneous payables.
Auditing
In Bank Reconciliation, you basically manipulate the column TX_CLEARED in either GLTRANS or CHECK_MSTR; it starts out as False, you set it to INPRG when you flag it as reconciled, and finally to 'True' when you commit your reconciliation. On commit, the account’s new reconciled balance and the "last" reconciliation date are stamped into table BANK_INFO (over-writing the previous values). In GL Reconciliation, you are manipulating an integer, GLTRANS.GL_REC_ID (each reconciliation commitment stamps the group of reconciled GLTRANS records with a new sequential number). This allows you to see which GLTRANS records were reconciled together. It also allows for a reconciliation history to be maintained (in tables GL_REC / GL_REC_DETAIL); you have an audit trail as to who reconciled what and when.
Sub-Ledgers
In Bank Reconciliation, you flag TX_CLEARED in GLTRANS for "Deposits" and "Others", and TX_CLEARED in CHECK_MSTR for "Payments". In GL Reconciliation, you only flag GLTRANS records. Currently, this is the only big advantage of Bank Reconciliation over GL Reconciliation - you can see which checks have cleared the bank in various apps like 'AP Inquiry' (apni). In the near future, there will be config options that allow you to generate a separate GLTRANS record per originating transaction (right now, GLTRANS records are summarized, using a lump dollar figure, by journal, audit, account, and date). If turned on, this will allow TruckMate to stamp the originating sub-ledger item’s ID (e.g. CHECK_MSTR.CHECK_ID) into GLTRANS, providing a one-to-one linkage; this in turn will allow TruckMate to either automatically stamp fields like CHECK_MSTR.TX_CLEARED when you reconcile a check type GLTRANS record in GL Reconciliation or to "look up" the GLTRANS.GL_REC_ID flag to determine whether the item has been reconciled in apps like apni. This will allow TruckMate apps or crystal reports to indicate various types of transactions as being reconciled, not just checks (e.g. cash receipts).
Filtering
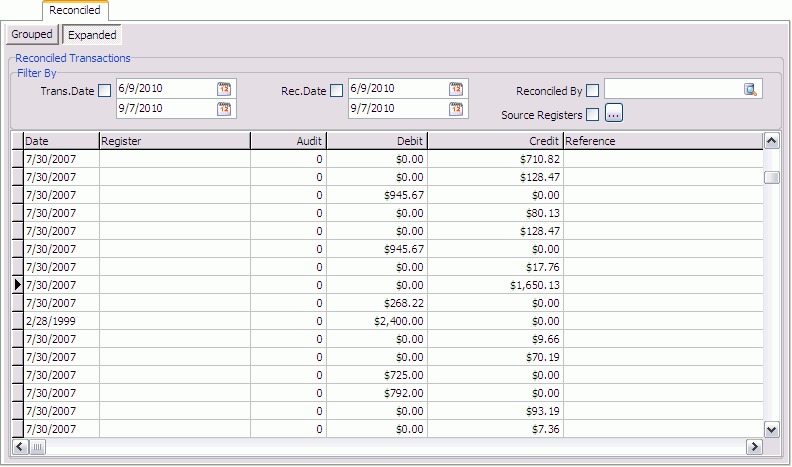
In Bank Reconciliation, the only available filter is 'Payee Type', and it is only applicable to the Payments grid. In GL Reconciliation, there are several filtering and viewing options. You can filter open (unreconciled) items by date, source registers (you can select a combination of several register types), and type (debits or credits). In Bank Reconciliation, you cannot view (other than by a crystal report) the reconciled transactions. In GL Reconciliation, you can view the account’s reconciled items either grouped by reconciliation (with a detail list of transactions for the currently selected reconciliation group) or in one ungrouped listing. The grouped view allows you to filter by reconciliation date and/or person who did the reconciliations. The expanded view allows you to filter by transaction date, reconciliation date, person who did the reconciliations, and/or source registers. The grouped view includes totals (dollar total of the reconciled transactions in the group, as well as the reconciled balance before and after the reconciliation). These totals are displayed in the sign of the account’s "normal" balance - e.g. reconciled debit balances are displayed as positive for asset and expense accounts but as negative for liability and revenue accounts; so, in most cases, the balances will be positive amounts.
Sorting
In Bank Reconciliation, via grid column title-click, you can sort some of the grids (Payments and Deposits, but not Other) by some of the columns (not by the Amount column in Deposits). Also, the sort is only ascending (if you title-click the column again, it does not reverse sort). In GL Reconciliation, you can sort or reverse sort by any column in any of its various grids. Bank Reconciliation also has a "locate" box (for the Payments grid only); GL Reconciliation has no locate option, but since you can sort on any column, you can quickly scroll to find the value you want.
Committing
In Bank Reconciliation, you can reconcile items either one at a time (via double-click) or multiple rows at once using 'Clear By Range' (a pop-up allows you to enter a date range or check number range). In GL Reconciliation, the double-click reconciliation of a single item works the same. However, the multi-row reconciliation is slightly different. Using the shift or control key in combination with the left mouse button, you can highlight several rows. There are then options to either reconcile or unreconcile all the highlighted rows at once. If the options are selected while no rows are highlighted, all unreconciled rows will be reconciled (or all reconciled rows will be unreconciled).
Totals / Target Reconciled Balance
In Bank Reconciliation, at the start, you enter the balance from your bank statement into the header and, as you reconcile items, totals at the bottom indicate how "close" your are to this target balance. This scenario is not really applicable for any accounts other than bank accounts. For many accounts (e.g. pre-paids and accruals), your target reconciled balance amount is always the same: $0. And for inter-company due to/from, you don’t have a target figure in mind ahead of time, you simply want the two accounts to be the same figure (albeit opposite sign); note that you can have two instances of GL Reconciliation open at once (logged into different companies), so that you can reconcile corresponding due to/from accounts simultaneously. So, in GL Reconciliation, there is no 'target' header field; the committed reconciled balance is always displayed in the status bar and 3 totals are displayed when viewing open items: a) the number of 'Pending Items' (rows you have flagged as reconciled but not yet committed), b) the 'Pending Amount' (the dollar total of those reconciled but as yet uncommited rows), and c) the 'Pending Balance' (the account’s new reconciled balance should you commit all the flagged rows).
GL Adjustments
In Bank Reconciliation, you may quickly enter two general journal amounts "on the fly": one for service charges and one for interest. Since GL Reconciliation can be used for many types of accounts, there is no such feature. However, quick links to 'GL Journal Entries' and 'Instant Checks' (cheque) are provided (via Window menu).
Subtotal GLTRANS Postings setting in the Application Configurator program
In the Application Configurator program, there is a setting called 'Subtotal GLTRANS Postings' for each General Ledger posting register (Billing Register, Check Register, Driver Deduction Register, etc.). If set to True (the default), then when GLTRANS records are created, all the GL transactions in the audit/register run are grouped/summed together by GL account and date (one lump figure per combination). If set to False, then the figures are grouped/lumped by GL account, date, and source transaction ID.
For example, suppose you want to reconcile I/C due to/from accounts. In that case, at minimum, you should set the option for the Billing Register to False (because the related I/C amounts are posted on related but different originating freight bills). That way, you will get granular amounts to allow reconciling some, but not all, amounts from a register run. With the option set to True, if you run the Billing Register in one company, a $100 "due to" amount from freight bill "X" may get lumped together with "due to" figures from several other freight bills, resulting in a $500 posting. But when the Billing Register is run on the other company, the $100 "due from" amount from related freight bill "Y" may get lumped together with "due from" figures from a different set of other freight bills, resulting in a $300 posting. How can you reconcile? With the option set to True, you can only reconcile on an audit-total by audit-total basis. With the option set to False, you can individually reconcile the $100 "due to" to the $100 "due from".
There are pros and cons to each setting.
The advantage of setting the option to True is that fewer GLTRANS records are generated and hence the performance of any SELECT on GLTRANS is better. A good example of this is summing GLTRANS amounts by period when printing financial statements.
The advantages of setting the optionto False are that more info is available in GLTRANS and the more granular amounts allow for easier reconciliation (both for the GL Reconciliation program and for reconciliation of sub-ledgers to the GL).
When this option is set to False, the existing columns REFERENCE and DESCRIPTION are populated for most registers (with the option set to True, they are left null for all registers other than gju).
Because companies might want granular/detailed information for data from some, but not all, registers, a separate option is provided for each register, allowing a company to only change the ones they need from True to False. This allows a compromise so as minimize the effect on performance (if only a single option were created, it would have been an all or nothing change, causing a substantial performance change).
Menu Bar / Toolbar
File Menu
Print Reports
![]() Selecting the Print Reports button will bring up the report selection window, common to many TruckMate applications. Here, you will select a report file from those available in your system and a Crystal Report will be generated.
Selecting the Print Reports button will bring up the report selection window, common to many TruckMate applications. Here, you will select a report file from those available in your system and a Crystal Report will be generated.
The Crystal Report template supplied with the TruckMate system is called 'OSCHEQUE.RPT'. After selecting the desired report (using the Report Selection form) the report will preview to the screen. Click the 'Printer' icon at the top of the screen to send the report to the printer that is configured as the default printer for your workstation.
For more information on Report functionality in TruckMate, see the Crystal Reports Reference.
Exit
![]() Selecting this option will close the Bank Reconciliation program.
Selecting this option will close the Bank Reconciliation program.
Navigate Menu
The Navigate Menu contains the normal TruckMate Navigation Bar, used to browse through your Database records, and the following options:
Find
![]() Click this button to open a search form that you can use to find a specific GL Account in your system.
Click this button to open a search form that you can use to find a specific GL Account in your system.
Window Menu
GL Journal Entries
![]() Selecting this option will open an instance of the GL Journal Entries program.
Selecting this option will open an instance of the GL Journal Entries program.
GL Journal Entries Register
![]() Selecting this option will open an instance of the GL Journal Entries Register program.
Selecting this option will open an instance of the GL Journal Entries Register program.
Instant Checks
![]() Selecting this option will open an instance of the Instant Checks program.
Selecting this option will open an instance of the Instant Checks program.
Tools Menu
TruckMate Monitor
![]() Click the down arrow next to this button to access the various functions of the new TruckMate Monitor.
Click the down arrow next to this button to access the various functions of the new TruckMate Monitor.
Remember Position / Size
Selecting this option will maintain the program window position and size upon close. When the program is re-opened, it will appear the same.
Reconcile
![]() On the Open and I/C Batch tabs, clicking this button will reconcile all entries that are set to pending.
On the Open and I/C Batch tabs, clicking this button will reconcile all entries that are set to pending.
Clear
![]() On the Open and I/C Batch tabs, clicking this button will clear the pending flag from any rows that have been selected/double clicked.
On the Open and I/C Batch tabs, clicking this button will clear the pending flag from any rows that have been selected/double clicked.
Commit
![]() On the Open and I/C Batch tabs, clicking this button will commit any pending rows as being reconciled.
On the Open and I/C Batch tabs, clicking this button will commit any pending rows as being reconciled.
Header Information
GL Account (for Open Tab and Reconciled Tab)
These fields list the GL Account number, the type of account, and the type of currency associated with it.
Open Tab
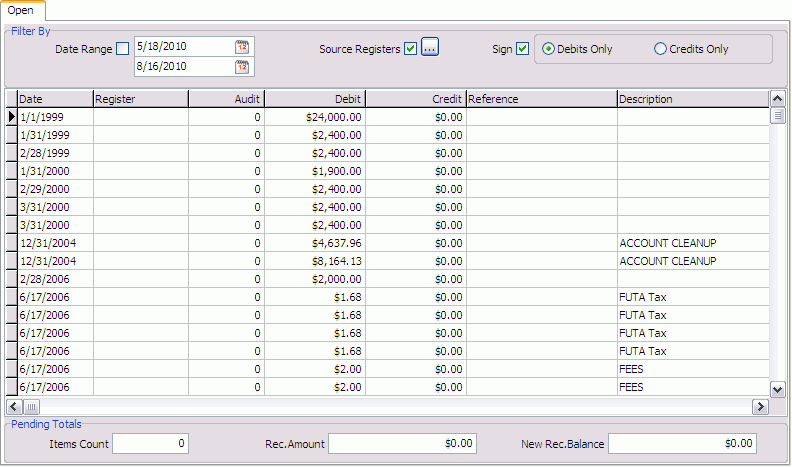
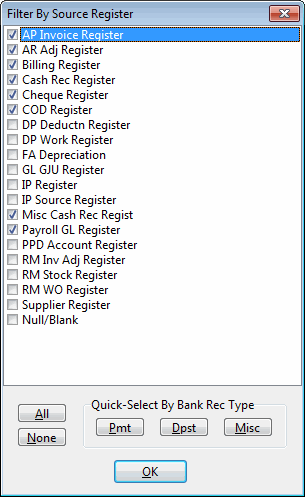
The Open Tab displays a list of open (unreconciled) items. The user can filter entries by:
-
Date Range
-
Source Registers: Click the ellipsis button to open the Filter By Source Register window and select which registers to be displayed.
-
Sign: Allows the user to filter by Debits Only or Credits Only.
This tab also displays the Pending Totals, with Items Count, Reconciled Amount, and New Reconciled Balance at the bottom of the screen.
Double-clicking on an entry will set it as being Pending. The user can then click the "Commit Pending Rows as Reconciled" button to reconcile all pending entries.
Reconciled Tab
Grouped Section
The Grouped section of the Reconciled Tab displays by batch (or Reconciled ID), as well as transactions.
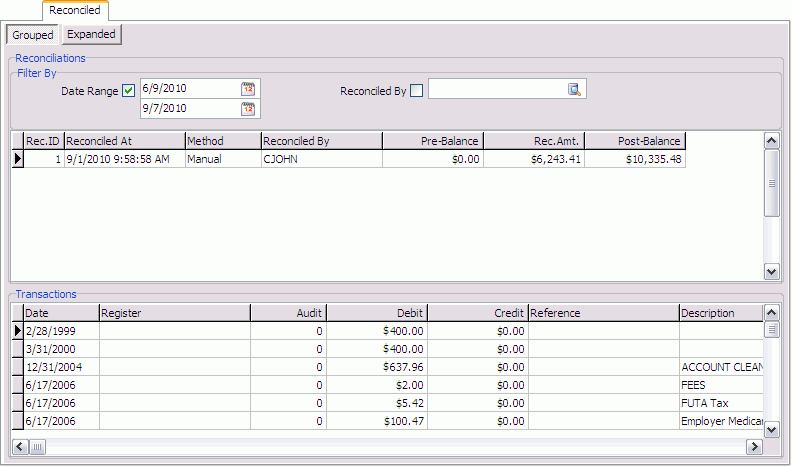
Filter By
In this grid, users can filter Reconciled batches by date or by the user who reconciled them.
Transactions
This grid displays all transactions associated with the selected Reconciled ID, selected in the grid above.
I/C Batch Tab
This Open tab process is totally manual and, despite the options to highlight many rows at once, can be tedious and time-consuming if you have a large volume of transactions. As an alternative, you can use the I/C Batch Tab. Entries here can be filtered by Due From Account, Due To Account, and Date Range.
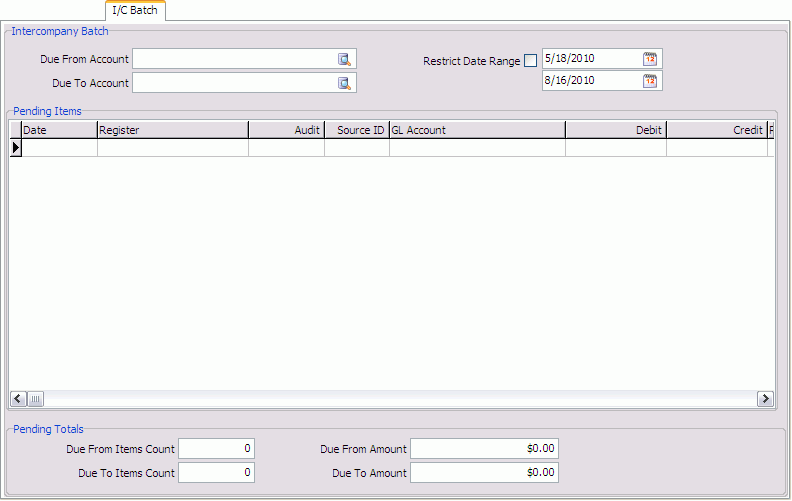
The user can select the due to or due from account. The list shows pairs of due to/from accounts (that you have setup in company profiles) and when you select a row from the pick list, both accounts in the main screen are set. (Users can also check "Restrict Date Range" and set the date range.) Then click the "Reconcile" button. The program will populate the grid with all "matching" (unreconciled) pairs of transactions it can find for the given pair of accounts and (if selected) the given date range.
I/C Register Tab
The I/C Register Tab is where users can set up auto-reconciliation of intercompany accounts by GJU Register for pending items.
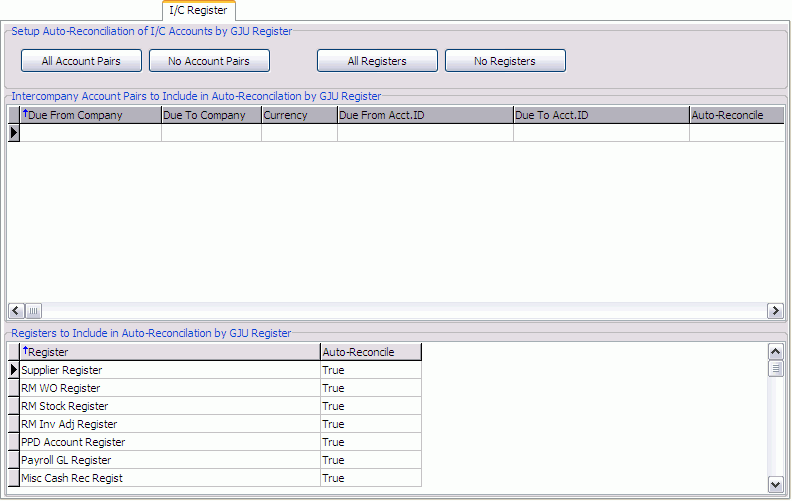
Setup Auto-Reconciliation of I/C Accounts by GJU Register
In this section, users can select from All Account Pairs/No Account Pairs and All Registers/No Registers for auto-reconciliation by the GJU Register.
Intercompany Account Pairs to Include in Auto-Reconciliation by GJU Register
This grid displays the intercompany account pairs that will be auto-reconciled.
Registers to Include in Auto-Reconciliation by GJU Register
In this grid, users can set various registers to auto-reconcile. Double click on in the Auto-Reconcile column to change the value from False to True and back.