TruckMate E-Mail System
TMW has consolidated the various ways of sending e-mails from TruckMate into a single shared component. The TruckMate E-Mail System is now used for a variety of tasks throughout the system, from Freight Bill Confirmation e-mails from the Customer Service program to Carrier Assignment notifications in the Dispatch program.
The TruckMate E-Mail System is set up in Profiles > Codes Maintenance > E-Mail Setup.
| Users must now have the Scheduler E-mail program running in the background as a Windows service for e-mail functionality to work. |
When e-mails are composed and the user clicks 'Send', the message is not actually sent to the recipients. Instead, it is stored in a queue waiting for the Scheduler program to retrieve it to actually send it out. (Network administrators may be more strict with their firewall policies, as only the scheduler system needs to be able to send e-mails outside the network.) Once a message is sent by the Scheduler program, it is removed from the queue and placed in a "sent" status. The message will remain in this status indefinitely for archival purposes.
Send E-Mail/Compose Message Window

The Compose Message window allows you to send out e-mails manually or automatically (i.e. based on a pre-configured E-mail Template). This window has all the usual components of sending an e-mail, with fields for 'From', 'To', 'Cc', 'Bcc', 'Subject', and 'Attachments', along with the e-mail body.
|
Toolbar buttons
The available Toolbar buttons toggle the availability of various fields in the template window, such as the 'Profile' button, etc.
Header values
Send Button |
Sends the e-mail based on the settings chosen in this window. |
Profile Button |
Select which profile to use for the e-mail. E-Mail Profiles are set up in the Profiles > Codes Maintenance program > E-Mail Setup > Profiles tab. |
Subject / Message |
Enter the e-mail subject line and message body in the appropriate fields. |
Attachments |
Select the 'Attach…' button to attach a file to the e-mail message. The system will behave differently depending on the 'To' address: if sending to e-mail, it will convert to a PDF document; if faxing, it will print it. All attachment data is stored in the database. This means that they are available to anyone viewing a message, regardless of where the message was composed. This also means the system running the Scheduler program, which sends the e-mails, may and should be independent from the systems used to compose them. |
Recipients (To, Cc, Bcc) |
The e-mail system supports mixed-media recipients. This means a single message may be sent to both e-mail addresses and fax numbers. The fax recipients are sent the message formatted within a fax report. In addition, all attached Crystal reports will be sent as subsequent faxes. The feature also supports faxing by printing to a fax-capable printer. Note: If sending a fax, there should be a fax number in the 'To' field instead of an e-mail address. E-mail recipients will not see any fax recipients because phone numbers are not allowed in e-mail recipient lists. |
E-mail Templates
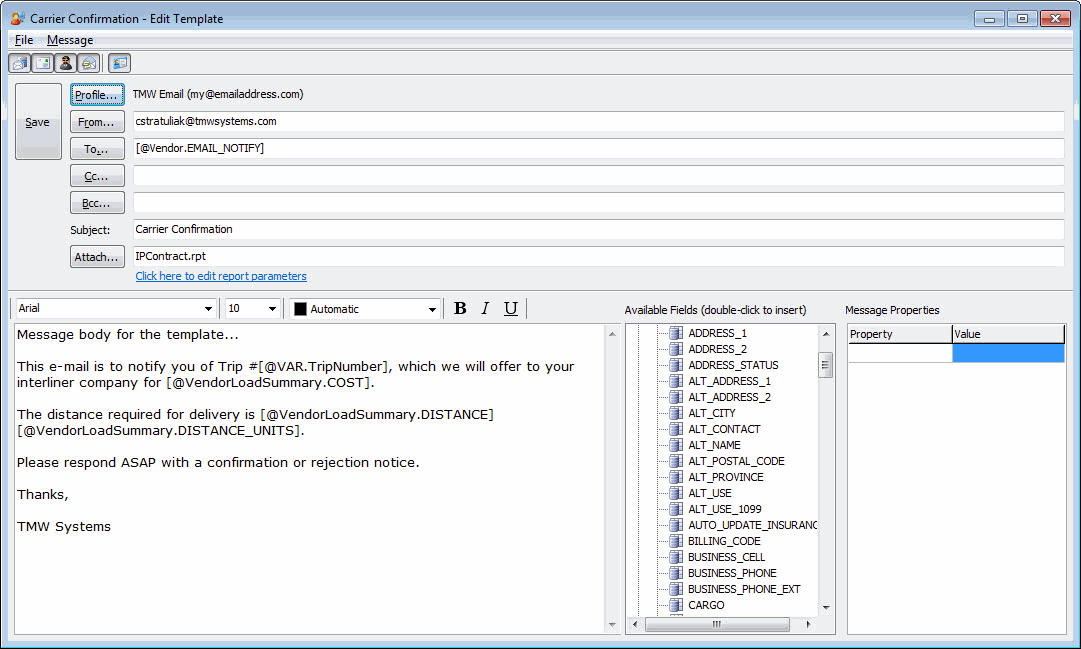
The system supports the creation of Templates for frequently sent e-mails. Select the 'Message > Convert to Template' option at any point from the Compose E-mail window to enter into the Edit Template window. Everything that can be put into an e-mail manually can be put into a template, including the e-mail 'Subject', 'Body', file attachments, recipient lists, etc. In addition, templates can include dynamic database values that are not filled in until the template is used. These fields may be placed anywhere in the template’s subject, body and even the recipient lists.
Header values
The available fields in the header section (including the Toolbar buttons) are the same as in the Compose E-mail window, only that when creating a template, they will be "remembered" for future use of the template. You can manually type in specific 'To', 'Cc', 'Message Body' values, etc. and they will always be the same when selecting this template, or you can use the 'Available Fields' section (see below) to pull information for these header fields from the database.
Available fields
The Available Fields section is a powerful tool that allows you to setup very detailed dynamic e-mail messages that will pull information from the TruckMate database that relates to your e-mail message. The Available Fields section lists the TruckMate database tables and fields relevant to the e-mail task you are working on. For example:
-
If the E-mail Template window is invoked from the Carrier Assignment screen, you will have access to the VENDOR and VENDOR_LOAD_SUMMARY tables and all their associated columns.
-
If the E-mail Template window is invoked from the Customer Service program, you will have access to the TLORDER table, among others.
The user need simply drag and drop database fields into the areas of the e-mail template they require database information for. In the above example, the user has dragged the VENDOR.E-MAIL_NOTIFY value into the 'To' column, which would mean that the Vendor’s e-mail address will automatically populate into the e-mail message generated from this template (as long as the Vendor has an e-mail address specified on the Vendor Profiles > Address Tab). You can also double-click any database column value to auto-add it to the e-mail message body section.
Custom Datasets
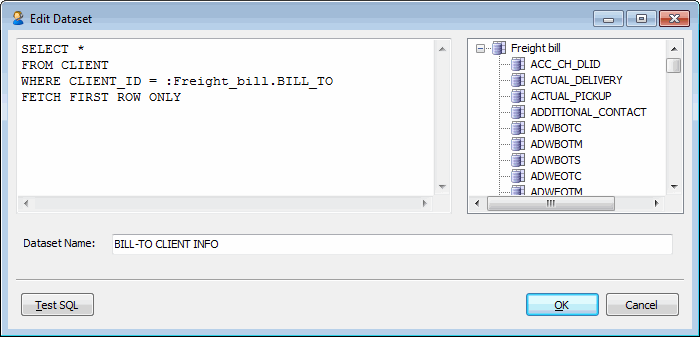
The most powerful feature of the Available Fields section of the e-mail template setup is the ability to create custom datasets based on any of the available database columns. A custom dataset is created by right-clicking a database field and selecting the New dataset based on TABLE.COLUMN shortcut menu option. Once this option is selected, the Edit Dataset window will open, which allows the user to enter an SQL "SELECT…" statement that will tie other TruckMate table information into the Available Fields section.
Custom Dataset example:
The user can enter any SQL statement they require and use the Test SQL button to confirm the integrity of their code. Once the user is satisfied with the custom dataset, they can provide a 'Dataset Name' value and click the 'OK' button to save/apply it to the e-mail template.
For example, if you are creating a Driver Detention e-mail template, you will not have initial access to the CLIENT table, but you do have access to the TLORDER.BILL_TO column, so you could do the following to gain access to the CLIENT table information for the Bill-To client:
-
Right-click on BILL_TO and select the 'New dataset based on TLORDER.BILL_TO' option.
-
When the Edit Dataset window opens, enter the following SQL:
SELECT * + FROM *CLIENT* + WHERE *CLIENT_ID* = *:Freight_bill.BILL_TO_CODE* + FETCH FIRST ROW ONLY -
Select the 'OK' button and the 'Available Fields' section will now have access to all the CLIENT table information for the freight bill’s Bill-To party.
| Just as with the main e-mail template setup window, you can drag/drop or double-click TruckMate columns to add them into your SQL automatically. |
Message properties
All messages may have any number of properties associated with them. These allow the message to carry ancillary data that may be put to specific use depending on the type of message being sent. For example, freight bill confirmation messages may have a status code parameter which, if set, will be interpreted as a status code to be added to the freight bill’s status history when the messages is queued for sending.
| The Message Properties section is made visible via the 'Message menu > Show Properties' option. |
Template selection
When you invoke an e-mail window from within any of the supported programs, the Choose Template window will open. Selecting an e-mail template will load that template automatically, with any dynamic database fields populated by the record displayed in the "calling" application. You can also select '(Blank message)' to begin composing a new e-mail without a template, or use the 'Create a new template' option to start setting up a new template.

| The Template feature is available from every program that supports e-mail functionality, but not all templates are available for every application. If you setup a template from the Carrier Assignment screen, for example, that template will only appear for selection when the user selects the 'Send E-mail' button from the Carrier Assignment screen (i.e. it will not show up when selecting 'Freight Bill Confirmation' in Customer Service). |
There are some shortcut menu options available when the user right-clicks on an existing template: