Container Inventory Control

The original Container Inventory Control program purpose was to keep track of your Containers by recording when Containers are received into the yard inventory, when Containers leave the yard inventory, and if ownership of Containers is transferred between various parties. The Container Inventory Program was expanded to handle other types of equipment as well. The program now includes tabs for all types of equipment. However, whether you want to handle other resources or not through this program is controlled by an app config option. Setting the 'CONINV.EXE - Advance Resource Display' app config to 'True' will enable other resources handling from the 'Container Inventory Control' program. If keeping an inventory of the other resources is not applicable in your business, keep this app config tho its' default value of 'False'.
| 'CONINV.EXE - Advance Resource Display' to 'True' changes the appearance of the entire application. It adds a tab for each resource in the details section. Another important effect of setting the app config to 'True' is that it enables the 'Screen Design' feature in the application. |
After entering information in the Intermodal Setup program, Container Depot Setup program, and Container Inventory Control program, use the Container Depot Billing program to print reports and create bills. Created bills will then appear in the Customer Service program.
To access Container Inventory Control:
| From this location | Go to |
|---|---|
TruckMate Menu and TruckMate Task List |
Dispatch > Intermodal > Container Inventory |
Windows Start Menu |
TruckMate 20xx > Container Inventory |
Windows Explorer |
C:\Program Files (x86) > TruckMate 20xx > ConInv.exe |
How Do I?
How do I Create a Container InGate record?
-
Open the Container Inventory Control program (CONINV.EXE).
-
Use the '+' button on the navigation bar and enter all pertinent details. See the Container Inventory Control documentation for help with specific InGate fields.
-
Click on the 'Checkmark' button on the navigation bar to save the record.
-
When ready, select 'Post' to assign a Control Number to the transaction.
-
After posting is complete, you must process this information through the Container Depot Billing program and the transaction will appear as a Freight Bill in the Customer Service program, where you can apply the InGate record to Intermodal tasks.
How do I create a Container OutGate record?
| Because a Container requires an InGate record before an OutGate record can be created, you must first follow the steps above in order to create a Container InGate. |
-
Open the Container Inventory Control program (CONINV.EXE).
-
Create an InGate record for your Intermodal Container.
-
Click the 'Create OutGate' button near the bottom of the Container Inventory Control program window.
-
Many of the details will populate automatically based on the information from the InGate section. Enter any additional Details you require for the OutGate record. See the Container Inventory Control documentation for help with specific OutGate fields.
-
Click on the 'Checkmark' button to save the OutGate record.
-
When ready, select 'Post' to assign a Control Number to the transaction.
-
After posting is complete, you must process this information through the Container Depot Billing program and the transaction will appear as a Freight Bill in the Customer Service program, where you can apply the OutGate record to Intermodal tasks.
How do I print Reports on InGate and OutGate information?
-
Open the Container Inventory Control program(CONINV.EXE).
-
Click the 'Configure' button in the Toolbar section near the bottom of the program form. The Report Configure options will appear in a separate window.
-
Choose the options you would like to use in your Reports. For more help with the individual options in this window, see the Container Inventory Control documentation. Click the 'Close' button to save your choices and return to the main form.
-
Click the 'Print' button. The Crystal Report selection window will display. Depending on the options you setup in the 'Configure' window, the program will automatically determine the proper Report to use (InGate or OutGate report). If you have not used the 'Configure' window, you can manually choose the report to use ('CONTAINERINVENTORY.RPT').
-
A Report preview window will display if you chose that option in the 'Configure' window. Click 'OK' to continue printing.
Menu and toolbar options
This topic describes menu and toolbar options and functionality that are specific to the Container Inventory Control window.
For information about common menu and toolbar options (i.e. File menu, Refresh, Multi-Company, etc.), see General menu and toolbar options in TruckMate basics.
Events Menu
Post In Gate
![]() Once all pertinent details for the In Gate record have been entered, select this button. Run the Control Depot Billing program and then this entry will be accessible in the Customer Service program.
Once all pertinent details for the In Gate record have been entered, select this button. Run the Control Depot Billing program and then this entry will be accessible in the Customer Service program.
Post Out Gate
![]() Once all pertinent details for the Out Gate record have been entered, select this button. Run the Control Depot Billing program and then this entry will be accessible in the Customer Service program.
Once all pertinent details for the Out Gate record have been entered, select this button. Run the Control Depot Billing program and then this entry will be accessible in the Customer Service program.
Create Out Gate
![]() After entering all pertinent details in the In Gate record, select this button to actually create the Out Gate record. Most values in the Out Gate will pre-populate based on the values entered for the In Gate.
After entering all pertinent details in the In Gate record, select this button to actually create the Out Gate record. Most values in the Out Gate will pre-populate based on the values entered for the In Gate.
Create Off Lease
![]() Select this button to create new 'Off Lease' entries in the Container Inventory Control program.
Select this button to create new 'Off Lease' entries in the Container Inventory Control program.
Search (Filter)
![]() Click this button to access a filter feature where you can specify exactly what you’re looking for. Choices are: 'Container Number', 'Container Owner', 'Container Size', 'Chassis Number', 'Origin', 'Destination', 'Booking Number', 'Status', 'Transaction Type', 'In Date', 'Out Date', and 'Container Depot'.
Click this button to access a filter feature where you can specify exactly what you’re looking for. Choices are: 'Container Number', 'Container Owner', 'Container Size', 'Chassis Number', 'Origin', 'Destination', 'Booking Number', 'Status', 'Transaction Type', 'In Date', 'Out Date', and 'Container Depot'.
Go To Container
![]() Brings up a dialog box where you enter a Container number to go directly to the entry related to that Container.
Brings up a dialog box where you enter a Container number to go directly to the entry related to that Container.
Go To Control #
![]() Brings up a dialog box where you enter a Control number to go directly to that entry.
Brings up a dialog box where you enter a Control number to go directly to that entry.
Go To Off Lease
![]() Select this button to access previously entered Off Lease entries within this program. In order to select this option, the User must have both an In Gate and Off Lease record displayed on the Container Inventory Control program window. When 'Go To Off Lease' is selected, the new connected 'IL' record will be created and displayed, which can then be used to create an Out Gate.
Select this button to access previously entered Off Lease entries within this program. In order to select this option, the User must have both an In Gate and Off Lease record displayed on the Container Inventory Control program window. When 'Go To Off Lease' is selected, the new connected 'IL' record will be created and displayed, which can then be used to create an Out Gate.
Maintenance
![]() Clicking this button brings up a new window detailing any Maintenance Jobs setup for the selected Container. You may add a new Maintenance Job by clicking the '+' button and entering the details in the Grid.
Clicking this button brings up a new window detailing any Maintenance Jobs setup for the selected Container. You may add a new Maintenance Job by clicking the '+' button and entering the details in the Grid.
Comments
![]() Select this button to open a window where you can enter any relevant comments pertaining to this Container.
Select this button to open a window where you can enter any relevant comments pertaining to this Container.
Invoices
![]() Brings up the Invoice window where you can view Bill Number, Bill Date, and Batch ID, if applicable, for this entry.
Brings up the Invoice window where you can view Bill Number, Bill Date, and Batch ID, if applicable, for this entry.
Configure Gate Reports
![]() Opens the Container Inventory Configuration window that allows you to configure this program for either In Gate or Out Gate reporting options. You can specify whether you wish to print a report, identify the report name, set the number of copies, and access a preview of the report by setting these configuration options.
Opens the Container Inventory Configuration window that allows you to configure this program for either In Gate or Out Gate reporting options. You can specify whether you wish to print a report, identify the report name, set the number of copies, and access a preview of the report by setting these configuration options.
Set Default Depot
![]() Select this button to enter a Default Depot name or use the search button to search the Depots entered on your system.
Select this button to enter a Default Depot name or use the search button to search the Depots entered on your system.
Split Gate
![]() Selecting this button will create two 'NA' InGates that need to be posted, one for the Container and another for the Chassis. When a gate is split, you must manually set the 'Days Grace' field. Both split InGates will have the ID of the original InGate in the 'Split ID' field.
Selecting this button will create two 'NA' InGates that need to be posted, one for the Container and another for the Chassis. When a gate is split, you must manually set the 'Days Grace' field. Both split InGates will have the ID of the original InGate in the 'Split ID' field.
| When searching for InGates, the User must select 'Show Split' to see these gates. When Split, the ID of the original InGate gets put in the 'Split ID' field for the 2 new InGates. |
Refresh Security
![]() Select this option to refresh the Security Settings that apply to the Container Inventory Control program. These settings are configured in the Security Setup program.
Select this option to refresh the Security Settings that apply to the Container Inventory Control program. These settings are configured in the Security Setup program.
In-Gate Header Information
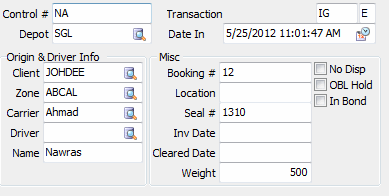
To add a new record to the left-hand side or 'In-Gate' side of the Container Inventory Control program:
-
Use the '+' button on the navigation bar and enter all pertinent details.
-
Click on the 'Checkmark' button on the navigation bar to save the record.
-
When ready select 'Post' to assign a Control number to the transaction. After posting is complete, you have run this information through the Container Depot Billing program, this transaction will appear as a Freight Bill in the Customer Service program.
Control Number
Will pre-populate once the information entered is posted into the system.
Transaction
Upon saving this information the letters 'IG' will appear meaning In Gate and denoting this as an In Gate entry in the system.
Depot
Enter the Depot name or use the search button to search for Container depots already entered in your system.
Depot records are created and maintained in the Container Depot Setup program.
Date In
Double-click in the field to bring up a calendar where you can scroll to the desired date.
Origin and Driver Information
Client
Enter an Originating Client ID or use the search button to search for Client IDs on your system. Client IDs are setup and maintained in the Customer & Vendor Profiles program.
Zone
Enter a zone or use the search button to search for zones already entered on your system.
Carrier
Enter a Carrier ID or use the search button to search for Carrier IDs on your system. Carriers are setup in the Container Depot Setup program.
Driver
Enter a Driver name or use the search button to search for Driver names on your system. Driver records are setup and maintained in the Driver Profiles program.
Name
Once selecting a Driver in the field above, this field will pre-populate with the Driver’s full name.
Miscellaneous Information (In Gate)
Booking #
Enter the Booking number, if applicable.
Location
Enter the location.
Seal #
Enter the Container Seal number, if applicable.
Inv Date / Cleared Date
Enter the Invoice Date and Date of Clearance, or double click these fields to select a Date from a Calendar menu.
Weight
Enter the Weight of the In Gate shipment.
No Disp / In Bond / OBL Hold
Place a check mark next to these values if they apply to the current shipment.
Out-Gate Header Information
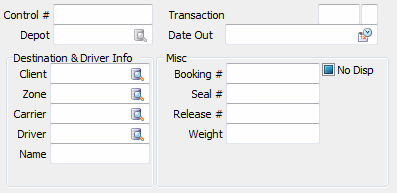
To create an 'Out-Gate' record, the following steps should be taken:
-
When a Container leaves the yard inventory you must click on either the 'Create Out Gate' button or the 'Create Off Lease' button to create a new record to track the Container’s 'Out-Gate'. Upon selecting the 'Create Out Gate' button (or menu Events Menu option) most of the fields in the Out Gate section will be automatically populated based on the In Gate information.
-
Click the 'Checkmark' button to save the record, and when ready select 'Post' to assign the transaction a Control number.
-
After posting is complete, and you have processed this transaction through the Control Depot Billing program, a Freight Bill representing this bill will appear in the Customer Service program.
-
To access previously entered Off Lease entries, select 'Go to Off Lease'. When ready, select 'Create Out Gate'.
Control Number
Will pre-populate once the information entered is posted into the system.
Transaction
Upon saving this information the letters 'OG' will appear meaning Out Gate and denoting this as an Out Gate entry in the system.
Depot
Enter the Depot name or use the search button to search for depots already entered in your system.
Depot records are maintained in the Container Depot Setup program.
Date Out
Double-click in the field to bring up a calendar where you can scroll to the desired date.
Destination and Driver Information
Client
Enter a Destination Client ID or use the search button to search for Client IDs on your system.
Zone
Enter a Zone or use the search button to search for Zones already entered on your system. Zone Codes are configured in the Codes Maintenance program.
Carrier
Enter a Carrier name or use the search button to search for carrier names on your system. Carrier Names are configured in the Customer & Vendor Profiles program.
Driver
Enter a Driver name or use the search button to search for Driver names on your system. Driver Names are setup in the Driver Profiles program.
Name
Once selecting a Driver in the field above, this field will pre-populate with the Driver’s full name.
Program Detail Tabs
The Detail Tabs part of the program contains a separate tab for each equipment type. Each tab consists of two identical groups of information, the left side group is used for In-Gate and the right side is for Out-Gate. The reason for having two separate sets of information is to account for the possibility of having some changes take place to the equipment during the period between the in-gate time and the out-gate time for the equipment.
Navigation Bar
The navigation bar is available in all the tabs, to allow the user to go to Add new records, Edit or Delete Existing records. The user can also use the navigation tool bar to save or cancel the changes made. A refresh button is also available to allow the user to retrieve fresh set of records from the database when there is a need for that.
Query Trip
Two 'Query Trip' buttons are available in all the tabs, one for In-Gate data and one for Out-Gate data. These buttons allow the user to query the trip that the selected equipment is assigned to.
Container Tab
The container tab contains information about the container (if the equipment in question is a container). Tow sets of duplicate information are available (one for in-gate and one for out-gate), below is a distinct description of the information available on the tab (without duplication).
Number
Enter a Container number or use the search button to search for Container numbers on your system.
Container Numbers are configured in the Container Profiles program.
Quick Container Entry
Click the 'P' button next to the 'Number' field to access the 'Quick Container Entry' dialog box, where you can quickly enter the details concerning a Container. This dialog has two purposes:
-
Enter new Containers: to add a new Container record to the CONTAINER Table, simply enter all the details for the new Container.
-
Select existing Container: type the 'Container #' of an existing Container and the rest of the fields on the Quick Container Entry window should automatically populate. If the Container you have selected is not currently set to 'Active' status, the User will be asked if it should be made 'Active'.
If any other information has not automatically populated, enter values as required in the blank fields.
View Container Trace Numbers
Selecting the 'T' button next to the 'Number' will open the Intermodal Trace program with the Trace Details associated with the selected Container.
Owner
Enter an Owner name or use the search button to search for Owners already entered into your system.
Container Owners are created in the Intermodal Tab of the Customer & Vendor Profiles program.
ISO #
Enter the Container’s ISO # in the space provided, or click the search button to select an ISO # from those available on your system.
Size
Enter the Container size or use the search button to view Container size information already entered in your system.
Container Size values are created in the Intermodal Setup program.
Type
Enter the Container type or use the search button to view Container types already entered in your system. Container Types are configured in the Container Profiles program.
FB. No
This field will automatically populate when billing a customer per container and the Container Depot Setup program > Depot Rate Setup Tab > 'Send Charge To' field contains the 'FB' (Freight Bill) value. All storage charges will be entered in the original FB. If your are calculating charges manually, you may enter the Freight Bill associated with this InGate record, or click the database pick button to search for a Freight Bill to attach.
Bad Order
Place a checkmark in the box provided to display this Container information as a 'Bad Order'.
Loaded
Place a check mark in this option box if the Container is currently loaded with Freight.
High Value
Place a check mark in this option box if the Freight being hauled within this Container will be of 'High Value' status.
Notes
Enter any relevant details concerning this Container.
Wheels
Select either COFC, or TOFC.
Movement Type
Use the pull-down menu and make a selection from the following choices: 'Import', 'Export', 'Dom IB', 'Dom OB', 'Empty Repo', and 'Other'.
Additional Charges
The availability of the following 'Charge' fields is determined in the Container Inventory Setup program > Acc Charges Tab. These fields can be auto-assigned based on the configuration provided in the Container Inventory Setup program > Acc Charges Tab & Depot Rates Tab.
Include Lift Charges
Place a checkmark in the box provided to enable this charge.
Include Inspection Charges
Place a checkmark in the box provided to enable this charge.
Include Tarp Charges
Place a checkmark in the box provided to enable this charge.
Include Steam Engine Charges
Place a checkmark in the box provided to enable this charge.
Billing Information
Bill To
Use the drop-down menu to select either 'A' (Automatic) or 'M' (Manual). This will allow user to enter a 'Bill To' code instead of having the automatic logic, which uses the 'Chassis Owner' code as the 'Bill To' if only 'Chassis' information is present, or else uses the 'Container Owner' code as the 'Bill To' code.
Bill To Code
If you have selected 'M' (Manual) in the 'Bill To' field described above, you can click the icon in this field to select a Client ID Code to use as the 'Bill To Code'.
No Charge
If there is no Rate sheet the 'Grace Days' will be set to '-1' and the 'No Charge' option will be flagged. If there is a Rate sheet the default value will be 'False' (unflagged), but the user can set it to 'True' to deal with exceptions.
|
There is a security setting in the Security Setup program > Security > Business Events > Miscellaneous > Container Inventory section entitled 'Allow Setting No Charge Checkbox'. If this option is flagged, the User will be able to check/uncheck the 'No Charge' flag. If this option is not flagged in Security Setup, the 'No Charge' field will be disabled. There is also an Application Configurator program option, entitled 'No Charge Always False' that can override the Security Setup program option. |
Bill Date
Enter the Billing Date you wish to use when creating the Invoices.
Days Grace
Enter the number of 'Grace' Days allowed in this Invoice.
Chassis Tab
Number
Enter a Chassis number or use the search button to search for Chassis Numbers on your system. Chassis Numbers are configured in the Trailer Profiles program.
Quick Chassis Entry
Click the 'P' button next to the Number field to access the 'Quick Chassis Entry' dialog box, where you can quickly enter the details concerning a Chassis. Once you select the 'Chassis #', the rest of the fields on the Quick Chassis Entry window should automatically populate. If the Chassis you have selected is currently set to 'Active' status, there will be a warning message.
If any other information has not automatically populated, enter values as required in the blank fields.
Owner
Enter an Owner name or use the search button to search for Owners already entered into your system. Chassis Owner records are created in the Intermodal Tab of the Customer & Vendor Profiles program and assigned to the equipment in the Ownership tab of the Trailer Profiles program.
Size
Enter the Chassis size or use the search button to view Cahassis size information already entered in your system. Container Size values are created in the Intermodal Setup program.
Class
Enter the Container Class or use the search button to view Container Classes already entered in your system. Container Classes are setup in the Container Profiles program.
Chassis
Place a checkmark in the box provided if this shipment is of 'Chassis Only' type.
Bad Order
Place a checkmark in the box provided to display this Container information as a 'Bad Order'.
Notes
Enter any relevant details concerning this Chassis.
Billing Information
Bill To
Use the drop-down menu to select either 'A' (Automatic) or 'M' (Manual). This will allow user to enter a 'Bill To' code instead of having the automatic logic, which uses the 'Chassis Owner' code as the 'Bill To' if only 'Chassis' information is present, or else uses the 'Container Owner' code as the 'Bill To' code.
Bill To Code
If you have selected 'M' (Manual) in the 'Bill To' field described above, you can click the icon in this field to select a Client ID Code to use as the 'Bill To Code'.
No Charge
If there is no Rate sheet the 'Grace Days' will be set to '-1' and the 'No Charge' option will be flagged. If there is a Rate sheet the default value will be 'False' (unflagged), but the user can set it to 'True' to deal with exceptions.
|
There is a security setting in the Security Setup program > Security > Business Events > Miscellaneous > Container Inventory section entitled 'Allow Setting No Charge Checkbox'. If this option is flagged, the User will be able to check/uncheck the 'No Charge' flag. If this option is not flagged in Security Setup, the 'No Charge' field will be disabled. There is also an Application Configurator program option, entitled 'No Charge Always False' that can override the Security Setup program option. |
Bill Date
Enter the Billing Date you wish to use when creating the Invoices.
Days Grace
Enter the number of 'Grace' Days allowed in this Invoice.
Trailer Tab
Number
Enter a Chassis number or use the search button to search for Chassis Numbers on your system. Chassis Numbers are configured in the Trailer Profiles program.
Owner
Enter an Owner name or use the search button to search for Owners already entered into your system. Trailer Owner records are created in the Intermodal Tab of the Customer & Vendor Profiles program and assigned to the equipment in the Ownership tab of the Trailer Profiles program.
Size
Enter the Trailer size or use the search button to view Trailer size information already entered in your system. Trailer Size values are created in the Basic Info tab of the Trailer Profiles program.
Class
Enter the Container Class or use the search button to view Container Classes already entered in your system. Trailer Classes are created in the Equipment Class Codes tab of the Codes Maintenance Program, and are assigned in the Basic Info tab of the Trailer Profiles program.
Trailer
Place a checkmark in the box provided if this shipment is of 'Trailer Only' type.
Bad Order
Place a checkmark in the box provided to display this Trailer information as a 'Bad Order'.
Notes
Enter any relevant details concerning this Trailer.
Billing Information
Bill To
Use the drop-down menu to select either 'A' (Automatic) or 'M' (Manual). This will allow user to enter a 'Bill To' code instead of having the automatic logic, which uses the 'Chassis Owner' code as the 'Bill To' if only 'Chassis' information is present, or else uses the 'Container Owner' code as the 'Bill To' code.
Bill To Code
If you have selected 'M' (Manual) in the 'Bill To' field described above, you can click the icon in this field to select a Client ID Code to use as the 'Bill To Code'.
No Charge
If there is no Rate sheet the 'Grace Days' will be set to '-1' and the 'No Charge' option will be flagged. If there is a Rate sheet the default value will be 'False' (unflagged), but the user can set it to 'True' to deal with exceptions.
|
There is a security setting in the Security Setup program > Security > Business Events > Miscellaneous > Container Inventory section entitled 'Allow Setting No Charge Checkbox'. If this option is flagged, the User will be able to check/uncheck the 'No Charge' flag. If this option is not flagged in Security Setup, the 'No Charge' field will be disabled. There is also an Application Configurator program option, entitled 'No Charge Always False' that can override the Security Setup program option. |
Bill Date
Enter the Billing Date you wish to use when creating the Invoices.
Days Grace
Enter the number of 'Grace' Days allowed in this Invoice.
Tank Tab
Number
Enter a Chassis number or use the search button to search for Chassis Numbers on your system. Chassis Numbers are configured in the Trailer Profiles program.
Owner
Enter an Owner name or use the search button to search for Owners already entered into your system. Tank Owner records are created in the Intermodal Tab of the Customer & Vendor Profiles program and assigned to the equipment in the Ownership tab of the Trailer Profiles program.
Size
Enter the Tank size or use the search button to view Tank size information already entered in your system. Tank Size values are created in the Basic Info tab of the Trailer Profiles program.
Class
Enter the Tank Class or use the search button to view Tank Classes already entered in your system. Trailer Classes are created in the Equipment Class Codes tab of the Codes Maintenance Program, and are assigned in the Basic Info tab of the Trailer Profiles program.
Tank
Place a checkmark in the box provided if this shipment is of 'Tank Only' type.
Bad Order
Place a checkmark in the box provided to display this Trailer information as a 'Bad Order'.
Notes
Enter any relevant details concerning this Tank.
Billing Information
Bill To
Use the drop-down menu to select either 'A' (Automatic) or 'M' (Manual). This will allow user to enter a 'Bill To' code instead of having the automatic logic, which uses the 'Chassis Owner' code as the 'Bill To' if only 'Chassis' information is present, or else uses the 'Container Owner' code as the 'Bill To' code.
Bill To Code
If you have selected 'M' (Manual) in the 'Bill To' field described above, you can click the icon in this field to select a Client ID Code to use as the 'Bill To Code'.
No Charge
If there is no Rate sheet the 'Grace Days' will be set to '-1' and the 'No Charge' option will be flagged. If there is a Rate sheet the default value will be 'False' (unflagged), but the user can set it to 'True' to deal with exceptions.
|
There is a security setting in the Security Setup program > Security > Business Events > Miscellaneous > Container Inventory section entitled 'Allow Setting No Charge Checkbox'. If this option is flagged, the User will be able to check/uncheck the 'No Charge' flag. If this option is not flagged in Security Setup, the 'No Charge' field will be disabled. There is also an Application Configurator program option, entitled 'No Charge Always False' that can override the Security Setup program option. |
Bill Date
Enter the Billing Date you wish to use when creating the Invoices.
Days Grace
Enter the number of 'Grace' Days allowed in this Invoice.
Flat Bed Tab
Number
Enter a Chassis number for the Flat Bed chassis or use the search button to search for Chassis Numbers on your system. Chassis Numbers are configured in the Trailer Profiles program.
Quick Flat Bed Entry
Click the 'P' button next to the Number field to access the 'Quick Chassis Entry' dialog box, where you can quickly enter the details concerning a Chassis. Once you select the 'Chassis #', the rest of the fields on the Quick Chassis Entry window should automatically populate. If the Chassis you have selected is currently set to 'Active' status, there will be a warning message.
If any other information has not automatically populated, enter values as required in the blank fields.
Owner
Enter an Owner name or use the search button to search for Owners already entered into your system. Chassis Owner records are created in the Intermodal Tab of the Customer & Vendor Profiles program.
Size
Enter the Flat Bed size or use the search button to view Flat Bed size information already entered in your system. Flat Bed Size values are created in the Basic Info tab of the Trailer Profiles program.
Class
Enter the Flat Bed Class or use the search button to view Flat Bed Classes already entered in your system. Flat Bed Classes are created in the Equipment Class Codes tab of the Codes Maintenance Program, and are assigned in the Basic Info tab of the Trailer Profiles program.
Flat Bed
Place a checkmark in the box provided if this shipment is of 'Flat Bed Only' type.
Bad Order
Place a checkmark in the box provided to display this Flat Bed information as a 'Bad Order'.
Notes
Enter any relevant details concerning this Flat Bed.
Billing Information
Bill To
Use the drop-down menu to select either 'A' (Automatic) or 'M' (Manual). This will allow user to enter a 'Bill To' code instead of having the automatic logic, which uses the 'Chassis Owner' code as the 'Bill To' if only 'Chassis' information is present, or else uses the 'Container Owner' code as the 'Bill To' code.
Bill To Code
If you have selected 'M' (Manual) in the 'Bill To' field described above, you can click the icon in this field to select a Client ID Code to use as the 'Bill To Code'.
No Charge
If there is no Rate sheet the 'Grace Days' will be set to '-1' and the 'No Charge' option will be flagged. If there is a Rate sheet the default value will be 'False' (unflagged), but the user can set it to 'True' to deal with exceptions.
|
There is a security setting in the Security Setup program > Security > Business Events > Miscellaneous > Container Inventory section entitled 'Allow Setting No Charge Checkbox'. If this option is flagged, the User will be able to check/uncheck the 'No Charge' flag. If this option is not flagged in Security Setup, the 'No Charge' field will be disabled. There is also an Application Configurator program option, entitled 'No Charge Always False' that can override the Security Setup program option. |
Bill Date
Enter the Billing Date you wish to use when creating the Invoices.
Days Grace
Enter the number of 'Grace' Days allowed in this Invoice.
Power Unit Tab
Number
Enter a Power Unit number for the Power Unit or use the search button to search for Power Unit Numbers on your system. Power Unit Numbers are configured in the Power Unit Profiles program.
Owner
Enter an Owner name or use the search button to search for Owners already entered into your system. Power Unit Owner records are created in theIntermodal Tab of the Customer & Vendor Profiles program, and assigned in the Ownership Tab of the Power Unit Profiles program.
Notes
Enter any relevant details concerning this Flat Bed.
Misc. Equip Tab
Number
Enter a number for the Miscellaneous Equipment or use the search button to search for the equipment Numbers on your system. Miscellaneous Equipment Numbers are configured in the Miscellaneous Equipment Profiles program.
Owner
Enter an Owner name or use the search button to search for Owners already entered into your system. Power Unit Owner records are created in the Intermodal Tab of the Customer & Vendor Profiles program and assigned in the Ownership Tab of the Miscellaneous Equipment Profiles program.
Notes
Enter any relevant details concerning this Flat Bed.
Billing Information
Bill To
Use the drop-down menu to select either 'A' (Automatic) or 'M' (Manual). This will allow user to enter a 'Bill To' code instead of having the automatic logic, which uses the 'Chassis Owner' code as the 'Bill To' if only 'Chassis' information is present, or else uses the 'Container Owner' code as the 'Bill To' code.
Bill To Code
If you have selected 'M' (Manual) in the 'Bill To' field described above, you can click the icon in this field to select a Client ID Code to use as the 'Bill To Code'.
No Charge
If there is no Rate sheet the 'Grace Days' will be set to '-1' and the 'No Charge' option will be flagged. If there is a Rate sheet the default value will be 'False' (unflagged), but the user can set it to 'True' to deal with exceptions.
|
There is a security setting in the Security Setup program > Security > Business Events > Miscellaneous > Container Inventory section entitled 'Allow Setting No Charge Checkbox'. If this option is flagged, the User will be able to check/uncheck the 'No Charge' flag. If this option is not flagged in Security Setup, the 'No Charge' field will be disabled. There is also an Application Configurator program option, entitled 'No Charge Always False' that can override the Security Setup program option. |
Bill Date
Enter the Billing Date you wish to use when creating the Invoices.
Days Grace
Enter the number of 'Grace' Days allowed in this Invoice.