Stock Adjustments


The Stock Adjustments program is used to make changes in inventory levels without processing a stock receipt. For example, inventory adjustments made on the basis of physical inventory counts would be entered here. Also, opening inventory levels are entered here.
After entering a detail line, you must post the line item using the right mouse Post menu option before you can use the stock with other programs in the Repairs & Maintenance module.
| Entries of stock received from vendors are processed through the Stock Receipts program. |
To access the Stock Adjustments program:
| From this location | Go to |
|---|---|
TruckMate Menu and TruckMate Task List |
Repair & Maintenance > Stock Adjustments |
Windows Start Menu |
TruckMate 20xx > Stock Adjustments |
Windows Explorer |
C:\Program Files (x86) > TruckMate 20xx > RMInvAdj.exe |
How Do I?
How do I make changes in inventory levels without processing a Stock Receipt?
The Stock Adjustments program is used to make changes in inventory levels without processing a stock receipt. For example, inventory adjustments made on the basis of physical inventory counts would be entered here. Also, opening inventory levels are entered here. Entries of stock received from vendors are processed through the Stock Receipts program.
After entering a detail line, you must post the line item using the right mouse Post menu option before you can use the stock with other programs in the Repairs & Maintenance module.
-
Open the Stock Adjustments program (RMINVADJ.EXE).
-
Use the lower '+' button to add a new record.
-
Enter the correct data in the fields.
-
Place your cursor anywhere in the grid and then use your context menu to select 'Post'.
-
Go to the GL Tab and verify the GL posting.
-
Go to the Header area and use the pull-down menu next to the 'Status' field. Select 'Complete'.
-
Run the R&M Inventory Adjustments Register program to update the information to the GL.
Menu and toolbar options
This topic describes menu and toolbar options and functionality that are specific to the Stock Adjustments window.
For information about common menu and toolbar options (i.e. File menu, Refresh, Multi-Company, etc.), see General menu and toolbar options.
Menu Bar / Toolbar
File Menu
Print Reports
![]() Selecting the Print Reports button will bring up the report selection window, common to many TruckMate applications. Here, you will select a report file from those available in your system and a Crystal Report will be generated.
Selecting the Print Reports button will bring up the report selection window, common to many TruckMate applications. Here, you will select a report file from those available in your system and a Crystal Report will be generated.
For more information on Report functionality in TruckMate, see the Crystal Reports Reference.
Filter On…
Filter on Status
Use this drop-down menu to display the Inventory Adjustment records in your system by their Status ('Entry', 'Complete' and 'Posted').
Filter On Shop
Use this field to filter the Inventory Adjustment records in your system by their Shop Code.
Exit
![]() Closes the Stock Adjustments program.
Closes the Stock Adjustments program.
General Information
Adjustment #
Is automatically assigned when you add a new record.
Reason
Enter a free-form Reason for the adjustment. This is for information and reporting purposes.
Date
The date will default to today’s date. To use a different date, double-click to display a calendar box.
Shop
Enter a shop code or select the search for more choices. Shops are configured in the R&M Configuration program.
Trace
Enter any trace number that may be useful to you. This is for information and reporting purposes.
Status
When you enter a new inventory receipt, the Status is set to 'Entry' by default. When the Status is set to 'Complete' (via the 'Set Complete' button), the inventory adjustment will no longer display in the Stock Receipts program. A third status, 'Cancel', will be set on inventory records that are deleted by the user. When the user selects the 'X' button (delete) on the TruckMate Navigation Bar, he/she will be prompted to set the selected record to 'Cancel' status. No records are every actually deleted from the R&M system.
Note: Set the filter below to 'Complete' to view completed inventory receipt records. 'Complete' means these records are ready to be updated through the R&M Stock Receipts Register, and then the records become 'Posted'. Also, once marked as 'Complete' the user cannot make changes to the entry but the entry can now be posted.
Dollars
Specifies the currency of the shop inventory value.
Created By
The user’s login name will default. User names are configured in the Security Configuration program.
Set Complete
After completing the header information for your new record, clicking the 'Set Complete' button will change the 'Status' field to 'Entry'. Once the information if finalized in Stock Adjustments main grid, clicking this button will set the record’s 'Status' to 'Complete' and will make it available for use in other TruckMate applications. See the notes on the 'Status' field above for more information.
Context Menu
Imaging
Available from the Header section (and anywhere else besides a grid), this option allows you to interface with your Third Party Imaging software. See the Codes Maintenance program for more information on setting up your Imaging software, and the Document Imaging Overview for more information on specific Third Party providers.
Parts Tab
The Parts Tab lists all the parts that have been added into your R&M Inventory system, listed by 'Part Code'.
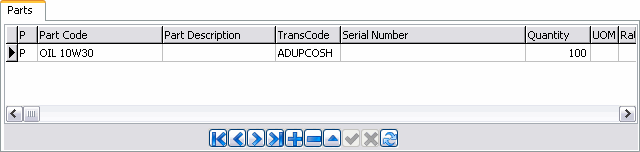
Part Code
Double-click to display and select a part code (you must post your header record first). Part codes are defined in the R&M Configuration program. If the part code is new, cancel the selection, click the right-mouse button, and select 'Create New Part Code'.
TransCode
The TransCode field (for transaction codes) only accepts codes that are defined with From and To locations of 'SH' (Shop). Transaction codes are defined in the R&M Configuration program. If only one code is thus defined, it will default into the TransCode field. Otherwise, double-click to display and select a code.
Serial Number
If the part class to which the part code belongs is defined as requiring a serial number, you will be required to enter the serial number here. The part class is defined in the R&M Configuration program. Note that you can leave the Serial Number field blank until you attempt to post the record (on the right-mouse menu).
Quantity
Enter the quantity for this part code. If the item has a serial number, the quantity should be '1'.
Rate
Enter the value of a single item. Depending on the configuration of the transaction code, the rate may default according to previous stock entries. Use the <TAB> key to calculate the Cost field entry (which is the Quantity multiplied by the Rate).
Cost
Is the Rate multiplied by the Quantity.
Remarks
Enter free-form Remarks pertinent to this line item here. This is for reference and reporting purposes only.
Part Description
The Part Description field will automatically populate based on your Part information in the R&M Configuration program.
UOM
The Unit of Measure field will automatically populate based on the applicable Part information in the R&M Configuration program.
Date
Automatically populates with the current date.
ID
Automatically populates with a Part ID number.
Inv Amount
Automatically populates with the current Inventory Amount for this specific part.
Count
Automatically populates with the current Count information for this specific part.
Context Menu
Post
Posting the line item will update the inventory levels and make the stock available in the other Repairs & Maintenance programs. A 'P' will appear on the far left to indicate that the item has been posted. The Status on the Stock Adjustments program header cannot be changed to 'Complete' until all line items are posted. When a line item has been posted, you can no longer make changes to it.
Post All
This option will post all items in the Parts tab, making them available in other Repair & Maintenance programs, just as it would if you posted each of them individually.
Reverse Post
Undoes the posting for this item.
Reverse Post All
Undoes the posting for all items.
Create New Part Code
You can add a part code 'on the fly' from the Stock Adjustments program, the same way you would from the R&M Configuration program. Choose the Add Part Code option from the right-mouse menu.
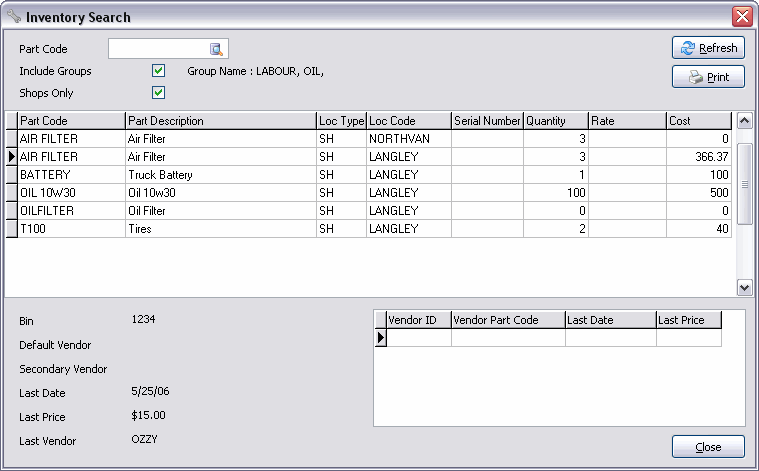
Check Inventory
Displays an Inventory Search window, where you can search for inventory based on a number of criteria.
Field |
Definition |
Part Code |
If the line item you were working on already had a part code, it will default into the Part Code field. Otherwise, double-click select the Database Search button to display a search menu and select a part code. Select search button for more choices. |
Shops Only |
If you only want to see inventory available in your shops (as opposed to that installed on equipment), check off the Shops Only box. |
Include Groups |
If you want to see inventory that is in the same group as the part code you selected, and is therefore interchangeable, check off the Include Groups box. The Group name will display to the right. Groups are defined in the R&M Configuration program. |
Refresh |
Will refresh the grid display after you change the parameters. |
Will display the Report Selection form. The Crystal Report template supplied with the TruckMate system is called 'RMINVSN.RPT'. The report will preview to the screen. Click the printer icon at the top of the screen to send the report to the printer that is configured as the default printer for your workstation. See the Crystal Reports Reference for more information on report functions. |
|
Part Code / Part Description / Loc Type / Quantity / Rate / Cost |
The fields within the main Inventory Search grid display data based on the information entered into the 'Part' tab of the R&M Configuration program and are read-only. |
Bin / Default Vendor / Secondary Vendor / Last Date / Last Price / Last Vendor |
These read-only fields will populate if the information exists within R&M Configuration program for the selected part. |
Vendor ID / Vendor Part Code / Last Date / Last Price |
These read-only fields will populate if the information exists within R&M Configuration program for the selected part. |
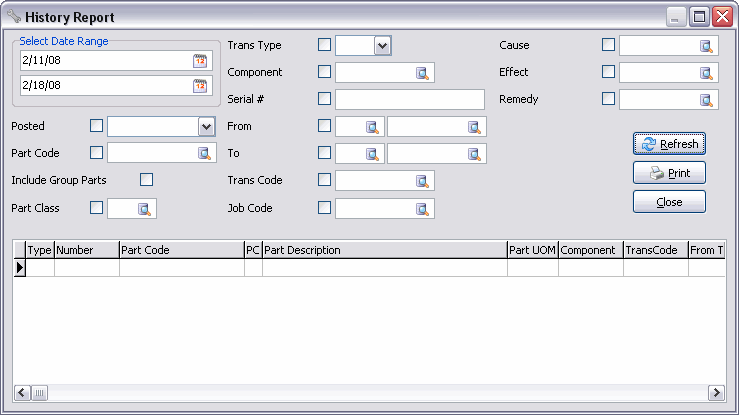
History Reports
Displays the History Report window where you select Repairs & Maintenance transactions based on the specified criteria. The items shown in the grid are the items that will be included on the report, so you can preview the included data before you preview the layout and print.
Field |
Definition |
Date |
Refers to the date of the transaction. A single piece of inventory may be displayed several times in the history report; once when it was received in the Stock Receipts program, again when it was installed on a piece of equipment on a work order, and so on. |
Posted |
Check the Posted box if you want to include (or exclude) only posted items (Stock Receipts, Stock Adjustments or R&M Work Order items). Double click in the field to the right to toggle the value. Select the search button for more choices. |
Part Code |
To report on a specific part code, check the Part Code box and enter the part code in the field to the right (or select the Database Search button to display and select valid codes). Part codes are defined in the R&M Configuration program. Select the search button for more choices. |
Include Group Parts |
If you wish to include parts in the same part group, check this box. Part groups are defined in the R&M Configuration program. |
Part Class |
Check the box if you want to select a specific part class, then double-click in the box to the right to display a selection list. Part classes are defined in the R&M Configuration program. Select the search button for more choices. |
Transaction Type |
Check the box if you want to select a specific transaction type, then double-click in the box to the right to toggle through valid selections. 'IA' indicates a transaction generated in the Stock Adjustments program (this program). 'ST' indicates a transaction generated in the Stock Receipts program. 'WO' indicates a transaction generated in the Work Orders program. 'OW' indicates an outside work transaction. Select the search button for more choices. |
Component |
Check the box if you want to select a specific component, then double-click in the box to the right to display a selection list. Components are defined in the R&M Configuration program. Select the search button for more choices. |
Serial # |
Check the box if you want to select a specific serial number, then enter the serial number in the box to the right. |
From |
Check the box if you want to select a specific origin for the transaction, then double-click in the box to the right to display a selection list. Select the search button for more choices. |
To |
Check the box if you want to select a specific destination for the transaction, then double-click in the box to the right to display a selection list. Select the search button for more choices. |
Trans Code |
Check the box if you want to select a specific transaction code, then double-click in the box to the right to display a selection list. Transaction codes are defined in the R&M Configuration program. Select the search button for more choices. |
Refresh |
When you have entered the desired criteria, click this button to refresh the grid display. |
Will display the Report Selection form. The Crystal Report template supplied with the TruckMate system is called 'RMHIST.RPT'. The report will preview to the screen. Click the printer icon at the top of the screen to send the report to the printer that is configured as the default printer for your workstation. See the Crystal Reports Reference for more information on report functions. |
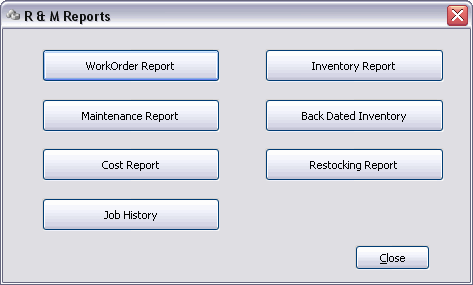
Reports
Displays the R&M Reports Selection window.
Button |
Definition |
Work Order Report |
Will display the Report Selection form. The Crystal Report template supplied with the TruckMate system is called 'RMWO.RPT'. You will be prompted to enter a work order number. The report will preview to the screen. Click the printer icon at the top of the screen to send the report to the printer that is configured as the default printer for your workstation. See the Crystal Reports Reference for more information on report functions. |
Maintenance Report |
Will display the Report Selection form. The Crystal Report template supplied with the TruckMate system is called 'RMMAINT.RPT'. The report will preview to the screen. Click the printer icon at the top of the screen to send the report to the printer that is configured as the default printer for your workstation. See the Crystal Reports Reference for more information on report functions. |
Cost Report |
Will display the Report Selection form. The Crystal Report template supplied with the TruckMate system is called 'RMCOST.RPT'. The report will preview to the screen. Click the printer icon at the top of the screen to send the report to the printer that is configured as the default printer for your workstation. See the Crystal Reports Reference for more information on report functions. |
Job History |
Will display the Report Selection form. The Crystal Report template supplied with the TruckMate system is called 'RMJOBS.RPT'. You will be prompted to enter the resource type. The report will preview to the screen. Click the printer icon at the top of the screen to send the report to the printer that is configured as the default printer for your workstation. See the Crystal Reports Reference for more information on report functions. |
Inventory Report |
Will display the Report Selection form. The Crystal Report template supplied with the TruckMate system is called 'RMINV.RPT'. You will be prompted to enter the shop code. The report will preview to the screen. Click the printer icon at the top of the screen to send the report to the printer that is configured as the default printer for your workstation. See the Crystal Reports Reference for more information on report functions. |
Back Dated Inventory |
Will display the Report Selection form. The Crystal Report template supplied with the TruckMate system is called 'RMBDINV.RPT'. The report will preview to the screen. Click the printer icon at the top of the screen to send the report to the printer that is configured as the default printer for your workstation. See the Crystal Reports Reference for more information on report functions. |
Restocking Report |
Will display the Report Selection form. The Crystal Report template supplied with the TruckMate system is called 'RMMINST.RPT'. The report will preview to the screen. Click the printer icon at the top of the screen to send the report to the printer that is configured as the default printer for your workstation. See the Crystal Reports Reference for more information on report functions. |
Copy and Insert
The Copy and Insert function is useful for entering multiple identical items of stock with serial numbers. For example, say you receive a shipment of twenty batteries, each with a different serial number. Enter the first battery, post the entry, then select Copy Insert off the right-mouse menu. Another entry will be created using all the same details except the serial number. Enter the serial number, post this entry, then select Copy Insert again. Continue until all the items have been entered.
Delete Zero Quantity from Cycle
Removes all Parts with a quantity of '0' from the Cycle Count process.
GL (General Ledger) Tab
The GL Tab displays the GL Accounts that are tied to your R&M Inventory, including the total Debit and Credit amounts for the accounts.
Account Code
Double-click to display and select an account code. Account codes are defined in the General Ledger Chart of Accounts program > Account Information Tab.
Description
Should automatically populate with the Account Code descriptor.
Account Type
Again should automatically populate with the Account Type.
Debit Amount
Enter the amount to be debited.
Credit Amount
Enter the corresponding debit amount.
No Journal Entries
If this flag is checked, then NO Journal/GL entries are created when posting Parts/Labour records. When the 'No Journal Entries' flag is checked, it will automatically overrule the Transaction Codes CostInv field (which may be set to create Journal / GL records). The user can uncheck the 'No Journal Entries' flag and Journal/GL entries will be created as specified according to the Transaction Code’s setting.
The flag’s default setting can be controlled via the Application Configurator > Repairs & Maintenance > RMCONFIG.EXE > 'Default No GL' option.
Cycle Count Tab
The Cycle Count Tab is generally used after a physical count of your Inventory has been completed. Once these numbers are known, you may begin tracking your Inventory levels through TruckMate. When the Cycle Count is complete, the Parts tab will be updated with the correct Inventory levels, based on a comparison process of the existing levels in the TruckMate system, and the ones gathered from the physical count.
Pop Cycle Count
To begin creating a Cycle Count for your part inventory, click this button. The Populate Cycle Count window will appear.
This window allows you to specify the range of your Cycle Count. The 'Shop' field is always based on the current shop value (in the main Stock Adjustments screen) and is a read-only value.
When you are done, click the 'OK' button to begin creating your Cycle Count. Once completed, the list of your part inventory will be displayed.
-
Start Bin
Specify the starting Bin # for your Cycle Count.
-
End Bin
Specify the ending Bin # for your Cycle Count.
Part Code
This field is automatically populated with information from the 'Part Code' of the 'Parts' tab.
Part Description
This field is automatically populated with information from the 'Part Description' of the 'Parts' tab.
Bin Number
This field is automatically populated with information from the 'Part Description' of the 'Parts' tab.
Count
In the 'Count' column, manually enter the stock quantities from your manual inventory count. These values will populate in the 'Parts' tab, and any discrepancies between the values there will be accounted for. If your current stock is lower than the value you enter in the 'Count' column, a negative value will appear in the 'Parts' tab’s 'Quantity' column. Conversely, if your current stock value is higher than the value entered in the 'Count' column, a positive number will be displayed in the 'Parts' tab.