Intermodal Trace

The Intermodal Trace program is used to search for Freight Bills and Trips for Intermodal Carriers. You can search by multiple criteria. The Intermodal Trace program is useful for viewing historical Trip information for Trips that no longer appear in the Dispatch program because they are complete, and for quickly finding Freight Bills.
The Intermodal Trace program is broken down into a simple header section and 10 Tabs which are used to view details of a Container, an Intermodal Trip or an Intermodal Freight Bill.
To access Intermodal Trace:
| From this location | Go to |
|---|---|
TruckMate Menu and TruckMate Task List |
Dispatch > Intermodal > Intermodal Trace |
Windows Start Menu |
TruckMate 20xx > Intermodal Trace |
Windows Explorer |
C:\Program Files (x86) > TruckMate 20xx > IMTrace.exe |
Menu Bar / Toolbar
File Menu
Print Reports
![]() Selecting the Print Reports button will bring up the report selection window, common to many TruckMate applications. Here, you will select a report file from those available in your system and a Crystal Report will be generated.
Selecting the Print Reports button will bring up the report selection window, common to many TruckMate applications. Here, you will select a report file from those available in your system and a Crystal Report will be generated.
For more information on Report functionality in TruckMate, see the Crystal Reports Reference.
Exit
![]() Selecting this option will close the Intermodal Trace program.
Selecting this option will close the Intermodal Trace program.
Multi-Company Menu
For more information on the Multi-Company options available from the Menu Bar, see the Multi-Company documentation.
Navigate Menu
The Navigate Menu contains the standard TruckMate Navigation Bar, used to browse your Database records, as well as the following options:
Find
![]() Click the 'Find' button to browse your system for compatible Container records. Container records are created/maintained in the Container Profiles program.
Click the 'Find' button to browse your system for compatible Container records. Container records are created/maintained in the Container Profiles program.
Refresh
Click the 'Refresh' button to refresh the displayed data to reflect any changes that have been made to the Container profile.
Tools Menu
TruckMate Monitor
![]() Click the down arrow next to this button to access the various functions of the new TruckMate Monitor.
Click the down arrow next to this button to access the various functions of the new TruckMate Monitor.
Remember Position / Size
Select this option to retain window size and position upon exit. When the program is re-opened, it will maintain its previous appearance.
Change History
![]() Click the 'Change History' button to select a new Container record to be displayed in the main form of the Intermodal Trace program.
Click the 'Change History' button to select a new Container record to be displayed in the main form of the Intermodal Trace program.
Clear Per Diem Tracking
![]() Selecting this option will remove all per diem tracking data for all containers where the 'Complete Date' of the per diem record is earlier than the 'Return Date'.
Selecting this option will remove all per diem tracking data for all containers where the 'Complete Date' of the per diem record is earlier than the 'Return Date'.
Track and Trace Details
![]() Selecting this option will open the Equipment Trace window, which will show Profit Tools container tracking data. This option/toolbar button will only be available when viewing containers that are being tracked by Profit Tools (i.e. have a Profit Tools history).
Selecting this option will open the Equipment Trace window, which will show Profit Tools container tracking data. This option/toolbar button will only be available when viewing containers that are being tracked by Profit Tools (i.e. have a Profit Tools history).
Help Menu
TruckMate Help
![]() Selecting this button will open the Intermodal Trace topic in the TruckMate Online Help file (the page you are currently viewing).
Selecting this button will open the Intermodal Trace topic in the TruckMate Online Help file (the page you are currently viewing).
About
![]() Selecting this button will open the standard TruckMate About window, which contains important information about the application you are currently using, including its version number (important for support calls).
Selecting this button will open the standard TruckMate About window, which contains important information about the application you are currently using, including its version number (important for support calls).
Service Portal
![]() Selecting this button will open an instance of your default Internet browsing software, with the https://www.tmwcare.com login page displayed.
Selecting this button will open an instance of your default Internet browsing software, with the https://www.tmwcare.com login page displayed.
Header Information
The only option available within the Intermodal Trace program’s header is a pick menu to select which Container you would like to use in the Trace.
Container
Click the search button to open a search form, where you may select which Container you would like to use in your Intermodal Traces. Once selected, the details of this Container will populate into the fields within the program Tabs.
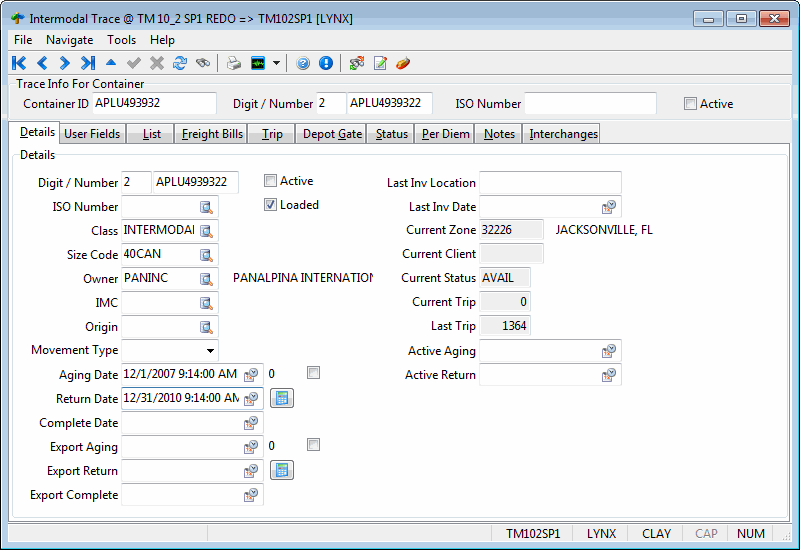
Details Tab
The Details Tab allows you to edit the Container information of the Container chosen in the Header section. The functionality of this Tab is similar to the options found within the Container Profiles program. While many of these fields will pre-populate based on the Container Profiles program, you may alter the values and then save them using the check mark button at the bottom of the form.
Container ID
This field will automatically populate based on the Container ID chosen in the Header section.
Active / Loaded
Shows whether the Container is in 'Active' status or if it has a 'Loaded' status. If these options are checked, the Container might already be on an Active Trip.
Digit / Number
Displays the selected Container’s 'Check Digit' in the first field, and then the Container’s 'Container Number' in the second field. These values are setup in the Container Profiles program and cannot be edited here.
ISO Number
Displays the ISO Number for this Container (or click the search button to select an ISO Number from those available on your system). ISO Numbers are setup on the 'ISO Code' Tab of the Intermodal Setup program. See the Intermodal Setup documentation for more information.
Class
Displays the Equipment Class of the Container. Equipment Classes are configured in the Codes Maintenance program. Enter the Equipment Class code or click the search button for a search form if it is not displayed. The Requested Equipment field in the Details section of the Customer Service program uses Equipment Classes; freight bills and resources can be matched based on a comparison of these fields. The Equipment Class is displayed in the Container Class column in the Container Grid in the Dispatch program.
Size Code
Displays the Container’s Size Code value. If not, click the search button to bring up a dialog box where you can search by 'Size Code' or 'Description'. The 'Size Code' is entered in the Intermodal Setup program’s Size Tab.
Owner
Displays the Customer Code of the Owner of the selected Container. If no 'Owner' is displayed, you may select one by clicking the search button and choosing a Customer Code from your system.
Aging Date / Return Date / Export Aging / Export Return
If these Date values have been configured for this selected Container, they will display in their appropriate fields. If not, you may set the 'Aging', 'Return', 'Export Aging' or 'Export Return' Dates by clicking their respective calendar buttons and choosing a Date value from the Calendar menu that appears.
Last Inv Location / Last Inv Date
Will display the most recent Zone Code and Date of the last Inventory pickup location (and Date/Time).
Current Zone / Current Client / Current Status / Current Trip / Last Trip
Displays information currently attributed to the selected Container. These fields cannot be edited.
Refresh
As in the other Tabs within this program, click the 'Refresh' button to re-apply any changes you have made to the Tab filtering options.
Change History
The Change History button allows you to quickly copy the Customer Service Freight Bill, Trip, and Gate History information from one Container to another. You must initially specify a Container in the above options of the Detail Tab for this button to function correctly.
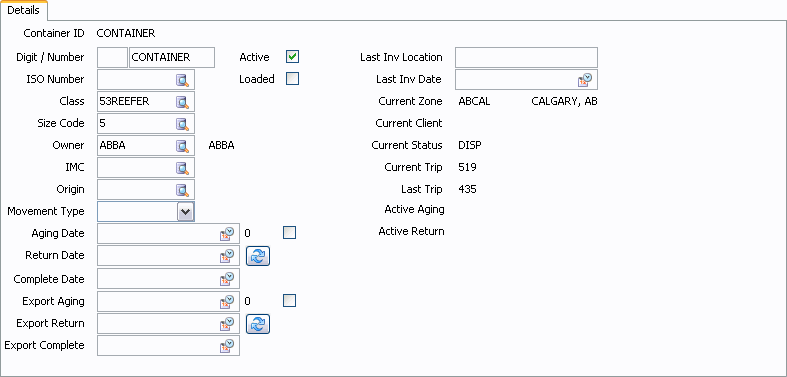
| If you do not see the 'Change History' button displayed on the Details Tab (as in the above image) you must open the Security Setup program and go to the 'Misc' page of the 'Business Events' section. There is an option labelled 'Enable Change History Button' which you must check for this button to be displayed. You must save this change to the appropriate User or User Group and then restart the Intermodal Trace application for the change to take effect. |
User Fields
You many enter data into the 10 'User Defined' fields (and 4 'User Date' fields) using your keyboard. The names of these User Defined fields can be configured to suit your specific needs from within the Application Configurator program.
User Fields Tab
The User Fields Tab lets you enter custom data in a number of 'User Defined' fields. These labels of these fields can be customized in the Codes Maintenance program.
List Tab
The List Tab allows you to view a breakdown of the information on all of the Containers setup in your system, based on the Filter options that you choose from the top section of the Tab. All of the Containers that meet the Filter requirements will be displayed in the Tab Grid, as in the following image:
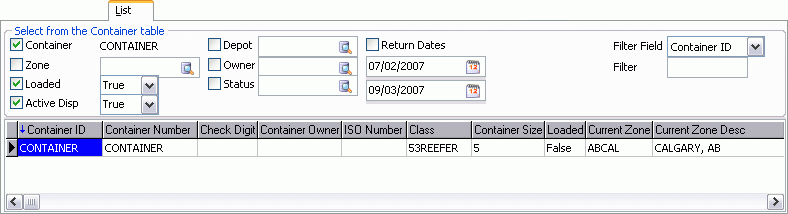
Container
This checkbox will default to 'checked' status in order to allow you to search the Container Status table (COSTAT) based on the Container ID number chosen in the program Header section.
Zone
Check the 'Zone' option to filter your Container records by current Zone Code. Click the search button to open a search form where you may specify the Zone you would like to use for filtering.
Loaded
Use the pull down menu to specify if you would like to Filter by Containers with 'Loaded' Status ('True') or 'Unloaded' Status ('False').
Active Disp
Use the pull down menu to specify if you would like to Filter by Containers with 'Active' Status ('True') or not ('False'). Status values for your Containers are applied from within the Dispatch program.
Depot
Checking this option allows you to filter your Containers by their Depot Zone Code. Check the checkbox and then click the search button to select a Zone Code from your system.
Owner
Checking this option allows you to filter your Containers by their 'Owner' Customer Code. Check the checkbox and then click the search button to select a Customer Code from your system.
Status
Checking this option allows you to filter your Containers by their current Status Code. Check the checkbox and then click the search button to select a Status Code from your system.
Return Dates
If you would like to filter your Container records by a 'Return Date Range', check the 'Return Dates' checkbox and then choose two dates by clicking the calendar button in both of the available fields.
Filter Field / Filter
These two remaining fields work together, as a kind of Custom Filtering option. First, use the pull down menu of the 'Filter Field' field to choose what kind of data you wish to Filter by (Current Status, Container ID, Class, etc.), then, in the second text field, enter the value that corresponds to the type you chose from the pull down menu.
Example: you may choose 'Container Size' from the 'Filter Field' field and then enter '53' in the second field to filter out only those Containers that are 53 feet in size.
Refresh
As in the other Tabs within this program, click the 'Refresh' button to re-apply any changes you have made to the Tab filtering options.
Freight Bills Tab
The Freight Bill Tab will display any Freight Bills associated with your selected Container (as defined in the 'Container' field in the IM Trace Header section). The details within the Grid will automatically populate depending on the details of the associated Freight Bill.
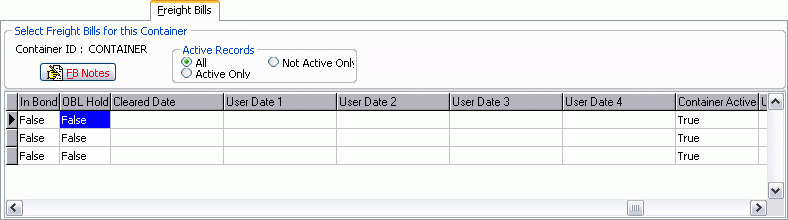
FB Notes
Selecting a Freight Bill detail line from the Grid on this Tab and then clicking the 'FB Notes' button will open a window that displays the Notes that have been entered regarding this Freight Bill. If Notes have been entered for the Freight Bill (in the Customer Service program), the Freight Bill details will be displayed in green. If you would like to add Notes, simply type the text into the space available and click the check mark button to save.
Active Records
These options allow you to Filter the Freight Bills that will appear in Grid below.
All
Select this option to display all Freight Bills available.
Active Only
Select this option to display only those Freight Bills with an 'Active' status.
Not Active Only
Select this option to display only those Freight Bills with a 'Not Active' status.
Trip Tab
The Trip Tab allows you to quickly filter Trip records based on a Date Range. This way, you can see which Trips are associated with the various Containers in your system.
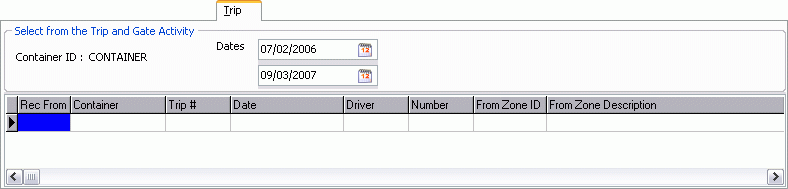
Dates
Choose two dates for the beginning and ending values of your Date range. Click the calendar buttons to choose a Date value from the Calendar windows that will display. The Grid will populate once you have specified a Date Range and have clicked the 'Refresh' button.
Refresh
As in the other Tabs within this program, click the 'Refresh' button to re-apply any changes you have made to the Tab filtering options.
Depot Gate Tab
The Depot Gate Tab allows you to filter your Trip records by Intermodal InGate and OutGate details.
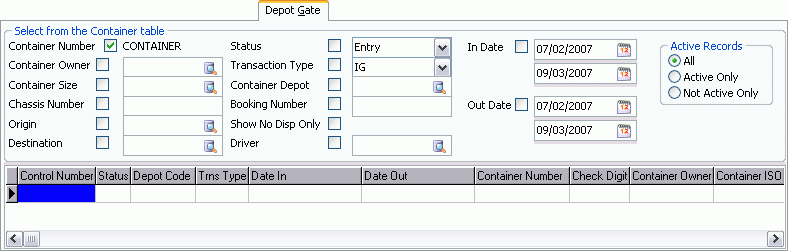
Container Number
This checkbox will default to 'checked' status in order to allow you to search the Container Status table (COSTAT) based on the Container ID number chosen in the program Header section.
Container Owner
Checking this option allows you to filter your Trips by their 'Container Owner' Customer Code. Check the checkbox and then click the search button to select a Customer Code from your system.
Container Size
Checking this option allows you to filter your Trips by their 'Container Size' Code. Check the checkbox and then click the search button to select a Size Code from your system.
Chassis Number
Checking this option will allows you to filter your Trips by a Chassis Number. Check the check boz and then click the search button to select a Chassis Number from your system.
Origin / Destination
To filter your Trips by their Origin or Destination Zone Code, check the appropriate checkbox and choose a Zone Code from your system by clicking the search button.
Status
Check the 'Status' option to filter your Trip records by current Trip Status. Click the search button to open a search form where you may specify the Status you would like to use for filtering.
Transaction Type
To filter by Transaction Type, check the checkbox and then select a Transaction Type from those available in the pull down menu.
Container Depot
Checking this option allows you to filter your Trips by their Container Depot Zone Code. Check the checkbox and then click the search button to select a Zone Code from your system.
Booking Number
Checking this option allows you to filter your Trips by their Booking Number. Check the checkbox and then click the search button to select a Booking Number from your system.
Show No Disp Only
Gate activity in the Container Inventory Control program can do status updates to Dispatch Trips if setup there. When you check this flag, it creates an exception that will stop dispatch updates via the Container Inventory Control program.
Driver
Checking this option allows you to filter your Trips by their associated Driver. Check the checkbox and then click the search button to select a Driver Code from your system.
In Date / Out Date
These two options allow you to filter your Trips by their 'In' or 'Out' Dates. Check either the 'In Date' or 'Out Date' (or both) checkbox options and then provide a Date Range by choosing two dates from the Calendar menus. The Trips with either 'In' or 'Out' Dates that fall within your Range will be displayed.
Refresh
As in the other Tabs within this program, click the 'Refresh' button to re-apply any changes you have made to the Tab filtering options.
Active Records
These options allow you to Filter the Trip records that will appear in Grid below.
All
Select this option to display all Trips available.
Active Only
Select this option to display only those Trips with an 'Active' status.
Not Active Only
Select this option to display only those Trips with a 'Not Active' status.
Status Tab
The Status Tab allows you to quickly filter your Container records based on Container Status or current Zone Code.
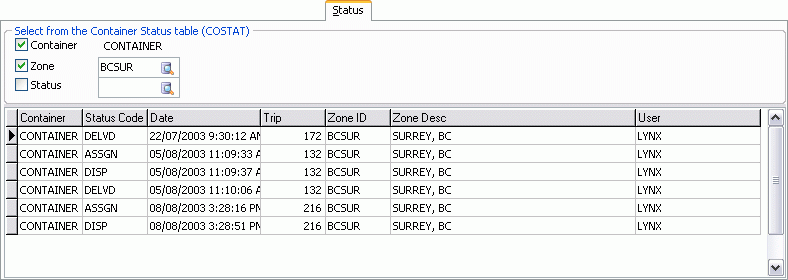
Container
This checkbox will default to 'checked' status in order to allow you to search the Container Status table (COSTAT) based on the Container ID number chosen in the program Header section.
Zone
Check the 'Zone' option to filter your Container records by current Zone Code. Click the search button to open a search form where you may specify the Zone you would like to use for filtering.
Status
Check the 'Status' option to filter your Container records by current Container Status. Click the search button to open a search form where you may specify the Status you would like to use for filtering.
Refresh
As in the other Tabs within this program, click the 'Refresh' button to re-apply any changes you have made to the Tab filtering options.
Per Diem Tab
The Per Diem Tab allows you to find out which Containers are being tracked by the TruckMate system for Per Diem charges.
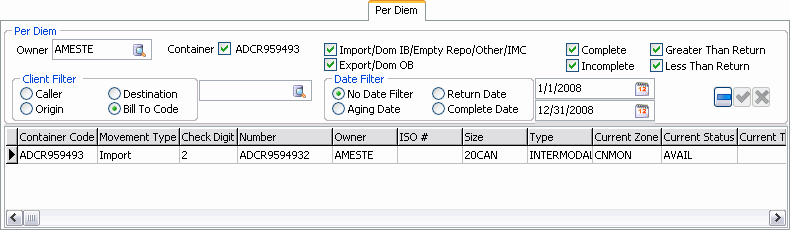
Owner
You can specify a Container Owner for Filtering in this Tab, though it is not required. Click the search button to search for a Container Owner (by Customer Code).
Container
This checkbox will allow you to search the Container Status Table (COSTAT) based on the Container ID number chosen in the program Header section.
Additional Filtering Options
Import / Export
Filters displayed Container records by 'Import' or 'Export' movement type.
Complete / Not Complete
Filters displayed Container records by 'Complete' status.
Greater Than Return
This flag affects how the Container records are filtered:
-
If 'Incomplete' is also checked: Filters on records where the 'Current Date' is greater than the 'Return Date' (from which to track containers where per diem charges are currently being calculated and containers have not yet been returned).
-
If 'Complete' is also checked: Filters on records where the actual 'Completed Date' is greater than 'Return Date' (from which per diem invoices will be generated and will stop tracking per diem on the containers).
Less Than Return
This flag affects how the Container records are filtered:
-
If 'Incomplete' is also checked: Filters records where the 'Current Date' is less than the 'Return Date' (from which to track containers where per diem charges are not currently being calculated for the container but which may soon be reaching this cut-off).
-
If 'Complete' is also checked - Filters on records where the actual 'Completed Date' is less that the 'Return Date' (therefore no per diem charges are applicable and can preview these records before clicking the 'Clear Per Diem Tracking' button).
Client Filter
If you wish to filter the displayed records by a particular Client ID, choose one of the four radio options ('Caller', 'Origin', 'Destination' or 'Bill To Code') and then choose a Client ID from the edit-pick menu in the field to the right. The displayed Container movement detail records will then be filtered based on that Client ID / FB Party combination.
Per Diem Grid Information
Container Code
Displays the Container Code attached to the particular Intermodal movement record. The user can double-click this field to view the Container information on the Details Tab.
Context Menu
E-mail Warning
Select this option to send a Warning e-mail to an Intermodal client. The details of this e-mail are configured via the TruckMate E-Mail System.
Create Invoice
Select this option to create an Intermodal Invoice for Per Diem charges. A new Freight Bill will be created that will tie back to the original Freight Bill (i.e. will create an '-A' Invoice).
Print Per Diem
Selecting this option will open the Crystal Report selection window, common to many TruckMate programs. From here, the user can select the 'CONTAINER_PERDIEM.RPT' file to print the Per Diem details for the selected detail line.
For more information on Crystal Report functionality, see the Crystal Report Reference page.
Clear Per Diem Tracking
Selecting this option will remove any Per Diem Tracking that has been applied to the record. The 'TRACKING_IMPORT' or 'TRACKING_EXPORT' flag will be set to 'False' depending on if the selected record is of 'Import' or 'Export' type.
| The user can hold the <Ctrl> key and click to select multiple Container records and then use this option to clear the tracking on all of them. |
View Freight Bill
Selecting this option will open the Intermodal Freight Bill in the Customer Service program, allowing the user to view further details not shown on the Per Diem Tab.
Notes Tab
The Notes Tab allows you to enter any Free Format Notes you would like to attach to this Container. Simply enter the Notes in the space provided and click the check mark button to save.
Interchanges Tab
Container interchanges (entered via right-click from Dispatch program > Containers Tab) can now be viewed on the Interchanges Tab. By default, the Interchanges Tab all interchanges for the selected container (displayed in the header section of the Intermodal Trace program). The Interchanges Tab grid is read-only (for informational purposes only).
Filter By Container / Filter By Date Range
You may optionally un-check the 'Filter by Container' flag to display interchanges for all containers at once. You may also restrict the list to just those within a particular 'Date Range'. After changing the filtering criteria, the user must select the 'Refresh' button on the Intermodal Trace program toolbar to apply the new filters.
Equipment Trace Window
The Equipment Trace window shows the Profit Tools track and trace information for a specific container in the TruckMate system.
When the Status Changer program is running (and the Application Configurator program > PROFIT TOOLS > 'Trace Frequency' config is set), the information found on this window will automatically update, based on the 'Trace Frequency' config value. When an update occurs, the PT_TRACE_CONTAINERS stored procedure runs and will add any new containers to Profit Tools that do not yet exist.
The stored procedure also returns a list of containers that are being traced. If Profit Tool’s list doesn’t match the list selected by the stored procedure, they will remove that container from their list (only if the Application Configurator program > PROFIT TOOLS > 'Remove Inactive Containers' config is set to 'True'.
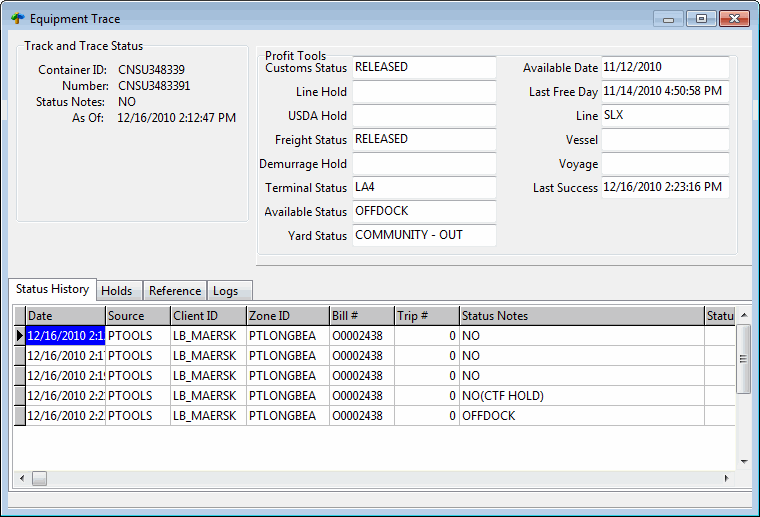
Header Section
Track and Trace Status
This section of the Equipment Trace window shows the 'Container ID', 'Number' and any 'Status Notes' that exist for the container in Profit Tools, as well as the 'As Of' date when the records were last updated.
Profit Tools
The Profit Tools section lists the exact/raw data returned from Profit Tools against the selected container. The various '…Status' values displayed here are not related to TruckMate status codes- they are hard-coded status codes returned by (and unique to) the port at which the container resides. Some additional notable fields are:
Available Status
This is the status code used at the port to designate when a container is available for use. This status code is often used for track and trace rules.
Available Date
This field defaults to the Customer Service program > Intermodal Tab > 'Notify Date' value (CONTAINER_TLORDER.NOTIFY_DATE). Profit Tools can then update this value as status changes occur against the container at the port. If the Application Configurator program > PROFIT TOOLS > 'Update Notify Date' config is set to 'True', any updates from Profit Tools to this value will be propagated to the freight bill’s 'Notify Date' value.
Last Free Day
This field displays the last free day before the container will start incurring charges at the port. If the Application Configurator program > PROFIT TOOLS > 'Update Last Free Day' config is set to 'True', any updates to this value from Profit Tools will be propagated to the freight bill’s 'Last Free Day' value (CONTAINER_TLORDER.LAST_FREE_DAY).
Status History Tab
The Status History Tab is used to check the status updates coming from Profit Tools for the container, as well as from other sources (such as EDI).
Holds Tab
The Holds Tab shows the status updates related to holds on the container at the port as well as some associated details. The 'Status' field can be either 'H' (Held), 'R' (Released) or 'S' (Stop Tracing). The 'S' status is used when a rule is met (i.e. if 'Current Status' = 'OFFDOCK', stop tracing the container).